
A Summary of JUnit 4 & 5 Annotations with Examples
Before writing this article, I only knew a few commonly used JUnit 4 annotations such as
@RunWith
@Test
@Before
@After
@BeforeClass
@AfterClass
How many times did you have to comment out a test? To my surprise, there are annotations to do just that.
@Ignore("Reason for ignoring")
@Disabled("Reason for disabling")
Well, it turns out that there are a handful of other annotations, especially in JUnit 5 that could help write better and more efficient tests.
What to expect?
In this article, I will cover the following annotations with usage examples. The purpose of this article is to introduce you to the annotation, it will not go into greater details of each annotation.
*All the examples from this article are also available in the Github. Please checkout the following repository. *
 rhamedy
/
junit-annotations-examples
rhamedy
/
junit-annotations-examples
JUnit 4 and 5 Annotations with Examples
The target audience of this article is developers of any level.
JUnit 4
The following JUnit 4 annotations will be covered

JUnit 5
The following JUnit 5 annotations are explained with examples
JUnit Dependencies
All the examples in this article are tested using the following JUnit dependencies.
testImplementation 'org.junit.jupiter:junit-jupiter-api:5.3.1'
testRuntimeOnly 'org.junit.jupiter:junit-jupiter-engine:5.3.1'
testCompileOnly 'junit:junit:4.12'
testRuntimeOnly 'org.junit.vintage:junit-vintage-engine:5.3.1'
Please check out the Github repository for more details.
JUnit Annotations Usage
Let's explore the JUnit 4 annotations one by one with a brief usage example
The Hello World of Unit Testing
The @Test annotation is used to mark a method as a test.
public class BasicJUnit4Tests {
  @Test
  public void always_passing_test() {
    assertTrue("Always true", true);
  }
}
The Class-Level and Test-Level Annotations
Annotations such as @BeforeClass and @AfterClass are JUnit 4 class-level annotations.
public class BasicJUnit4Tests {
  @BeforeClass
  public static void setup() {
    // Setup resource needed by all tests.
  }
  @Before
  public void beforeEveryTest() {
    // This gets executed before each test.
  }
  @Test
  public void always_passing_test() {
    assertTrue("Always true", true);
  }
  @After
  public void afterEveryTest() {
    // This gets executed after every test.
  }
  @AfterClass
  public static void cleanup() {
    // Clean up resource after all are executed.
  }
}
The annotations @BeforeAll and @AfterAll are JUnit 5 equivalents and imported using the following statements.
// JUnit 5
import org.junit.jupiter.api.BeforeAll
import org.junit.jupiter.api.AfterAll
Ignoring a Test vs. Assumption
A test is ignored with @Ignore annotation or an assertion can be changed to an assumption and JUnit Runner will ignore a failing assumption.
Assumptions are used when dealing with scenarios such as server vs. local timezone. When an assumption fails, an AssumptionViolationException is thrown, and JUnit runner will ignore it.
public class BasicJUnit4Tests {
  @Ignore("Ignored because of a good reason")
  @Test
  public void test_something() {
    assertTrue("Always fails", false);
  }
}
Executing Tests in Order
Generally, it is a good practice to write order agnostic unit tests.
@FixMethodOrder(MethodSorters.NAME_ASCENDING)
public class FixedMethodOrderingTests {
  @Test
  public void first() {}
  @Test
  public void second() {}
  @Test
  public void third() {}
}
In addition to sorting in ascending order of test names, the MethodSorter allow DEFAULT and JVM level sorting.
Adding Timeout to Tests
Unit tests would mostly have fast execution time; however, there might be cases when a unit test would take a longer time.
In JUnit 4, the @Test annotation accepts timeout argument as shown below
import org.junit.Ignore;
import org.junit.Test;
public class BasicJUnit4Tests {
  @Test(timeout = 1)
  public void timeout_test() throws InterruptedException {
    Thread.sleep(2); // Fails because it took longer than 1 second.
  }
}
In JUnit 5, the timeout happens at the assertion level
import static java.time.Duration.ofMillis;
import static org.junit.jupiter.api.Assertions.assertTimeout;
import org.junit.jupiter.api.Test;
public class BasicJUnit5Tests {
  @Test
  public void test_timeout() {
    // Test takes 2 ms, assertion timeout in 1 ms
    assertTimeout(ofMillis(1), () -> {
      Thread.sleep(2);
    });
  }
}
Sometimes it is more meaningful to apply a timeout across all tests which includes the @BeforeEach/Before and @AfterEach/After as well.
public class JUnitGlobalTimeoutRuleTests {
  @Rule
  public Timeout globalTimeout = new Timeout(2, TimeUnit.SECONDS);
  @Test
  public void timeout_test() throws InterruptedException {
    while(true); // Infinite loop
  }
  @Test
  public void timeout_test_pass() throws InterruptedException {
    Thread.sleep(1);
  }
}
Using Rule with JUnit Tests
I find @Rule very helpful when writing unit tests. A Rule is applied to the following
- Timeout - showcased above
- ExpectedException
- TemporaryFolder
- ErrorCollector
- Verifier
ExpectedException Rule
This rule can be used to ensure that a test throws an expected exception. In JUnit 4, we can do something as follow
public class BasicJUnit4Tests {
  @Test(expected = NullPointerException.class)
  public void exception_test() {
    throw new IllegalArgumentException(); // Fail. Not NPE.
  }
}
In JUnit 5, however, the above can be achieved via an assertion as follow
public class BasicJUnit5Tests {
  @Test
  public void test_expected_exception() {
    Assertions.assertThrows(NumberFormatException.class, () -> {
      Integer.parseInt("One"); // Throws NumberFormatException
    });
  }
}
We can also define a Rule in the class-level and reuse it in the tests
public class JUnitRuleTests {
  @Rule
  public ExpectedException thrown = ExpectedException.none();
  @Test
  public void expectedException_inMethodLevel() {
    thrown.expect(IllegalArgumentException.class);
    thrown.expectMessage("Cause of the error");
    throw new IllegalArgumentException("Cause of the error");
  }
}
TemporaryFolder Rule
This Rule facilities the creation and deletion of a file and folder during the lifecycle of a test.
public class TemporaryFolderRuleTests {
  @Rule
  public TemporaryFolder temporaryFolder = new TemporaryFolder();
  @Test
  public void testCreatingTemporaryFileFolder() throws IOException {
    File file = temporaryFolder.newFile("testFile.txt");
    File folder = temporaryFolder.newFolder("testFolder");
    String filePath = file.getAbsolutePath();
    String folderPath = folder.getAbsolutePath();

    File testFile = new File(filePath);
    File testFolder = new File(folderPath);
    assertTrue(testFile.exists());
    assertTrue(testFolder.exists());
    assertTrue(testFolder.isDirectory());
 }
}
ErrorCollector Rule
During the execution of a unit test, if there are many assertions and the first one fails then subsequent declarations are skipped as shown below.
@Test
public void reportFirstFailedAssertion() {
  assertTrue(false); // Failed assertion. Report. Stop execution.
  assertFalse(true); // It's never executed.
}
It would be helpful if we could get a list of all failed assertions and fix them at once instead of one by one. Here is how the ErrorCollector Rule can help achieve that.
public class ErrorCollectorRuleTests {
  @Rule
  public ErrorCollector errorCollector = new ErrorCollector();

  @Test
  public void reportAllFailedAssertions() {
    errorCollector.checkThat(true, is(false));  // Fail. Continue
    errorCollector.checkThat(false, is(false)); // Pass. Continue
    errorCollector.checkThat(2, equalTo("a"));  // Fail. Report all
  }
}
There is also the Verifier Rule that I won't go into details, and you can read more about it here.
For more information on @ClassRule and the difference between the two, please see this Stackoverflow post.
JUnit Suites
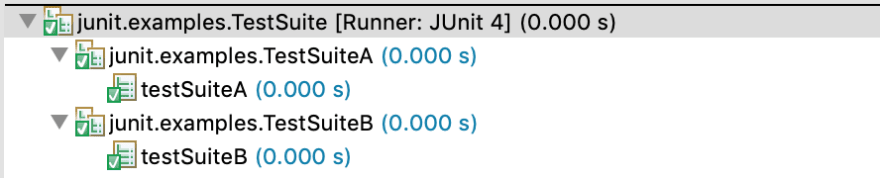
The JUnit Suites can be used to group test classes and execute them together. Here is an example
public class TestSuiteA {
  @Test
  public void testSuiteA() {}
}
public class TestSuiteB {
  @Test
  public void testSuiteB() {}
}
Assuming that there are many other test classes, we could run both or one of these using the following annotations
@RunWith(Suite.class)
@Suite.SuiteClasses({TestSuiteA.class, TestSuiteB.class})
public class TestSuite {
  // Will run tests from TestSuiteA and TestSuiteB classes
}
The above would result in the following
Categories in JUnit 4
In JUnit 4, we can make use of the Categories to include and exclude a group of tests from execution. We can create as many categories as we want using a marker interface as shown below
An interface with no implementation is called a marker interface.
public interface CategoryA {}
public interface CategoryB {}
Now that we have two categories, we can annotate each test with one or more category types as shown below
public class CategoriesTests {
  @Test
  public void test_categoryNone() {
    System.out.println("Test without any category");
    assert(false);
  }
  @Category(CategoryA.class)
  @Test
  public void test1() {
    System.out.println("Runs when category A is selected.");
    assert(true);
  }
  @Category(CategoryB.class)
  @Test
  public void test2() {
    System.out.println("Runs when category B is included.");
    assert(false);
  }
  @Category({CategoryA.class, CategoryB.class})
  @Test
  public void test3() {
    System.out.println("Runs when either of category is included.");
    assert(true);
  }
}
A special JUnit Runner called Categories.class is used to execute these tests
@RunWith(Categories.class)
@IncludeCategory(CategoryA.class)
@ExcludeCategory(CategoryB.class)
@SuiteClasses({CategoriesTests.class})
public class CategroyTestSuite {}
The above would only run test test1 , however, if we remove the following entry then both test1 and test3 are executed.
@ExcludeCategory(CategoryB.class)
Tagging & Filtering Tests in JUnit 5
In addition to the Categories in JUnit 4, JUnit 5 introduces the ability to tag and filter tests. Let's assume we have the following
@Tag("development")
public class UnitTests {
  @Tag("web-layer")
  public void login_controller_test() {}
  @Tag("web-layer")
  public void logout_controller_test() {}
  @Tag("db-layer")
  @Tag("dao")
  public void user_dao_tests() {}
}
and
@Tag("qa")
public class LoadTests {
  @Tag("auth")
  @Test
  public void login_test() {}
  @Tag("auth")
  @Test
  public void logout_test() {}
  @Tag("auth")
  @Test
  public void forgot_password_test() {}
  @Tag("report")
  @Test
  public void generate_monthly_report() {}
}
As shown above, tags apply to both the entire class as well as individual methods. Let's execute all the tests tagged as qa in a given package.
@RunWith(JUnitPlatform.class)
@SelectPackages("junit.exmaples.v2.tags")
@IncludeTags("qa")
public class JUnit5TagTests {}
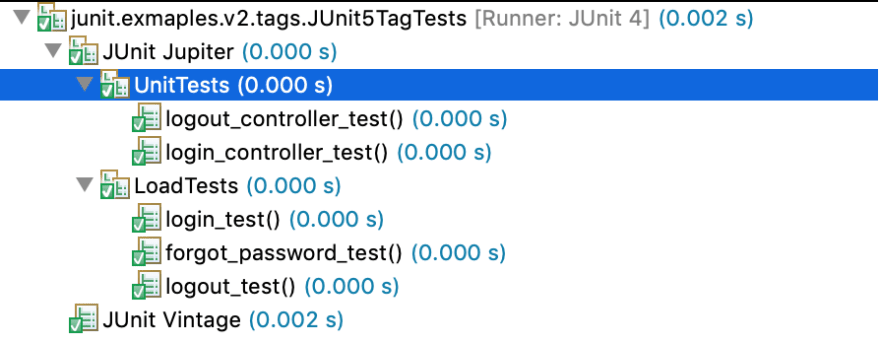
The above would result in the following output
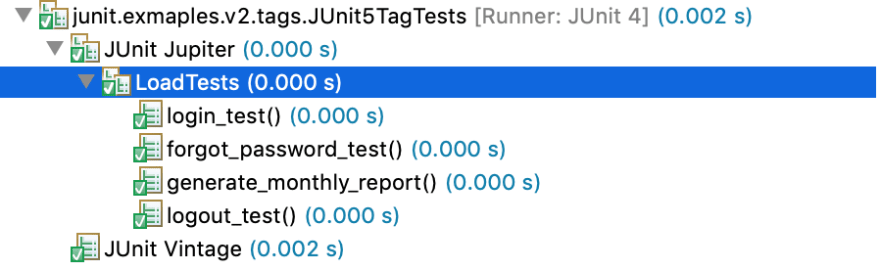
As shown above, only the test class with qa tag is run. Let's run both qa and development tagged tests but, filter the dao and report tagged tests.
@RunWith(JUnitPlatform.class)
@SelectPackages("junit.exmaples.v2.tags")
@IncludeTags({"qa", "development"})
@ExcludeTags({"report", "dao"})
public class JUnit5TagTests {}
As shown below, the two tests annotated with dao and report are excluded.
Parametrizing Unit Tests
JUnit allows parametrizing a test to be executed with different arguments instead of copy/pasting the test multiple times with different arguments or building custom utility methods.
@RunWith(Parameterized.class)
public class JUnit4ParametrizedAnnotationTests {
  @Parameter(value = 0)
  public int number;
  @Parameter(value = 1)
  public boolean expectedResult;
  // Must be static and return collection.
  @Parameters(name = "{0} is a Prime? {1}")
  public static Collection<Object[]> testData() {
    return Arrays.asList(new Object[][] {
      {1, false}, {2, true}, {7, true}, {12, false}
    });
  }
  @Test
  public void test_isPrime() {
    PrimeNumberUtil util = new PrimeNumberUtil();
    assertSame(util.isPrime(number), expectedResult);
  }
}
To parametrize the test_isPrime test we need the following
- Make use of the specialized
Parametrized.classJUnit Runner - Declare a non-private static method that returns a Collection annotated with
@Parameters - Declare each parameter with
@Parameterand value attribute - Make use of the
@Parameterannotated fields in the test
Here is how the output of our parameterized test_isPrime look like

The above is a using @Parameter injection, and we can also achieve the same result using a constructor, as shown below.
public class JUnit4ConstructorParametrized {
  private int number;
  private boolean expectedResult;

  public JUnit4ConstructorParametrized(int input, boolean result) {
    this.number = input;
    this.expectedResult = result;
  }
  ...
}
In JUnit 5, the @ParameterizedTest is introduced with the following sources
- The
@ValueSource - The
@EnumSource - The
@MethodSource - The
@CsvSourceand@CsvFileSource
Let's explore each of them in detail.
Parameterized Tests with a ValueSource
The @ValueSource annotation allows the following declarations
@ValueSource(strings = {"Hi", "How", "Are", "You?"})
@ValueSource(ints = {10, 20, 30})
@ValueSource(longs = {1L, 2L, 3L})
@ValueSource(doubles = {1.1, 1.2, 1.3})
Let's use one of the above in a test
@ParameterizedTest
@ValueSource(strings = {"Hi", "How", "Are", "You?"})
public void testStrings(String arg) {
  assertTrue(arg.length() <= 4);
}
Parameterized Tests with an EnumSource
The @EnumSource annotation could be used in the following ways
@EnumSource(Level.class)
@EnumSource(value = Level.class, names = { "MEDIUM", "HIGH"})
@EnumSource(value = Level.class, mode = Mode.INCLUDE, names = { "MEDIUM", "HIGH"})
Similar to ValueSource, we can use EnumSource in the following way
@ParameterizedTest
@EnumSource(value = Level.class, mode = Mode.EXCLUDE, names = { "MEDIUM", "HIGH"})
public void testEnums_exclude_Specific(Level level) {
  assertTrue(EnumSet.of(Level.MEDIUM, Level.HIGH).contains(level));
}
Parameterized Tests with a MethodSource
The @MethodSource annotation accepts a method name that is providing the input data. The method that provides input data could return a single parameter, or we could make use of Arguments as shown below
public class JUnit5MethodArgumentParametrizedTests {
  @ParameterizedTest
  @MethodSource("someIntegers")
  public void test_MethodSource(Integer s) {
    assertTrue(s <= 3);
  }

  static Collection<Integer> someIntegers() {
    return Arrays.asList(1,2,3);
  }
}
The following is an example of Arguments and it can also be used to return a POJO
public class JUnit5MethodArgumentParametrizedTests {
  @ParameterizedTest
  @MethodSource("argumentsSource")
  public void test_MethodSource_withMoreArgs(String month, Integer number) {
    switch(number) {
      case 1: assertEquals("Jan", month); break;
      case 2: assertEquals("Feb", month); break;
      case 3: assertEquals("Mar", month); break;
      default: assertFalse(true);
    }
  }
static Collection<Arguments> argumentsSource() {
    return Arrays.asList(
      Arguments.of("Jan", 1),
      Arguments.of("Feb", 2),
      Arguments.of("Mar", 3),
      Arguments.of("Apr", 4)); // Fail.
  }
}
Parameterized Tests with a CSV Sources
When it comes to executing a test with a CSV content, the JUnit 5 provides two different types of sources for the ParametrizedTest
- A
CsvSource- comma-separated values - A
CsvFileSource- reference to a CSV file
Here is an example of a CsvSource
@ParameterizedTest
@CsvSource(delimiter=',', value= {"1,'A'","2,'B'"})
public void test_CSVSource_commaDelimited(int i, String s) {
  assertTrue(i < 3);
  assertTrue(Arrays.asList("A", "B").contains(s));
}
Assuming that we have the following entries in sample.csv file under src/test/resources
Name, Age
Josh, 22
James, 19
Jonas, 55
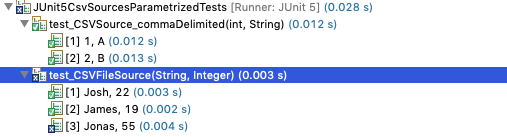
The CsvFileSource case would look as follow
@ParameterizedTest
@CsvFileSource(resources = "/sample.csv", numLinesToSkip = 1, delimiter = ',', encoding = "UTF-8")
public void test_CSVFileSource(String name, Integer age) {
  assertTrue(Arrays.asList("James", "Josh").contains(name));
  assertTrue(age < 50);
}
Resulting in 2 successful test runs and one failure because of the last entry in sample.csv that fails the assertion.
You can also design custom converters that would transform a CSV into an object. See here for more details.
Theory in JUnit4
The annotation @Theory and the Runner Theories are experimental features. In comparison with Parametrized Tests, a Theory feeds all combinations of the data points to a test, as shown below.
@RunWith(Theories.class)
public class JUnit4TheoriesTests {
  @DataPoint
  public static String java = "Java";
  @DataPoint
  public static String node = "node";
  @Theory
  public void test_theory(String a) {
    System.out.println(a);
  }
  @Theory
  public void test_theory_combos(String a, String b) {
    System.out.println(a + " - " + b);
  }
}
When the above test class is executed, the test_theory test will output 2¹ combination
Java
node
However, the test test_theory_combos would output all the combinations of the two data points. In other words, 2² combinations.
Java - Java
Java - node
node - Java
node - node
If we have the following data point oss then test_theory_one test would generate 2³ combinations (2 number of args ^ 3 data points). The test test_theory_two would create 3³ combinations.
@DataPoints
public static String[] oss = new String[] {"Linux", "macOS", "Windows"};
@Theory
public void test_theory_one(String a, String b) {
  System.out.println(a + " - " + b);
}
@Theory
public void test_theory_two(String a, String b, String c) {
  System.out.println(a + " <-> " + b + "<->" + c);
}
The following is a valid data point
@DataPoints
public static Integer[] numbers() {
  return new Integer[] {1, 2, 3};
}
JUnit 5 Test DisplayName
JUnit 5 has introduced @DisplayName annotation that is used to give an individual test or test class a display name, as shown below.
@Test
@DisplayName("Test If Given Number is Prime")
public void is_prime_number_test() {}
and it would show as follow in the console

Repeating a JUnit Test
Should the need arise to repeat a unit test X number of times, JUnit 5 provides @RepeatedTest annotation.
@RepeatedTest(2)
public void test_executed_twice() {
  System.out.println("RepeatedTest"); // Prints twice
}
The @RepeatedTest comes along with currentReptition, totalRepetition variables as well as TestInfo.java and RepetitionInfo.java Objects.
@RepeatedTest(value = 3, name = "{displayName} executed {currentRepetition} of {totalRepetitions}")
@DisplayName("Repeated 3 Times Test")
public void repeated_three_times(TestInfo info) {
  assertTrue("display name matches",
     info.getDisplayName().contains("Repeated 3 Times Test"));
}
We could also use the RepetitionInfo.java to find out the current and total number of repetitions.

Executing Inner Class Unit Tests using JUnit 5's Nested
I was surprised to learn that JUnit Runner does not scan inner classes for tests.
public class JUnit5NestedAnnotationTests {
  @Test
  public void test_outer_class() {
    assertTrue(true);
  }
  class JUnit5NestedAnnotationTestsNested {
    @Test
    public void test_inner_class() {
      assertFalse(true); // Never executed.
    }
  }
}
When Running the above test class, it will only execute the test_outer_class and report success, however, when marking the inner class with @Nested annotation, both tests are run.

JUnit 5 Test Lifecycle with TestInstance Annotation
Before invoking each @Test method, JUnit Runner creates a new instance of the class. This behavior can be changed with the help of @TestInstance
@TestInstance(LifeCycle.PER_CLASS)
@TestInstance(LifeCycle.PER_METHOD)
For more information on @TestInstance(LifeCycle.PER_CLASS) please check out the documentation.
DynamicTests using JUnit 5 TestFactory Annotation
JUnit tests annotated with @Test are static tests because they are specified in compile-time. On the other hand, DynamicTests are generated during runtime. Here is an example of DynamicTests using the PrimeNumberUtil class.
public class Junit5DynamicTests {
  @TestFactory
  Stream<DynamicTest> dynamicTests() {
    PrimeNumberUtil util = new PrimeNumberUtil();
    return IntStream.of(3, 7 , 11, 13, 15, 17)
       .mapToObj(num -> DynamicTest.dynamicTest("Is " + num + " Prime?", () -> assertTrue(util.isPrime(number))));
    }
}
For more on dynamic tests, see this blog post.
Conditionally Executing JUnit 5 Tests
JUnit 5 introduced the following annotations to allows conditional execution of tests.
@EnabledOnOs, @DisabledOnOs, @EnabledOnJre, @DisabledOnJre, @EnabledForJreRange, @DisabledForJreRange, @EnabledIfSystemProperty, @EnabledIfEnvironmentVariable, @DisabledIfEnvironmentVariable, @EnableIf, @DisableIf
Here is an example of using @EnabledOnOs and @DisabledOnOs
public class JUnit5ConditionalTests {
  @Test
  @DisabledOnOs({OS.WINDOWS, OS.OTHER})
  public void test_disabled_on_windows() {
    assertTrue(true);
  }
  @Test
  @EnabledOnOs({OS.MAC, OS.LINUX})
  public void test_enabled_on_unix() {
    assertTrue(true);
  }
  @Test
  @DisabledOnOs(OS.MAC)
  public void test_disabled_on_mac() {
    assertFalse(false);
  }
}
I am using a MacBook, and the output looks as follow

For examples of other annotations, please check out these tests.
Conclusion
Thank you for reading along. Please share your thoughts, suggestions, and feedback in the comments.
Please Feel free to follow me on dev.to for more articles, Twitter, and join my professional network on LinkedIn.
Lastly, I have also authored the following articles that you might find helpful.
A guide on how to get started with contributing to open source

A listing of key habits that in my opinion would help you become a better developer
Finally, a short summary of coding best practices for Java


Top comments (0)