Introduction
Setting up the No Cache tool in Charles Proxy can be a cumbersome process. It often requires navigating through a maze of options to enable the proxy and dealing with the tedious process of making it work with SSL. You may also find yourself debugging issues with VPNs.
But what if you could achieve the same result with just a couple of clicks, right within your browser? With Requestly’s Chrome extension, you can easily manage caching headers without the hassle. Say goodbye to complex configurations and proxies, and embrace Requestly’s user-friendly experience.
Charles Proxy No Cache Tool
How the No Cache Rule Works
The No Cache rule in Charles Proxy is designed to prevent your browser from storing and serving cached versions of web resources. It achieves this by altering response and request’s cache-control headers to stop browser from caching the resource. This is useful when you want to ensure that you’re always fetching the latest version of a resource from the server, whether you’re debugging or testing changes in a live environment. By bypassing the cache, you eliminate any potential issues caused by outdated or stale content.
How to Configure the No Cache Rule in Charles Proxy
Configuring the No Cache rule in Charles Proxy involves several steps:
Open Charles Proxy: Launch the Charles Proxy application on your system.
-
Navigate to the Tools Menu:
- In the top menu, click on Tools.
- From the dropdown, select No Caching.
-
Add a New Rule:
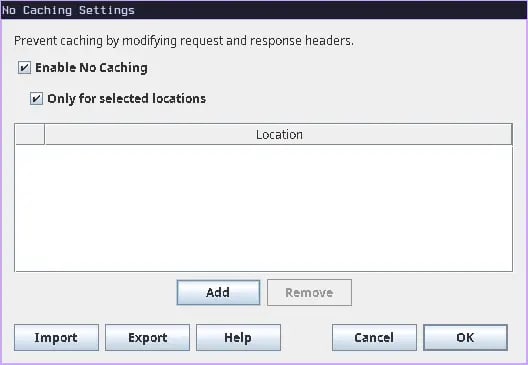
- In the No Caching window, check the Enable no Caching checkbox, This will disable cache across all the websites
- But if you want to disable it for some specific webpages you can check Only for selected locations. and then click on Add.
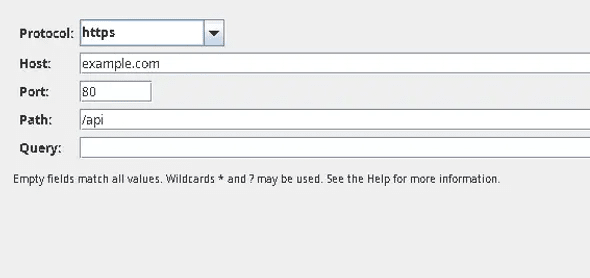
- A new window will appear, allowing you to define the parameters of the rule.
-
Configure the Rule:
- Protocol: Here you can select your site’s protocol http or https
- Host: Here you can enter the host/domain that you want to apply the rule to.
- Port: You can specify the port on which your site is running.
- Path: Define the path if you want the rule to apply only to specific paths on the host.
- Query: here you can define the query parameters which should be targeted.
-
Save the Rule:
- Once you’ve configured the necessary parameters, click OK to save the location.
- Now Click OK on No Cache settings to enable the tool
-
Verify the Rule:
- Refresh the page in your browser to confirm that the resources are no longer being served from the cache.
Modify Headers To Disable Cache in Requestly
For developers and testers who need to bypass browser caching without the hassle of setting up complex tools with proxy and configuring ssl, Requestly offers a simple solution. With just a few clicks, you can modify headers to disable caching on the browser itself without installing any external application.
Install Requestly Extension: Download and install requestly’s browser extension for your browser.
Open Requestly Dashboard: Click on the Requestly icon in your browser toolbar to open the Requestly dashboard.
Configure Request Headers: Here you can add, remove, or override any header from a request or response.
- Rule Name: here you can edit the rule’s title and description which helps identify it later.
- Source Condition: Here you define the condition for the rule to run, you can use inbuilt functions like contains or equal or you can write custom regex or wildcards for pattern matching
- Modify Headers: Here you have the option to choose between response and request headers, you can select either one or both whichever you want to modify, for this case we will modify both request and response headers one by one.
-
Add Modification: Here you specify the changes you want to do in the HTTP header or request and response, you can either add, remove, or override HTTP headers. For this case let’s add a
cache-controlheader with valueno-store, must-revalidate.
Now you can save the rule and test it on your desired website, or if you do not want to go through the hassle of setting it up yourself, we have created a shared list of this rule for disabling cache for you. Go ahead and import it by clicking this button below
Install Requestly Browser Extension if not installed already
Or create your own Rule by following the setups below
Interactive guide
Check out this interactive and easy explanation of how to create this rule :
Gudie
Other Use Cases
Modify Header rule in requestly is a powerful tool and can serve many purpose, it can also be used for other usercase like :
-
Add Custom Authentication Tokens: You can automatically add authentication tokens to requests by modifying headers like
Authorization. This is helpful for testing APIs or accessing resources that require token-based authentication. - Modify CORS Headers: You can modify CORS (Cross-Origin Resource Sharing) headers, which allows you to test cross-origin requests or bypass CORS restrictions during development, making it easier to debug and test APIs.
-
Simulate Different Languages: Adjust the
Accept-Languageheader to test how your website appears in different languages, ensuring that localization and internationalization are functioning correctly
Migrate from Charles proxy
If you already have a Charles Proxy setup and want to give Requestly a try, You can import these tool settings in Requestly in just few clicks
Requestly currently supports following tools that you can import from Charles Proxy:
- Rewrite
- Map Local
- Map Remote
- No Caching
- Block lists
- Block Cookies
Steps to import
- In Charles Proxy, go to the top menu bar and select
Tools > Import/Export Settings.
- In the popup window that appears, switch to the
Exporttab. Under theToolssection, select the tools you want to export and click theExportbutton at the bottom right.
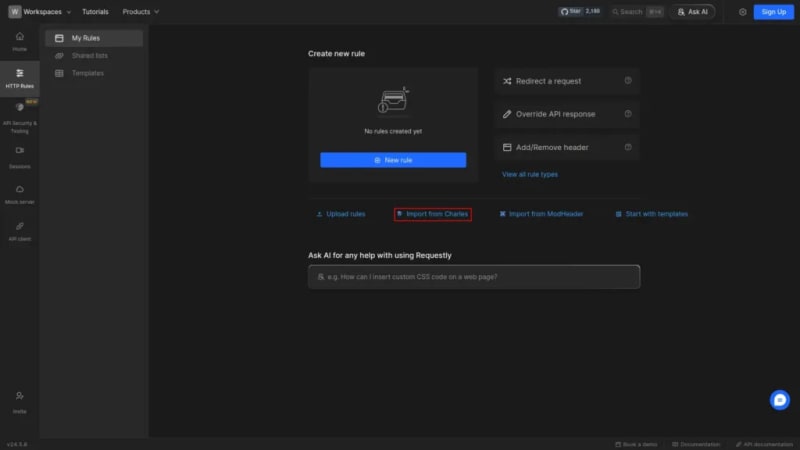
Open the Requestly dashboard. If you don’t have any existing rules, you’ll see an
Import settings from Charles Proxy.You can also open it from https://app.requestly.io/import-settings-from-charles
- Upload or drag your exported Charles
.xmlfile into Requestly.
- Once the import is successful, your Charles Proxy settings will be converted into Requestly rules.
Conclusion
I hope this article has given you a clear understanding of both the No Cache feature in Charles Proxy and how Requestly can achieve the same results with greater ease. While Charles Proxy effectively handles the task, Requestly offers a more streamlined and efficient experience.
Since Requestly operates directly from your browser and leverages built-in browser APIs, there’s no need for complex SSL configurations, eliminating the SSL issues often encountered with Charles Proxy. Plus, you don’t need to switch between different tools—everything you need is right in your browser.
Requestly’s exceptional support is reflected in its 4.4 ⭐ rating from over 1,200 users on the Chrome Web Store, proving it’s a great product with top-tier support.


Top comments (0)