
Currently, I am in my last semester of teaching a second-year programming course on software components in Java, and I’m at that point in the semester where we take off the training wheels. In other words, we stop giving the students a template and instead ask them to complete a programming project from scratch.
When we do this, there’s always an uptick in panic from the students. Since we’ve always provided a template up to that point, they have very little intuition around getting started. As a result, I thought I’d put together an article for them that would share a few tips and tricks that I’ve used over the years.
In this article, I’ll share exactly what project we ask our students to complete, and I’ll share a few ways I would recommend getting started on it.
Project Overview
Over the course of a semester, we ask our students to complete 11 Java projects. Each of these projects come with a considerable amount of template code which serves as a stop-gap for more interesting projects.
For example, for the 4th project, we ask students to put together an RSS reader which displays an RSS feed as an HTML web page. Instead of asking them to do it from scratch, we provide 5 empty methods with detailed contracts. All the students have to do is fill out the methods, and they’ll have a working RSS reader.
It’s not until the 10th project that we ask students to come up with their own methods. In particular, we ask them to write a program which can take a list of terms and definitions and turn it into an HTML glossary. As a result, students need to implement a series of features including:
- An input prompt to ask for a file of terms and definitions as well as a folder name for the output files
- An index file which contains all the terms is alphabetical order
- A series of term pages which contain the definitions of words as well as links to other terms within the definitions
Also, we use our own software components. As a result, students aren’t able to turn to available libraries and whatnot in the wild to solve this problem. Instead, they have to work within the bounds of our internal software packages. These constraints make for an interesting challenge for students as they can’t use data structures like ArrayList, any file reading utilities like Scanner, or HTML formatting libraries like StringTemplate.
If students want to go the extra mile, they can get bonus points for fully testing their project using JUnit. Of course, many do not bother.
How to Get Started
Obviously, when students get this project, they’re a bit overwhelmed. They have almost no clue how to get started, and we don’t typically offer any tips or tricks (until now).
Okay, that’s not totally true. We actually do prepare them quite a bit, but they’re not always conscious of it. As we get closer to the glossary assignment, we ask our students to implement methods that might be useful in the project during the labs—we just don’t explicitly tell them their value. The idea being that they would remember they implemented something that could be useful. Unfortunately, they don’t always make that connection.
At any rate, we inevitably get swamped with all kinds of requests from students for help. In fact, this past week, I received a handful of emails with all sorts of questions. After writing a pretty lengthy email to a student, I figured I could turn around and convert some of my tips into a formal announcement. Then, I thought “why don’t I just write an article that could help even more folks?” So, I did.
In the following subsections, we’ll take a look at few ways we can get started on a programming project from scratch.
Ask Clarifying Questions
Before we start a project, it’s always a good idea to step back and think about everything we’re asked to do. Do we fully understand what the client wants? If anything is unclear, now is the time to reach out to the client and ask any questions we have.
In the example above, we might ask the client exactly what the input file format looks like. If possible, we should get them to send us a couple samples, so we have input we can use to validate our solution.
At this point in the process, we shouldn’t worry too much about nailing down every detail. Instead, we should ask the client to identify the most important pieces of the software and nail down those requirements. Then, when we begin implementing the solution, we can circle back with the client if we have additional questions.
No one expects us to know exactly what we don’t know.
List Out Tasks
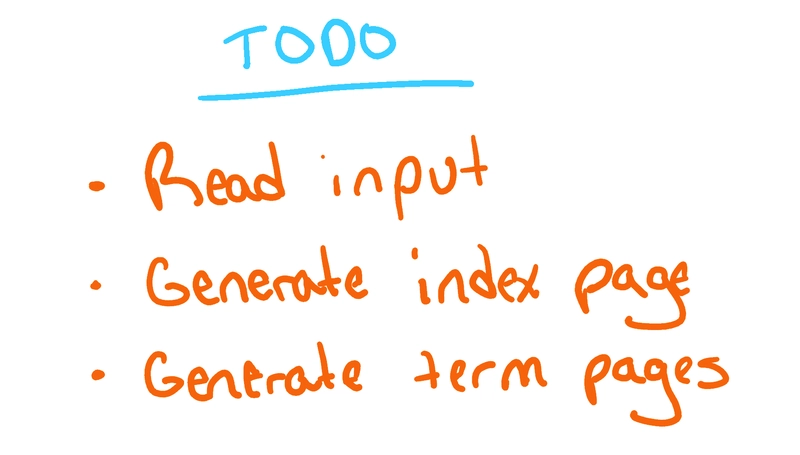
Once we’re comfortable with the requirements, it’s a good idea to list out all the tasks we’ll need to complete. Above, I listed out three core tasks which described three main pieces of the design:
- An input prompt to ask for a file of terms and definitions as well as a folder name for the output files
- An index file which contains all the terms in alphabetical order
- A series of term pages which contain the definitions of words as well as links to other terms within the definitions
Laying these tasks out is important because they can be converted directly into methods. For example, we might have a method that reads in terms and definitions from a file and stores the result in some data structure we can use later. Likewise, we might also have a method that generates the index page. Finally, we might have some method that generates each term page.
If we think about methods as tasks, we’ll be well on our way to completing the project.
Map Data Flow Through Tasks
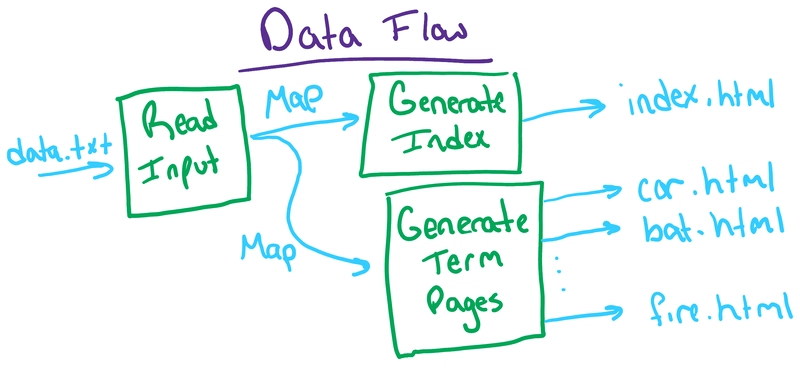
Now that we have our tasks, we’ll need to think about how data will flow through each task. In other words, it doesn’t make sense for us to dive into implementation if we don’t even know what each method should expect as input or produce as output. For example, we can’t write our index file method without knowing how the terms and definitions are stored.
To map the flow of data, it probably makes sense to work from one of the ends: either the data file input side or the HTML output side. In either case, we know exactly what the form of the data will be; we just need to connect the dots.
In this case, it probably makes more sense to start from the output end and think about what form the data should be in to make our job easiest. Specifically, we know we need to create an index page of sorted terms and term pages with definitions. For the index page, we’ll probably want the terms in some data structure that we can sort. As for the term pages, we’ll probably want some data structure that makes it easy to retrieve terms and their definitions.
If we were extra clever, we’d find a data structure that could work well in both situations. For example, if we were allowed to use Java components, then we might opt for a TreeMap which is a special map where the keys are sorted according to their natural ordering.
Since we know we want a TreeMap, we know exactly how we should store the terms and definitions from the input file. Now, we need to define our task interfaces.
Define Task Interfaces
At this point, the bulk of the “thinking” is done. Now, we can begin to build our own template. To do that, we’ll need to define the interfaces for our methods. Let’s start by writing out our three methods without any inputs or outputs:
public static ... readTermsAndDefinitions( ... ) { ... }
public static ... generateIndexPage( ... ) { ... }
public static ... generateTermPages( ... ) { ... }
With these methods sketched out, we can begin thinking about what each of them will be doing. First, the readTermsAndDefinitions() method will be parsing an input file and converting it into a TreeMap. In other words, it should probably take a Scanner and return a TreeMap:
public static TreeMap<String, String> readTermsAndDefinitions(Scanner input) { ... }
Meanwhile, the other two methods are fairly similar. They both will take in our TreeMap and output some web pages. Since we haven’t defined any additional functionality, we’ll go ahead and assume these methods don’t actually return anything (e.g. a string or list of strings). Instead, we’ll have them write directly to the appropriate files:
public static void generateIndexPage(TreeMap<String, String> termsAndDefs) { ... }
public static void generateTermPages(TreeMap<String, String> termsAndDefs) { ... }
Now, we made some pretty major assumptions with these methods. First, we assumed that all the file names could be inferred from the termsAndDefs parameter. For instance, we might name every term page after the term (e.g. car.html, bat.html, etc.). Likewise, the index page was assumed to be index.html.
Since the client didn’t make any requests in regard to how the pages are named, we don’t have any additional data that we could pass along from the input. As a result, it’s up to us to decide how we implement the naming conventions internally. If we choose some naming scheme that requires additional information, we may need to change these interfaces.
For now though, let’s move on.
How to Complete a Template
Now that we’ve designed our own template, we can begin filling it out. However, I want to pause and say that software development only gets more messy from here. While it might be nice to have our own template, we’ll quickly find out that plans can change. When that happens, we’ll need to be able to adjust accordingly.
At any rate, let’s go ahead and talk about how to actually fill out a template.
Break Tasks Down into Subtasks
When we started putting together our list of tasks in the previous section, we were thinking big picture. When it actually comes down to implementing these tasks, we may find that there’s quite a bit of complexity.
For example, let’s talk about the readTermsAndDefinitions() method. First, we need to read and parse a file. Depending on how the file is formatted, this could be a pretty challenging task. For instance, how would we parse the following file:
task::a piece of work to be done or undertaken.
labor::work, especially hard physical work.
endeavor::an attempt to achieve a goal.
enterprise::a project or undertaking, typically one that is difficult or requires effort.
Here, each term and definition are printed on a separate line. The term is then separated from the definition using a a double colon.
To read this, we might use the Scanner to read each line. We might then pass that line off to a helper method which could parse the line into two pieces—term and definition—and return the result in some easy-to-use data structure. Even better, we might pass a TreeMap and the string to this method where the TreeMap would be updated directly.
Breaking down tasks into subtasks can be a bit messy. In general, it’s probably best just to take a stab at implementation. Then, as the method grows, think of ways to extract useful code into helper methods. This iterative process of changing the underlying code structure without altering external behavior is called refactoring, and it’s an important skill to learn.
Test Behavior, Not Implementation
I’m going to break character here for a second and say that I once “advocated” for the testing of private methods. The argument I made in that article is that nothing in software is absolute: sometimes it’s okay to test private methods.
That said, generally, testing private methods should be avoided, and that’s even more true when a project is just getting off the ground. At this stage in development, the code is so brittle that it’s impossible to rely on interfaces. Instead, test behavior, not implementation.
What I mean is that it’s important to start writing tests for code at the task-level only. These are methods that we took the time to design properly, so their interfaces shouldn’t change very much, if at all. As a result, we can write our tests without worrying about them breaking because we changed method signatures.
In our case, we should only write tests for our three task-level methods: readTermsAndDefinitions(), generateIndexPage(), and generateTermPages(). The idea here is that we can then change whatever is happening under the hood without having to rewrite our test code; it’ll just work indefinitely.
My only caveat with this sort of design is that it can sometimes be challenging to write tests that exercise code in some of the deeper methods—especially if they cover edge cases of edge cases.
Also, sometimes the task-level methods take in data that is so complex, it’s hard to really design test cases. For example, let’s say one of our task-level methods needs a database connection. It would probably be easier to just test the underlying implementation rather than mocking database connections or outright creating test databases. That said, we should probably resist this temptation at least for the time being.
Polish and Present
At this point, the solution is on its way to completion. As each method is populated, we’ll need to continually test behavior and confirm the expected behavior with the client. Eventually, we’ll be able to call it quits. Unfortunately, however, the bulk of the work is in polishing the project.
As with most things in life, project completion follows the 80/20 rule. In other words, 80% of our time will be spent polishing the last 20% of the project. Once we have the bulk of the functionality in place, we’ll spend the remainder of our time making sure everything is in perfect working order.
In a project like this, the last 20% will account for the following types of tasks:
- Patching edge cases of business logic
- Modifying HTML output style
- Formatting text for input prompts
- Generating test data
- Refactoring underlying method structure
- Tweaking performance
- Documenting code
Then, when we’re finally finished, we’ll need to get the solution ready for presentation. In my class, there is no formal presentation, but code should be in an easy to use format. As a result, we ask students to submit their code as a zip file which can be imported directly into Eclipse with all the same project settings.
Make sure to circle back with the client once again to get an idea of exactly what their submission guidelines look like. If all goes well, we’ll be all done!
Additional Tips
In my class, most students have no exposure to the ways software is developed in the wild. For instance, they have no exposure to the different project management methodologies like agile and waterfall. Likewise, they have a very limited exposure to software tooling like testing, continuous integration, and version control.
Of course, all that tooling is important. In fact, I’d argue that every software project should be version controlled at the very least. Luckily, version control software is highly supported in the community, and most people are familiar with the popular version control hubs like BitBucket, GitHub, and GitLab. If you’re interested in getting started with making your first repository, I have a short tutorial which leverages Git and GitHub.
On top of version control, it can be helpful to loop in some continuous integration (CI) technology. I’m personally fond of TravisCI because it integrates directly into GitHub, but there are a ton of CI tools. For instance, I think the most popular tool is Jenkins. If configured properly, these tools can be used to test code every time there’s a commit. Then, when the project is read to go, these tools can also deploy the entire solution on your behalf.
Finally, coding is a social beast. As a result, it’s helpful to have some form of peer review built into the development process. In the tech community, we have rebranded peer review as code review, but it’s the same idea: a group of peers checking the quality of someone’s work. Naturally, code reviews don’t require a formal process, but there’s a ton of literature out there on why they’re important and how to get the most out of them. Likewise, there are a ton of software tools which integrate code reviews seemlessly including GitHub and Swarm.
Share Your Tips
As someone with a mix of academic and industrial experience, I can’t say that I’m an expert in software development. That said, I have enough experience to come up with a decent process for navigating new projects, so I figured I’d give it a share.
What about you? How do you approach a completely new project? Do you just dive in or do you do a bit of planning? Are there any tools you use to assist in the development process? Are you working in a team or do you prefer to go solo? What’s your general strategy for refactoring your code? And, how do you plan for additional features once the project is “done”?
Software development is a messy process, and we haven’t fully developed great processes around getting work done. Part of me thinks that’s because we treat software development like a hard science when it’s often more of a creative art. In other words, projects grow and change organically over time and it’s not always clear where the project will end up. How do we balance the reality of change with the desire to map out every possible scenario?
While you’re thinking about some of these questions, I’ll do my usual plug. First, this site relies on folks like you to help it grow. If you’d like to learn of ways you can support the site, I’ve put together a nice list of options which include hopping on the email list and becoming a Patreon.
Finally, if you enjoyed this article, here are a few handpicked articles for you:
- How to Create a Git Repo From Scratch: Git Init, GitHub Desktop, and More
- How to Obfuscate Code in Python: A Thought Experiment
- It’s Okay to Test Private Methods
Otherwise, feel free to share your thoughts below in the comments. And, take care! See you next time.
The post How to Complete a Programming Project From Scratch appeared first on The Renegade Coder.

Top comments (0)