
When we start developing an app we usually do it the old fashion way: we get an idea, we elaborate on it, we make a plan to develop an app then we start coding and in the end, we test if our app is working properly.
Nothing is wrong with that approach but, there are some features that we can not test with it and sometimes it will be very hard and time-consuming to debug the code and find the errors we have, sometimes also we end up writing more code than needed.
Therefore, the test-driven development or TDD came out to the surface which is a software development process that works as follows: Thinking about the idea, designing and developing tests for every small functionality of the app and expecting the desired result (tests will be failing), then write code to make the tests work, and finally refactor the code to be more readable and maintainable and repeat.
The TDD workflow (Red / Green / Refactor cycle):
The process described above is called the “Red, Green, Refactor cycle” and it works as follows:
1. Red: Analyze the problem then write the test (which will fail because we do not have the code to make it work yet).
2. Green: Write just enough code to make the test pass.
3. Refactor: Improve the code design and always refactor in green.
TDD structure (the AAA):
The AAA stands for “Arrange, Act and Assert”:
1. Arrange: It consists of the preparations to start testing like initializing or instantiating objects, setting up mocks and stubs, defining let variables using factories …etc.
2. Act: To predict the behavior expected from the tested object while it is in use, for example, to visit a page then click a button or to build a post then try to save it calling the appropriate methods and execute the behavior we want to test.
3. Assert: To expect the actions and methods used in the “Act” phase to produce the desired results and compare the two.
Testing with RSpec:
RSpec is a testing tool written in Ruby and used to test it. It is the most frequently used testing library for Ruby in production applications, it is widely used to test Ruby on Rails apps using the TDD approach.
RSpec basics:
Some important RSpec basics to jump-start into using it, it works with the AAA structure that I previously explained:
- Define the variable or instantiate the object.
- Use the desired methods on it.
- Expect it to equal something that you set.
Example:
To avoid repetition:
- You can use a Before method with a
do…itblock, and instantiate the object inside it with a@before its name and use it that way everywhere in the test.
Example:
before do
  @variable = Classname.new
end
- You can also use let with a symbol to name the variable and instantiate the object inside its block (let is lazy and it will cache the variable in the first use and use it from the cache if we use it again).
Example:
let(:variable) { Classname.new }
Using RSpec and Capybara in Rails
In Ruby on Rails, there are many testing frameworks like the default one that comes with the new Rails projects Minitest or the ones that I’m writing about in this article RSpec and Capybara which I will explain a how to set them up in a new Rails project and show some basic uses of the two.
Setting up RSpec and Capybara on rails:
- Initialize a new rails app without the default minitest run the following command:
$ rails new -T <name of the app> - Add the following gems to the development group in the Gemfile:
‘Rspec-rails’, ‘factory_bot_rails’, ‘spring-commands-rspec’. - Add a new group named test and put the following gem inside it:
‘Capybara’. - Run
$ bundle installto install the gems. - In the terminal and after
cdingto the new app run:$ rails g rspec:installto install RSpec. - Then run
$ bundle exec spring binstub —- allto generate binstub for all the files. - Create the first test file ending with
_spec.rbat the end andrequire “rails_helper”in the first line of every spec file.
Optional:
These two steps may be helpful in some cases:
- Open the .rspec file in your project and add:
— colorto enable colored previews. - Add
— formatdocumentation to the same file to get more details when you run the tests. - To run the RSpec just run the command:
$ rspecin the terminal and you will see something similar to the below image:

Testing basics:
To write a simple test we have to follow the below steps:
- Make a
_spec.rbfile for the unit or the feature to be tested or open the one generated automatically by Rails if that’s the case. - You start with a
describeblock that can take a string or a Class. - You can indent many
describeblocks together but the better practice is to usecontextinstead for the inner blocks. - To test the different methods and functionalities of a class use the
itblock that takes a string as a description. - Write your tests inside the
itblock. - Run the command
$ bundle exec rspec <file name>to only test the wanted file, or you can omit the name to run the whole test suite.
Test types in rails:
There are 3 different kinds of tests in Rails
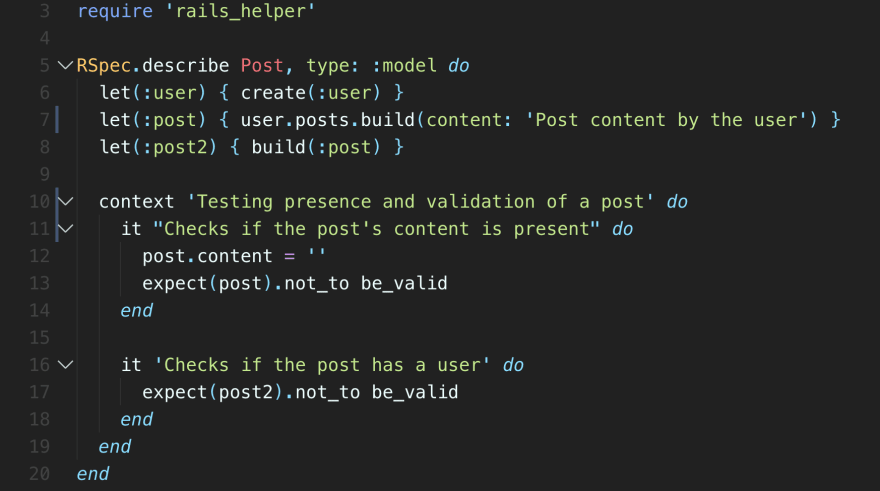
1. Unit tests: Testing Models or different units and parts of the app to make sure they work properly, E.g: Testing for the presence and validations of a model.
2. Integration test: Test that units or features communicate properly together and produce the expected results. E.g: Testing the user’s sign up functionality and checking if it saves a new record to the database.
3. Acceptance tests: To test the whole application and the user interface UI.
Using RSpec and Capybara in rails:
1. RSpec (Unit and controller tests):
- Usually, it is used for unit tests, checking if the validation is properly working, if the associations are properly set in both the correct and incorrect cases.
- It is also used to test controllers, checking if all the different actions are properly working and doing what they were created to do, giving the expected results, but I prefer skipping the controllers’ tests and just do it in the integrations since it will check kind of the same thing.
2. Capybara (integration / feature tests):
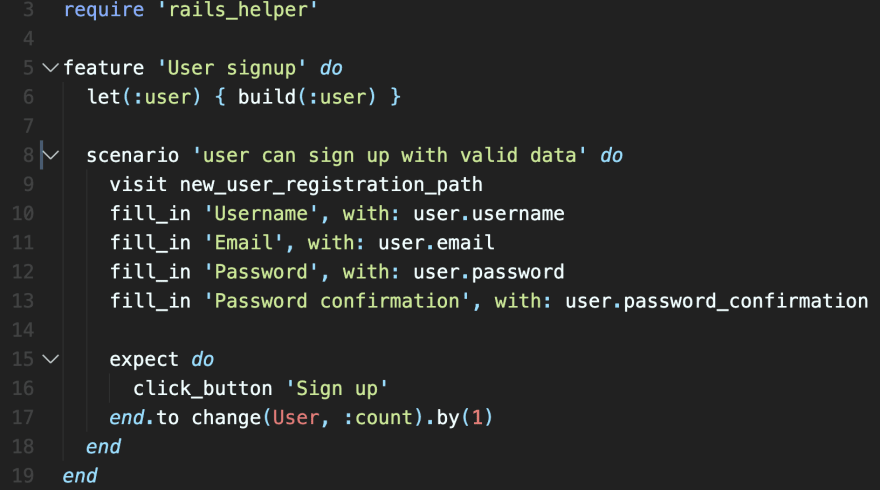
- Usually, it is used for integration tests that make use of a form, we use Capybara which has a slightly different syntax, in Capybara
describebecomesfeatureanditbecomesscenario. - With Capybara we can make use of the forms easily just filling in the fields with the desired information and expecting the correct or the wrong result as in the below image:
Conclusion
Developing a good app requires good maintainable, bug-free code, something that is hard and takes a long time to achieve using the standard development workflow if it is a big app, but implementing the TDD workflow and using tests with RSpec or Minitest make our life much easier, saves up time debugging and makes the code more professional, maintainable and human-readable.
Resources for more about TDD and RSpec
The following websites are great if you’d like to learn more about RSpec and testing in Ruby on Rails:
PS: Thank you for reading and if you liked my article I would appreciate it if you follow me here and on twitter to you get notified about any new articles I post in the future.


Top comments (0)