Table of contents:
- How do we install TypeScript?, go to canonical section
- Visual Studio Code & TypeScript = perfect marriage, go to canonical section
- Tooling and Configuration, go to canonical section
- Should I use a linter?, go to canonical section
- Our first TypeScript code, go to canonical section
One of the mistakes I’ve made when I started with TypeScript was not to bother seeing what tools were available so that I could do a proper installation. Although I had my TypeScript project up and running very quickly, in the long run, this approach not only slowed me down because my configuration was not up to standard, but also made my experience less enjoyable.
We’ll have time to dig into syntax features, design patterns and so on. But for now, let’s get started by simply installing TypeScript on our machine.
How do we install TypeScript?
TypeScript compiler : Despite what we may think, TypeScript does not reach the browser. It makes use of its compiler to search for errors. Only when they are all fixed are we allowed to successfully compile. And what does it compile to? JavaScript. JavaScript will get to the browser after our beautiful TypeScript is stripped out from our code.
Modern IDEs support TypeScript but usually do not include the needed compiler. We’ll need to install it separately.
- Installing the TypeScript compiler globally:
npm install -g typescript
Note: If you’re on MacOS and get an “Eaccess” error, try sudo before the npm command.
- Create a folder for your project and open it:
You can either use the MacOS Terminal, the Windows Command Line or your IDE, but I’ll use the MacOS Terminal)
mkdir my-first-typescript-project && cd my-first-typescript-project
- Create a file and name it index.ts:
*.ts is the official extension for TypeScript files and should be always used. It actually stands for TypeScript.
touch index.ts
- Open your IDE of choice:
First, you’ll want to make sure it supports Typescript. You might need to install additional plugin(s). Type the following line in your index.ts:
console.log(“Hello World”)
At this point, your code hasn’t been compiled to JavaScript yet, therefore your browser won’t be able to read it.
- In your terminal, type:
tsc index.ts
Note: If you get an error when running the “tsc” command, it means something went wrong with your installation.
Now look at your file structure and you’ll find a new file index.js. This is the compiled file from your TypeScript. At the moment is identical since both syntaxes for this code are the same. Later on, we will see a slightly more complex example in which the JavaScript and TypeScript are different.

Visual Studio Code & TypeScript = perfect marriage
VS Code is created and maintained by Microsoft. Whilst there are many other options available such as Atom (GitHub) and Brackets (Adobe), VS Code made is way up to the top very rapidly. Its integration with TypeScript is phenomenal. There are many features making this happen but I’d like to highlight just a few of them I find important:
- IntelliSense IntelliSense shows you intelligent code completion, hover info, and signature information so that you can write code more quickly and correctly.

- Hover information Hover over a TypeScript symbol to quickly see its type information and relevant documentation.

- Signature help As you write a TypeScript function call, VS Code shows information about the function signature and highlights the parameter that you are currently completing.

- Error checking TypeScript main purpose is to warn you about programming mistakes through type checking. If you assign the wrong type, VS Code will throw an error message.

- Quick fixes VS Code runs a set of diagnostics to find coding issues and, in some cases, will give you powerful hints on how to fix the problem.

To install VS Code simply go to https://code.visualstudio.com/ and follow the instructions.
VS Code includes TypeScript support but does not include the TypeScript tsc compiler. We’ll need to install it anyway.
Tooling and Configuration
So far we’ve got a file and an IDE and we’re able to write and compile TypeScript code, which is great. But in a real-world scenario, you might want to customize your compiler. With this, you’re able to be almost as restrictive as you wish and enforce the right amount of coverage in your TypeScript code.
Also, this can be done incrementally simply changing your options. This is an action that takes time and much practice.
tsconfig.json as the name suggests is a JSON format file where you can explicitly select and config your compiler options. It should be placed in the root folder determining this folder as the root of the project. To create we simply write in our terminal:
tsc --init
This command will create our tsconfig.json with a json object called “compilerOptions”. Nested in it, we’ll have a few dozens of commented code lines leaving us instructions and tips for options that we can choose from.
For a basic setup we’d need just a few options:
{
    "compilerOptions": {
        "target": "es5" /* Specify ECMAScript target version */,
        "module": "commonjs" /* Specify module code generation */
    },
}
Our preferences might change from project to project and, especially, if we are using libraries or frameworks. In my case, I’m a React developer so these are some of the options I consider important in my projects:
- --allowJs : Allows JavaScript files to be compiled. This option can be quite useful when migrating a JS project to TS. It allows refactoring the codebase incrementally instead of all at one go. Developers who are not comfortable with TS might make use of this option also in greenfield projects when coming across with difficulties but is this something that’d add value to the project? My rule of thumb for this is not to allow JS compilation. Developers facing issues with TS might get too comfortable when there’s a “cheating” option and, in the long run, it won’t help the project to be consistent.
- --checkJs : This option follows a Blacklist approach where the compiler checks every JavaScript file by default. To use in conjunction with --allowJs.
-
--jsx : This flag will allow to support *.tsx and is shipped with three modes:
- “preserve”: this mode will keep jsx as part of the output to be further consumed by another transform step (e.g. Babel). The output will have a *.jsx extension.
- “react”: this mode does not need to go through a JSX transformation before use and the output will have a *.js file extension.
- “react-native”: It’s the equivalent of “preserve” but the output will instead have a *.js file extension.
- --outDir : Redirect output structure to the directory.
- --rootDir : Specifies the root directory of input files.
- --forceConsistentCasingInFileNames : Pretty self-explanatory. It disallows inconsistently-cased references to the same file.
- --strict : Enable all strict type-checking options.
- --noImplicitAny : The any type should be a helper when in doubt but not a long term solution. And never to be shipped into production. With this flag set to true, we make sure the compiler will raise an error on expressions and declarations with an implied any type.
- --sctrictNullChecks : In this mode, the null and undefined values are not in the domain of every type and are only assignable to themselves and the any type. In the example below, we see that the parameter firstName is optional. Therefore, there’s the chance of being undefined.
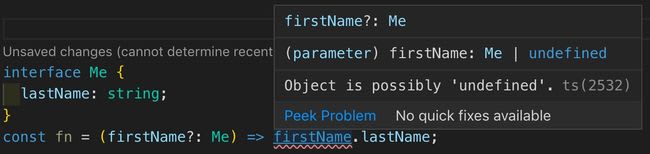
This can be a problem in case we try to access this property. Being strict with this rule may prevent runtime errors when we try to access a property that is undefined
- --esModuleInterop : TypeScript can be quite fancy when importing modules depending on his specificity. In order to write a simple import statement such as:
import foo from “foo”
we need to set this flag to true.
Should I use a linter?
In one word: yes. Linting is the action of statically analyzing code to detect programming errors. It comes back from the 70’s and it has been a vital part of any serious project, especially when is collaborative.
The linter defines rules or expectations about how our code should look like and It will flag any errors detected. Some of the benefits are:
- It turns our codebase more reliable and error-free.
- It makes the code more readable.
- It finds syntax errors before execution.
- Enforces better practices.
ESlint vs TSlint

Since its first release in 2013, ESlint has been the standard for JavaScript linters.
A pluggable and configurable linter tool for identifying and reporting on patterns in JavaScript
TSlint came upon the scene being the obvious linting option for TypeScript. It’s a linter that can only be used for TypeScript, while ESLint supports both JavaScript and TypeScript. Since a big part of the community uses ESlint, TSlint revealed itself a barrier for many developers who use the former. Also, TypeScript caused surprise in the community when in their 2019 Roadmap announced their team will be focusing on leveraging ESLint instead of TSlint. It doesn’t mean the latter will go away soon but it’s a clear sign where the TypeScript team wants to go and where the community will be following it to.
Before we install any dependencies we need to create our package.json file:
npm init
Then, to run ESlint, we’ll need to install the following:
- eslint : core library.
- @typescript-eslint/eslint-plugin : parser that will allow eslint to lint TypeScript code when running in conjunction with @typescript-eslint/parser.
- @typescript-eslint/parser : An ESLint-specific parser.
In our terminal we’ll type:
npm install eslint @typescript-eslint/eslint-plugin \
    @typescript-eslint/parser --save-dev
Now that we’ve got our dependencies installed, let’s create a eslintrc.js (we can also use a json) file that we’ll use to set our rules. This file should be in the root, at the same level as the previously installed tsconfig.js:
module.exports = {
  parser: “@typescript-eslint/parser”,
  extends: [
    “plugin:@typescript-eslint/recommended”,
  ],
 parserOptions: {
    ecmaVersion: 2018,
    sourceType: 'module',
  },
  rules: {
     //Our ESlint rules.
  },
};
The configuration above is a simple one that will get us ready to start writing awesome code. But ESlint wouldn’t be that useful without setting its rules. A list of rules can be found at https://eslint.org/docs/rules/.
Our first TypeScript code
Let’s start by understanding the difference between a simple function expression in JavaScript and TypeScript.
const name = "Francisco";
const age = 36;
const human = true;

const character = (name, age, human) => {
  console.log(`
  My name is ${name}
  My age is ${age}
  Am I a human? ${human}
  `);
};
We can say the above function expression “character” accepts the arguments name, age and hero. But what are its types? We can pass any type since there are no restrictions or documentation whatsoever.
Now let’s see the same code in TypeScript:
const name = "Francisco";
const age = 36;
const human = true;

const character = (name: string, age: number, human: boolean): void => {
  console.log(`
  My name is ${name}
  My age is ${age}
  Am I a human? ${human}
  `);
};
In case you get an error like this:

There’s a very short and nice article here about why it happens and how to fix it.
In this last block, we explicitly say name is a string, age is a number and hero is a boolean. Since we don’t return anything, we use the type void which is used where there is no data type. These are called type annotations. Try this code in your index.ts file.
Now, and just for fun, try to run:
tsc index.ts
Open the corresponding JavaScript file to compare the code.
var name = "Francisco";
var age = 36;
var human = true;

var character = function (name, age, human) {
    console.log(`
        My name is ${name}
        My age is ${age}
        Am I a human? ${human}
    `);
};
Notice anything different? Among other details, there are no template literal strings and our const are now var.
But what’s important to notice is that the type annotations have disappeared. They’ll not be read by the browser.
This episode is over and now we have our machine ready to write beautiful TypeScript. Next, we’ll have a look at types and consider some other advantages of using a type system.
Related articles
Previous: A TypeScript Tale - Episode 1
Next:


Top comments (0)