Recently, I was working on a side project and deployed an update on my favorite deployment platform, Hatchbox.
The deployment ran and failed with an error message:
error An unexpected error occurred: "ENOSPC: no space left on device
Hatchbox gives users a nice interface to deploy Ruby on Rails applications. Everything is taken care of for us, from server provisioning to application deployment. It’s really a nice service and allows lots of customizability.
This particular application is provisioned on Amazon EC2. Hatchbox provisions to multiple providers including Amazon and DigitalOcean but their responsibility for the platform does not go beyond provision. Issues such as what to do about these types of errors is up to the user.
Finding the Problem
I am running an a t2.micro instance which does not have a lot of space but I didn’t expect to run out so soon. I ssh’d into the server and ran a check of disk space with the
df -h
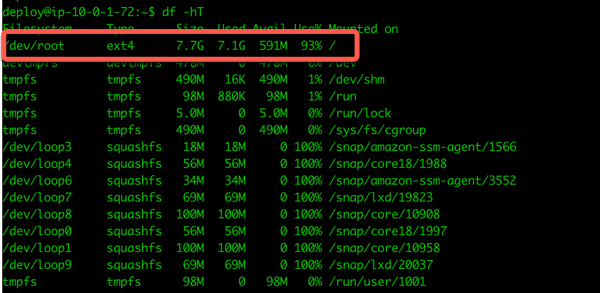
command. The result showed me what was wrong:
Granted, this shows I have 93% free and that should be enough to deploy my application and it is. I removed some old deploys and freed up enough space to finish the deploy. Disk space was at 99% before cleanup. This was a temporary solution and adding space is needed.
Fixing the Problem
If you are familiar with how managing partitions on a Mac or Windows system then you should have an understanding how to solve this problem. On these system there is the idea of a partition, which has a set size. The partition is formatted for a given file system and can then be used to store applications and data. These partitions can have their size adjusted and formatted for use. This is how this problem is solved.
This application is running on Amazon EC2 and those servers use Elastic Block Storage (EBS) for server storage. The nice feature of EBS is the ability to easily change the size of the drive allocated for our use. The default size for our t2.micro instance is set to 8G, which seems small but can be easily expanded.
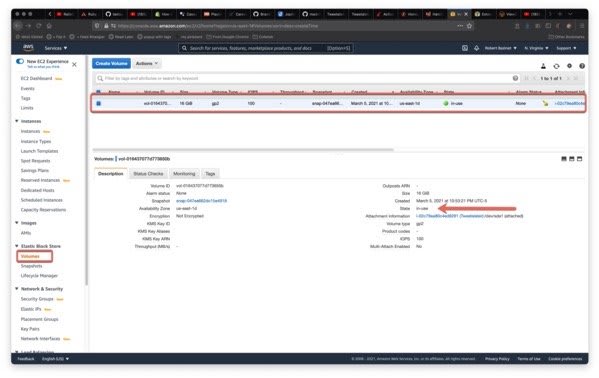
Loggin into the Amazon Web Services dashboard, the available volumes are shown. Selecting Volumes listed under Elastic Block Store on the left side column reveals them:
I have a single volume listed, you mileage may vary. Choose the one for the EC2 instance needing more space. Notice the display shows 16g of storage. This screenshot was taken after the changes were made to expand the volume.
Right clicking on the volume shows a nice menu:
Finding this menu was not obvious when first arriving at this page. You will want to choose the Modify Volume option from the popup menu where you will see the following modal:
I changed this option from 8GB to 16GB for my purposes. Once you click the Modify button it will take some time for the change to take effect. The status will be here:
The State field will change and update with progress. Mine took about 5-10 minutes. When it’s all done it will return to showing In-Use.
Unfortunately, once this process is done the disk space is not expanded. You have to expand the volume on your own.
Expanding the Volume
Amazon does have a nice document to accomplish this task. It’s a good idea to take a look at this and follow their specific directions including taking a snapshot of the volume in the event there are problems.
I decided against the snapshot because I didn’t have any production data I needed to be concerned about.
These are the steps to finish expanding the volume. I assume you are familiar enough with the command line to complete these steps. These steps need to be completed from the EC2 instance itself. Access to the instance is accomplished with secure shell (ssh). Root privileges are also needed.
1. Check the file system in the volume. Mine shows ext4.
The Type column shows the format of the filesystem. Take note of this, it will be needed later.
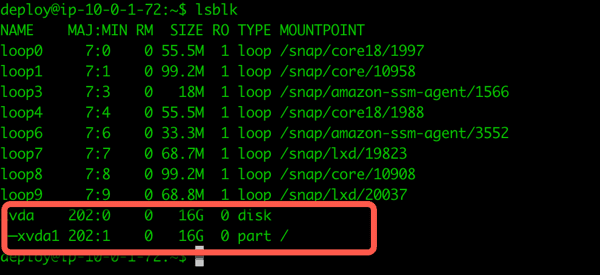
2. Run lsblk to look for the partition that needs to be extended.
This shows my partition after the upgrade had been done. The disk size showed 16G and the partition (xvda1) showed 8G.
3. Extend the partition
We need to extend the partition so we can use it in the next step. From a terminal window of your EC2 instance.
sudo growpart /dev/xvda1 1
The 1 at the end indicates the partition to be expanded.
4. Extend the File System
Since the filesystem of the drive I am targeting is ext4, I use the command:
sudo resize2fs /dev/root
Once this command completes running another df -h shows our partition is expanded and we no longer receive errors when trying to deploy to Hatchbox. This issue is not unique to Hatchbox and will solve this problem for any method used to deploy to your Amazon EC2 instance.
Conclusion
This process is not difficult but does require paying attention to some details. If you aren’t familiar with how-to access remote systems or how partitions and filesystems work then you might want to find a friend who can help.
I hope this helps…
The post Fixing Out of Diskspace Errors on Amazon EC2 appeared first on Accidental Technologist.


Top comments (0)