This article was first published on razcodes.dev
Prerequisites
To follow this article, you will need to have an AWS account. You can create one here.
Note that while creating an account with AWS you are eligible for the free tier for your first year, some of the setup will not be free. It is always a good idea to setup a billing alarm first thing after you create your account, and you can do so by following this article.
You will also need to have a domain name. If you don't, you can register one using a registrar like Google Domains, or another one of your choice. You can also register your domain directly with AWS using Route53 once you login. I like having the domain name in a different place, just because I am not 100% sure I will stay with this hosting solution forever, so I feel this gives me the flexibility to move around and experiment easier.
Setting up S3
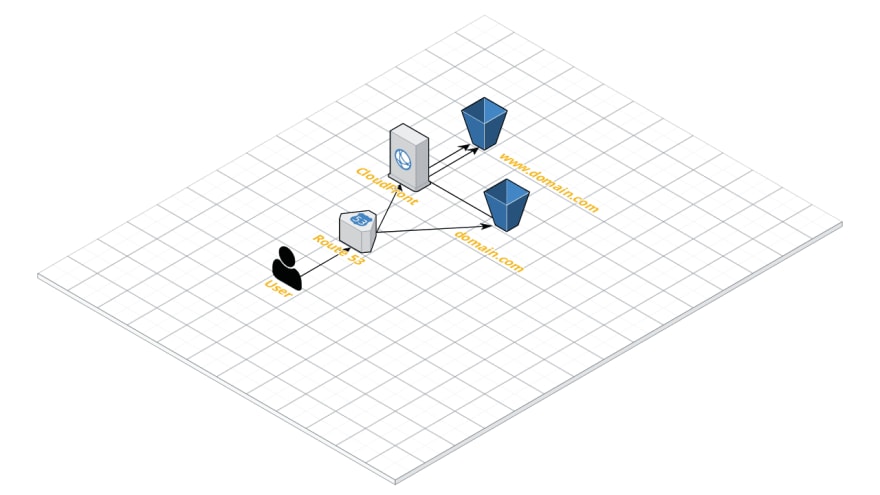
S3 is the AWS file system where the files for the website will be uploaded. We will be creating 2 buckets here, one for the root domain (getjambalaya.com) and one for the www subdomain (www.getjambalaya.com). The root domain bucket will just be forwarded to the main www one where we will be uploading all the files.
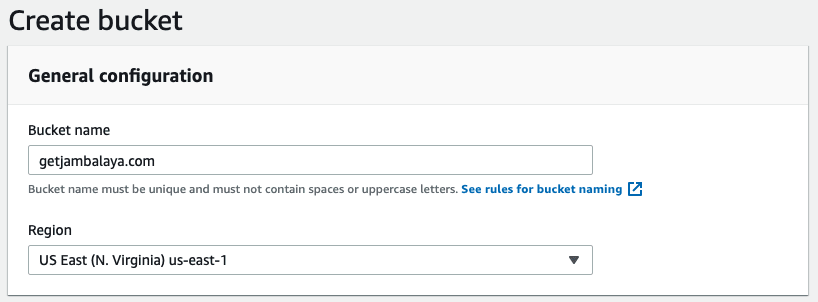
Go to your AWS console and then go to S3. Start by creating the first bucket. This bucket will have to be the name of your domain.
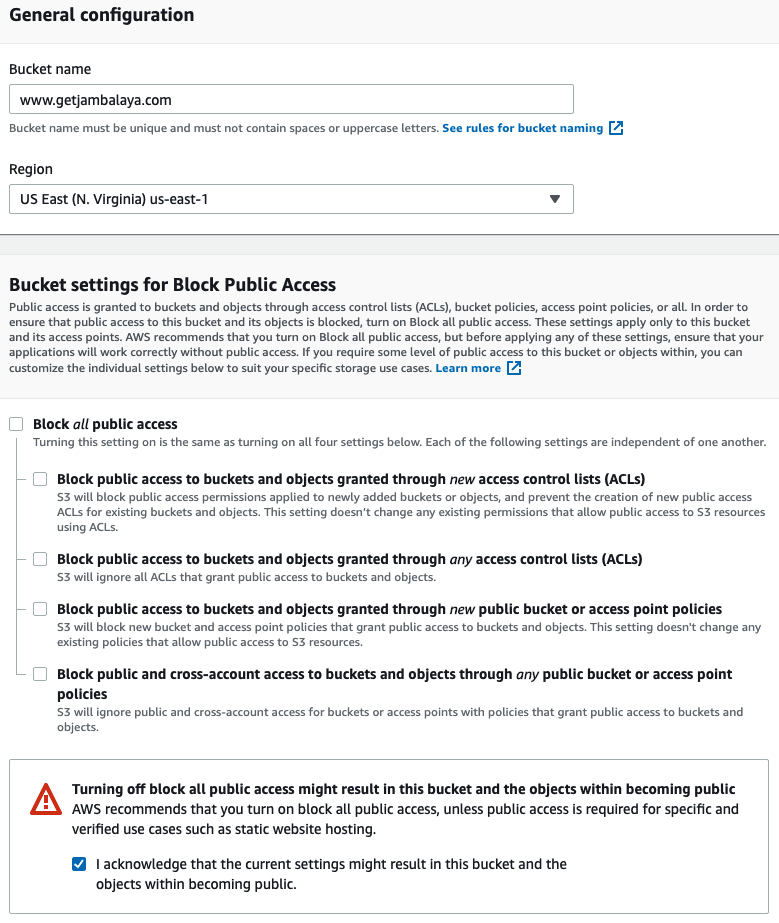
Next create the www domain bucket, this time deselecting Block all public access and acknowledging the choice. We are doing this, since this bucket will be made public.
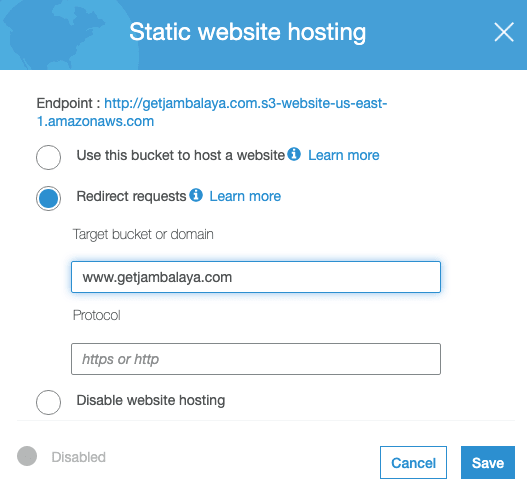
Still in S3, click on the initial bucket, go under Properties and under Static website hosting, set it up so it redirects to your www domain.
Go to your www bucket, under Properties -> Static website hosting, and Use this bucket to host a website. Also put index.html as the index document.

For this same bucket, under Permissions -> Bucket Policy, you can add the following policy, making sure you replace my domain name with yours. This will make all the objects in the bucket accessible to the outside world.
 {
    "Version": "2012-10-17",
    "Statement": [
        {
            "Sid": "AddPerm",
            "Effect": "Allow",
            "Principal": "*",
            "Action": "s3:GetObject",
            "Resource": "arn:aws:s3:::www.getjambalaya.com/*"
        }
    ]
}
You can now go under Overview and upload all the files of your website into your bucket. For this example I will just upload an index.html file that I have prepared.
Setting up the domain
In AWS go to Route 53 and under Hosted zones click Create Hosted Zone.

Once the zone has been created, take all 4 of your NS domains provided and make sure you update your DNS setting with your registrar. For Google Domains I went under my domain -> DNS -> Name Servers -> Use custom name servers. Should be the same with others as well.

These might take a while to update as such is the way with DNS settings.
Getting the certificate
In AWS, Services -> Certificate Manager -> Request a certificate -> Request a public certificate. Put in your domain name (www.getjambalaya.com). Select DNS validation. Add Tags if you wish. Confirm and Request.
Because we already added the domain to Route53, on the confirmation screen, you can expand by clicking on your domain name and click on Create record in Route53 and then Create.
Now you will just have to wait until AWS validates your certificate based on the DNS settings. It only took 2 minutes for me, but might take longer.
Creating the CloudFront distribution
In AWS, Services -> CloudFront -> Create Distribution -> Web -> Get Started. There will be a lot of options on this screen, but only a few will be changed for this exercise.
Under Origin Domain Name select your www s3 bucket. Under Viewer Protocol Policy chose Redirect HTTP to HTTPS.

Under Alternate Domain Names put in your www domain name (www.getjambalaya.com).
Under SSL Certificate chose Custom SSL Certificate and chose the one you just created above.

Last thing, under Default Root Object put in index.html.
Click Create. It will take a while for the distribution to be created so be patient.
Finishing the domain setup
Now back to Services -> Route 53 -> Hosted Zones select your domain name. We will create 2 more record sets, one for each bucket we created above.
Create Record Set -> Alias and select as the Alias Target the s3 bucket you created first, then click Create.

For the second one, we will point it to the CloudFront distribution we created above, so make sure you wait until that finishes.
Create Record Set, add www to the name, select Yes for Alias and in the Alias Target, select your CloudFront distribution, then Create.
As with other DNS changes this might take a bit to update so if it does not work right away just be patient. It will.
Congratulations, you can now visit your new website.

Top comments (3)
Hey Raz,
I followed this tutorial and was able to get almost everything working! It was very thorough and easy to follow. However, https:// example.org does not redirect to the right url (https:// example.org). Wondering if you had any idea what to do
Thanks for this tutorial. Helped me to get my landing page up in a day.
Disclaimer: I am recommending an article I wrote. So, take the quality of referral with a grain of salt.
I used to host my website using the method @Raz suggested. However, setting up things like CodeBuild for automated deployment and domain management started too much toil for nothing. I recently started using AWS Amplify, which does all the things @Raz mentioned, but in addition to that provide some additional features that I mentioned. I authored an article to explain the process, dev.to/rafee/deploying-serverless-...