October 2018
Originally posted at Medium
This is a sequel of my basic tutorial on Git and GitHub posted here. If you’re new to Git or GitHub, I would suggest you to start reading from there.
Catalog:
- Organizations
- Forks
- Pull Requests
- Code Review Process
- Deployment
- Tags
- Releases
- Advanced features
I have given you the basic idea of Git and GitHub in my previous post. In this post, we are going to see how we can improve knowledge on VCS (Version Control System) and make our development process more structured to work with a community or Co-workers for better collaborative programming.
Okay, I said “A community” or “Co-workers”. If they also want to contribute, how they can see and work on your own cloud repository? We need a common repository to place our project so that every other person wants to work on the project can access it.
How do we do that? Here we go.
Organizations
The organization is like creating a group in GitHub just like Groups in other social media or messaging platforms such as Facebook, WhatsApp, Skype, etc.
What is awesome than a group of programmers in one place! 💙

Let’s start by creating an organization.
Go to the homepage of GitHub or click here to see the following screen.
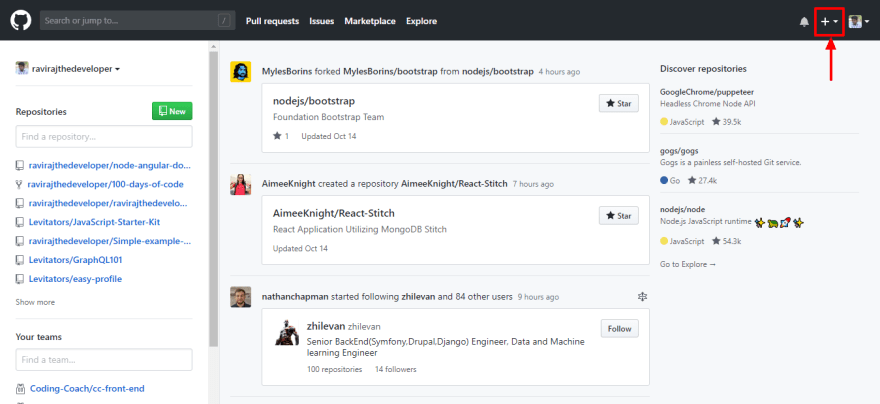
If you’re not a Hacker, you have to log in first to see the above screen. 😬
At the right top, you have this + icon, clicking on it will open up this drop-down window.

You already got the idea, aren’t you? If you still haven’t, You have to click on “Create new organization” to create a new organization. 😑
Fill in some basic details like the organization name, Email ID, etc. As of now, you can create it in the free plan since we are not going to create any private projects. When you are creating an organization for your company or some team where you want to keep your project private, you have to set up the payment settings in this step.
We don't need to add additional members as of now, you can do it at any time at the later point of time. Just fill in the other mandatory details and complete the creation of a new organization.
Cheers! Now you got your own organization. 😎
Organizations can hold of projects (AKA repositories) and existing members of GitHub as part of it. So, we have to create a project in the organization to let the other people work on it along with us as a team.
Waiting for what? Let’s create one.
In the homepage of your organization, you can see a button named, “New”. Clicking on it will open up a window where you can fill in some details and create a repository just like creating a repository with our own account. The only difference is, the repository is owned by the organization, not you even though it was created by very you. What does it mean? It means that only who get admin access to your organization can do whatever with these repositories and no other members can.
Don’t worry. Currently, you’re the only admin for your organization.
You cannot push code to the repository that you just created on your own organization.
Yes, you read it right. You just shouldn’t, if you really want to work collaboratively with your team, friends or peer programmers.
As I mentioned before, the repo is owned by the organization. Which means every member working on the projects has to know what’s going on. You should not change something in the code and push it directly. You need to suggest changes and submit as a proposal. so that other members will review the code and we can push the code when everyone approves. When the organization grows like many open-source organizations, only authorized admins will approve the changes to not to break the application.
Okay, how do they do it? That’s where the Forking comes into play.
Forks
A fork is nothing but a copy of the repository.
Let’s fork!
In the homepage of your organization’s project, you can see a button named, “Fork” in the right top as shown below.

When you fork the repo you just created in the organization, it will ask under which account you want to create this fork. Click on your account where do you see your username and your profile picture. Now you got the copy of your organization’s repo under your account. It's called the fork of the organization's repo.
You know what, you’re the owner of this copied fork repository. (Even though it inherits some of its properties of organization’s repo like security configurations, etc.)
What’s the difference between the fork and your own repository?
The fork is always linked to the original repo of others and the other organizations as the parent. So if you want to propose a code change to their repo, you can easily give from the forks since it knows it’s parent, apparently.
You cannot propose code changes to any other repositories from some other repo you create on your account. It just doesn’t work like that.
You can create any number of branches and change anything in this project by pushing your commits to it.
But, how do we suggest these changes to the organization’s repo? Proceed further to find the answer.
Pull Requests
Pull request (AKA PR) is the method of proposing code changes to the parent repo or even one branch to another in the same repo.
Whenever you work on a feature or fixing a bug or even some random code change, usually you will commit the code and push to the cloud on your personal repository. In the organization's repo, you cannot simply push your changes as it is. You have to propose the change and the other members of the organization have to review and merge your proposed change with the organization's repo.
So, you would not be the only one to take the blame when something goes wrong in the code base. 😝
But, the pull request is more than just a change proposal. It’s a dedicated forum for discussing the proposed code change. If there are any problems with the changes or something need to be discussed about some code change, organization members can post feedback in the pull request and even tweak the code by pushing follow-up commits.
Let's see this in action.
Clone your fork repository to your local machine. Create a new branch, let's name it feature/first-proposal and make some code change in the branch and push the commit to your fork in the cloud.
If you don't how to do it, refer my previous article.
Now open your fork repository in the browser. You can see a drop-down to change the project as shown below.
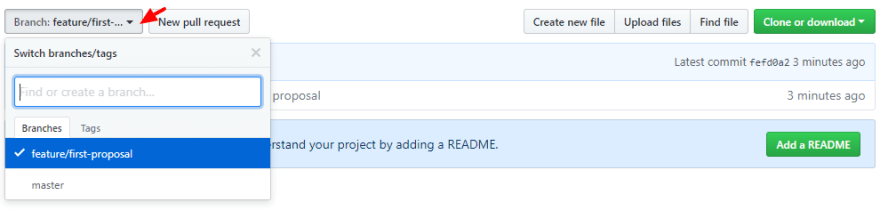
Now go to your new branch by selecting feature/first-proposal in the drop-down.
Let's raise a Pull request by clicking the "New pull request" next to the branch selecting drop-down. Now it will just preview the pull request that you're about to raise. You can change any details, modify the pull request name and change the parent branch to which you're proposing the code change. Once you're sure about all the details click on "Create pull request" to confirm the proposal.
You have successfully filed a Pull request to the organization repo. Now everything we need to do is to let any other member of the organization to review this pull request by sharing the link to this PR. You can just copy it from the browser address bar.
Code review process
When you raise a PR, the other members of the organization review your code just to make sure you did not break any existing features of the project by adding some additional code or removing some code. 😝
And it's vice-versa, you will have to review your teammates' code so that you will know what's going on with the project.
So how do we do it?
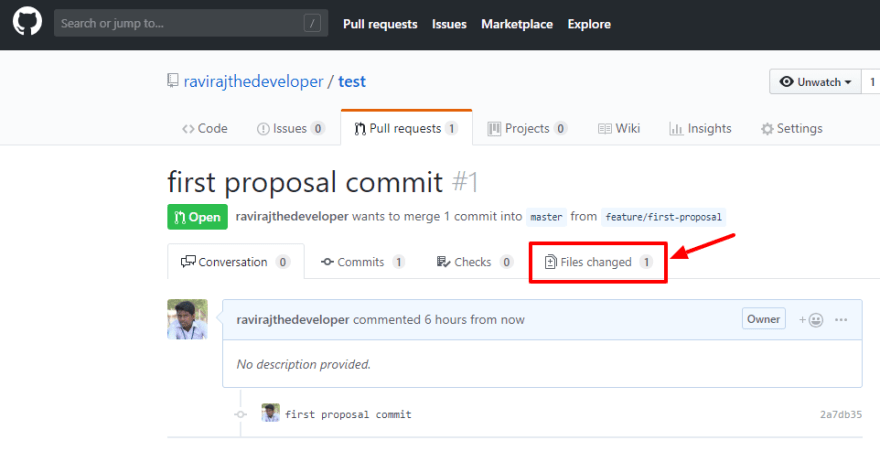
Click on the tab saying "Files changed" as shown below, which will open up a page showing all code changes in some color codes in all the files that you or your teammate changed.

In the above picture, the code shown in green are the ones that have been added to the project and the ones shown in red are removed from the project. Also, you can see + or - signs before every line which is self-explanatory as the same purpose as the color codes do.
The reviewer has to go through all the code change and see if there's any mistake made in the code that is obvious. If there's any mistake or something has to be done differently or missed, the reviewer can leave a comment to the request. You don't need to go anywhere to put a comment, an awesome feature which GitHub has done to you is that you can leave a comment on any line and it will be pointing the exact line to anyone viewing the PR later.
When you hover over the code, you can see a blue colored button with + (plus) icon appears before the line starts, clicking on it will open up a comment box in the very same line. You can type anything, tag anybody in the organization and you can do many more things just like any other comment box. Even emojis are supported. 😉
Then the requester will get a notification through Email and in the GitHub notifications about the comment in their PR. And even the reviewer can inform the requester in any chat to get their immediate attention. The conversations in the PR can be continued or relevant changes can be done and pushed with additional commits to the same branch.
After the requester addresses all the comments left by the reviewer, now the "Files changed" page will be updated and the reviewer has to go through the changes again to make sure there are no worse things happened in the next commits. 😝
Please read this article, it is an interesting article on how the pull request and the code review process has to be done in a polite and friendly manner.
Once everything looks fine, the reviewer has to approve the pull request by clicking on the "Review changes" button and submit with "Approve" radio button checked as shown below.

And merge the pull request with the master branch of the organization's repository by clicking "Merge pull request" button and confirming it as shown below.

Pull request need not be approved to get merged with the organization repo unless it is configured so. So, you can review the code changes yourself and merge it with the master branch without approval. But ideally, it is not advised.
Deployment
In the organization's projects, we will deploy the code somewhere through FTP or some containerization tool(Docker or Kubernetes) on the cloud through any service provider such as Amazon Web Services, Azure Cloud, Google Cloud Platform to name a few.
Whenever we make changes, we might want to deploy the code to any server instance created in any of the cloud services.
It is completely fine if you have done it before or even heard of it. We are not going to do this right now because it is a wide topic to learn dedicatedly.
If DevOps team or some other people does these work in your organization, it is right time you learn it and work with them on this process as it is becoming more of a required skill set for the developers as well.
We are not going to cover deployment steps as there are a ton of resources available for each service provider on their official websites and other resources online. We are only going to see how do we store the different version of the code base with the use of git and how are we going to differentiate the latest released version for easier deployment process.
Tags
Tags are nothing but naming a released version of the project and keep the whole project files at any stage in some compressed format as a back-up.
The process is similar to the branches.
Let's create a tag by running the following command by opening up a terminal window on your project directory.
git tag v1.0
v1.0 is the tag's name here. It is just like a branch name, you can type anything instead of that.
Let's push this tag to your fork repository in the cloud.
git push origin v1.0
The above command will push the tag to your fork which means that you have taken backup project files in your cloud. It can be fetched and restored anytime. When something collapses in the deployed server, you can make use of these tags to rollback to the previous version of the project. Usually, tags are pushed in the organization's repository instead of anyone's fork repo to keep the tags available organization-wide.
So how do we restore a tag pushed to the cloud?
The command git fetch origin will fetch all the branches as you know. It will also download all the tags to your local machine.
You can see all the tags by executing, git tag. It will list the names of all the tags in your local machine.
Let's say, you made a lot of commits and moved on with some other branch and your product owner/manager asks you to rollback to the v1.0 version to the development environment in the cloud server.
You can fetch all the tags from the cloud using the commands listed above. You can restore a particular tag using git checkout origin/v1.0 just like checkout to a branch. It will restore the code from the tag v1.0 as you have backed it up. Now you can proceed to deploy the code to the server from your local machine.
Releases
Multiple deployments down the line, you or your team members would not be able to remember which version is deployed when and why. Also, we cannot have a track of which version is live in the server now. So we need to manually track it somewhere or we simply do the following to keep track of the released live version of the project.
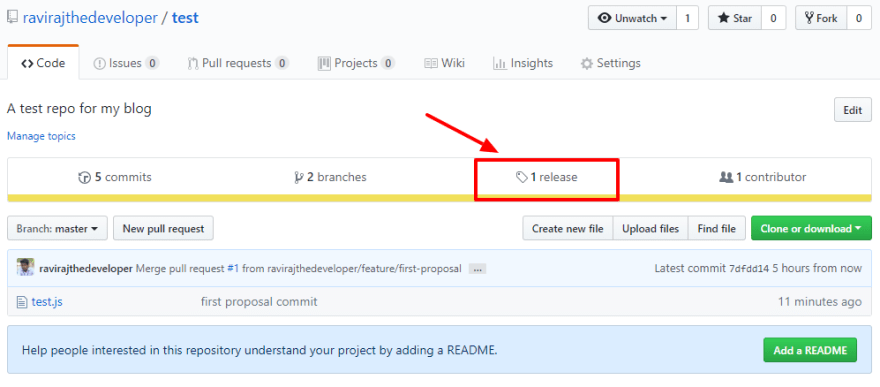
You can find a tab called "releases" as shown below.
Click on the "Tag" tab as shown below to see the list of tags so far that has been pushed to your cloud repository.

Select the tag that you want to name as the latest release. Then click on the "Edit tag" button on the right top corner as shown below.

Now it will ask you some details to fill in. Don't worry it's not a job application, it only has a few fields to type in. 😉
Type any name in the "Release title" field, the same as the tag name would be fine. Then type any summary about this release to let your teammates know about the release if you want, otherwise leave it blank.
Go ahead and submit the release.
Now you can see the details of this tag on the top marked as "Latest release" in the "Releases" page as shown below.

You can follow the same steps to push a new tag every time there's a new version needs to be deployed to the cloud server.
Awesome! We are done with the basic workflows followed in the collaborative programming in the organizations these days.
Advanced features
The following are some of the advanced features in Git that you can use to make your development process smarter.
Save the code changes in memory without committing or losing it with the feature of
git stashEdit commit messages, Squashing multiple commits into one, remove a commit in a branch and much more with the "Rebase" feature using the command
git rebase.See the whole logs of the commits and even the code changes with
git logcommand.Use any particular commit made in the past in your current branch with the use of
git cherry-pickcommandSee the code changes with smart filtering options like the commit author, or particular word in the code and much more to find any commits in the past with
git blamecommand
All of the above said commands have to be used with some more options passed along with it to actually make it work. Learn about them before using those and make sure you don't collapse the code base and lose anything.
If you like this post, like it. Even bookmark it if you really found it useful. 😉
Let's connect on social platforms,
Happy coding. 👩💻🙂

Top comments (5)
Thanks, for article Do you know how many developers I can add to my Github organization?
Hi Sarah,
Thank you. For your question, it depends on the GitHub pricing policy. It changes frequently as their business model changes. You can check their pricing page and contact their support for more detail.
i need someone to help me setup github for our team with 3 developers.How should be the workflow?
The Organization section in the post has to be done to set up the organization and project that your team is going to work on.
Then the Fork section has to be followed by all the team members who are all going to work on the project.
Then the Pull Request section is the one followed every time any developer wants to push changes.
The sections afterward are followed for the complete development process until the project is deployed and maintained.
All the best.
Thank you so much, I really didn't expect that much of this article, master.