
Originally posted on our blog here.
More links:
In this post, we are going to clone Coinbase Dashboard using Argon Dashboard Bootstrap and Loopple. We will also use our code editor to make small HTML changes.
Before we dive into this tutorial, let's first present you the "stars": Coinbase and Loopple.
Coinbase is a secure online platform for buying, selling, transferring, and storing cryptocurrency. The company made history in April 2021 by being the first crypto company in the world to go public.
Loopple is a dashboard builder that helps developers to create beautiful admin panels in minutes. Our editor will help you speed up the development process and will provide you with an easier way to prototype your dashboards layouts.
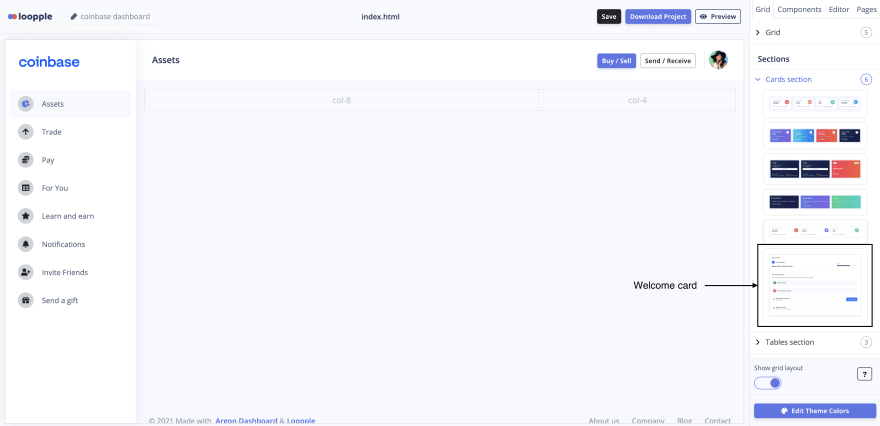
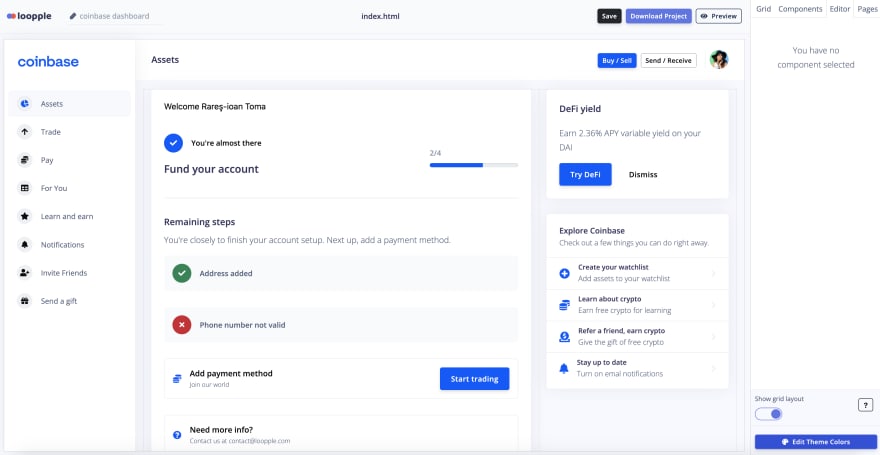
In this tutorial we want to clone the first page of Coinbase dashboard, that looks like this:

Following the guidelines below we will create Coinbase clone using Loopple builder.
You can also see the full video tutorial here.
What are the steps to replicate Coinbase Dashboard?
Step 1: Create a new project
We first need to create a new project using the Argon Dashboard theme. Link for the new project here: https://www.loopple.com/new-project.
We need to click on the Argon Dashboard image and give our project "coinbase dashboard", or any name you choose. After this, click on "Create" button and a new project will be created.

Step 2: Select the navbar
Now, we have to select the navbar. By clicking on the "+" button on the navbar, the following modal will open:

For this dashboard, we will choose the last navbar variant, the one with 2 buttons and a profile image. After we select it, we have to change its color to white. To do that we have to click on the navbar and select the white color from the sidebar.

After this, we have to change the text of the buttons to match Coinbase's texts: "Buy/Sell" for the first button, and "Send/Receive" for the second button. To to that, we have to double click on the button and the texts will become editable. We also have to change the navbar brand text, from "Navbar" to "Assets". After these changes, our navbar will look like the following:

Step 3: Select the sidebar
Now that we have our navbar in place, let's edit the sidebar. By clicking "+" on the sidebar the following modal will open:

For this tutorial, we will the last sidebar: "Sidebar Rounded Icons". After we select it, we have to make a few changes, like replacing the image, changing the icons colors, and texts.
To change the image, we have to click on the sidebar's image and in our sidebar, we will see and input where we can add a new image. We will use the following link for the Coinbase logo image: https://raw.githubusercontent.com/Loopple/loopple-public-assets/main/logos/coinbase-logo.png.

Now, let's see how can edit the sidebar's icons. We can see that when we click on an icon, in the editor we can see that we can change the icon color and classes. To change the icon we have to change the "fa-..." class, using one of the icons available on fontawesome.

To make Coinbase's sidebar look, we will leave the first item with the primary color and change all the others to dark color. We will also change the texts by double-clicking on each text element. After all these changes, the sidebar will look like this:

Now, that we have the navbar and sidebar in place, let's add components to the content.
Step 4: Add grid to content
As we can see on the Coinbase dashboard, the content is split into 2 parts - one that occupies 75% of the screen width, one that occupies 25%. To do this in our dashboard, we are using the Bootstrap grid system and we will split the screen into col-8 and col-4 columns. You can see better the division that we will make in the image below:

To add the grid to our content we will use our option available in the editor:

For this dashboard, we will use the "Grid with 8-4 columns". To add it to the screen we have to click on the image and drag it to the green area:
Step 5: Add components
In this step, we have to add the following components:
- Welcome card - contains the steps and payment methods
- Info card - contains the FAQ and terms
- Balance card - contains information about money available
- Watchlist table - Cryptocurrencies that we are watching
- DeFi card - information about different ways to earn money/crypto
- List card - Different steps to make the best out of Coinbase
Welcome card
First, let's add the welcome card. We will find it on the card section:
After we drag it into the first column (col-8), there are a few things that we need to change, like the texts, icons, and the color of the progress bar.
To change the progress bar color, we have to click on the dark bar and our sidebar will show the "Progress Bar" title with an input that contains the progress bar classes. We will change the "bg-default" class to "bg-primary".

After we change the texts and colors, our card will look like this:

Info card
Now, let's add the Info card. We can see on Coinbase that it contains a list of questions with arrows, so the most appropriate variant available in Argon Dashboard is in the Card Collapse available in cards.

In Coinbase's info card, we can see that there are just 2 questions, so we have to remove one from our card. To do that we have to click on the "Edit Code" button on top of the card. If this button is not showing on the card you have to activate it from settings: https://www.loopple.com/profile/settings.
After we click on the "Edit Code" button, a pop-up with the card's code will show up. You can move and resize it the way you want.
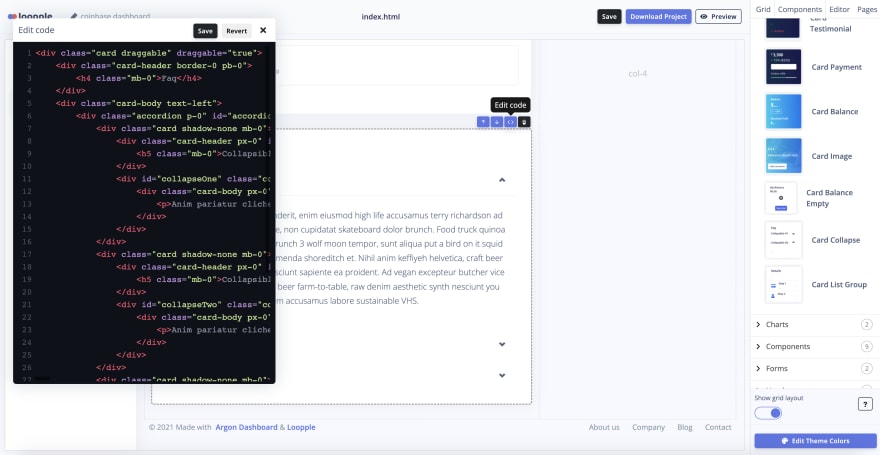
In this example, we will use it at the top of the page. To remove the last line of the info card we have to remove the last card from the code:

After we remove it, we have to click on the Save button on top of the code editor pop-up. You can also choose to revert the code if you need the component to return to its initial state.
After we edit the texts, our card will look like the following:

Balance card
We can find the balance card in the cards category.

This card requires small changes: edit texts and transform button color to white. The last change requires our code editor, and the button classes will be: btn btn-outline-light text-dark btn-sm.
Watchlist table
The watchlist table can be found in the tables category.

We can see that in the Coinbase dashboard, the watchlist table has 5 rows. We can also add more rows/columns on our tables by clicking on the table and then select from the sidebar these options:

By clicking on the "Add row" table, our editor will duplicate the last row of the table. So, in this case, we will have another row containing the Solana informations. We can edit the images and texts of the row using Loopple options we previously learned.
DeFi card
The DeFi card will be the first element we add on the col-4 column. We will build it using our simple card available in the cards components and our code editor.

Now that we added the card into the column, we need some customisation to make it look like the DeFi card available on Coinbase. Using our code editor we will add one more button and change the title font size.
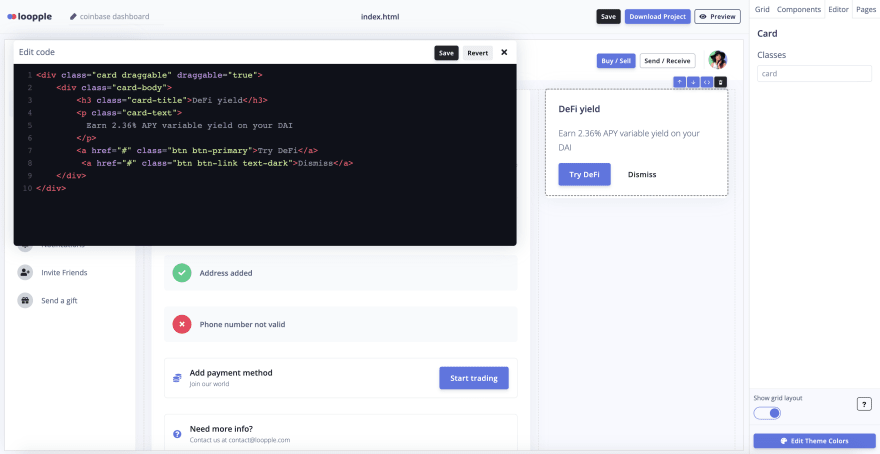
The code for the new DeFi card:
<div class="card draggable" draggable="true">
    <div class="card-body">
        <h3 class="card-title">DeFi yield</h3>
        <p class="card-text">
          Earn 2.36% APY variable yield on your DAI
        </p>
        <a href="#" class="btn btn-primary">Try DeFi</a>
         <a href="#" class="btn btn-link text-dark">Dismiss</a>
    </div>
</div>
List card
We can find the list card in the cards components under the name of "Card List Group".

Here we have to modify the texts and the icons, and the card will look like this:

Step 6: Change theme colors
The last step and we think the most important step, is to change the theme colors so our dashboard will completely take the Coinbase design look.
So, we will change the following colors: primary, success, danger, dark and light.
Here are the colors that are used in Coinbase dashboard:
- primary: #0052ff
- success: #098551
- danger: #cf202f
- dark: #0a0b0d
- light: #eef0f3
To change our theme colors, we have to click on the "Edit Theme Colors" button, situated in the right bottom part of the screen.

To change one color, you have to click on the color square. For example, let's change the primary color first. By clicking on the second square, the blue one, a pop-up with a color scheme will show up:

Here, by clicking on the input, we will change the #5E72E4 color to #0052ff. In order to aply the changes, we have to click on the "Save button".
The same thing we have to do with the success, danger, dark and light colors.
After we change the colors, our dashboard will take a completely new look.
That’s it! You just created a Coinbase clone using Loopple in under 17 minutes. You can also continue developing this by adding pages with more and different elements.
If you want to watch this in video format, you can watch this here on Youtube.
Please let me know what you think. Thank you!

Latest comments (0)