
Mdu Sibisi
The payment gateway is one of the most important components of any digital platform accepting payments. Your site or app needs to provide flexible and secure payment options to be competitive, with payment processing features having a direct impact on conversion rates. It's one area you can't afford to skimp on.
This article shows how you can create a payment gate for your website using Java and the Rapyd Collect API. The tutorial's source files are available in this GitHub repo.
What Is the Rapyd Collect API?
Rapyd Collect is a global payment acceptance platform that lets you offer a diverse set of payment methods and options to a wide number of regions. Rapyd is on a mission to liberate global commerce with all the tools you need for payments, payouts, and business everywhere. The Rapyd Collect API lets you integrate the Rapyd Collect payment collection features and services into your e-commerce websites and apps.
Rapyd's network is expansive, allowing you to accept payments in over 100 different countries. It also features local payment options in over 50 different currencies. Payments can be collected through debit and credit cards, Rapyd Wallet, global and local e-wallets, cash, or bank redirect. The Rapyd Collect API also supports subscription billing and invoicing.
Most of these features are made available to you through Rapyd Collect's highly customizable checkout page. Rapyd allows you to implement it in three ways:
- Hosted: This option redirects site visitors to a checkout page hosted on Rapyd's servers. It's arguably the easiest way to integrate a payment collection flow.
- Toolkit integration: This option enables you to embed Rapyd's checkout into your website using an iFrame.
- API Integration: This option allows you to build the Rapyd Collect platform directly into your app. It requires you to meet PCI-DSS compliance before accepting payments.
As a PCI level 1 service provider and British Standard Institution (BSI)–accredited company in information security management, Rapyd can handle sensitive user and payment information for you.
Keeping up with the rapidly evolving e-commerce technological landscape remains a challenge, especially for small to medium enterprises. Delegating payment collection and payment cybersecurity eases the pressure off your IT resources and budget.
Implementing a Checkout Page with Rapyd
This tutorial focuses on building a checkout page for an online supplement store, but you can adapt it to any integrated development environment (IDE) or development workflow of your choice.
As mentioned earlier, you can implement the Rapyd Checkout Page as either hosted, embedded, or built into an application using the API. The tutorial uses the first option.
Project Prerequisites
You need a few things before you can start coding:
- A Rapyd account
- Java JDK (17)
- Jakarta EE 9 or Java EE 8 (or earlier)
- Application server
- IDE
Take note that you need some development experience with Java to follow along with this tutorial.
Building Your Java Application
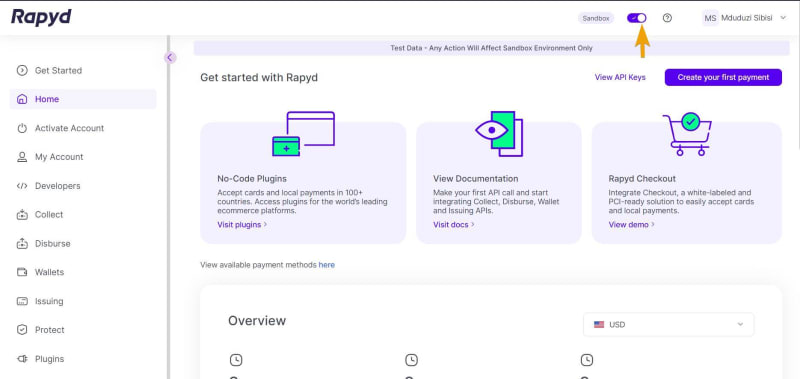
Before you start building your Java application, you must ensure your Rapyd account is set to Sandbox mode. You can toggle between environments using the switch on the toolbar:
You can go old school and manually build your class files using an application like Notepad, or you can use a more fully featured text editor or IDE. This tutorial uses the latter, specifically Apache NetBeans.
If you prefer to use an alternative tool, such as Visual Studio Code, VSCodium, or Eclipse, you should have no problem adapting this tutorial to your preferred approach. A set of examples and links to the class files are all included in the project repo.
Launch NetBeans and create a new Maven-based Java web application:

Name your project and set its location when prompted:

Next, you'll be required to choose a server and a Java Platform, Enterprise Edition (Java EE) version for your project. The project in this tutorial uses GlassFish and the latest version of Java EE at the time of writing (Jakarta EE 9.1 Web). Since the 19th version of the Java SE JDK was yet to be compatible with GlassFish, it is advised that you download and use JDK 17:

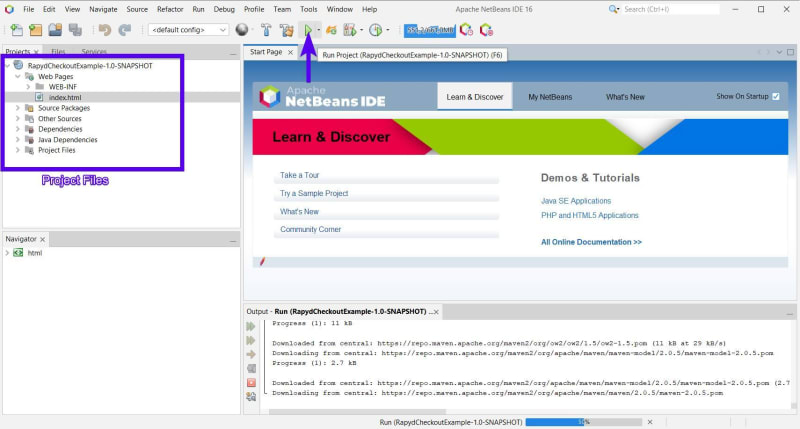
The IDE will initialize the project and create all the necessary folders and files. It's a good idea to run the project after initialization to ensure that it and your application server have been set up properly:
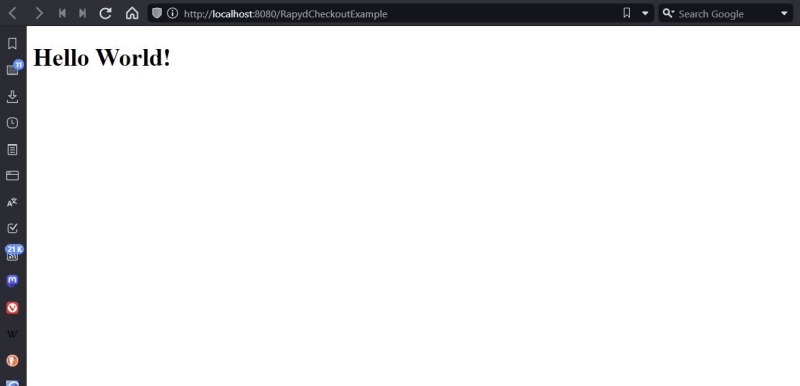
Most IDEs, depending on how they're set up, will automatically launch the project in a developer-specific or default IDE–specified browser. NetBeans is no different. Nevertheless, you can also manually run your browser and navigate to the address your server is hosting your application (e.g., http://localhost:8080/RapydHostExample):
Use the Project side panel to open the index.html file. It's located under the Web Pages node. Expand this node, right-click on the index.html file, and click on Open:

Overwrite the index.html contents with the following code:
<!DOCTYPE html>
<head>
<meta charset="UTF-8">
<meta http-equiv="X-UA-Compatible" content="IE=edge">
<meta name="viewport" content="width=device-width, initial-scale=1.0">
<title>International Supplement Shop</title>
</head>
<body>
<div>
<h1>Hi! 👋 Welcome to the Best Supplement Shop in The World</h1>
<p>Try out our new vegan protein shake!</p>
<hr>
<h1>Checkout our latest products:</h1>
<section>
<div>
<h3>Vegan Protein Supplement 2Lbs (908 grams)</h3>
<p>This is a dairy-free protein shake that is easy to digest</p>
<b>$10</b>
<br/>
<a href="Vegan Protein Supplement.jsp">See more</a>
</div>
</section>
</div>
</body>
</html>
Create a new JSP file under the Web Pages project folder and name it Vegan Protein Supplement.jsp:

Replace the template content in the Vegan Protein Supplement.html file with the following code:
<%@page contentType="text/html" pageEncoding="UTF-8"%>
<!DOCTYPE html>
<!DOCTYPE html>
<html>
<head>
<meta name="viewport" content="width=device-width, initial-scale=1.0">
<title>Vegan Protein Supplement</title>
</head>
<body>
<div>
<h1>Unflavored Vegan Protein Supplement</h1>
<p>A vegan protein supplement that can be either taken with water as a shake or added to recipes.<br/>
Ideal for vegan athletes trying to build muscle.
Go from Vegan to Vegain with this pea and watermelon seed protein supplement! </p>
<b>$10</b>
<br>
<form action="Purchase" method="POST">
<input type="hidden" name="amount" value="100">
<input type="submit" value="Purchase" name="submit">
</form>
</div>
</body>
</html>
The checkout page will be called from the Vegan Protein Supplement.jsp Purchase button.
Customizing the Rapyd Checkout Page
Open the Rapyd client dashboard and click on the Settings item on the left panel; then click on the Branding widget on the main screen:
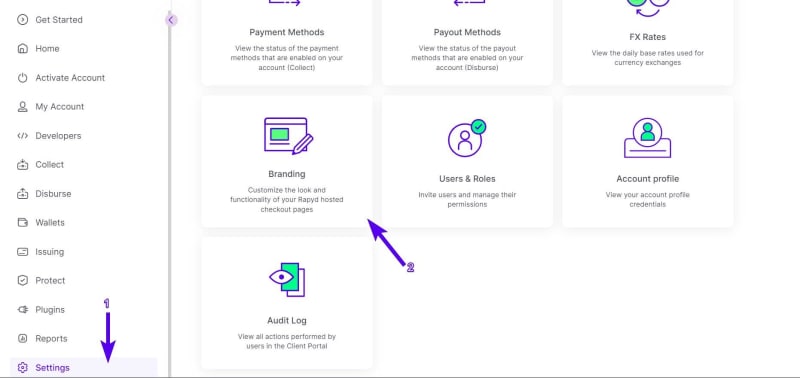
The branding screen allows you to customize the look and feel of your Rapyd-hosted checkout page:
You can add and customize visual aspects, such as the following:
- The logo: You can upload an image of your logo.
- Call to action buttons: You can set the text and color of these buttons.
- Redirects: You can set the URL that the customer is sent to after a transaction has succeeded, failed, or canceled. Ideally, you should set it as your website's home page.
- Customer support: You can add customer support and business information to your Rapyd payment gateway.
- Page type: You can choose between Hosted Checkout, Save Card Details Page, and Beneficiary Accounts Page.
To keep it simple on the first run, select card as the only payment option by clicking on the wallet icon and unchecking all the other options:

Leave everything else as is for now.
Calling the Rapyd Checkout Page
To call the Rapyd Checkout Page, you need to create a servlet that will call the checkout page when the purchase button is clicked. Expand the Source Packages node in the project navigation panel and right-click on the main package (ie com.mycompany.rapydcheckoutexample). Click on New in the context menu and then select Servlet:

Name the servlet (this tutorial used CheckoutServlet), then click on the Finish button.
Open the servlet in the edit window and replace its contents with the following code:
package com.mycompany.rapydcheckoutexample;
//import jakarta.servlet.DispatcherType;
//import java.io.IOException;
import jakarta.servlet.annotation.WebServlet;
import jakarta.servlet.http.HttpServlet;
import jakarta.servlet.http.HttpServletRequest;
import jakarta.servlet.http.HttpServletResponse;
import jakarta.ws.rs.POST;
import org.apache.http.HttpEntity;
import org.apache.http.HttpResponse;
import org.apache.http.client.ClientProtocolException;
import org.apache.http.client.HttpClient;
import org.apache.http.client.ResponseHandler;
import org.apache.http.client.methods.HttpGet;
import org.apache.http.impl.client.HttpClients;
import org.apache.http.util.EntityUtils;
import javax.crypto.Mac;
import javax.crypto.spec.SecretKeySpec;
import java.io.IOException;
import java.io.UnsupportedEncodingException;
import java.security.InvalidKeyException;
import java.security.MessageDigest;
import java.security.NoSuchAlgorithmException;
import java.util.Base64;
import java.util.Random;
@WebServlet("/Purchase")
public class CheckoutServlet extends HttpServlet{
String cancelCheckoutURL = "http://example.com/cancel";
String completeCheckoutURL = "http://example.com/complete";
String country = "US";
String currency = "USD";
String language = "en";
public static String hash256(String data) throws NoSuchAlgorithmException {
MessageDigest md = MessageDigest.getInstance("SHA-256");
md.update(data.getBytes());
return bytesToHex(md.digest());
}
public static String bytesToHex(byte[]bytes) {
StringBuffer result = new StringBuffer();
for (byte byt: bytes)
result.append(Integer.toString((byt & 0xff) + 0x100, 16).substring(1));
return result.toString();
}
public static String hmacDigest(String msg, String keyString, String algo) {
String digest = null;
try {
SecretKeySpec key = new SecretKeySpec((keyString).getBytes("ASCII"), algo);
Mac mac = Mac.getInstance(algo);
mac.init(key);
byte[]bytes = mac.doFinal(msg.getBytes("UTF-8"));
StringBuffer hash = new StringBuffer();
for (int i = 0; i < bytes.length; i++) {
String hex = Integer.toHexString(0xFF & bytes[i]);
if (hex.length() == 1) {
hash.append('0');
}
hash.append(hex);
}
digest = hash.toString();
} catch (UnsupportedEncodingException e) {
System.out.println("hmacDigest UnsupportedEncodingException");
}
catch (InvalidKeyException e) {
System.out.println("hmacDigest InvalidKeyException");
}
catch (NoSuchAlgorithmException e) {
System.out.println("hmacDigest NoSuchAlgorithmException");
}
return digest;
}
public static String generateString() {
int leftLimit = 97; // letter 'a'
int rightLimit = 122; // letter 'z'
int targetStringLength = 10;
Random random = new Random();
StringBuilder buffer = new StringBuilder(targetStringLength);
for (int i = 0; i < targetStringLength; i++) {
int randomLimitedInt = leftLimit + (int)
(random.nextFloat() * (rightLimit - leftLimit + 1));
buffer.append((char)randomLimitedInt);
}
String generatedString = buffer.toString();
return (generatedString);
}
@Override
public void doPost(HttpServletRequest request, HttpServletResponse response)
throws IOException {
try {
System.out.println("GetPOS Start");
String httpMethod = "post"; // get|put|post|delete - must be lowercase
String urlPath = "/v1/checkout";
String basePath = "https://sandboxapi.rapyd.net"; // hardkeyed for this example
String salt = generateString(); // Randomly generated for each request.
long timestamp = System.currentTimeMillis() / 1000L; // Unix time (seconds).
String accessKey = "0F32811C67FADC15E0ED"; // The access key received from Rapyd.
String secretKey = "d8abc747ebfec6cb10a049a9904d7c7652cefeb4cafa6304b15a0176ccf4ef19eac4c0ba61ed8f65"; // Never transmit the secret key by itself.
String bodyString = "{"
\+ "\"amount\": 10,\n" +
"\"complete_checkout_url\":" + completeCheckoutURL +",\n" +
"\"country\":" + country+",\n" +
"\"currency\":" + currency + ",\n" +
"\"cancel_checkout_url\":" + cancelCheckoutURL + ",\n" +
"\"language\":" + language + "}"; // Always empty for GET; strip nonfunctional whitespace.
// Must be a String or an empty String.
String toEnc = httpMethod + urlPath + salt + Long.toString(timestamp) + accessKey + secretKey + bodyString;
System.out.println("String to be encrypted::" + toEnc);
String StrhashCode = hmacDigest(toEnc, secretKey, "HmacSHA256");
String signature = Base64.getEncoder().encodeToString(StrhashCode.getBytes());
HttpClient httpclient = HttpClients.createDefault();
try {
HttpGet httpget = new HttpGet(basePath + urlPath);
httpget.addHeader("Content-Type", "application/json");
httpget.addHeader("access_key", accessKey);
httpget.addHeader("salt", salt);
httpget.addHeader("timestamp", Long.toString(timestamp));
httpget.addHeader("signature", signature);
// Create a custom response handler
ResponseHandler < String > responseHandler = new ResponseHandler < String > () {
@ Override
public String handleResponse(
final HttpResponse response)throws ClientProtocolException,
IOException {
int status = response.getStatusLine().getStatusCode();
HttpEntity entity = response.getEntity();
return entity != null ? EntityUtils.toString(entity) : null;
}
};
String responseBody = httpclient.execute(httpget, responseHandler);
System.out.println("----------------------------------------");
System.out.println(responseBody);
} catch (Exception e) {
System.out.println(e.getMessage());
for (StackTraceElement exc : e.getStackTrace()) {
System.out.println(exc.toString());
}
}
} catch (Exception e) {
System.out.println(e.getMessage());
for (StackTraceElement exc : e.getStackTrace()) {
System.out.println(exc.toString());
}
}
}
}
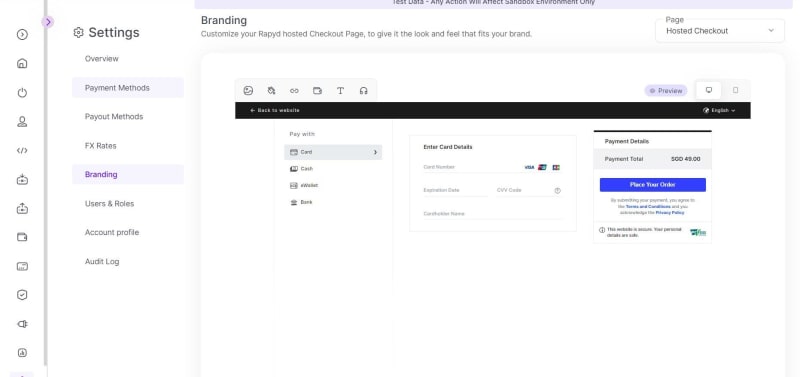
You can now build your project. You'll notice that it's a three-page process that goes from the index page to the product page and, finally, the checkout page. Your checkout page should look like this:
And congratulations! You've successfully integrated Rapyd with a Java application that works as a payment gateway.
Conclusion
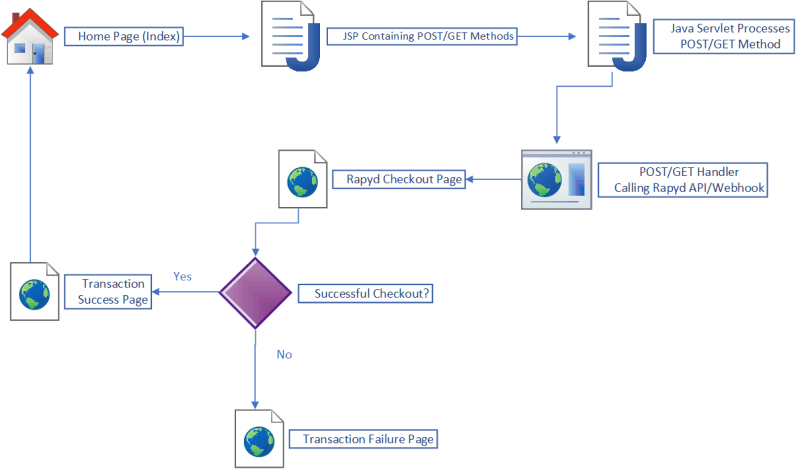
In this tutorial, you've learned about Rapyd Collect and explored how you can use it to build and plug a checkout page into your Java-based web store or application. Here's an overview of the architecture for this project:
You can access the complete project source files featured in this tutorial from GitHub.
Got any thoughts or questions? Be sure to post them in the Rapyd Developer Community.

Top comments (0)