
In this post, I will show you how to add user to the subscription list of Mailchimp. For this example, we will use the default registration of Laravel. However, we will add a few more fields and do a slight modification to the default registration. Importantly, we will add a subscription checkbox and while registering an account, if the user clicks the subscription checkbox, we will save data to our database and also add user details such as email address, first name, last name,address and phone number of user to the list of Mailchimp. If the user does not check the subscription checkbox we will save user information only to our database.
Step1: Let's start by modifying the registration form
resources/views/auth/register.blade.php
I will remove the name field and add the first name and last name fields instead. I will also add the phone and address filed. Finally, I will create a checkbox. Our form looks as below.
@extends('layouts.app')

@section('content')
    <div class="container">
        <div class="row justify-content-center">
            <div class="col-md-8">
                <div class="card">
                    <div class="card-header">{{ __('Register') }}</div>

                    <div class="card-body">
                        <form method="POST" action="{{ route('register') }}">
                            @csrf

                            <div class="row mb-3">
                                <label for="firstname"
                                    class="col-md-4 col-form-label text-md-end">{{ __('First name') }}</label>

                                <div class="col-md-6">
                                    <input type="text" class="form-control @error('name') is-invalid @enderror"
                                        name="firstname" value="{{ old('firstname') }}" required autocomplete="firstname"
                                        autofocus>

                                    @error('firstname')
                                        <span class="invalid-feedback" role="alert">
                                            <strong>{{ $message }}</strong>
                                        </span>
                                    @enderror
                                </div>
                            </div>

                            <div class="row mb-3">
                                <label for="lastname"
                                    class="col-md-4 col-form-label text-md-end">{{ __('Last name') }}</label>

                                <div class="col-md-6">
                                    <input type="text" class="form-control @error('lastname') is-invalid @enderror"
                                        name="lastname" value="{{ old('lastname') }}" required>

                                    @error('lastname')
                                        <span class="invalid-feedback" role="alert">
                                            <strong>{{ $message }}</strong>
                                        </span>
                                    @enderror
                                </div>
                            </div>

                            <div class="row mb-3">
                                <label for="email"
                                    class="col-md-4 col-form-label text-md-end">{{ __('Email Address') }}</label>

                                <div class="col-md-6">
                                    <input type="text" class="form-control @error('email') is-invalid @enderror"
                                        name="email" value="{{ old('email') }}" required>

                                    @error('email')
                                        <span class="invalid-feedback" role="alert">
                                            <strong>{{ $message }}</strong>
                                        </span>
                                    @enderror
                                </div>
                            </div>

                            <div class="row mb-3">
                                <label for="address"
                                    class="col-md-4 col-form-label text-md-end">{{ __(' Address') }}</label>

                                <div class="col-md-6">
                                    <input id="address" type="text"
                                        class="form-control @error('address') is-invalid @enderror" name="address"
                                        value="{{ old('address') }}" required>

                                    @error('address')
                                        <span class="invalid-feedback" role="alert">
                                            <strong>{{ $message }}</strong>
                                        </span>
                                    @enderror
                                </div>
                            </div>

                            <div class="row mb-3">
                                <label for="phone" class="col-md-4 col-form-label text-md-end">{{ __(' Phone') }}</label>

                                <div class="col-md-6">
                                    <input type="number" class="form-control @error('phone') is-invalid @enderror"
                                        name="phone" value="{{ old('phone') }}" required>

                                    @error('phone')
                                        <span class="invalid-feedback" role="alert">
                                            <strong>{{ $message }}</strong>
                                        </span>
                                    @enderror
                                </div>
                            </div>

                            <div class="row mb-3">
                                <label for="password"
                                    class="col-md-4 col-form-label text-md-end">{{ __('Password') }}</label>

                                <div class="col-md-6">
                                    <input id="password" type="password"
                                        class="form-control @error('password') is-invalid @enderror" name="password"
                                        required autocomplete="new-password">

                                    @error('password')
                                        <span class="invalid-feedback" role="alert">
                                            <strong>{{ $message }}</strong>
                                        </span>
                                    @enderror
                                </div>
                            </div>

                            <div class="row mb-3">
                                <label for="password-confirm"
                                    class="col-md-4 col-form-label text-md-end">{{ __('Confirm Password') }}</label>

                                <div class="col-md-6">
                                    <input id="password-confirm" type="password" class="form-control"
                                        name="password_confirmation" required autocomplete="new-password">
                                </div>
                            </div>
                            <label
                                class="col-md-4 col-form-label text-md-end form-check-label">{{ __('Subscribe to our email list') }}</label>
                            <div class="col-md-6 form-check-inline">
                                <input type="checkbox" class="form-check-input" name="subscribe">
                            </div>

                            <div class="row mb-0">
                                <div class="col-md-6 offset-md-4  text-center">
                                    <button type="submit" class="btn btn-success">
                                        {{ __('Register') }}
                                    </button>
                                </div>
                            </div>
                        </form>
                    </div>
                </div>
            </div>
        </div>
    </div>
@endsection
if you visit/register, You will see your form.

Step2: Let's make changes in User.php, RegisterController.php and user migration file.
First, open your user migration file which is located in the app/database/migrations folder. I will remove the name from there and add the first name and last name as strings. I will also add the address and phone as a string and this could be nullable. My user migration file looks like this.
<?php

use Illuminate\Database\Migrations\Migration;
use Illuminate\Database\Schema\Blueprint;
use Illuminate\Support\Facades\Schema;

return new class extends Migration
{
    /**
     * Run the migrations.
     *
     * @return void
     */
    public function up()
    {
        Schema::create('users', function (Blueprint $table) {
            $table->id();
            $table->string('firstname');
            $table->string('lastname');
            $table->string('email')->unique();
            $table->timestamp('email_verified_at')->nullable();
            $table->string('password');
            $table->string('address')->nullable();
            $table->string('phone')->nullable();
            $table->rememberToken();
            $table->timestamps();
        });
    }

    /**
     * Reverse the migrations.
     *
     * @return void
     */
    public function down()
    {
        Schema::dropIfExists('users');
    }
};
Finally, run php artisan migrate to create tables
Step3:In User.php add firstname,lastname,address,and phone in fillable array.
Now, User.php looks like this:
<?php

namespace App\Models;

use Illuminate\Database\Eloquent\Factories\HasFactory;
use Illuminate\Foundation\Auth\User as Authenticatable;
use Illuminate\Notifications\Notifiable;
use Laravel\Sanctum\HasApiTokens;

class User extends Authenticatable
{
    use HasApiTokens, HasFactory, Notifiable;

    /**
     * The attributes that are mass assignable.
     *
     * @var array<int, string>
     */
    protected $fillable = [
        'firstname',
        'lastname',
        'email',
        'password',
        'address',
        'phone'
    ];

    /**
     * The attributes that should be hidden for serialization.
     *
     * @var array<int, string>
     */
    protected $hidden = [
        'password',
        'remember_token',
    ];

    /**
     * The attributes that should be cast.
     *
     * @var array<string, string>
     */
    protected $casts = [
        'email_verified_at' => 'datetime',
    ];
}
Step4:
In RegisterController.php, remove a name from create method and validator and add firstname and lastname.
Now, our RegisterController.php looks like this:
<?php

namespace App\Http\Controllers\Auth;

use App\Models\User;
use App\Http\Controllers\Controller;
use Illuminate\Support\Facades\Hash;
use App\Providers\RouteServiceProvider;
use Illuminate\Support\Facades\Validator;
use Illuminate\Foundation\Auth\RegistersUsers;

class RegisterController extends Controller
{
    use RegistersUsers;

    /**
     * Where to redirect users after registration.
     *
     * @var string
     */
    protected $redirectTo = RouteServiceProvider::HOME;


    public function __construct()
    {
        $this->middleware('guest');
    }

    /**
     * Get a validator for an incoming registration request.
     *
     * @param  array  $data
     * @return \Illuminate\Contracts\Validation\Validator
     */
    protected function validator(array $data)
    {
        return Validator::make($data, [
            'firstname' => ['required', 'string', 'max:255'],
            'lastname' => ['required', 'string', 'max:255'],
            'email' => ['required', 'string', 'email', 'max:255', 'unique:users'],
            'password' => ['required', 'string', 'min:8', 'confirmed'],
        ]);
    }

    /**
     * Create a new user instance after a valid registration.
     *
     * @param  array  $data
     * @return \App\Models\User
     */
    protected function create(array $data)
    {
        return User::create([
            'firstname' => $data['firstname'],
            'lastname' => $data['lastname'],
            'email' => $data['email'],
            'password' => Hash::make($data['password']),
            'address' =>  $data['address'],
            'phone' => $data['phone']
        ]);
    }
}
Now, you should be able to create an account.
Step5:
Now, let's work on Mailchimp. We will create a list where we will store our subscribers, and we will also create an API key in Mailchimp. The two things we need from Mailchimp are the list id(Audience Id) and an API key. First, create an account on Mailchimp if you don't have an account. Click this link Create Your First Audience, It will show you how to create an Audience and get your Audience Id and API key.
Refer to the picture below to create an audience and get the API key.

As you can see in the above picture I have an audience with name customers.
Copy the audience id and save it somewhere as we need this later.
](https://media2.dev.to/dynamic/image/width=800%2Cheight=%2Cfit=scale-down%2Cgravity=auto%2Cformat=auto/https%3A%2F%2Fdev-to-uploads.s3.amazonaws.com%2Fuploads%2Farticles%2Fnxupz3phsmzz5klz30gt.png)
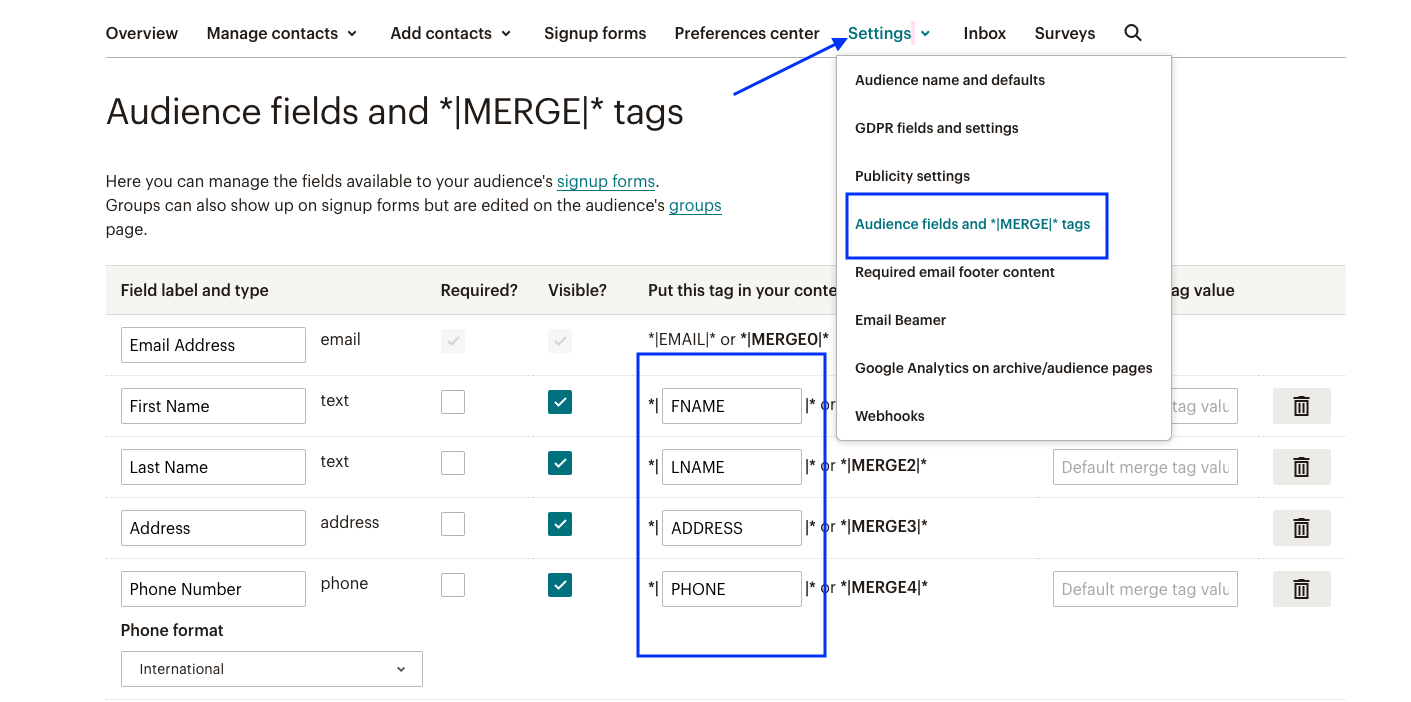
By default, Mailchimp has a first name(FNAME), last name(LNAME), address(ADDRESS), phone(Phone Number), Tags, Language, Email Marketing, Source, Contact Rating, Date Added, and Last Changed. But you can create your custom field. This can be done by clicking Audience fields and *|MERGE|* tags on Settings Menu as shown in the picture below.

Let's say you want to collect the user's date of birth, you can simply click add field and select birthday, and choose one of the data formats, either DD/MM or MM/DD.

Referring to the above picture, you can change untitled to Birthday(relevant name) and MMERGE5(could be different in your case such as MMERGE6, MMERGE7, etc) to BIRTHDAY.
The birthday will be set as a header in the Mailchimp audience table and BIRTHDAY will be used as a key that accepts a value date of birth,(DD/MM, or MM/DD).
You can also mark it as required. If you mark this field as required, you must send this while making an API call otherwise Mailchimp will throw an error.
There are also other fields available in Mailchimp such as Text, Number, Date, Address, etc.
Get API Key
Go to your account and click the Extras menu, you will see an API keys dropdown.

You will see api key something like this fcb94dcb70e2v520ba57b458e6b76g4r-us5
Your API key everything before - . Here us5 is data center and in my case it is United state.
API Key:fcb94dcb70e2v520ba57b458e6b76g4r

Step6:
Now, let's work on implementing the feature. We will save user records in our database and also some information in Mailchimp. We can write the whole logic within the create method of RegisterController, but I am going to use Event and Listener concepts to perform this task.
Event-listener is a great way to clean up your code from a controller. Obviously, we don't want all the logic within the single method as it might make the code looks messy and complicated. So we want to separate our logic and still want to achieve the same functionality. Events are something that has occurred in your application and listeners are the set of logic that responds to the events. Let's say the User registered to the application, This is an event and you want to perform certain tasks such as sending a verification code to the user's email, and adding a user to the subscription list. In our case, registering a user is an event. Our application will listen to this event and subscribe users to the Mailchimp list.
We can run php artisan make:event Eventname and php artisan make:listener Listenername to create Event and Listener. Note that one event can have more than one listener.
This command will create an Event in App\Events folder and a Listener in App\Listener folder. Finally, we will register our event and listeners in App\Providers\EventServiceProvider.phpfile as below.
protected $listen = [
   Registered::class => [
     SendEmailVerificationNotification::class,
   ],
   Eventname::class => [
     Listenername::class
     //another listener class...
   ]
];
Now let's make RegistrationSuccessful event with command php artisan make:event RegistrationSuccessful and SubscribeUserToMailchimp listener with command php artisan make:listener SubscribeUserToMailchimp.These command will generate two files RegistrationSuccessful.php in app/Events.These two files look like this.
SubscribeUserToMailchimp.php in app/Listeners
RegistrationSuccessful.php
<?php

namespace App\Events;

use Illuminate\Broadcasting\Channel;
use Illuminate\Broadcasting\InteractsWithSockets;
use Illuminate\Broadcasting\PresenceChannel;
use Illuminate\Broadcasting\PrivateChannel;
use Illuminate\Contracts\Broadcasting\ShouldBroadcast;
use Illuminate\Foundation\Events\Dispatchable;
use Illuminate\Queue\SerializesModels;

class RegistrationSuccessful
{
    use Dispatchable, InteractsWithSockets, SerializesModels;

    /**
     * Create a new event instance.
     *
     * @return void
     */
    public function __construct()
    {
        //
    }

    /**
     * Get the channels the event should broadcast on.
     *
     * @return \Illuminate\Broadcasting\Channel|array
     */
    public function broadcastOn()
    {
        return new PrivateChannel('channel-name');
    }
}
and SubscribeUserToMailchimp.php
<?php

namespace App\Listeners;

use Illuminate\Contracts\Queue\ShouldQueue;
use Illuminate\Queue\InteractsWithQueue;

class SubscribeUserToMailchimp
{
    /**
     * Create the event listener.
     *
     * @return void
     */
    public function __construct()
    {
        //
    }

    /**
     * Handle the event.
     *
     * @param  object  $event
     * @return void
     */
    public function handle($event)
    {
        //
    }
}
Step7:
Let's register Event and Listener to EventServiceProvider.phpand it looks like this.
<?php

namespace App\Providers;

use App\Events\RegistrationSuccessful;
use Illuminate\Auth\Events\Registered;
use App\Listeners\SubscribeUserToMailchimp;
use Illuminate\Auth\Listeners\SendEmailVerificationNotification;
use Illuminate\Foundation\Support\Providers\EventServiceProvider as ServiceProvider;

class EventServiceProvider extends ServiceProvider
{
    /**
     * The event to listener mappings for the application.
     *
     * @var array<class-string, array<int, class-string>>
     */
    protected $listen = [
        Registered::class => [
            SendEmailVerificationNotification::class,
        ],

        RegistrationSuccessful::class => [
            SubscribeUserToMailchimp::class,
        ],
    ];

    /**
     * Register any events for your application.
     *
     * @return void
     */
    public function boot()
    {
        //
    }

    /**
     * Determine if events and listeners should be automatically discovered.
     *
     * @return bool
     */
    public function shouldDiscoverEvents()
    {
        return false;
    }
}
Registered and SendEmailVerificationNotification classes are by default given by Laravel. We register RegistrationSuccessful class as an event and the SubscribeUserToMailchimp as a listener class.
Step8:
Now, let's Work on RegisterController.php, on create method we will check if the user has checked the checkbox(Subscribe to our email list). if yes we will create an event and pass user information to the event class for further processing, also we will save user information in our database. If the user has not checked the checkbox then we will not create an event.
So, our final RegisterController.php looks like this.
<?php

namespace App\Http\Controllers\Auth;

use App\Models\User;
use App\Http\Controllers\Controller;
use Illuminate\Support\Facades\Hash;
use App\Events\RegistrationSuccessful;
use App\Providers\RouteServiceProvider;
use Illuminate\Support\Facades\Validator;
use Illuminate\Foundation\Auth\RegistersUsers;

class RegisterController extends Controller
{

    use RegistersUsers;

    protected $redirectTo = RouteServiceProvider::HOME;

    public function __construct()
    {
        $this->middleware('guest');
    }

    protected function validator(array $data)
    {
        return Validator::make($data, [
            'firstname' => ['required', 'string', 'max:255'],
            'lastname' => ['required', 'string', 'max:255'],
            'email' => ['required', 'string', 'email', 'max:255', 'unique:users'],
            'password' => ['required', 'string', 'min:8', 'confirmed'],
        ]);
    }

    protected function create(array $data): User
    {
        $user = User::create([
            'firstname' => $data['firstname'],
            'lastname' => $data['lastname'],
            'email' => $data['email'],
            'password' => Hash::make($data['password']),
            'address' =>  $data['address'],
            'phone' => $data['phone']
        ]);

        if (request()->has('subscribe')) {
            RegistrationSuccessful::dispatch($user);
        }

        return $user;
    }
}
It’s pretty straightforward. We dispatched the event and you can do this in two ways, either RegistrationSuccessful::dispatch('something'); or event (new RegistrationSuccessful('something'));. So now our
RegistrationSuccessful event class will receive $user which will be declared as public property, so that it will be accessible to our Listener class(SubscribeUserToMailchimp)
Step9:RegistrationSuccessful.php
<?php

namespace App\Events;

use App\Models\User;
use Illuminate\Queue\SerializesModels;
use Illuminate\Broadcasting\PrivateChannel;
use Illuminate\Foundation\Events\Dispatchable;
use Illuminate\Broadcasting\InteractsWithSockets;

class RegistrationSuccessful
{
    use Dispatchable, InteractsWithSockets, SerializesModels;

    public $user;

    public function __construct(User $user)
    {
        $this->user = $user;
    }

    public function broadcastOn()
    {
        return new PrivateChannel('channel-name');
    }
}
Step10:
Now, let's work on config/services.php and .env files. We have an audience id and API key from Mailchimp which we will register in our .envfile.
First services.php
'mailchimp' => [
    'key' => env('MAILCHIMP_KEY'),
    'listid' => env('MAILCHIMP_LIST_ID'),
 ],
And in .env file set the api key and audience id
MAILCHIMP_KEY=Your_api_key_from_mailchimp
MAILCHIMP_LIST_ID=Your_audience_id_from_mailchimp
Step11:
Now we are ready to work on our listener class,SubscribeUserToMailchimp.php.
First, Let's see the API documentation of Mailchimp. Here is the link Marketing API
Based on API, the base URL is https://${dc}.api.mailchimp.com/3.0/, Where dc is the data center. You can find your data center in your API key. In my case it is us5. So my base URL will be https://us5.api.mailchimp.com/3.0/. If the last part of your Mailchimp API key is us6, all API endpoints for your account are available at https://us6.api.mailchimp.com/3.0/.Here is the Documentation
So, now our SubscribeUserToMailchimp.phplooks like this.
<?php

namespace App\Listeners;

use Exception;
use Illuminate\Http\Response;
use Illuminate\Http\JsonResponse;
use Illuminate\Support\Facades\Http;

class SubscribeUserToMailchimp
{
    public string $key;
    public string $listId;
    public const BASE_URL = "https://us5.api.mailchimp.com/3.0/";

    public function __construct()
    {
        $this->key = config('services.mailchimp.key');
        $this->listId = config('services.mailchimp.listid');
    }

    public function handle($event): JsonResponse
    {
        try {
            $response = Http::acceptJson()
                ->withToken($this->key)
                ->post(self::BASE_URL . 'lists/' . $this->listId . '/members', [
                    'status' => 'subscribed',
                    'email_address' => $event->user->email,
                    'merge_fields' => [
                        'FNAME' => $event->user->firstname, 'LNAME' => $event->user->lastname,
                        'ADDRESS' => [
                            'addr1' => $event->user->address,
                            'city' => 'n/a',
                            'state' => 'n/a',
                            'zip' => 'n/a',
                            'country' => 'n/a'
                        ], 'PHONE' => $event->user->phone
                    ],
                ]);

            $response->throw();

            $responseData = $response->body();
            $decodedResponse = json_decode($responseData, true);

            if ($response->status() == Response::HTTP_OK) {
                return response()->json([
                    'success' => true,
                    'message' => 'member successfully added to mailchimp list',
                    'responseBody' => $decodedResponse,
                ]);
            }
        } catch (Exception $e) {
            return response()->json([
                'error' => $e->getMessage(),
            ], Response::HTTP_BAD_REQUEST);
        }
    }
}
Now, let me explain what is happening above. As you can see I have set the base URL to const BASE_URL, and in the constructor, we received the API key and listid(ie: audience id) from our config/services/mailchimp array, and the keys are set in our .envfile. We have assigned this list id and API key to $listid and $key respectively and declared them as public.
The important thing to note is that any property defined as public in the Event(eg: RegistrationSuccessful) class can be accessed by to listener class(SubscribeUserToMailchimp). For example, in the Event class, we have a public $eventwhich we can access in the Listener class as $event->user. We expect our handle method to return JsonResponse.
Here I have used Guzzle HTTP client, Which is the wrapper around Guzzle. It allows making HTTP requests to communicate with other web applications(In our case, it is Mailchimp). It is available in Laravel 8 and above version. In the above, acceptJson method specify that your application expects the application/json content type in response to your request. The wthToken method adds a bearer token to the request's Authorization header. $response->throw() will throw an exception if a client or server error occurred. We wrapped this logic within the try and catchblock.
As per the Mailchimp documentation FNAME, LNAME, PHONE, ADDRESS, etc should be included within merge_fields, however, email and status should be outside of merge_fields. Learn about Merge field Mailchimp address field expects five parameters: Address Line 1 (addr1), City (city), State (state), Zip code (zip), Country (country). My form does not have city, state, zip code, and country fields, So I have mentioned 'n/a'.
By default, Laravel automatically includes Guzzle. if you are using laravel version below 8, you may install it again via Composer: composer require guzzlehttp/guzzle
If you want to send requests with Guzzle, You could do something like this.
$client->request('POST', $url, [
    'headers' => [
        'Authorization' => "Barer {$token}",
        'Content-type' => 'application/json',
    ],
    'json' => [
        'foo' => 'bar'
        'merge_fields' => [ ]
    ]);
Now, If you create an account by checking the checkbox, it will save user registration information in your database and the user will also be added to the Mailchimp audience list.

Queued Event Listeners
As you might have noticed the browser has to wait for sometime for response back from mailchimp once user was successfully added to mailchimp audience list.This process can be done in the background with queue. By doing this user will be redirected back quickly and tasks will be performed in the background. For this you should implement ShouldQueue in SubscribeUserToMailchimp(class SubscribeUserToMailchimp implements ShouldQueue). Make sure you imported Illuminate\Contracts\Queue\ShouldQueue. Also, you have to create a table php artisan queue:table and run php artisan migrate and , in .env change QUEUE_CONNECTION=sync to QUEUE_CONNECTION=database
Final step is to run php artisan queue:work

Check user in Mailchimp and update details
Sometime we may come in a situation where user can fill the many forms with the same email address. In that case, Mailchimp will not allow you to insert duplicate email address that already exist within the list. The best way to handle this situation is to find the user based on email and update the other details of user based on email.If you check Mailchimp documentation, all it need is {subscriber_hash} as a last part of URL. So we have to convert email address to hash value. The md5() function calculates the MD5 hash of a string.
public function userExistInMailchimp(): bool
{
    $response = Http::withToken($this->token)
       ->acceptJson()
       ->get(self::BASE_URL . 'lists/' . $this->listId . '/members/' . md5(strtolower($userEmail)));

     return $response->status() == Response::HTTP_OK ? true : false;
 }
I have wrapped email address that comes from the form with md5. This method will return true if the user's email already exist in the audience list, otherwise, it will return false. Now based on this result we can make an update.
Now, to make update we could do something like this.
$response = Http::acceptJson()
        ->withToken($this->token)
        ->put(self::BASE_URL . $this->listId . '/members/' . md5(strtolower($userEmail)),  ['merge_fields' => ['FNAME' => $firstname, 'LNAME' => $lastname,'ADDRESS'=> $address, 'PHONE'=> $phone]);
Create an automated email with Mailchimp
Mailchimp automation sends automated emails to subscribers. For example, Mailchimp can send an automated email when someone subscribes to your audience or purchases a certain product. To create a free automated welcome email, first, click All campaigns under Campaigns on the left-hand side of the menu as shown below in the picture.
Step1:

Step2:

Step3:

Step4:

Thank you for reading this. I hope this was helpful 😊

Top comments (0)