
Introduction
This tutorial will introduce you to Redux toolkit and teach you how to use it right way following best practices. By the time you finish this tutorial, you should be able to build your own Redux Applications.
What is Redux ?
Redux is a library for managing and updating application state using events called actions. It serves as a centralized store for state, that needs to be used across your entire application(instead of props drilling), with rules ensuring that the state can only be updated in a predictable fashion.
What is Redux Toolkit ?
Redux Toolkit is an all in one state management library for React.js. It helps you to create and manage global state easily with a lot less boiler plate code. Redux toolkit is basically an extension on Redux and other dependent packages, functions for state management. It simplifies most Redux tasks, prevents common mistakes, and makes it easier to write Redux applications.
How State management works in Redux ?
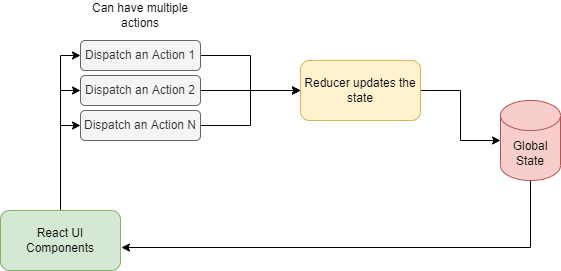
Assume that you have created an action(action is a function that triggers the respective reducer) named incrementValue and reducer(reducer is a function or piece of code, that actually updates the global state known as store based on action event).
Let's say you have a component with button for incrementing the counter value based on onclick event. When you trigger the onclick event it will dispath an action named incrementValue. That action resolves against the respective reducer and updates the global state in store. The registered subscribers of the store will get notified with latest state details. Please find the reference image attached above.
Steps to implement Redux Toolkit to your app
- Create a new react app and install all the required dependencies
- Clean the boilerplate code
- Create a counter app using
useState(Optional) - Implement a store, slice and actions
- Subscribe and Dispatch events
- Final thoughts
Let's see this in action by building a simple
counter applicationusing redux toolkit.
1. Create a new react app and install all the required dependencies
Before creating a react app make sure you installed Node.js. Once you installed the dependencies use below snippet to create a new react app.
npx create-react-app counter-app
cd counter-app
Use the below command to install dependent packages.
npm install @reduxjs/toolkit react-redux react-bootstrap bootstrap
Add below snippet to public/index.html file. This is for bootstrap cdn.
<link href="https://cdn.jsdelivr.net/npm/bootstrap@5.1.3/dist/css/bootstrap.min.css" rel="stylesheet" integrity="sha384-1BmE4kWBq78iYhFldvKuhfTAU6auU8tT94WrHftjDbrCEXSU1oBoqyl2QvZ6jIW3" crossorigin="anonymous">
<script src="https://cdn.jsdelivr.net/npm/bootstrap@5.1.3/dist/js/bootstrap.bundle.min.js" integrity="sha384-ka7Sk0Gln4gmtz2MlQnikT1wXgYsOg+OMhuP+IlRH9sENBO0LRn5q+8nbTov4+1p" crossorigin="anonymous"></script>
Now run the app using npm start command. Open this url If you see something like this.
Then you have successfully created your react app.
2. Clean the boilerplate code
Remove everything from App.js and add below snippet.
import './App.css';

function App() {
  return (
    <div className="App container-md pt-5">
      <span> Will add details here... 🔥  </span>
    </div>
  );
}
export default App;
This is how it looks
3. Create a counter app using useState (Optional)
Create a state variable counter for storing the current value. As well as create functions to increment and decrement counter value.
import './App.css';
import React, {useState} from 'react';
import { Button } from 'react-bootstrap';
import 'bootstrap/dist/css/bootstrap.min.css';

function App() {
  // create a state variable called counter and set it to 0
  const [counter , setCounter] = useState(0);

  // create a function called increment that adds 1 to the counter
  const incrementCounter = () => {
    setCounter(counter + 1);
  }

  // create a function called decrement that subtracts 1 from the counter
  const decrementCounter = () => {
    setCounter(counter - 1);
  }

  return (
    <div className="App container-md pt-5">
      <div className = "pb-3">
      <h2> Simple Counter Application... 🔥 </h2>
      </div>
      <div className = "row">
        <div className = "col-md-5">
          <Button variant="primary" onClick = {incrementCounter}>
            Increment
          </Button>
        </div>
        <div className = "col-md-2">
          <h4>
            {counter}
          </h4>
        </div>
        <div className = "col-md-5">
          <Button variant="primary" onClick = {decrementCounter}>
            Decrement
          </Button>
        </div>
      </div>
    </div>
  );
}

export default App;
Run the command npm start and you will see this below UI.
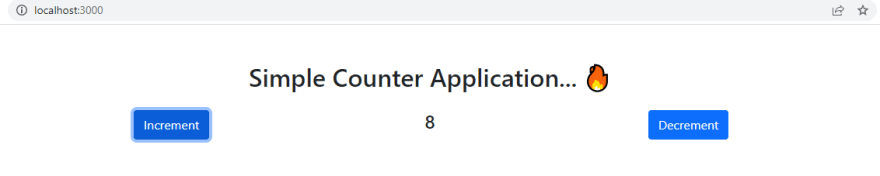
Great 🔥, you are ready to dive deep into the actual topic.
4. Implement a store, slice and actions
- Create a store(
src/redux/store.jsx) which is responsible for subscribing and maintaining the global state.
import { configureStore } from "@reduxjs/toolkit";
export const store = configureStore({
    reducer : {}
})
- Wrap the main component with Provider in index.js as shown below. This will provide access to global state
storeacross your application.
import { Provider } from "react-redux";
import { store } from "./redux/store";
const root = ReactDOM.createRoot(document.getElementById('root'));
root.render(
  <Provider store={store}>
    <React.StrictMode>
      <App />
    </React.StrictMode>
  </Provider>
);
- Create a slicer(
src/redux/counterSlicer.jsx) where you define actions and reducers.
import { createSlice } from "@reduxjs/toolkit";

// Create the initial state of the counter
const initialState = {
    counter : 0
}

// Create the slice of the state
const counterSlice = createSlice({
    // The name of the slice
    name : 'counter',
    // The initial state of the slice
    initialState,
    // The reducers of the slice
    reducers : {
        // Increment the counter by 1 when the increment action is dispatched
        incrementAction : (state) => {
            // Increment the counter by 1
            state.counter = state.counter + 1;
        },
        // Decrement the counter by 1 when the decrement action is dispatched
        decrementAction : (state) => {
            // Decrement the counter by 1
            state.counter = state.counter - 1;
        }
    }
});

// Export the actions of the slice
export const {incrementAction , decrementAction } = counterSlice.actions;
// Export the reducer of the slicel
export default counterSlice.reducer;
- Update the store.js
import { configureStore } from "@reduxjs/toolkit";
import counterReducer from "./counterSlice";

export const store = configureStore({
    reducer : {
        counter : counterReducer
    }
})
5. Subscribe and Dispatch events
Subscribe to state
counter(same name as defined in store.jsx)in App.js.
- add import statement in App.js
import { useSelector } from "react-redux";
- add subscriber to global state in App.js
const counterStore = useSelector(state => state.counter);
- listen to state changes in App.js
 <div className = "col-md-2">
       <h4>
          {counterStore.counter}
        </h4>
 </div>
If you run the application now, you will see exactly like below. But the increment and decrement won't work. Don't worry it will start working soon 😃

Now it's time to call actions.
- add import statements
import { useSelector, useDispatch } from "react-redux";
import { decrementAction, incrementAction } from "./redux/CounterSlice";
- create a dispath variable for calling actions
const dispatch = useDispatch();
- call the dispath event in increment and decrement onClick
 <Button variant="primary" onClick = {() => dispatch(incrementAction()) }>
        Increment
  </Button>
.....
<Button variant="primary" onClick = {() => dispatch(decrementAction())}>
        Decrement
 </Button>
- Final App.js
import './App.css';
import React, {useState} from 'react';
import { Button } from 'react-bootstrap';
import 'bootstrap/dist/css/bootstrap.min.css';
import { useSelector, useDispatch } from "react-redux";
import { decrementAction, incrementAction } from "./redux/CounterSlice";

function App() {
  // create a state variable called counter and set it to 0
  const [counter , setCounter] = useState(0);
  const counterStore = useSelector(state => state.counter);
  // create a dispatch variable
  const dispatch = useDispatch();

  // create a function called increment that adds 1 to the counter
  const incrementCounter = () => {
    setCounter(counter + 1);
  }

  // create a function called decrement that subtracts 1 from the counter
  const decrementCounter = () => {
    setCounter(counter - 1);
  }

  return (
    <div className="App container-md pt-5">
      <div className = "pb-3">
      <h2> Simple Counter Application... 🔥 </h2>
      </div>
      <div className = "row">
        <div className = "col-md-5">
          <Button variant="primary" onClick = {() => dispatch(incrementAction()) }>
            Increment
          </Button>
        </div>
        <div className = "col-md-2">
          <h4>
            {counterStore.counter}
          </h4>
        </div>
        <div className = "col-md-5">
          <Button variant="primary" onClick = {() => dispatch(decrementAction())}>
            Decrement
          </Button>
        </div>
      </div>
    </div>
  );
}

export default App;
- Now you should see increment and decrement in action 🔥.

6. Final thoughts
Awesome 🔥, you have successfully completed this tutorial. I would 💝 to hear your feedback and comments on the Great things your are building with React.
If you are struck somewhere feel free to comment. I am always available.
Please find the complete code at github

Top comments (0)