Developers build modern enterprise applications on the orchestration of a complex network of microservices. Over time, as the number of applications and microservices increases, the complexity of the orchestration increases as well.
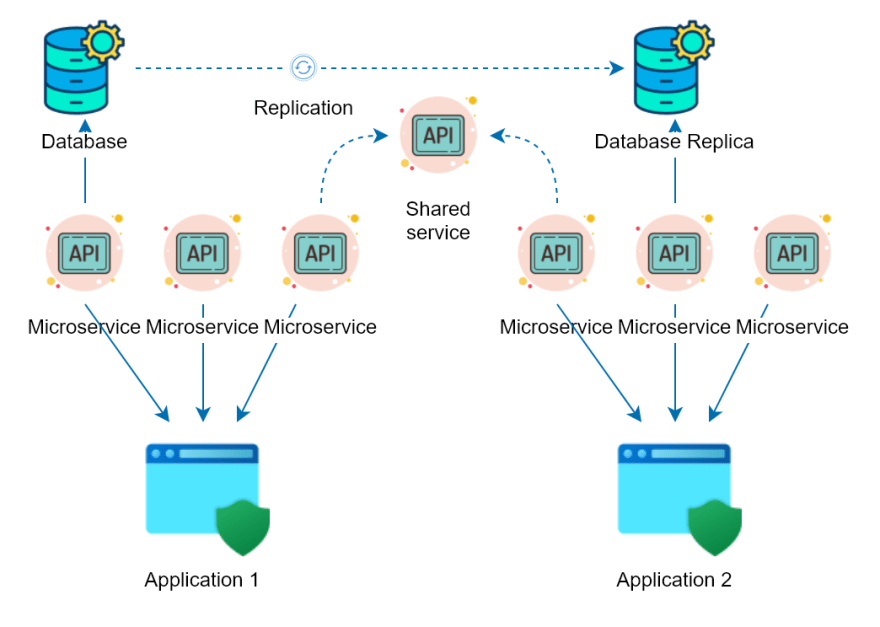
Reusable APIs address the problem of complexity by allowing multiple applications to rely on a few independent microservices that expose the data and functions of their domain.
Why Should We Build Reusable APIs?
API sprawl is a living challenge in large organizations. It is not uncommon to hear from architects that their organizations have hundreds of APIs, many of which are unknown to teams in the company. The lack of visibility leads to teams creating even more redundant APIs, which adds to the existing problem.
The API sprawl problem depends on the scale, so creating duplicate APIs might not be a problem for small organizations with a small number of applications, services, and databases. On the other hand, bespoke API development might consume a lot of development time and effort for a large organization.
The challenges of API sprawl include:
- Managing the APIs gets more complex as the number of APIs increases.
- Introducing diverse databases that do not support interoperation.
- Cross-cutting concerns and organizational policies such as security, logging, and monitoring are hard to implement consistently.
Since reusable APIs are not specific to a single application, an organization can have far fewer APIs in its portfolio. However, there are many benefits an organization can realize by introducing reusable APIs:
- APIs can be easily cataloged and maintained.
- Building a new application won't require creating new APIs. The reduced development cost will also reduce the time to market.
- Reduced spend on security. Due to fewer connections between applications and web services, you can easily control and monitor access to your digital assets.
- Applications and APIs can be scaled and migrated independently.
Adopting reusable APIs can be significantly challenging unless you have a comprehensive API platform that supports a low friction application of security, scalability, and monitoring best practices. Without an API platform, addressing common API concerns such as the following can become a challenge:
- Applying policies on key areas such as security, logging, and caching uniformly across all APIs.
- Consistently monitoring the APIs.
- Maintaining documentation of the APIs.
- Creating applications and connections on-demand to the APIs through a self-service platform used by application developers.
It is important to note that reusable APIs serve many applications simultaneously, and hence every reusable API is critical to the organization's operations. The API platform must be highly scalable and performant to avoid disruptions in operations.
One Solution to Help Developers Manage Reusable APIs: Kong
Kong is an open-source API platform that acts as middleware between the compute clients and APIs. The Kong platform contains a variety of plugins that allow you to extend the capabilities of APIs easily. In addition, operations teams and product owners can use the Kong platform to create self-service portals for developers interested in consuming the APIs, managing application and developer registrations without involving the API developers.
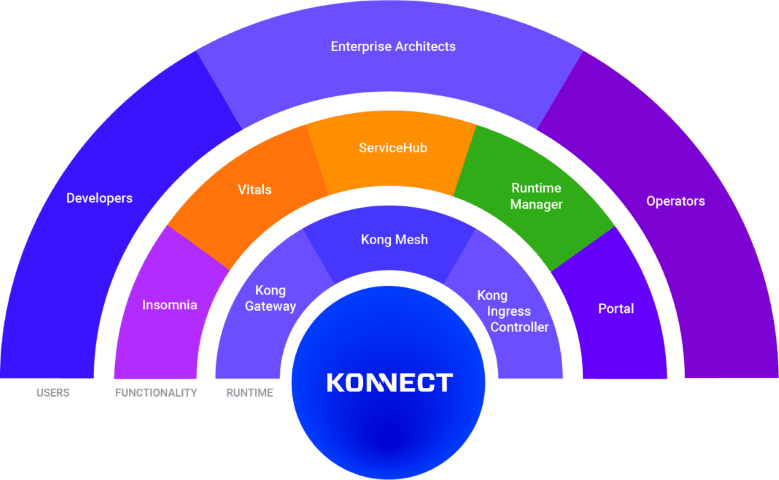
The Kong platform consists of the following three API proxy components (called gateway runtimes) used to manage and operate the upstream services:
- Ingress Controller: Enables the application-to-application connectivity in a Kubernetes environment.
- Kong Mesh: Enables connectivity between services of an application in Kubernetes or cloud environment.
- Kong Gateway: Enables edge connectivity for services with clients.
Kong Konnect brings the gateway runtimes together on a single platform. Enterprises deploy their APIs on various hosts such as Kubernetes, cloud, and on-premise. Based on the host, you can choose the appropriate gateway runtime for your APIs and leverage the flexibility and scale of Kong to manage your services.
Regardless of the gateway runtime that you choose, you can use all the plugins and tools of the Kong ecosystem. The Konnect platform's core is the ServiceHub, which provides service catalog capabilities for the end-to-end lifecycle management of services.
Every Kong runtime is composed of two fundamental components:
- Control plane: The control plane enables the operators to define routes, telemetry, and policies such as authentication, routing, and rate limiting.
- Data plane: The data plane controls the exposure of the upstream APIs as per the policies defined in the control plane. The data plane is responsible for routing the network traffic, enforcing the policies, and emitting the telemetry.
Addressing the Horizontal Concerns of Microservices with Kong
The primary reason for adopting an API gateway such as Kong is to add abstractions. An API gateway can help you decouple the following:
- External network from the internal network
- External API interface from backend API interface
- External API version from internal API version
Some broader API concerns that you can address with an API gateway include:
-
Enterprise policies: Operations teams can enforce certain policies without affecting the business APIs
- Authentication: Basic, API Key, LDAP, mTLS, OAuth/OIDC, and others
- Traffic control: Canary release, caching, rate limiting, and others
- Monitoring and analytics
- Logging: Datastream, file log, StatsD, and others
- Security: Teams can place API gateways in the DMZ, and the security teams can focus on applying strict policies to mitigate the risks on the API gateways. Since the business APIs are not part of the DMZ, their security standards can be much lower. Also, the backend APIs run a low risk of receiving invalid messages because the API gateways inspect the messages in the DMZ and block illegal messages from propagating further.
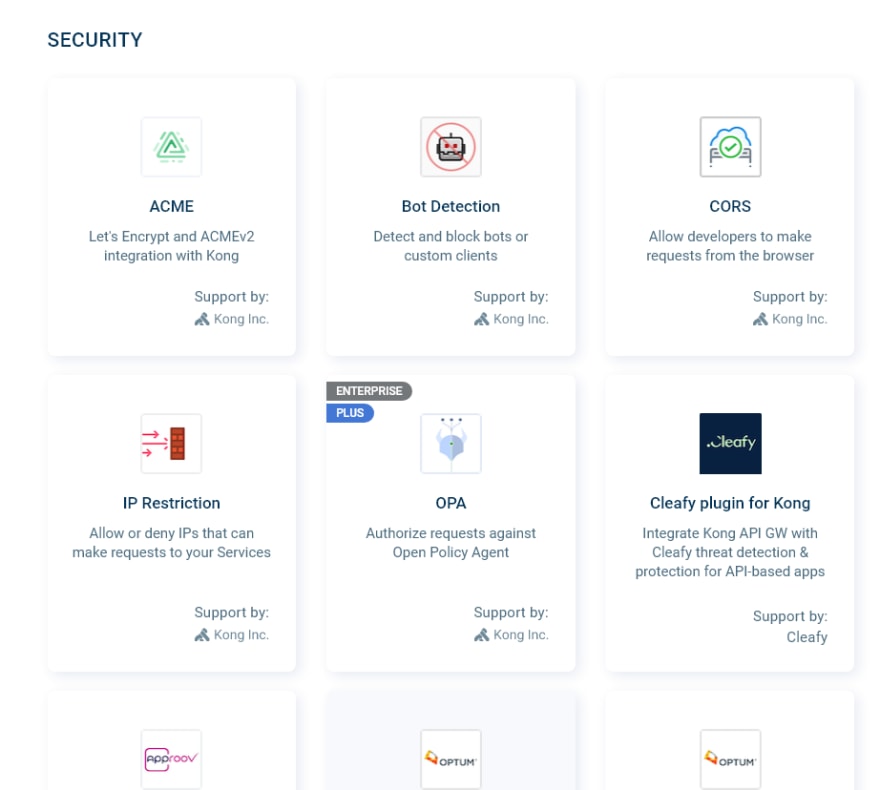
Kong offers a wide range of plugins that security teams can use to address the security concerns of API gateways.
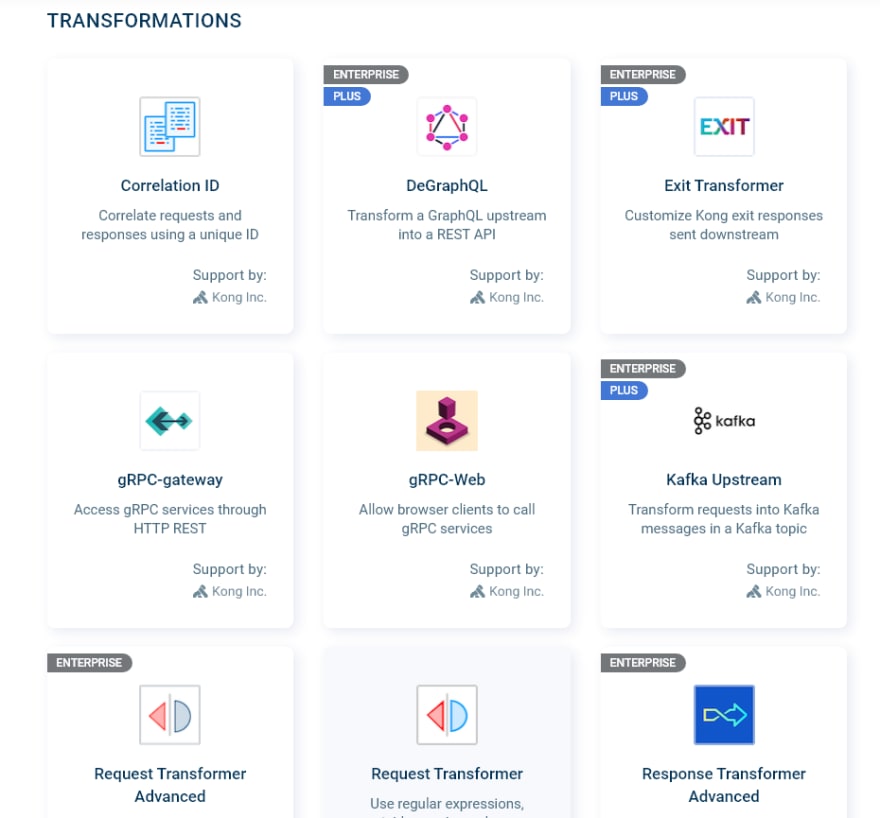
- Request transformation: Kong supports transforming the requests and responses to enable heterogeneous services to communicate with one another. Kong can transform messages from one synchronous messaging protocol to another, such as gRPC to REST and REST to GraphQL. Kong can also transform synchronous requests to asynchronous requests with plugins such as the REST to Kafka messages transformer.
- Deployment: You can deploy the Kong data plane to popular cloud or container platforms such as AWS, Azure, Heroku, and Kubernetes on any cloud.
What is ServiceHub, and What is its Role in APIOps?
The concept of APIOps is quite simple: bring DevOps and GitOps to the API and microservices lifecycle.
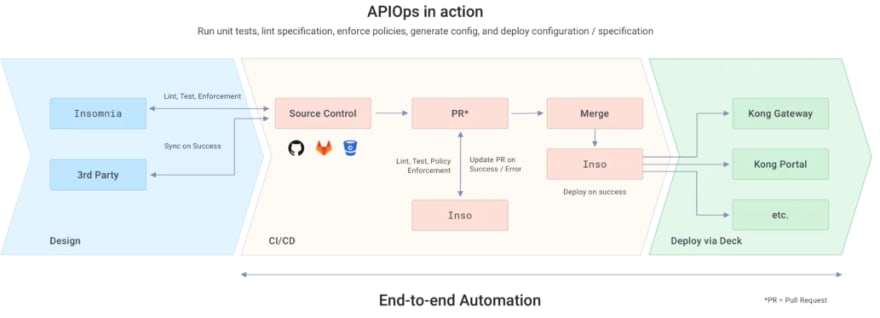
Let's discuss how the suite of Kong tools (Insomnia, inso, and decK) can help you implement APIOps for your microservices. Below are the typical stages of an APIOps deployment pipeline:
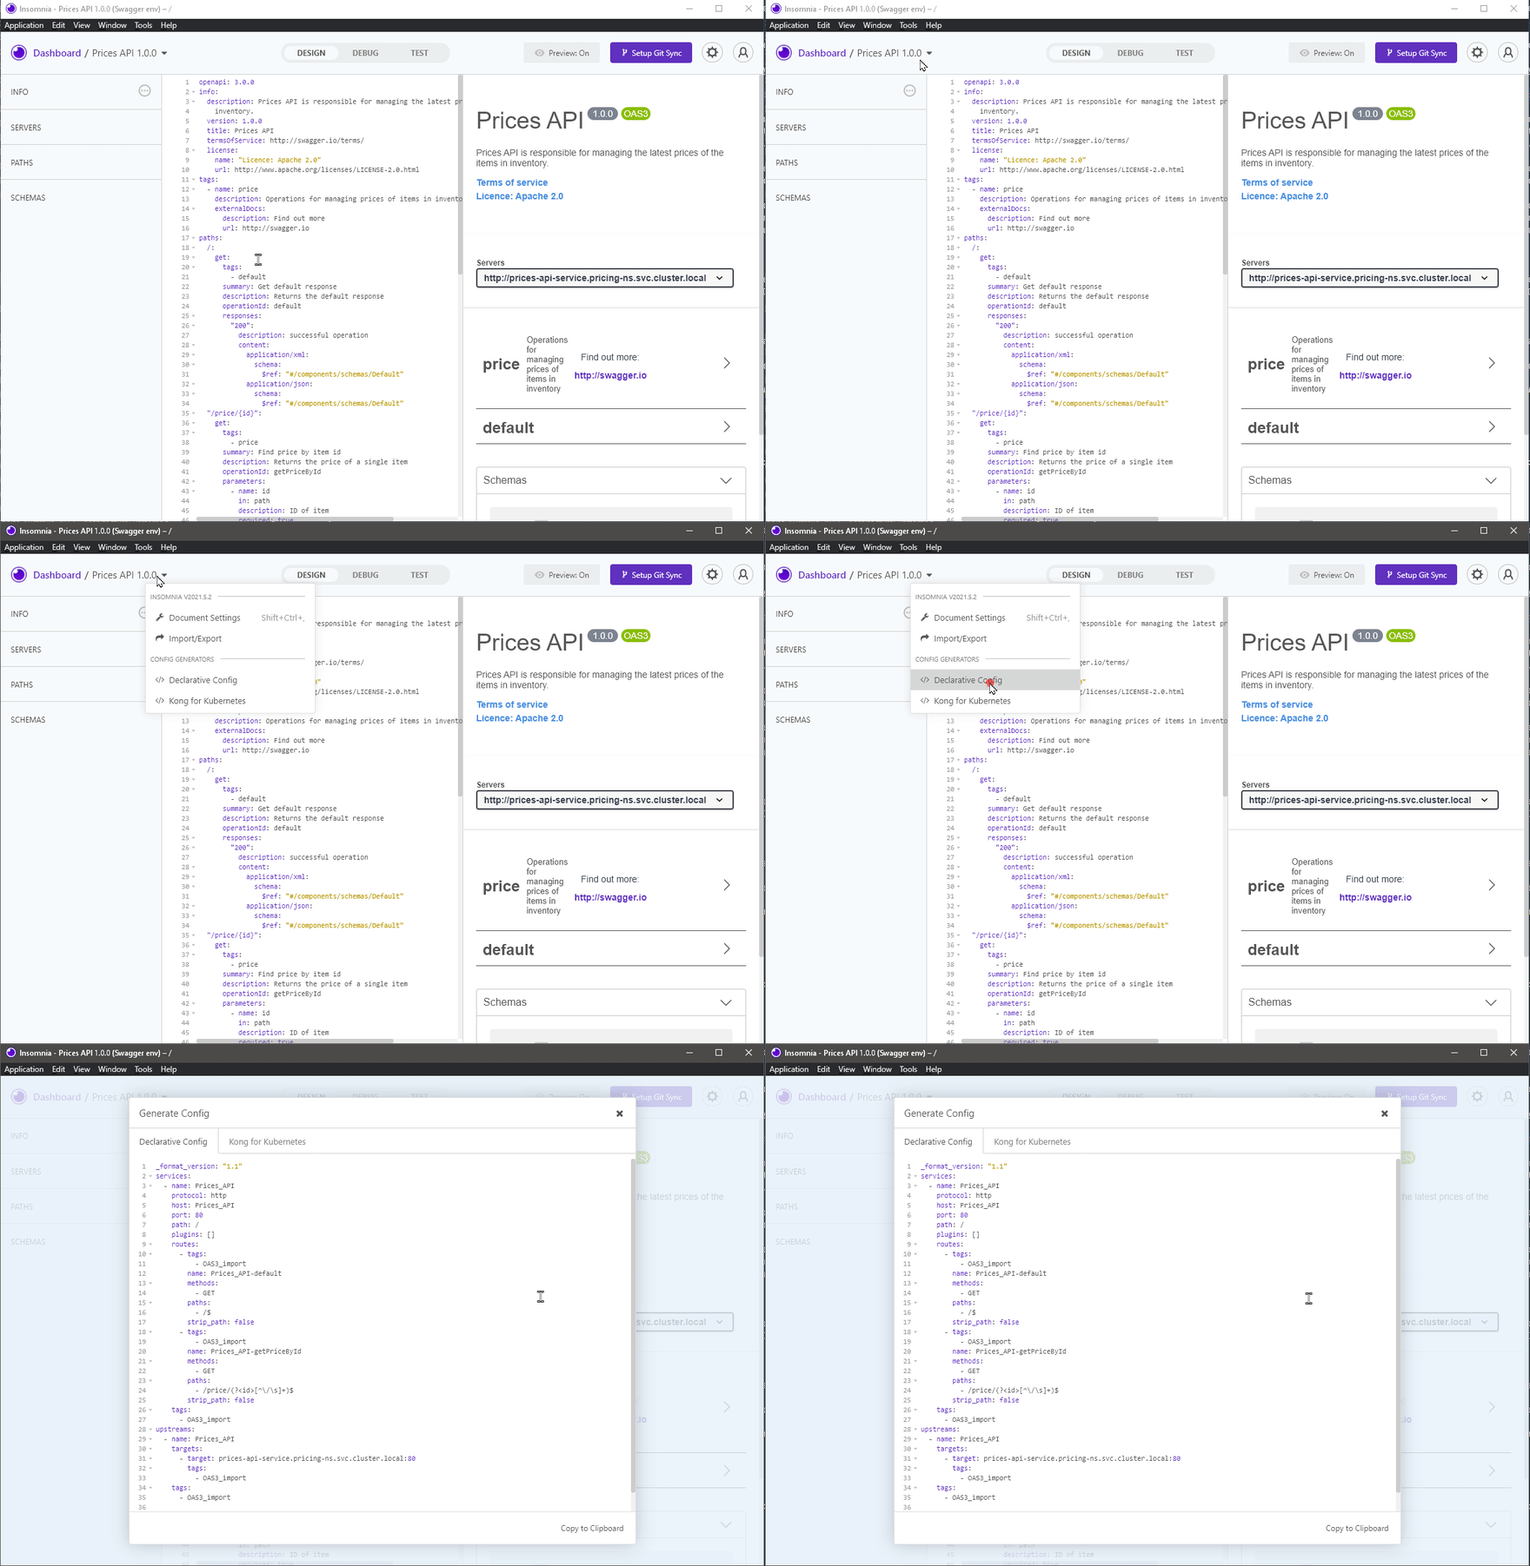
- Design stage: Developers can use Insomnia to design API specs and write tests for their API. Insomnia will instantly lint your OpenAPI specs and validate them. You can also use Insomnia to specify Kong plugins and policies that need to be applied to your API endpoints for proper governance and security. Next, you can use Insomnia to generate the declarative config to set up a local Kong Gateway to verify the setup on your system.
To push your API to the correct repository, you can leverage the built-in Git Sync feature.
CI stage: Once the new code is in the repository, the reviewer can use the Inso CLI and the build system to run automated tests and the OpenAPI specification linter. After validating the quality and governance of the API, Inso can generate a declarative config for Kong.
Deployment stage: The decK CLI can use the generated declarative config to adjust the state of the Kong runtime. decK maintains the state of the Kong Gateway runtime in a persistent store, and it can use the declarative config to detect the drift between the desired state and the gateway runtime. Once the drift is detected, decK can automatically bring the runtime to the desired state.
After the deployment is complete, the new API specs can be published to the Kong developer portal using the DevPortal CLI. The API developers can use the new API specs to create new applications without further coordination with the API team.
The following diagram illustrates these stages of an APIOps deployment pipeline:
See it in Action: (Example) Pricing Service for an eCommerce Application
One common example of microservices is an eCommerce application that uses several services to power the customer experience.
Product pricing is one of the common concerns of several applications in the eCommerce ecosystem. Both the trading application for customers and the finance application for the internal finance team make use of the product pricing service. We can build a single, reusable product pricing service that fulfills the concerns of both applications. A single pricing service will ensure that the pricing information is always consistent and accurate. The development teams in the organization can build new products by using the same service, thereby reaching the market faster. Also, new pricing features such as discounts and taxes can be quickly added to the pricing service and made available to all the applications in the organization.
We will cover the steps to roll out the product pricing service to the developers in the organization in the following sections. First, we will deploy the pricing service in Kubernetes and then use the Kong Gateway runtime on Kubernetes as a proxy for the service.
Set Up a Kong Konnect Account
Sign up for a Kong Konnect account. You can start with the free tier and upgrade to the other pricing tiers based on your needs. Kong Konnect offers several resources to help you get started. You can follow their getting started documentation, blog post, or video to familiarize yourself with the platform.
Next, prepare a Kubernetes cluster in AWS, Azure, or GCP for deploying your service and the gateway runtime. For example, I created the following single-node Kubernetes cluster on Azure Kubernetes Service (AKS).
We will revisit our cluster soon. Let's first write the specs of the Prices API.
Write API Specs with Insomnia
Download and install Insomnia on your system. Click on the Design tab to launch the editor to write the OpenAPI specs for the pricing service.
Our API contains a single endpoint: /price/{product id} to fetch the price of a product. Write the following spec in the editor and inspect the preview in the split pane.
openapi: 3.0.0
info:
  description: Prices API is responsible for managing the latest prices of products.
  version: 1.0.0
  title: Prices API
paths:
  "/price/{id}":
    get:
      tags:
        - price
      summary: Find price by item id
      description: Returns the price of a single item
      operationId: getPriceById
      parameters:
        - name: id
          in: path
          description: ID of item
          required: true
          schema:
            type: integer
            format: int64
      responses:
        "200":
          description: successful operation
          content:
            application/xml:
              schema:
                $ref: "#/components/schemas/Price"
            application/json:
              schema:
                $ref: "#/components/schemas/Price"
        "400":
          description: Invalid ID supplied
        "404":
          description: Item not found
servers:
  - url: http://prices-api-service.pricing-ns.svc.cluster.local
components:
  schemas:
    Price:
      type: object
      properties:
        id:
          type: integer
          format: int64
          example: 1
        value:
          type: number
          format: decimal
          example: 30.5
        currency:
          type: string
          example: USD
        validUntil:
          type: string
          description: date till which the price is valid
          example: 2019-05-17
      xml:
        name: Price
You can use the built-in Git integration to share your work with your team. You can also debug and test your API inside Insomnia.
I have published the Docker image for the API based on the previous spec to Docker Hub. If you are interested, the following is the .NET implementation of the API, which is also available in my GitHub repository:
var builder = WebApplication.CreateBuilder(args);
var app = builder.Build();

app.MapGet("/price/{id}", (int id) => new Price(id, id * 3.5, "USD", DateTime.UtcNow + TimeSpan.FromDays(5)));

app.Run();

record Price(int Id, double Value, string Currency, DateTime ValidUntil);
Use the following Kubernetes specification to deploy the pricing service to your cluster.
kind: Namespace
apiVersion: v1
metadata:
  name: pricing-ns
  labels:
    name: pricing
---
apiVersion: apps/v1
kind: Deployment
metadata:
  name: prices-api-deployment
  namespace: pricing-ns
  labels:
    app: prices-api
spec:
  replicas: 1
  selector:
    matchLabels:
      app: prices-api
  template:
    metadata:
      labels:
        app: prices-api
    spec:
      containers:
        - name: prices-api
          image: rahulrai/prices-api:latest
          ports:
            - containerPort: 8080
          resources:
            requests:
              memory: "64Mi"
              cpu: "250m"
            limits:
              memory: "128Mi"
              cpu: "500m"
---
apiVersion: v1
kind: Service
metadata:
  name: prices-api-service
  namespace: pricing-ns
spec:
  ports:
    - port: 80
      targetPort: 8080
      protocol: TCP
      name: http
  selector:
    app: prices-api
--------
You can inspect the service and its ports by running the following command in a kubectl shell:
Configure the Kong Runtime
Kong Konnect manages your control plane for you and allows you to use the Konnect portal or decK CLI to configure the required plugins that will help you add security and governance to your upstream service.
The data plane component, which will work according to the policies defined in the control plane, will be hosted in our cluster. First, we install the data plane component and connect it to the control plane.
Navigate to the Konnect portal and click on the Runtime option. Next, open the Kubernetes tab and click on the Generate Certificate button. Kong will generate the certificates that your data plane can use to establish a secure connection to the control plane. Copy the certificates and the unique Helm chart parameters files for your runtime.
Follow the instructions in the Kubernetes runtime configuration guide to set up a runtime with the certificates and configuration parameters that you previously recorded.
After installing the runtime, you can get the external IP address of the Kong Gateway by executing the following command:
kubectl get service my-kong-kong-proxy -n kong
Record the External IP address of the proxy, which is the access point for your data plane.
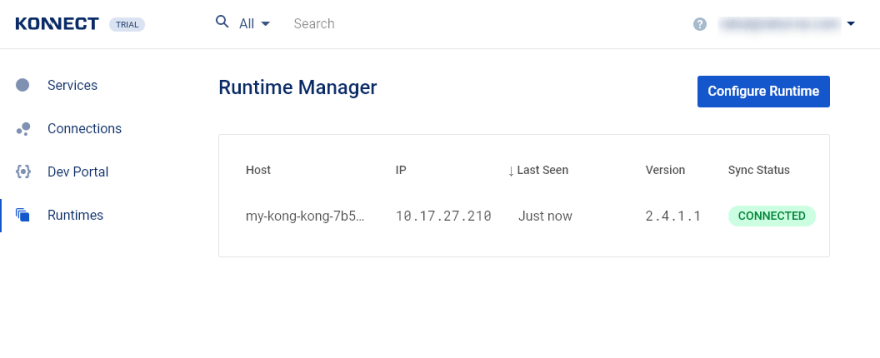
Once connected, you can view your runtime on the Runtimes page as follows:
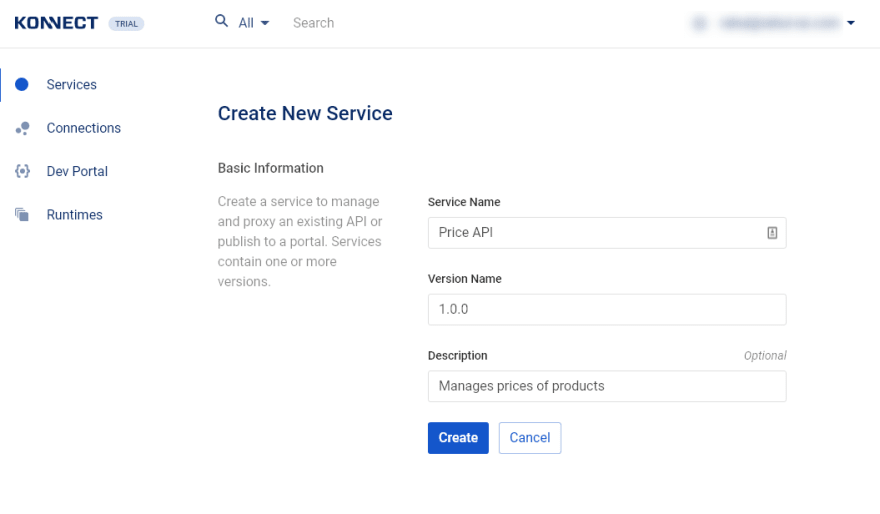
We now have our service and the data plane running in the cluster. Also, our data plane is connected to the control plane. Next, we create a representation of the pricing service in the ServiceHub and create a route to enable the data plane to communicate with the Prices API service.
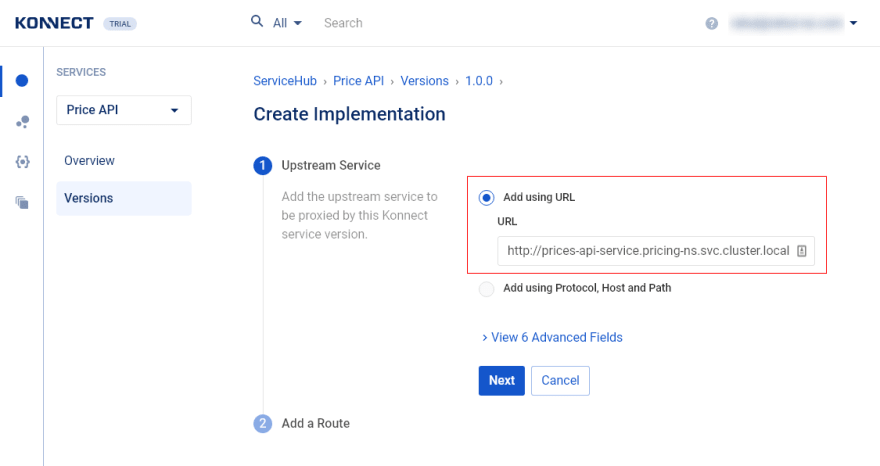
We need to link the gateway to the upstream service by creating an implementation of the service. First, click on the current version of the service, then click on the Add New Implementation button.
We specify the URL of the upstream service. The default URL of a service in Kubernetes follows the format: http://<service-name>.<namespace>.svc.cluster.local:<port>.
To extract the URL of any cluster service, execute the nslookup command in the shell of a pod as follows:
kubectl run temp-pod --rm -i --tty --restart=Never --image=radial/busyboxplus:curl -- nslookup prices-api-service.pricing-ns
Enter the service URL in the URL field of the form and click on the Next button.
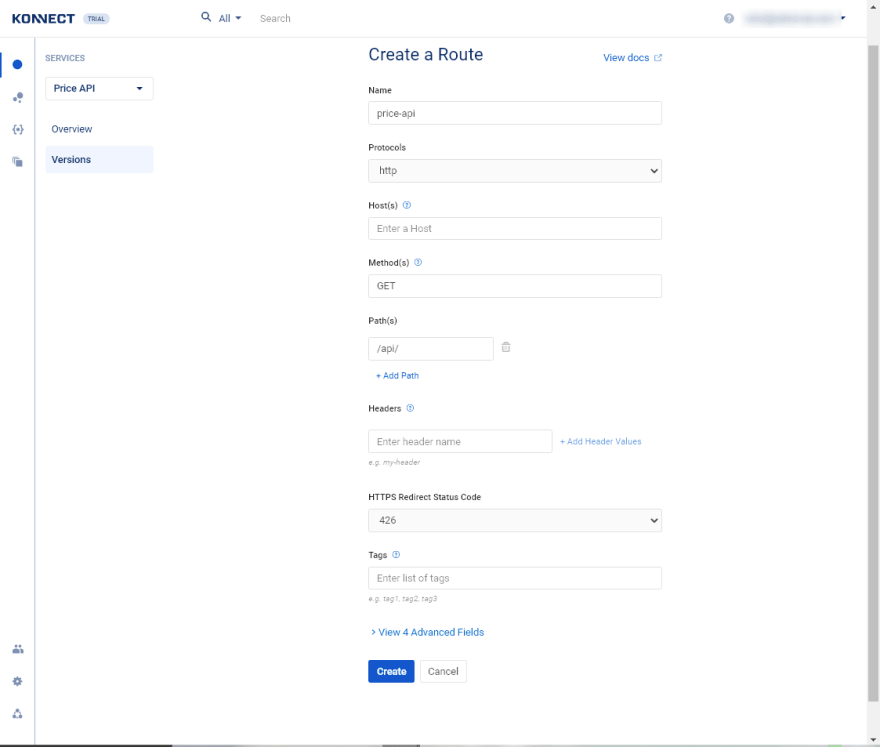
Since an API gateway can interface multiple upstream services, you must specify the route path (or hostnames, headers, and so on) that the gateway can use to identify the requests destined for an upstream service. We will configure the route such that request to path /api/ will be routed to the service as follows:
Click on the Create button to create the route. The communication between the control plane and the data plane is fast. So, we can now send a request to the Prices API service via the gateway available at the external IP address that we previously recorded as follows:
curl http://<kong-external-ip>/api/price/<any-number>
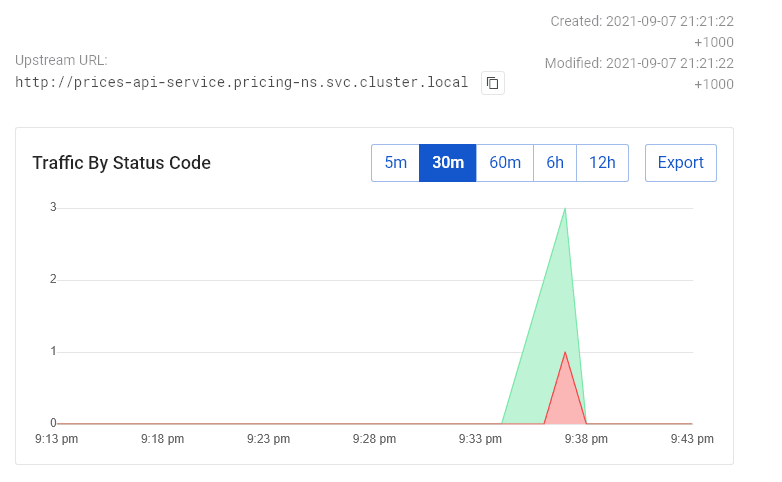
You can view the traffic sent to the API in the Kong Vitals data. I simulated some successful requests and some errors to showcase how the data is displayed.
Let's now make the Prices API available to the developers of our organization.
Publishing the Prices API to the Developer Portal
On the version details page, you will find the Version Spec card with the option to upload the API specification you created in Insomnia previously. The specification will help the developers understand the API request and response formats before building their applications on it.
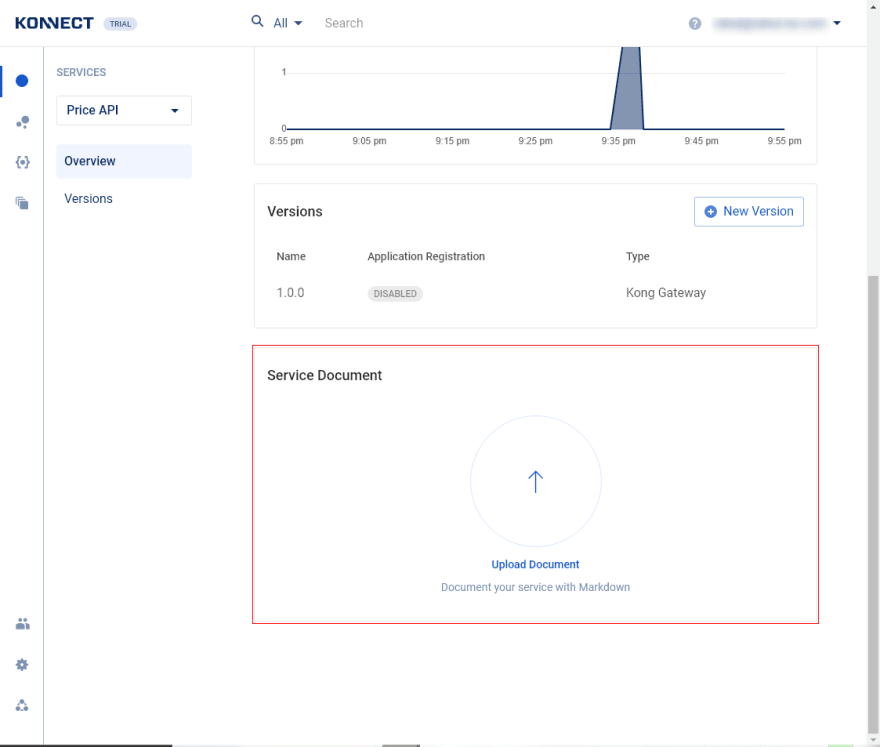
From the service details page, you can upload Markdown-formatted documentation of your API for the developers to read.
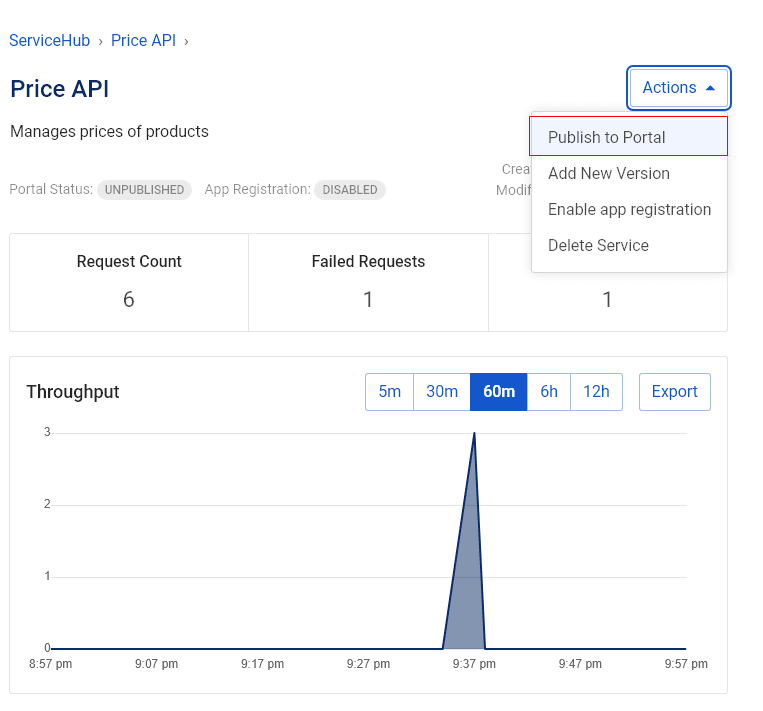
To publish your service to the Dev Portal, click on the Publish to Portal option in the Actions menu.
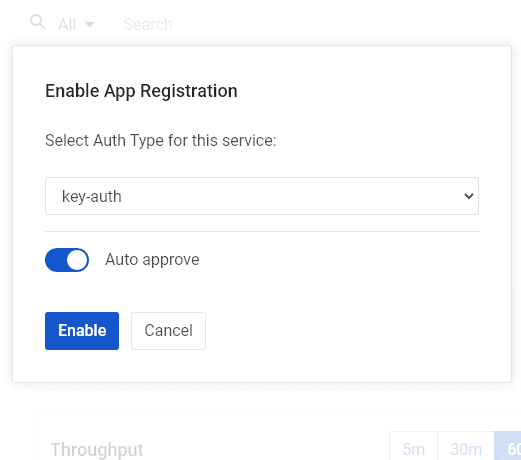
To allow developers to use the service in their applications, click on the Enable app registration from the same menu.
When you enable app registration, an application will present its identity to the Kong Gateway to access the upstream service. You can choose between API Key based authentication (key-auth) and OAuth2 based authentication (openid-connect). For simplicity, choose the key-auth option. You can also enable the Auto approve toggle to automatically approve the developers' requests to build applications leveraging your service. Click on the Enable button to complete the process.
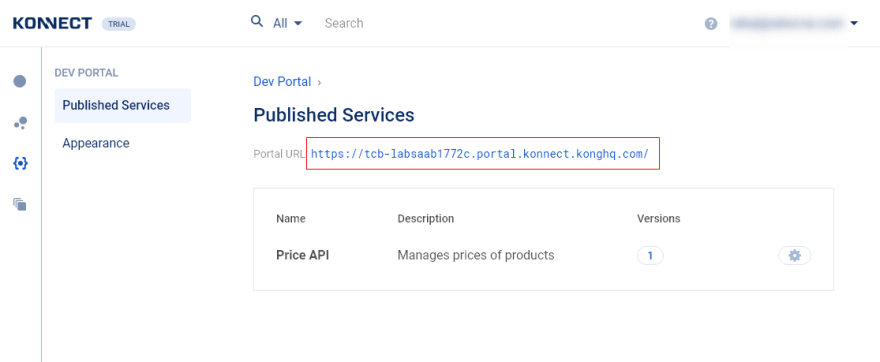
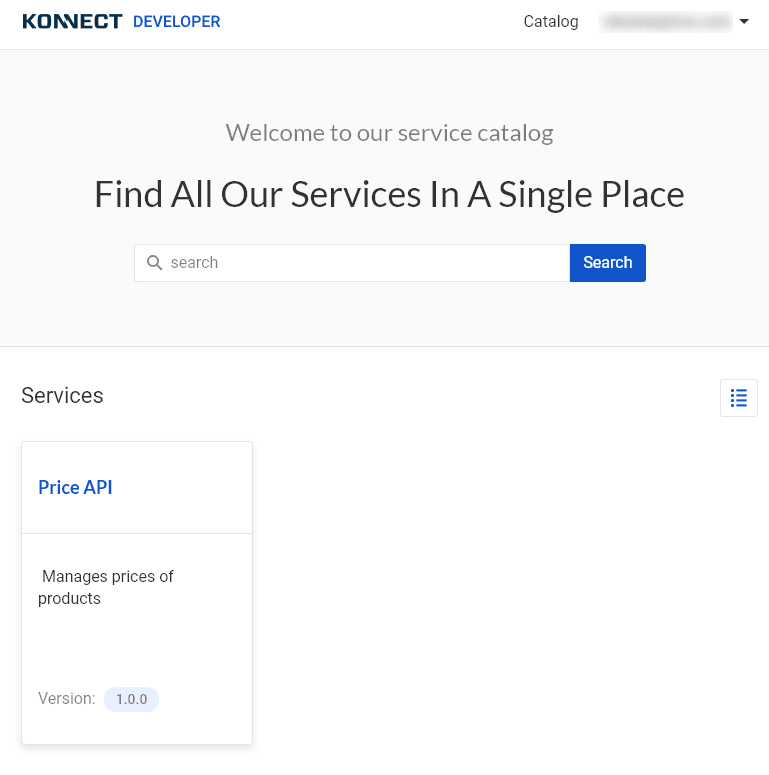
Click on the Dev Portal option to view the list of published services in the Dev Portal and the link to the Dev Portal.
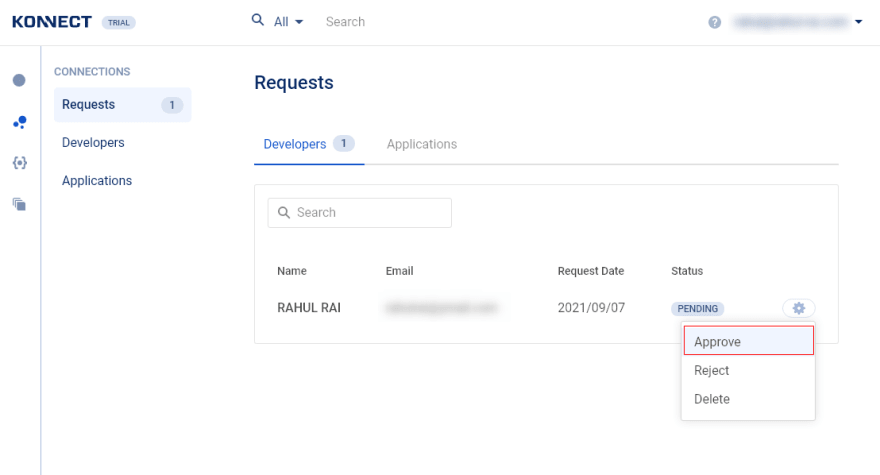
Visit the Dev Portal in a new tab and register for an account. Then, head back to the Konnect portal and click on the Connections and the Requests options to view the developer registration request. You can approve the request by clicking on the Approve button.
Use the newly approved developer account to access the self-service developer portal. You will find the Prices API in the list of services available to you for building applications. Click on the Prices API service card.
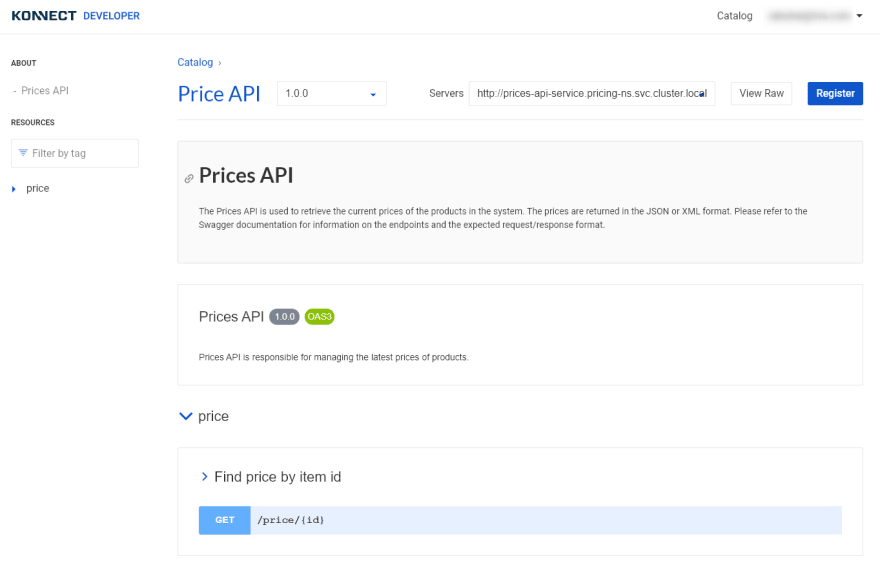
If you previously uploaded the API spec in the ServiceHub, you will find the UI for your API spec here. Developers can easily view the endpoints and understand the schema of request and response from this view.
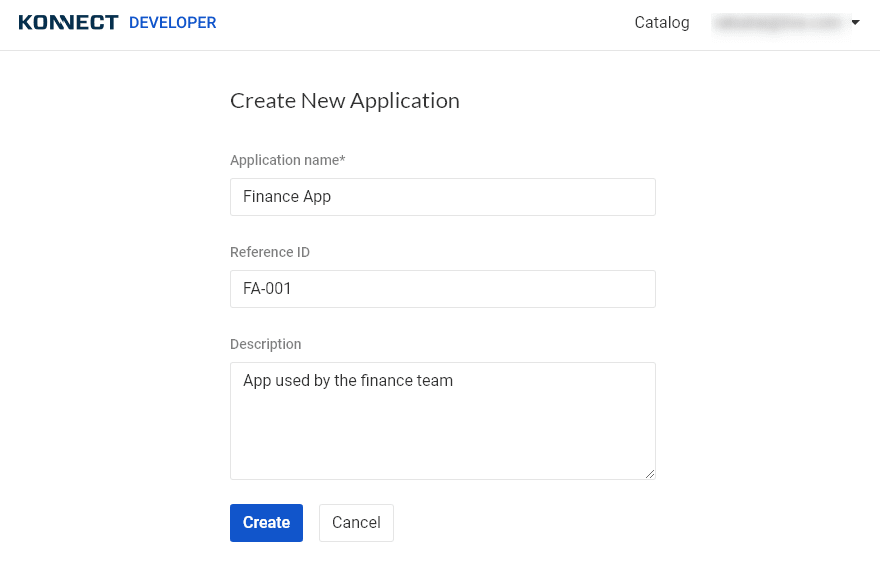
Click on the Register button to begin registering the API with an application. Since you don't have any applications, the following dialog will ask you to create a new application. To create a new application, click on the Create Application button.
Enter the details of the new application and click on the Create button.
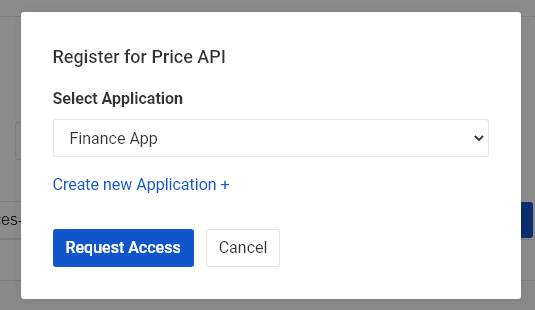
Finally, click on the Request Access button to request access to the API.
Since, in the ServiceHub, we configured the service requests to be automatically approved, we can now use the service in our application without requiring further approvals.
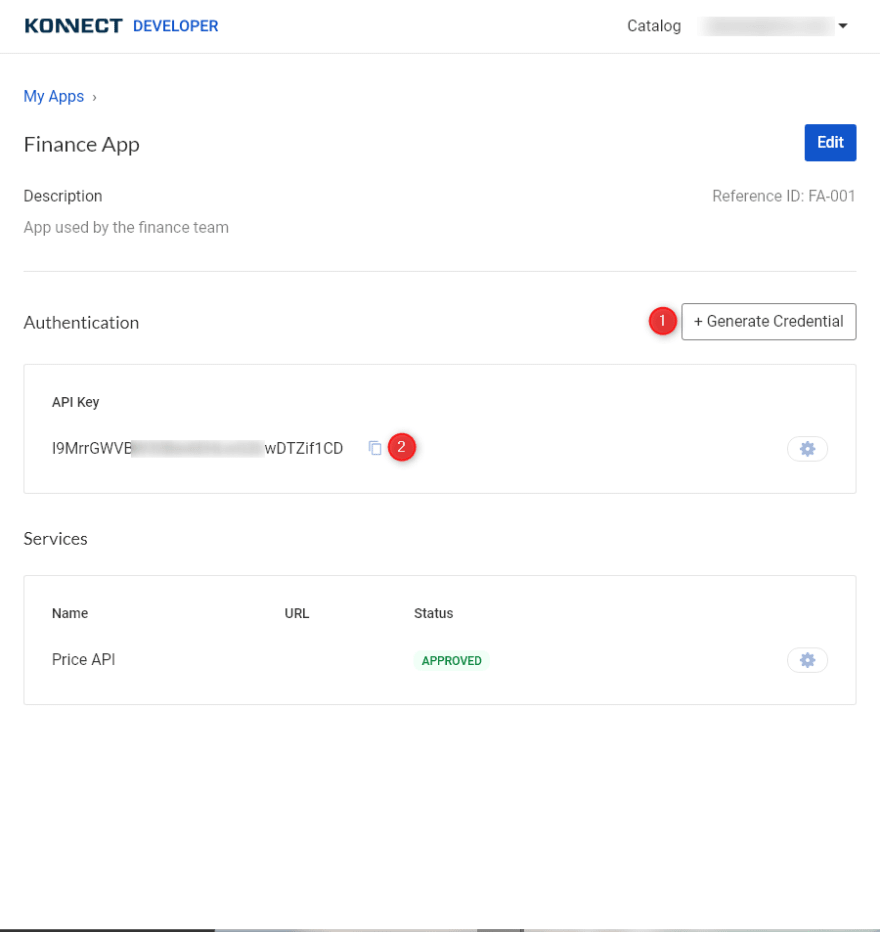
We now need the identity of the application to access the API. Click on the Generate Credential button to generate a new credential for the application. It will instantly create an API key that you can use to access the upstream Prices API.
Let's use this key to access the API as follows:
curl --request GET 'http://<gateway-ip>/api/price/50' --header 'apikey: <api-key>'
To prevent consumers from sending an excessive number of requests to the API, let's add a plugin to limit the number of requests received by our API per minute.
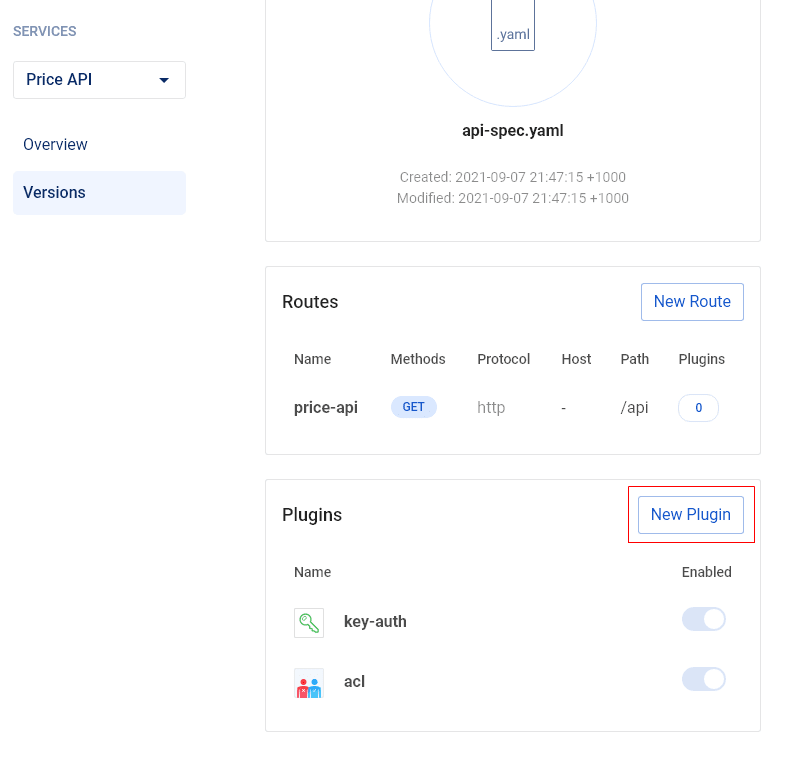
Head back to the Konnect portal and navigate to the version view of the API in ServiceHub. Next, click on the New Plugin button in the Plugins card.
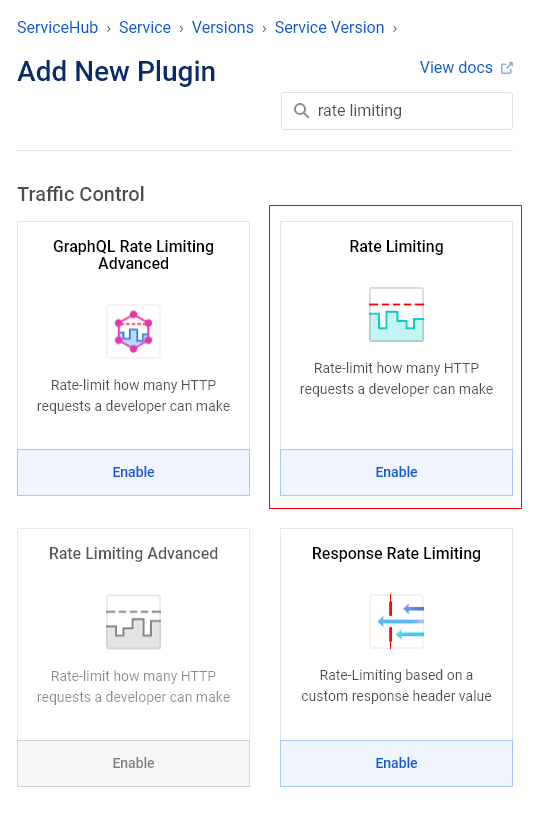
Search for the Rate Limiting plugin and click on the Enable button.
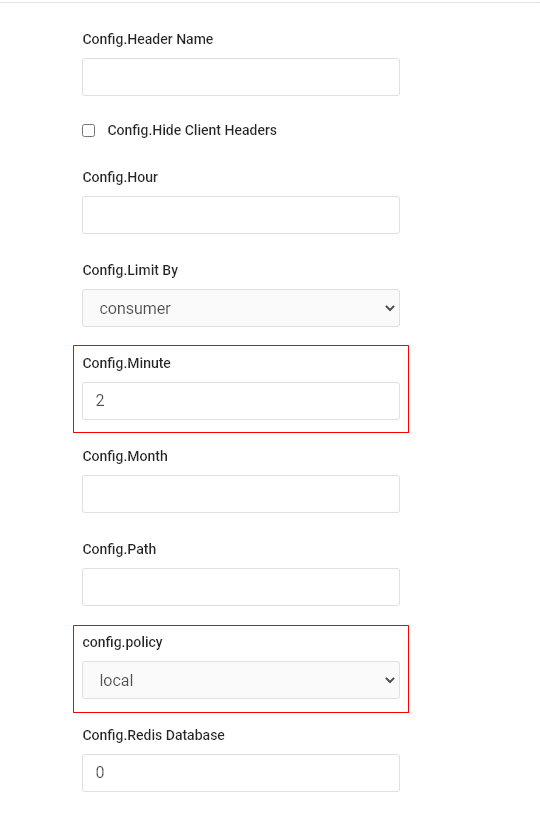
Configure the plugin to allow a maximum of two requests per minute by setting the value of the property Config.Minute to 2. Also, set the value of the property config.policy to local to enable the gateway to persist the state in the local memory.
Click on the Create button to add the plugin to the list of plugins active on the service version.
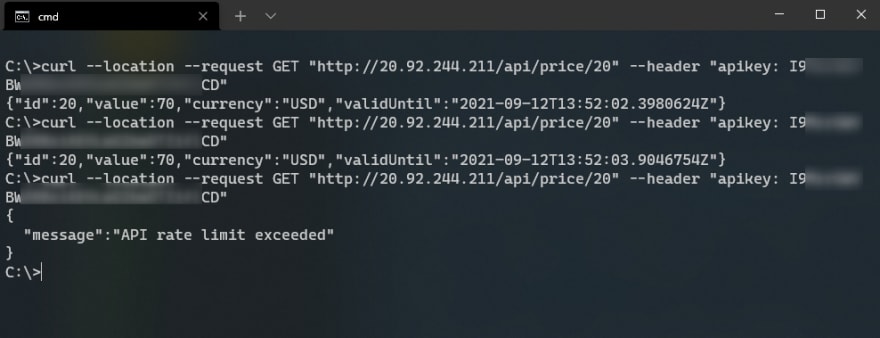
Try sending multiple requests to the API and observe the response. You will find that the gateway starts throttling the requests after the second request:
You can add more plugins to enforce other policies on your APIs. You can find the list of available plugins and their documentation on the Kong Plugin Hub.
Conclusion
Adopting the principle of using reusable APIs can help an organization eliminate the waste of precious resources by reusing the same API for multiple applications. In addition, reusable APIs can make your microservices ecosystem easier to maintain while improving the velocity of your application development at the same time.
The Kong Konnect platform and its family of tools can help you implement APIOps and automate the delivery and management of reusable APIs. Kong Konnect enforces a clear separation between operations and application developers through the ServiceHub and the Developer Portal.
On the one hand, the ServiceHub allows the operations to onboard APIs and manage their versions. On the other hand, the Dev Portal enables the application developers to be autonomous in building new applications.
Implementing cross-cutting concerns of APIs such as authentication and caching requires a thorough understanding of the best practices and time and effort in implementation. The Kong Plugin Hub allows the operations team to enforce organization-specific policies across the APIs without wasting time and money.
With Kong Konnect, the burden of implementing non-functional requirements regarding a business API is no longer the responsibility of the developers. With a clear separation of responsibility, each team can concentrate on its strengths.









Top comments (0)