
As we all know in today's era everybody is moving towards cloud because deploying and maintaining applications in our local environment could be compound and costly .
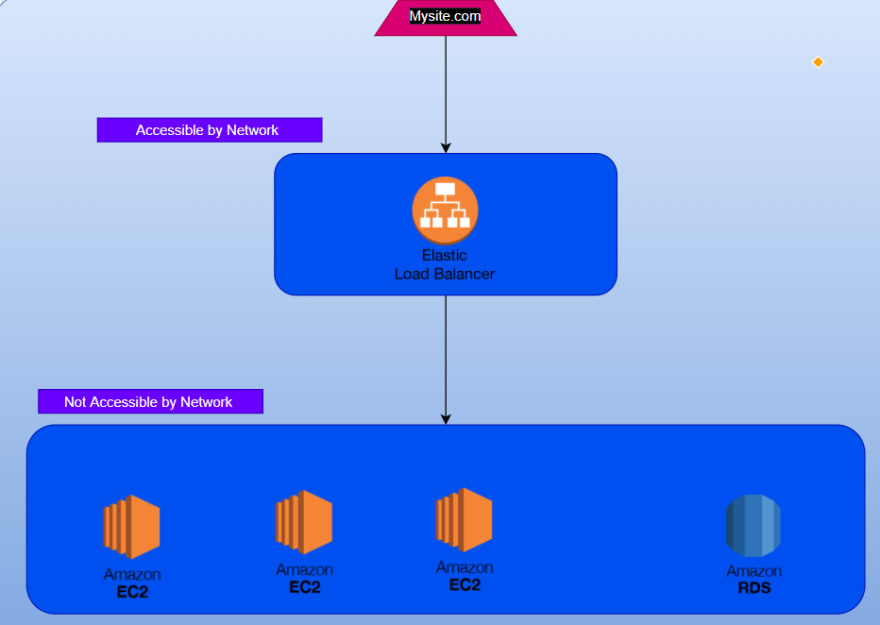
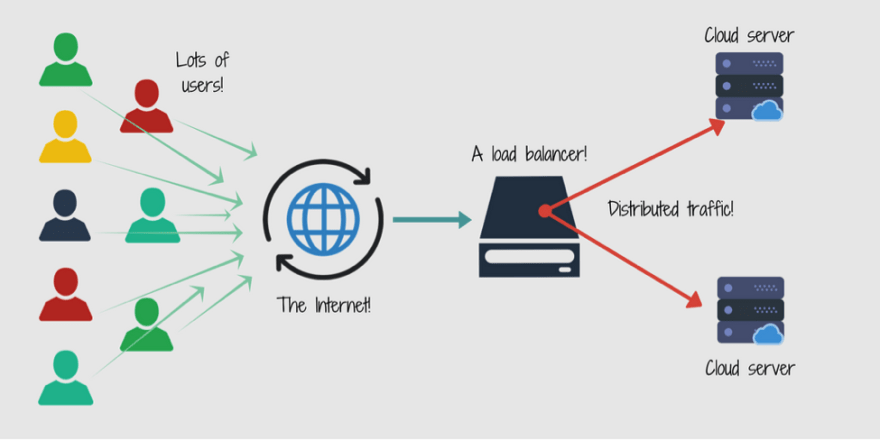
Here is the architecture diagram below .
Explain :
The architecture comprises of a private network and a public network in which the load balancer resides where we can basically implement a path based routing . The separation of private network is to strength the security of our application where we make sure the integrity of our application .
This is a multi-tire architecture project which comprises of individual business logics individually scalable and monitorable .
Steps :
This project is build on AWS so you must have a AWS account and ssh-client like putty if you are on windows or for mac or Linux use openssh .
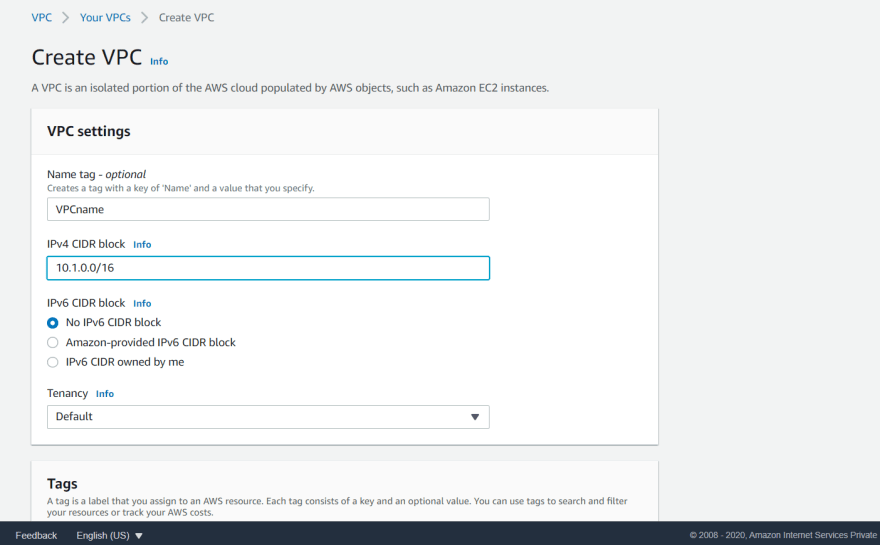
First we have to create a VPC :
VPC is an isolated space inside our region More info for click me .
creating a VPC with a name and with a ipv4 CIDR(classes inter-Domain Routing is a method used to allocate IP address) block 10.1.0.0/16 range where the application is going to deploy .
Creating a subnet for the access :
Partitioning the network according to the public and private access .
Let's define 4 regions (You can choose the number according to your need) and later in the configuration part we can decide which one to deploy in the public and in the private network .
In our network all the internet access and non-internet access part is going to deploying in public and private subnet respectively .
So the public subnet is having a public IP address and the private subnet is having a private IP address .
- Configuration for our subnet :
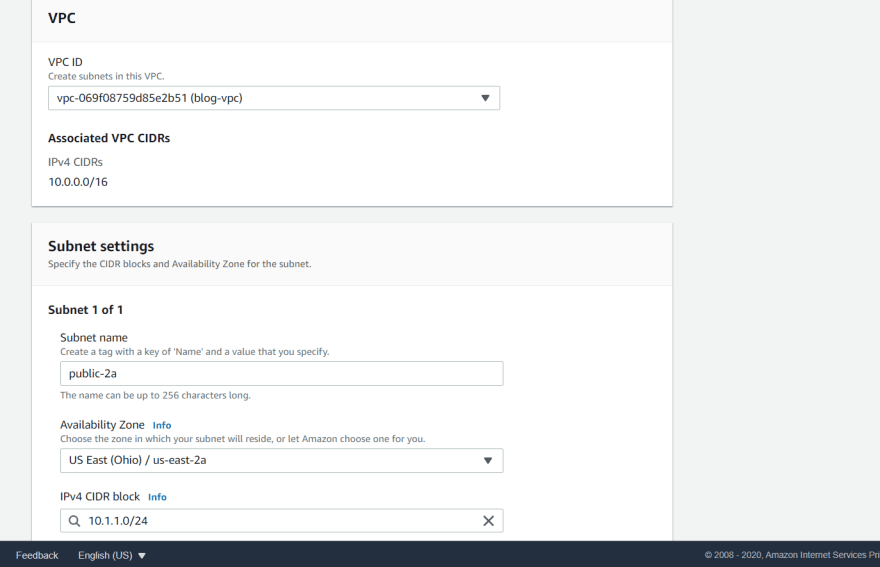
Let's have a look at the configuration of four of our subnets .
tag - public-2a
region - 2a
VPC - main network
ipv4 - 10.1.1.0/24 this range is a part of the main network range
tag - public-2b
region - 2b
VPC - main network
ipv4 - 10.1.2.0/24
tag - private-2a
region - 2a
VPC - main network
ipv4 - 10.1.3.0/24
tag - private-2b
region - 2b
VPC - main network
ipv4 - 10.1.4.0/24
Create an Internet gateway :
suppose you want to have a internet access in your home then you contact to the internet service provide to bring up a connection to your home . similarly here we have to create a internet gateway for the same purpose .
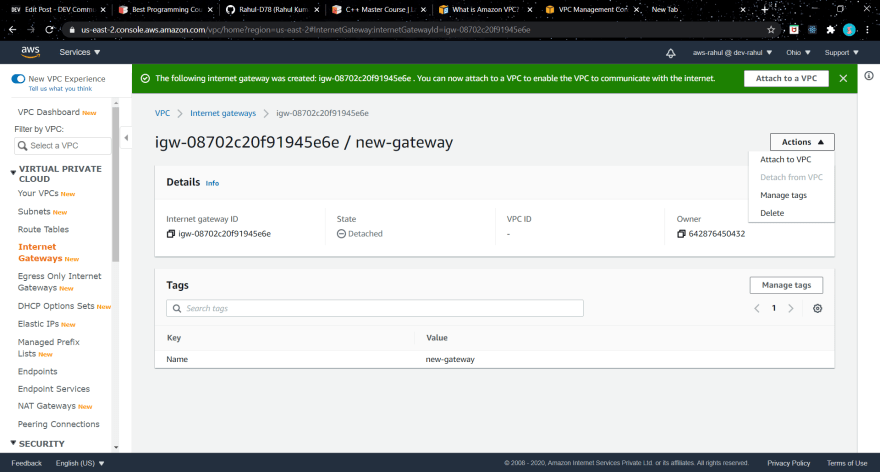
steps :
- create a new internet gateway .
- attach it to your VPC
when you deploy a resource in the cloud it is always deployed in the subparts . just like you have WIFI in the home and you do not have a active connection to that then your laptop does not know weather to connect to the WIFI or not .
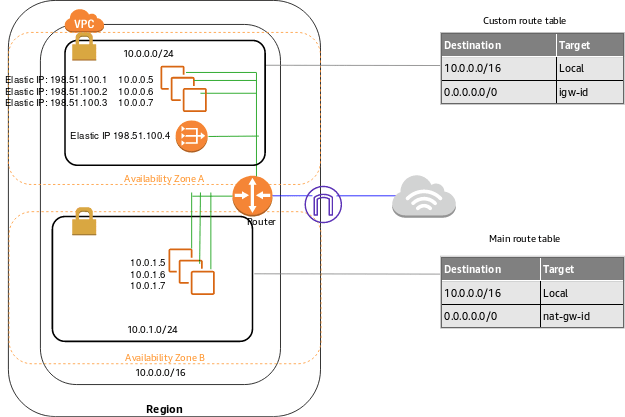
Creating route tables :
So we have created 4 subparts of our main network then we just have to define which one to give the internet access and which one to not .
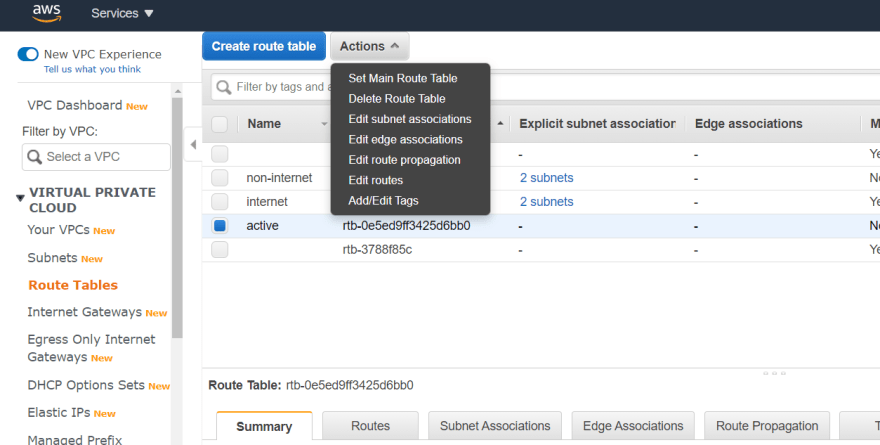
- create two one is Active and another one is non-active
- Go to the actions -- connect the public subnets to the Active route-table and then the private subnets to the -- non-active route-table .
- Make sure you have deployed both of them in your main network (VPC) .
Now we have to specify the route to the gateway .
- Steps :
- Select the gateway which we want to give the internet access and in our case it is named as Internet .
Edit routes --> Add a route
0.0.0.0/0 internet gateway
we connected two subnets to the route table and they can connect to the internet by using the internet gateway .
All the resources that we are going to communicate with each other because they are the part of the same network .
So consider a scenario where in your home network your laptop and mobile is connected which leads the communication between two .
The subparts can communicate with each other whether they have the internet access or not . Which make sure the communication to our private network . This kind of division ensures the security of our infrastructure .

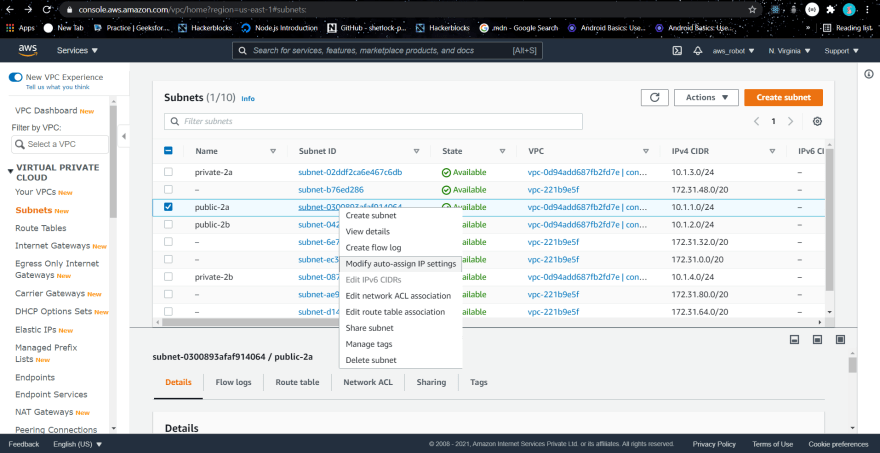
The resources which are public subnet we have to assign a public IP address to them in order to talk to them .
Just select your public network and then go to actions modify auto assign IP and then tick the enable public assign IP .
steps:
subnets
public-2a
modify auto....
enable auto assign
save
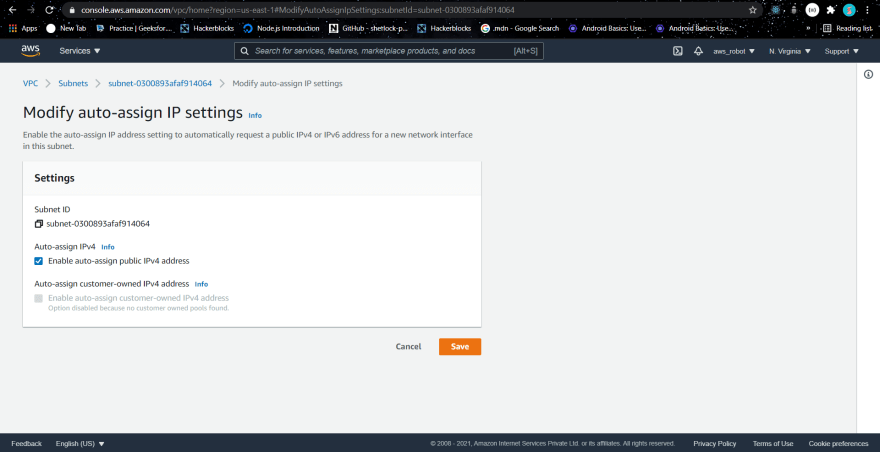
Public IP address is the address which can be reach out to the network .
- All the address we have specified earlier are the local IP address.
Lets Move to the application deployment part :
- Steps :
- Create a new EC2 instance
- in the configure instance
- network -- main-network
- subnet -- public subnet
- go with the default firewall as of now and then we have to restrict the firewall later .
- Then lunch it .
- select the security group
- edit inbound rule -- > my IP
- Connect it to your machine :
ssh -i pem file and host@ipaddr
Installing the webserver for the access to our webpage .
sudo apt install apache2
$ cd /var/www/html
So this is a sample blogging project . where i have two routes as home and the about route . Obviously same steps can be followed in different real life projects .
create a new index.html page with the content as follows :
<h1> Welcome to the homepage </h1>
Create an AMI of the home-page :
home page is now ready to deploy in the private subnet .
Steps:
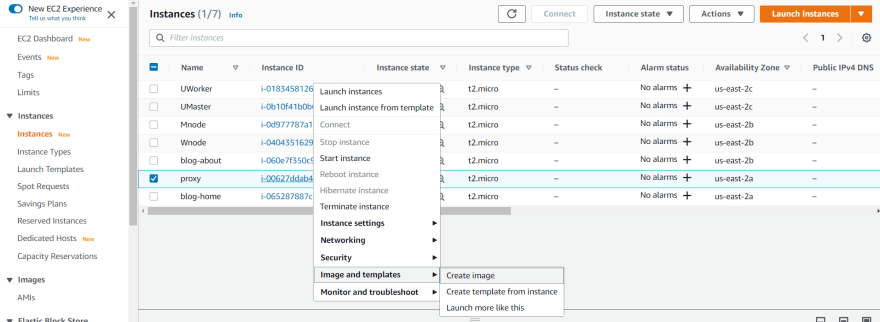
And then name it as you wish here i name it as blog-home
Lets again go to the same path where our home page id resides and then change the index.html .
<h1>This is the about page</h1>
- Then create an AMI out of it . By following the same steps but here we have to name it as about-page .
Configure both of the images :
We have to give two of our web pages public-2a and public-2b as the subnet . And make sure they reside in our main-network(VPC) .
- Steps :
- Lunch Instances
- My AMIs

- Select main-network(VPC)
- private-2a (For the home page)
- default security group .
- And for our about page select the subnet in the private-2b and rest of all are same .
Note :
If you see it not has a public IP and it has a private IP address,
which is only reachable from our public instance . which in our case the proxy-server .
After creating both the AMI's we now can have a look at our next architecture .

As per the diagram we have to define a load-balancer which can indeed talk to our AMIs . As per the path based routing specified routing .
Make sure we can connect to our private networks through the proxy-sever :
- Steps:
- Copy the pem file which is in our local system to the proxy server .
$ scp -i pemfile ubuntu@publicip:/home/ubuntu
- Next connect to the private server(blog-home) through private IP .
$ ssh -i pemfile ubuntu@privateip
If you are trying to connect to one of our machine which is deployed in the private subnet it could not because it is not a part of our main network .
- check in both home and about server if the apache server is running or not .
Configure our load balancer to connect to the server .
- Steps :
- load-balancer
- create a load balance
application load balancer (which helps in path based routing)
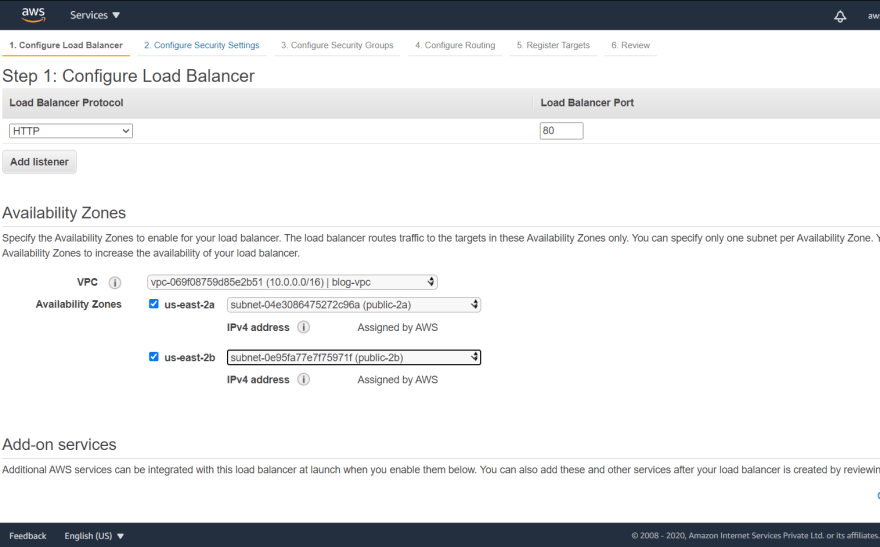
Configuration :
name --> blog-demo
Protocol --> HTTP
VPC--> main
availability jones public-2a and public-2b
default firewall
Make sure you have the security group same as your servers . otherwise it will throw an error says server is not healthy
- routing give it a name and then select the blog-demo and blog-about .
target group (set of severs that you can connect to)
1.name --> home-page-server
- next --> select main-home
- home target group should have the home server attached if not then edit it .
- create one target group for about-page-server
Then edit rules for the Load-balancer :
- Steps :
- load balancer
- in the listeners
- edit rules
- configure the path /about* --> about-page-server --> save
- configure the path /home* --> home-page-server --> save

Then copy the load balancer DNS URL and paste it in the browser .
ssh to stream server .

cd /var/www/html
mkdir watch
cp index.html /about

ssh to home server .

cd /var/www/html
mkdir home
cp index.html /home
Now our servers are inside a private subnet and we can only connect to them through using a proxy server that we have deployed in our public region .
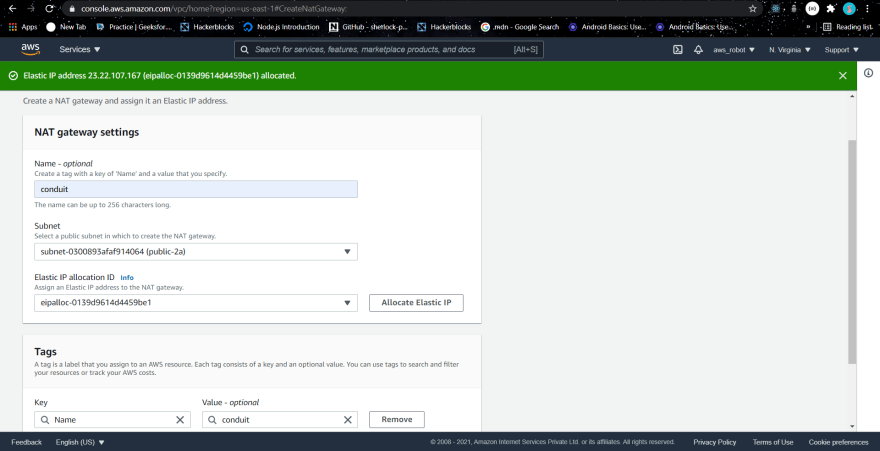
NAT Gateway :
In case we need to update our server or the application then we could not do in our current architecture . We have to configure NAT (Network address translation) which converts the private IP to public and then we can communicate to the Internet .
Steps to attach a NAT gateway
- Navigate to the Nat Gateways
create a NAT Gateway
Edit the private route table routing configuration .
Destination : 0.0.0.0/0
Target : NAT-gateway

Now your private instance is attached to the internet .
$ping www.google.com


Top comments (0)