
This article was originally posted on
https://www.realpythonproject.com/how-to-make-an-ai-assisted-phone-service-with-twilio/
If you’ve ever called a business to book an appointment or tried to chat on a website to get your questions answered, there’s a good chance you have already interacted with an AI-assisted phone service. AI-assisted phone services have existed for a long time, and with the recent advancements in natural language processing (NLP), they have become more sophisticated.
AI-assisted phone services can be used in a number of different ways. For example, chatbots can be used to answer customer questions, while interactive voice responses (IVRs) can be used to take orders or book appointments. Additionally, AI-assisted phone services can be used to gather customer feedback and track customer satisfaction. This feedback can then be used to improve customer experience and ensure that customers are happy with the services they receive.
In this tutorial, you will build a bot that will be used to save a user’s information in a database. This bot will be built using Twilio and developed in Replit. Replit is a powerful browser-based integrated development environment (IDE) that lets you develop your projects online. You will be using various features provided by Replit, such as their unit testing and their live servers and database. Here is a high-level overview of how the bot will work:

What Are AI-Assisted Phone Services
AI-assisted phone services are powered by voice recognition software and NLP, meaning that they can understand the user’s voice and respond in a way that is natural for humans. This makes the user experience more like talking to a human than using a traditional automated phone service.
There are two general classes of AI-assisted phone services:
- Personal assistant phone services: They can do things like provide information about local businesses, book appointments, and connect people with customer service representatives. They are helpful in cases where the user cannot look up the information themselves, such as when driving.
- Customer service phone services: They provide customer support for businesses. They can take orders, book appointments, cancel reservations, and transfer people to the right department. They are helpful in cases where these tasks need to be done without human intervention or when it would be more practical to do so.
Here are some of the benefits of AI-assisted phone services:
- They are typically cheaper than hiring multiple people to work in shifts and around the clock.
- They have the ability to simultaneously handle multiple customers.
- They can be programmed to automate tasks, like creating tickets and saving users’ feedback.
- They enable users to experience a more efficient and less frustrating customer service experience.
As mentioned earlier, the most common AI-assisted phone services are chatbots and IVRs. Chatbots are computer programs that can mimic human conversation via text. They are commonly used to simulate a human’s conversation in online customer service. They are also used to communicate with customers on behalf of brands and businesses, such as in a phone app that lets people order food or ask for a local business’ operating hours. In Facebook Messenger, they can be added as a friend and sent messages to make exchanges feel more humanlike. Chatbots can also be used in Discord and Slack.
IVRs are computer programs that interact with people by voice. They are also commonly used to provide customer service. IVRs can be used to ask people questions about their accounts or to direct them to the right department, to provide information about a product or service, or even to take orders over the phone. A customer can call an IVR and press the appropriate buttons corresponding to the information they have or need, and the IVRs then automatically direct them to the right department or provide the details the customer has requested.
Many companies use these technologies in their online support structures. Although it does not completely eliminate the requirement of an actual person for customer support, it makes the process more efficient.
Building Your Own AI-Assisted Phone Service
This tutorial is divided into two sections. First, you will build your own AI-assisted phone service using Twilio. Second, you will build a Flask API to receive data from the phone service and store it in a database. All the development will be done using Replit. You can sign up for free here.
Here are some useful links for easy access:
Working with Twilio
You will need a Twilio account to follow along. After signing up, you should be redirected to your dashboard.
To start, go to Account > API keys & tokens.

You should see a button to create an API key, which you will need in order to consume Twilio’s API.

After you create your API key, you will need to save a couple of strings: the Account SID and the Auth Token.
Now, create a new Python project on Replit.

Normally, you would have to create an .env file in which to store your credentials. However, Replit has an alternative for this. Click on the lock icon on your sidebar.

Save your Twilio Account SID (account_sid) and Auth Token (account_key), and then scroll down. You should see an option to insert the code to read them using Python.

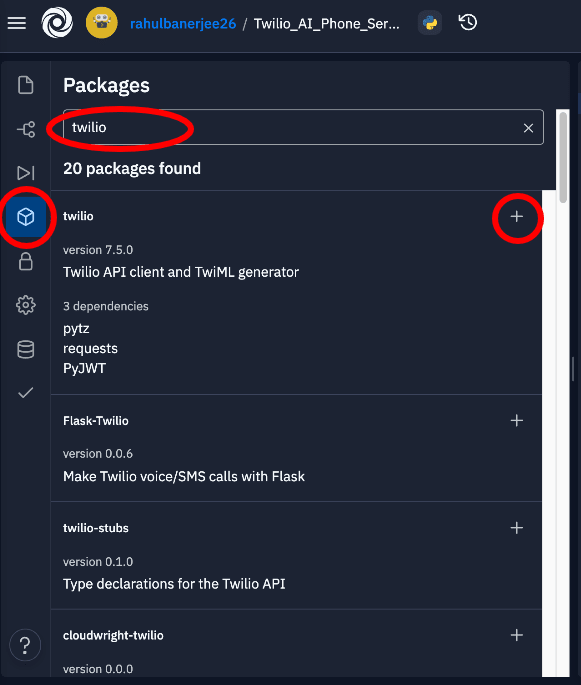
Twilio has a Python wrapper for their API, and Replit provides a simple way to install packages. On the sidebar, select the cube-like icon and search for Twilio. Click on the plus icon to install the package.
You will have to create an Assistant resource:
You can use the code to create the Assistant inside a try-except block to avoid creating a new resource every time you run the script. The code in the except block is run when an Assistant resource with the same unique name is created. In this case, you can simply fetch the existing Assistant resource. You can run the repl to create your own. By default, Replit will run the file named main.py. However, if you wish to, you can click on shell and run your file using the python3 command.

Replit has a really cool feature that can explain what a code snippet does. Simply highlight the code snippet and click on Explain Code. Note that you will need to upgrade to the Hacker Plan in order to use this feature.
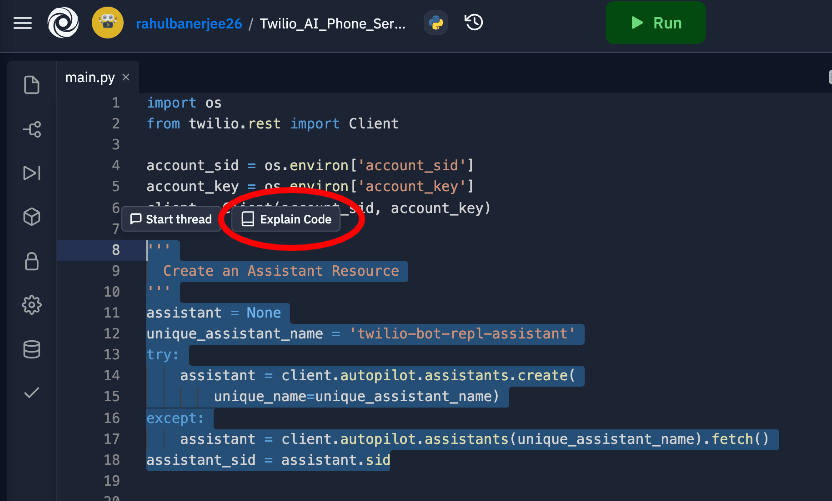
Replit will analyze your code comment and generate an explanation for you. You can also create a thread to add comments (similar to how you would do in code reviews). This was the explanation generated for the highlighted code snippet:
1. The code creates a variable called the assistant and sets it to None.

2. The code then tries to create an assistant with the unique name "twilio-bot-repl-assistant".

3. If that fails, then the code fetches the assistant with the unique name "twilio-bot-repl-assistant".
As you can see, it is pretty accurate.
Next, you can add a task to the above Assistant. A task is basically an action your Assistant resource can perform. You can read more about it in the Twilio Docs.
Like the Assistant resource, you can use a try-except block again to avoid creating multiple tasks. Right now, an empty object is being passed to the actions parameter. This will be updated with the action you want your Assistant resource to perform. You can read more about the actions Twilio supports in their docs.
Now, we want the Assistant resource to ask the user for their name and phone number. For our use case, we will use the collect action. It is equivalent to an HTML form element in many ways.
Below is the syntax for a collect action:
You can add multiple actions, but for now, we just need a single collect action. You can add multiple questions to a single collect action. Here’s what mine looks like:
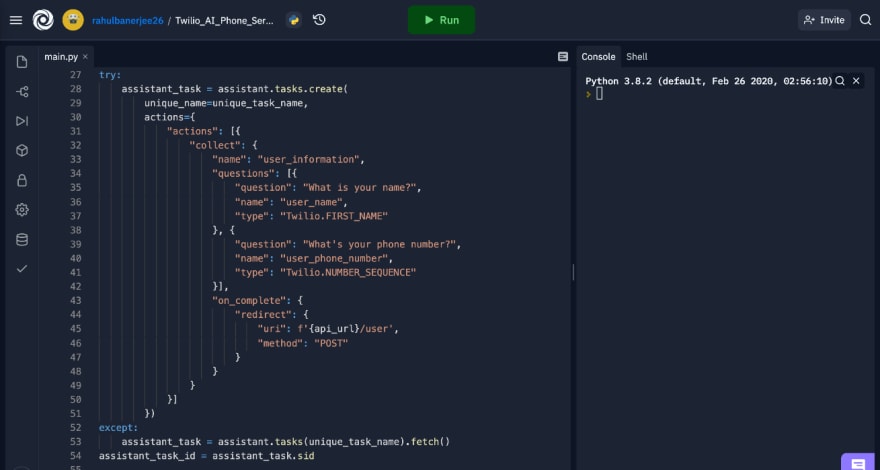
I used the built-in types provided by Twilio. Optionally, you can define your types by following these instructions. In the value for the key uri in redirect, you will notice a variable api_url. If you have a functioning API endpoint, you can create a variable named api_url and set it to your API’s URL. If you do not have a functioning API, you do not need to create a variable and can leave the value for uri as it is. You can follow the subsequent sections to build an API and update the value for uri later.
Now that the task is created, you will need to add sample phrases to trigger this task:
You can add multiple samples. Twilio recommends adding ten samples per task, but for this tutorial, one will suffice. Whenever the user says “register,” your Assistant resource will perform the collection action you declared earlier.
Now you can build your model:
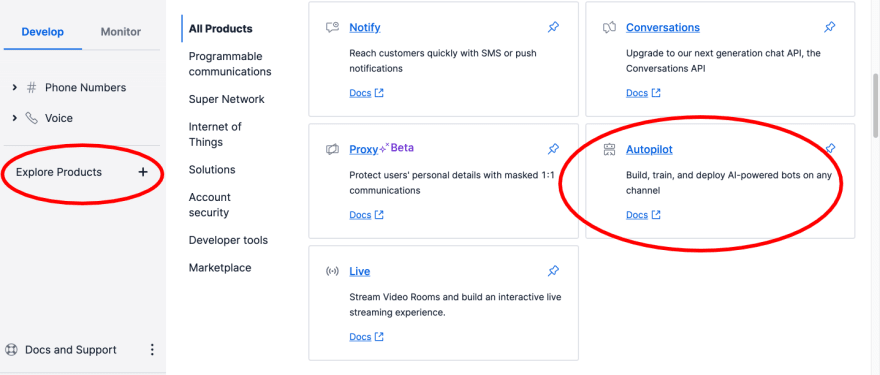
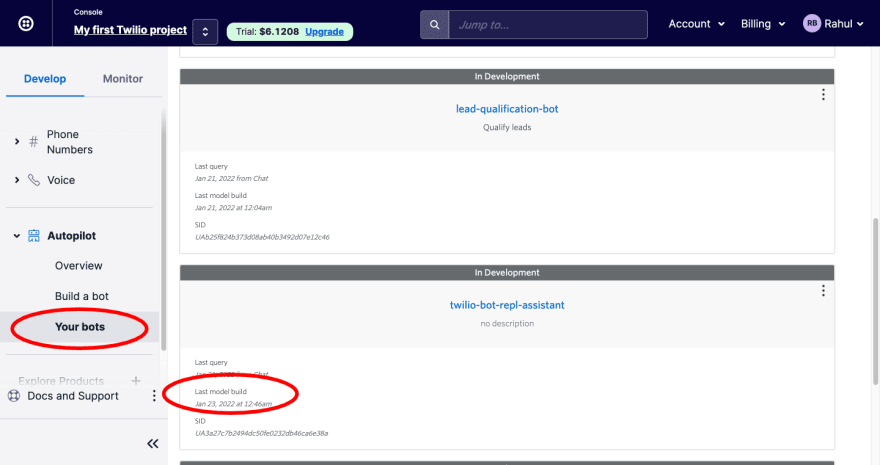
This process will take some time. Head over to your dashboard and click on Explore Products > Autopilot.
Click on Your bots and check the Last model build time for your Assistant resource.
After the build process is complete, select your model and click on Simulator.

This will allow you to test your model. Since you do not have an API right now, the Assistant will simply collect the information and will not send it to an API. Turn on the Debug view to check which task is being performed by the Assistant. You can also see the values being stored in the variables you created using the collect action earlier.
On the right-hand menu, you should see an option called Channels. This will let you add your bot to a Twilio phone number so the bot can work as a chatbot or an IVR.
Building the API
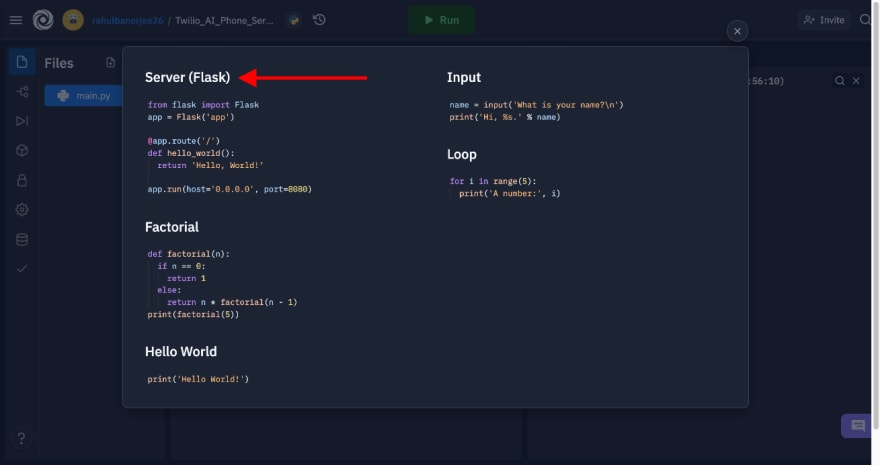
To start, create a new Python project on Replit using one of their existing templates. In the main.py file, you should see text asking you if you would like to choose an example. Click on the examples link and select Server (Flask).
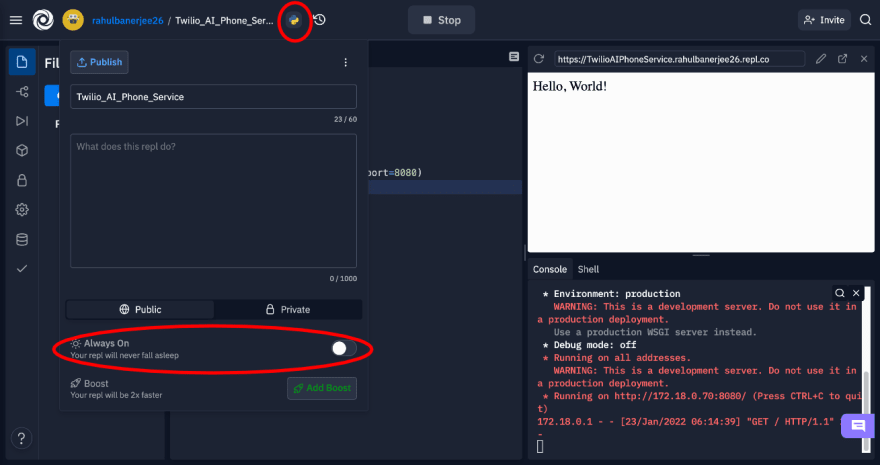
Click on the Run button to run the Flask server. Replit will automatically install all the required dependencies.
Normally, you would have to use a service like ngrok to expose your Flask server via a public URL, but Replit handles that for you. As long your server is running, it can be publically accessible by anyone via the URL shown on the right:

You can set your repl to Always On, which basically means that your Flask server will be running even if your close repl, so in a way, it deploys your Flask server. Note that this feature is only available on the Hacker Plan, so you will have to upgrade if you want to use it.
Now create a new endpoint that will accept both GET requests and POST requests. A GET request will return the users who have previously registered, while the POST request will save the information of the user. The Twilio bot you created in the previous section will make a POST request.
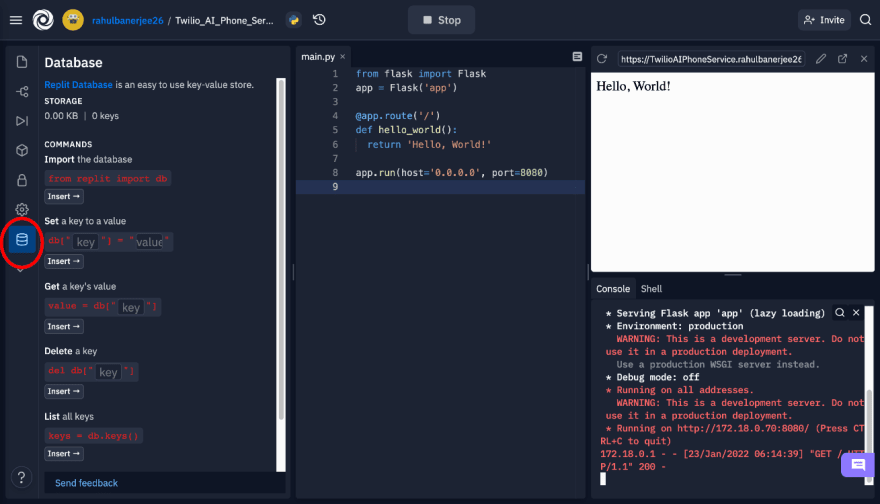
Replit has a built-in database that can be used to store the user information:
Some helpful code snippets to perform create, read, update, and delete (CRUD) operations will be shown when you click on the database icon, almost like a cheat sheet. Below is the code snippet to handle GET requests:
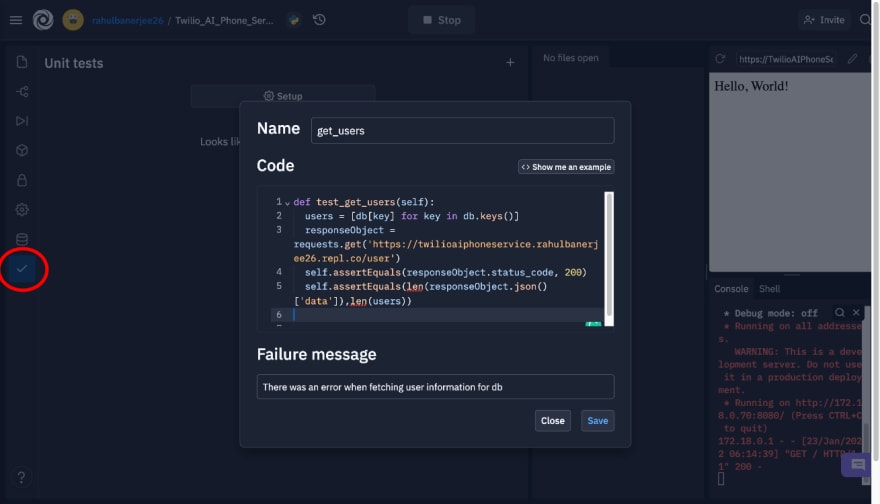
This code simply reads all the rows in the database and returns them as an array. Replit also allows you to add unit tests. You can add a unit test to verify that the endpoint handles GET requests as expected. The code in the image below creates a simple unit test that checks the response status code of the GET requests and compares the length of the data in the database to the length of the data returned by the GET request:
You will have to add a couple of import statements for your unit tests to work. Click on Setup and add the following imports:

Click on Run tests, and you should see a success message saying that all your unit test cases passed.
Now add the code to handle the POST requests:
Here, the Twilio bot sends a deeply nested object. You can print the data in request.form to check the format of the data. The above code gets the username and phone number, and stores them in the Replit database. Then it returns a Twilio action object so the bot can respond to the user once their information is saved.
Adding the API URL to Your Twilio Bot
Before testing the bot, you will have to add your API’s endpoint to the Twilio task you created earlier. This can be done using either the Twilio Console or the Twilio API.
Using Twilio Console
Go to the Twilio Console and navigate to your Twilio bot, as shown in the previous sections. Then go to Tasks and select the task you already created.

Initially, you had the following in your action:
Update the value for uri with your API’s URL. In my case, it looks like this:
Save the new task and build the model.
Using the Twilio API
Alternatively, if you’d prefer, you can update the API URL value using code. The task resource you created earlier has an update method that can be used to pass a new action with your API URL. You can read more about it in the Twilio Docs.
Go to the file where you wrote the code for your Twilio bot. In the section where you create a Task resource, replace assistant.tasks.create() with assistant.tasks.update(). This will ensure that your script will update the action instead of creating a new one. Update the JSON object to include your API URL. Once you are done, run the script again to update your action and build the model.
After you have added your API’s URL to your action resource—either via the Twilio Console or the Twilio API—your bot should work as shown below:

Conclusion
In this tutorial, you built an AI-assisted phone service using Twilio to collect a user’s name and phone number. You also built an API to save this information inside a database.
As you’ve likely noticed by now, Replit has a lot of useful features that allow you to code online. Although this article only showed its support for Python, it equally supports other programming languages, such as C++, JavaScript, and TypeScript; and frameworks, such as React or Vue.js. It comes with a built-in browser to preview your frontend or API. Additionally, it also has a built-in database and support for unit testing and storing environment variables.
Furthermore, Replit’s Explain Code feature is able to generate explanations for code snippets. Replit also has support for Git, allowing you to add commits or revert to previous ones as needed. Be sure to check out this powerful online IDE that can be used to make phone services, among many other things.


Top comments (0)