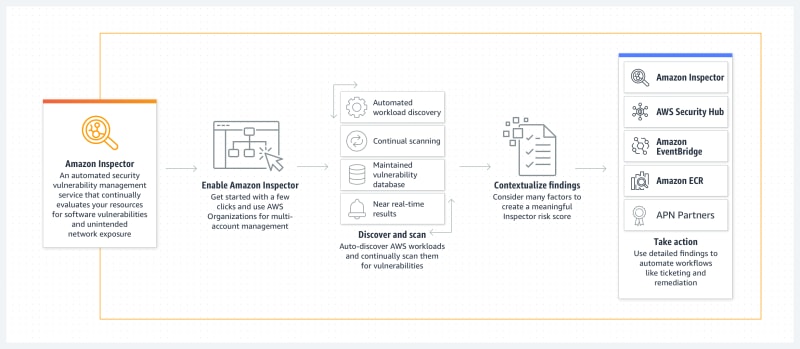
What is Amazon Inspector
Amazon Inspector is a vulnerability management service that continuously scans your AWS workloads for software vulnerabilities and unintended network exposure. Amazon Inspector automatically discovers and scans running Amazon EC2 instances, container images in Amazon Elastic Container Registry (Amazon ECR), and AWS Lambda functions for known software vulnerabilities and unintended network exposure.
Features of Amazon Inspector
- Centrally manage multiple Amazon Inspector accounts
- Continuously scan your environment for vulnerabilities and network exposure
- Assess vulnerabilities accurately with the Amazon Inspector Risk score
- Identify high-impact findings with the Amazon Inspector dashboard
- Manage your findings using customizable views
- Monitor and process findings with other services and systems
Getting started with Amazon Inspector
Following steps is for activating Amazon Inspector scans for a standalone account or as an Amazon Inspector delegated administrator with AWS Organizations in a multi-account environment.
- Open the Amazon Inspector console at https://console.aws.amazon.com/inspector/v2/home.
- Choose Get Started.
- Choose Activate Amazon Inspector.
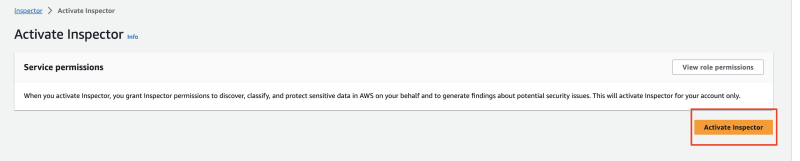
> Amazon Inspector is a Regional service. Any of the configuration procedures that you complete must be repeated in each Region that you want to monitor with Amazon Inspector
> When you activate Amazon Inspector in a standalone account, all scan types are activated by default.
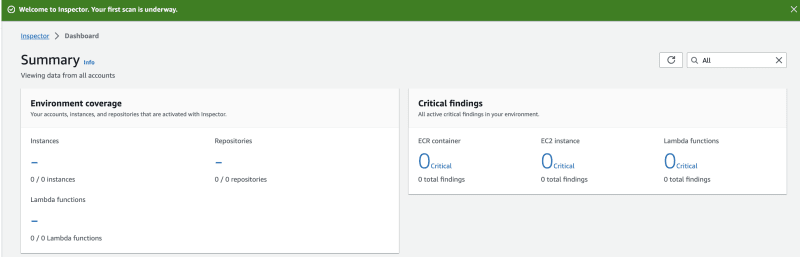
Once you activated, you see below dashboard
Managing findings in Amazon Inspector
Viewing findings
Findings can be grouped by the following parameters:
- By vulnerability – Lists the most critical vulnerabilities detected in your environment. Choose a vulnerability title from this view to open a details pane with additional information.
- By account – Lists your accounts, Amazon Inspector scan coverage percent for each account, and the total number of Critical and High severity findings for each account. This grouping is only available to delegated administrators.
- By instance – Lists the most vulnerable Amazon EC2 instances in your environment.
- By container image – Lists the most vulnerable Amazon ECR container images in your environment.
- By container repository – Shows the repositories with the most vulnerabilities.
- By Lambda function – Shows the Lambda functions with the most vulnerabilities.
- All findings – Shows a complete list of findings for your environment. This is the default view when you navigate to the Findings page. In this view you can filter by active, suppressed, and closed findings.
Filtering findings
A finding filter allows you to view only the findings that match the criteria you specify. Findings that do not match the filter criteria are excluded from your view. You can create finding filters using the Amazon Inspector console.
Suppression rules
You can use suppression rules to automatically exclude Amazon Inspector findings that match specified criteria. For example, you can create a rule to suppress all findings with a low vulnerability score. This helps focus your view on only the findings that are the most critical to you.
Suppression rules don't have any impact on the finding itself and don't prevent Amazon Inspector from generating a finding. Suppression rules are only used to filter your list of findings.
If Amazon Inspector generates a new finding that matches a suppression rule, the service automatically sets the status of the finding to Suppressed. The findings that match suppression rule criteria don't appear by default.
Exporting findings reports
In addition to sending findings to Amazon EventBridge and AWS Security Hub, you can optionally export findings to an Amazon Simple Storage Service (Amazon S3) bucket as a findings report. A findings report is a CSV or JSON file that contains the details of findings that you choose to include in the report
Amazon Inspector deep inspection for Amazon EC2 Linux instances
With deep inspection Amazon Inspector can detect package vulnerabilities for application programming language packages in your Linux-based Amazon EC2 instances. Amazon Inspector scans default paths for programming language package libraries. You can also configure custom paths in addition to the default ones. For more information, see Custom paths for Amazon Inspector Deep inspection.
Amazon Inspector performs deep inspection scans using data collected from an Amazon Inspector SSM plugin.
Amazon Inspector collects updated application inventory from instances for deep inspection every 6 hours.
ℹ️
Deep inspection is not supported for Windows or Mac instances
Custom paths for Amazon Inspector Deep inspection
You can configure custom paths for Amazon Inspector to search when it performs Deep inspection of your Linux Amazon EC2 instances. When you add a custom path Amazon Inspector scans for packages in that directory and all sub-directories within it.
Amazon Inspector scans all custom paths in addition to the following default paths that are scanned for all accounts:
- /usr/lib
- /usr/lib64
- /usr/local/lib
- /usr/local/lib64
Set a custom path in the console
Sign in as the Amazon Inspector delegated administrator and follow the steps following to add custom paths for your organization.
- Open the Amazon Inspector console at https://console.aws.amazon.com/inspector/v2/home.
- Using the AWS Region selector in the upper-right corner of the page, select the Region where you want to activate Lambda standard scanning.
- From the side navigation panel, under General settings, select EC2 scanning settings.
- Under Custom paths for your own account , select Edit to add paths for your individual account. If you're the delegated administrator, you can choose Edit in the Custom paths for your organization pane to add custom paths for all accounts within the organization.
- Enter your custom paths in the text boxes.
- Choose Save to save your custom paths. Amazon Inspector will include these paths in its next Deep inspection.
Deactivate Amazon Inspector
ℹ️
Before you deactivate Amazon Inspector, we recommend that you export your findings. For more information, see Exporting findings reports from Amazon Inspector.
To deactivate Amazon Inspector
- Open the Amazon Inspector console at https://console.aws.amazon.com/inspector/v2/home.
- By using the AWS Region selector in the upper-right corner of the page, choose the Region in which you want to deactivate Amazon Inspector.
- In the navigation pane, choose General settings.
- Choose Deactivate Inspector.
- When prompted for confirmation, enter deactivate in the text box, and then choose Deactivate Inspector.
- (Recommended) Repeat these steps in each Region for which you want to deactivate Amazon Inspector.
Reference:
https://docs.aws.amazon.com/inspector/latest/user/what-is-inspector.html
https://docs.aws.amazon.com/inspector/latest/user/findings-understanding.html
https://docs.aws.amazon.com/inspector/latest/user/deactivating-best-practices.html

Top comments (0)