
In this post, we will be building our own private VPN using a VPS serverand OpenVPN.
Why Private VPN?🤔
Have you ever wondered when you have access to VPN providers? why should you ever consider building your private VPN? Let me help you answer this question. So basically a VPN is something that sits between your network and the Internet. It makes your IP anonymous by sending the IP of the VPN provider's server that you are connected to but the problem is that your network traffic can be easily seen by your VPN provider.
It's a proven fact that these VPN providers sell your data to scammers and advertisers.
If you like to learn more about VPNs do check out this Post.
What is OpenVPN?👐
![]()
OpenVPN is a VPN system that implements techniques to create secure point-to-point or site-to-site connections in routed or bridged configurations and remote access facilities. It implements both client and server applications. It has a Free version which is one of the reasons why I am onto it🤑🤑:)
Getting Started😀
We will not be discussing how to create a server. If you like to more about creating a server do read this Post. I recommend Vultr(Use this link to get $100 credits😉) if you're looking for a cheap and best VPS server provider
Installing Ghost
- First, we should figure out the public IP of our instance. For that, we must run
wget -qO - ipinfo.iowhich will give you similar output to this ⬇
{
  "ip": "11.22.33.444",
  "hostname": "8.9.8.1.bc.googleusercontent.com",
  "city": "Singapore",
  "region": "Singapore",
  "country": "SG",
  "loc": "1.2897,103.8501",
  "org": "AS396982 Google LLC",
  "postal": "018989",
  "timezone": "Asia/Singapore",
  "readme": "https://ipinfo.io/missingauth"
}
- Now we can install OpenVPN by running the following commands
wget https://git.io/vpn -O install-open-vpn.sh
chmod +x install-open-vpn.sh
- Then run
sudo bash install-open-vpn.shfor the shell script to get executed
- Initially, it will ask you for an IP address to use(Make sure you select your pubic IP address)

- Then it will ask you to choose the Network protocols to use (Defaults to UPD)

- Now you will have to choose the PORT on which you want OpenVPN to listen (Defaults to 1194 )

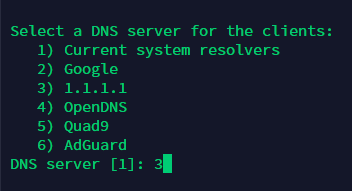
- Now it will ask you to choose the DNS (Domain Name System) Server to use. I Personally prefer Cloudflare's 1.1.1.1. Feel free to choose the one you like
- Name your client and hit enter

- Once the installation is completed. It will give you the location of the client file. You either
cat file_locationor spin up a temporary web server usingpython –m SimpleHTTPServerand download it by visiting your server's IP

- Now you will have to download the OpenVPN Client on your PC/Laptop
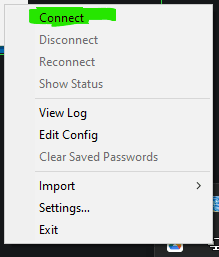
- Once you have downloaded and the installation is complete. You will have to right-click on the OpenVPN client Icon.
![]()
- Then You have to choose Import --> Import file then choose the file that we downloaded or copied from our server.

- Once the file is imported. Now you will see an option to connect Just click on it and you're good to go.
- Now if you visit ipinfo.io you will now see the IP of your server instead of your IP address 😉
Conclusion
Just a quick reminder, If you are using major cloud platforms like Digital Ocean, Google Cloud, and Amazon web services. They have this feature called one-click install wherein you will get your server up and running with OpenVPN pre-installed.
I hope this post was educational and informational to you. Do let me know in the comments section below if you guys have any sort of queries on your mind💡
P.S:- Vultr(Get a $100 credit by registering using this link) is a good hosting choice if you're looking for one
Thanks For Reading!😀

Top comments (0)