
Another phase at Flatiron is in the books and I finished my first full stack application with React/Rails libraries. It was satisfying to finally put together all the pieces that I have been acquiring at each phase of my bootcamp and create something that was super fun to make!
Along the way, I found that working with state in a more complex application was a little more tricky to manage. This led me to start researching better ways to manage state.
Redux
One of the tried and true ways to manage state is to use Redux. It has been around for quite a few years now and was created to manage state in a more centralized manner and structured so that it is easier to debug. In conjunction with the Redux Toolkit (contains packages and functions that are essential to building a Redux app), it guides you to write code that is predictable, testable and helps ensure your web app will behave correctly. Since it has been around the block for awhile, it also has a robust ecosystem with many different addons for your needs.
However, if you are working with a smaller project, Redux might be more trouble than it is worth since there is a lot of boilerplate code and restrictions. You should probably only implement it when:
You have a lot of state that is needed in numerous components in your app.
The app state is updated frequently over time.
The logic to update a certain state is complex.
The app has a medium to large codebase and will be worked on by many people.
It is important to think about the complexity of your app before deciding whether to use it or not. Usually smaller projects can get away with useContext or simply just lifting state.
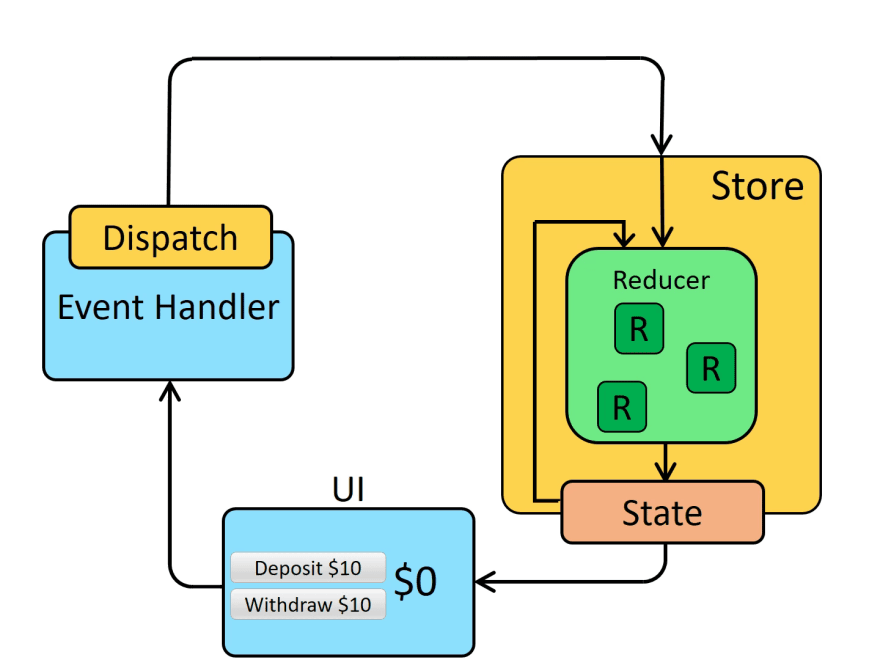
Redux's key players: The store, reducer and dispatcher
The store essentially houses your global state. You should not directly modify state held in here and instead create an "action"/object that describes the action you want to invoke. These actions are held in what is called a reducer. They do the behind the scenes work and calculate the new state based on the previous state and action. The dispatcher is what connects UI to the store and successively the reducer. When the event handler (i.e onClick or onSubmit) is invoked, the dispatcher takes the user action and runs it to the store ** which then runs through the **reducer to determine the correct response action and returns the updated state.
Below is an illustration for better visualization of the data flow but we will also go through a simple example of how it works together:
Creating a simple counter with Redux
After installing 'react-redux' and '@reduxjs/toolkit' into our application we need to create a slice. It is a function that allows us to separate our reducer and action logic by the different features within our app.
// slices/counter.js

import { createSlice } from "@reduxjs/toolkit";

export const slice = createSlice({
  name: "counter",
  initialState: {
    value: 0,
  },
  reducers: {
    increment: (state) => {
      state.value += 1;
    },
    decrement: (state) => {
      state.value -= 1;
    },
  },
});

export const actions = slice.actions;
export const reducer = slice.reducer;
Within the slice function, we set the name or type as the feature we are trying to create. Then we set the initial state of our counter feature to 0 and create the reducer objects that will return the actions we want to invoke. Make sure to name the actions something that can be easily interpreted by others that will be looking at your code (i.e increment, decrement). Export the actions and reducer.
Next, in our store file we want to configure our store and import the configureStore hook from our toolkit as well as our counter reducer we just created
// store.js

import { configureStore } from "@reduxjs/toolkit";
import { reducer as counterReducer } from "./slices/counter";

export default configureStore({
  reducer: {
    counter: counterReducer,
  },
});
Finally, we need our dispatcher to connect us to the UI. In our App component we will import useSelector and useDispatch hook from 'react-redux'. We take the imported actions from our reducer and set them in our dispatch hook to be invoked upon the onClick event. Finally, the useSelector() hook is important as it takes in the function argument that targets the part of the state we want (the counter) and will allow us to "select" or extract the value for it to be displayed to the user.
// App.js

import React from "react";
import { useSelector, useDispatch } from "react-redux";
import { actions } from "./slices/counter";

function App() {
  const count = useSelector((state) => state.counter.value);
  const dispatch = useDispatch();

  return (
    <div className="App">
      <div>
        <h1>Counter</h1>
        <p>{count}</p>
        <button onClick={() => dispatch(actions.increment())}>+</button>
        <button onClick={() => dispatch(actions.decrement())}>-</button>
      </div>
    </div>
  );
}

export default App;
That does it for the basics of Redux! Try it out for yourself and if you have a large scale project on the horizon with a lot of collaborators, Redux might be the right choice for you!
Happy coding!


Top comments (0)