
Introduction
In the previous article, we have covered in detail how to authenticate our Swagger UI and Next.js application using Duende Identity Server. In the previous flows, we used the Authorization Code Grant Type to request the access token, with this flow we centralize our authentication process to use the consent page from the Identity Server. But in some scenarios, we want to use the view from our SPA to authenticate directly (without going to the Identity Server view). Fortunately, Identity Server has a flow which let us achieve that simple thing. It’s it Resource Owner Password Credentials (ROPC) flow.
In this article, we’re going to implement the ROPC flow and use the access token to consume our API.
Github Repo
To easily follow along with this post, you can look into the Github repo:
SPA Identity Server Authenticate Sample
Introduce to Resource Owner Password Credentials Flow
"The Password grant type is a way to exchange a user's credentials for an access token. Because the client application has to collect the user's password and send it to the authorization server, it is not recommended that this grant be used at all anymore.”
”As of OAuth 2.1, the ROPC grant type is now deprecated, and its use is discouraged by the OAuth security best practices.”
ROPC flow is a simple grant flow used for authenticating a user identity and requesting for user's data from the system by a client. It involves the user, who is the "Resource Owner" (resource can be the profile or an API resource). The Identity Server validates the user credentials (username and password) against a userstore (basically a database) and upon successful validation grants the requesting client a token of desired type. Since a user is involved in this flow, the client can request for an access token used to access the API resource which the user has permission.
Implementing the ROPC in Duende Identity Server
We will implement the ROPC using the client config we’ve defined in the previous article.
// Config.cs

new Client
{
    ClientId = "nextjs_web_app",
    ClientName = "NextJs Web App",
    ClientSecrets = { new Secret("secret".Sha256()) },
    RequireClientSecret = false,
    AllowedGrantTypes =  new[] {
            GrantType.AuthorizationCode,
            **GrantType.ResourceOwnerPassword // Add this to allow the client to use ROPC to authorize**
        },

    AllowOfflineAccess = true, // Add this to recieve the refresh token after login

    // where to redirect to after login
    RedirectUris = { "http://localhost:3000/api/auth/callback/sample-identity-server" },
    // where to redirect to after logout
    PostLogoutRedirectUris = { "http://localhost:3000" },
    AllowedCorsOrigins= { "http://localhost:3000" },

    AllowedScopes = new List<string>
    {
        IdentityServerConstants.StandardScopes.OpenId,
        IdentityServerConstants.StandardScopes.Profile,
        "SampleAPI"
    },
Notice the two lines
// ....
AllowedGrantTypes =  new[] {
        GrantType.AuthorizationCode,
        **GrantType.ResourceOwnerPassword // Add this to allow the client to use ROPC to authorize**
},

AllowOfflineAccess = true, // Add this to recieve the refresh token after login
To validate the user credentials against our own user-store, we need to supply our own implementation of the IResourceOwnerPasswordValidator interface, which the Identity Server invokes when it receives a token request of Password GrantType.
Inside the IdentityServerAspNetIdentity project, create a class named UserValidator implementing the interface IResourceOwnerPasswordValidator which declare a single method ValidateAsync(ResourceOwnerPasswordValidationContext context). Identity Server will use this method to validate the credentials and set the context to success or failure .
// UserValidator.cs

public class UserValidator : IResourceOwnerPasswordValidator
{
    private readonly UserManager<ApplicationUser> _userManager;
    private readonly SignInManager<ApplicationUser> _signInManager;
    public UserValidator(
        UserManager<ApplicationUser> userManager,
        SignInManager<ApplicationUser> signInManager)
    {
        _userManager = userManager;
        _signInManager = signInManager;
    }

    public async Task ValidateAsync(ResourceOwnerPasswordValidationContext context)
    {
        var result = await _signInManager.PasswordSignInAsync(context.UserName, context.Password, isPersistent: true, lockoutOnFailure: true);

        if (result.Succeeded)
        {
            var user = await _userManager.FindByNameAsync(context.UserName);
            if (user != null)
            {
                var claims = await _userManager.GetClaimsAsync(user);
                // context set to success
                context.Result = new GrantValidationResult(
                    subject: user.Id.ToString(),
                    authenticationMethod: AuthenticationMethods.Password,
                    claims: claims
                );
                return;
            }
        }

        // context set to Failure
        context.Result = new GrantValidationResult(
                TokenRequestErrors.UnauthorizedClient, "Invalid Crdentials");

    }
}
Then we need to tell Identity Server to use the UserValidator class. In the ConfigurationServices method of HostingExtensions class.
// HostingExtensions.cs

builder.Services
            .AddIdentityServer(options =>
            {
                options.Events.RaiseErrorEvents = true;
                options.Events.RaiseInformationEvents = true;
                options.Events.RaiseFailureEvents = true;
                options.Events.RaiseSuccessEvents = true;

                // see https://docs.duendesoftware.com/identityserver/v6/fundamentals/resources/
                options.EmitStaticAudienceClaim = true;
            })
            .AddInMemoryIdentityResources(Config.IdentityResources)
            .AddInMemoryApiScopes(Config.ApiScopes)
            .AddInMemoryClients(Config.Clients)
            .AddAspNetIdentity<ApplicationUser>()
            **.AddResourceOwnerValidator<UserValidator>(); // Add this line**
We’ve done configuration to accept ROPC authorization for this client. We will test whether it’s successfully before move on setting up our Next.js SPA.
We will use Postman to call the /token endpoint. Start the Identity Server project and make a request like below
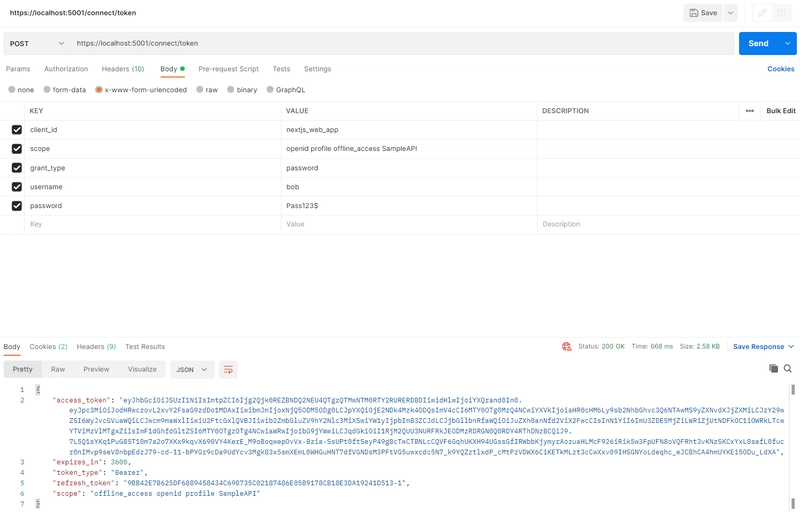
(Or you can use the import function of Postman to import the text below)
curl --location --request POST 'https://localhost:5001/connect/token' \
--header 'Content-Type: application/x-www-form-urlencoded' \
--data-urlencode 'client_id=nextjs_web_app' \
--data-urlencode 'scope=openid profile offline_access SampleAPI' \
--data-urlencode 'grant_type=password' \
--data-urlencode 'username=bob' \
--data-urlencode 'password=Pass123$'
The response contains the JSON object which is like this
{
    "access_token": "xxx",
    "expires_in": 3600,
    "token_type": "Bearer",
    "refresh_token": "xxx",
    "scope": "offline_access openid profile SampleAPI"
}
Notice we got the access_token directly, and when the access_token is expired, we can use the refresh_token to exchange for a new access_token.
Configure Next.js to use authenticate with Username and password
To config our SPA Next.js application to authorize using the ROPC flow, we have to add another provider. NextAuth.js already has one that allows us to handle signing with arbitrary credentials, such as a username and password. We will bring the above Postman request into the Credential provider.
Back to our Next.js application, inside the [...nextauth].ts config file
import CredentialsProvider from "next-auth/providers/credentials";

// ....
export default NextAuth({
  providers: [
        // Other Providers
        // ...

        CredentialsProvider({
      name: "Credentials Demo",
      credentials: {
        username: { label: "Username", type: "text", placeholder: "alice" },
        password: { label: "Password", type: "password" },
      },
      async authorize(credentials, req) {
        const reqData = {
          ...credentials,
          client_id: "nextjs_web_app",
          scope: "openid profile offline_access SampleAPI",
          grant_type: "password",
        } as any

        let formBody = []
        for (let property in reqData) {
          let encodedKey = encodeURIComponent(property)
          let encodedValue = encodeURIComponent(reqData[property])
          formBody.push(encodedKey + "=" + encodedValue)
        }

        const formBodyStr = formBody.join("&")

        const res = await fetch("https://localhost:5001/connect/token", {
          method: "POST",
          body: formBodyStr,
          headers: {
            "Content-Type": "application/x-www-form-urlencoded;charset=UTF-8",
          },
        })
        const response= await res.json()
        // If no error and we have user data, return it
        if (res.ok && response) {
          return response
        }
        // Return null if user data could not be retrieved
        return null
      },
    }),
    ]
})
The response data schema is like this
{
    "access_token": "xxx",
    "expires_in": 3600,
    "token_type": "Bearer",
    "refresh_token": "xxx",
    "scope": "offline_access openid profile SampleAPI"
}
Start the application and go to http://localhost:3000/. Press the Sign in button on the header, you will be navigated to NextAuth.js Sign in page

There will be two options for you to Sign in, using the flow in the previous article or sign in directly using the RPOC flow. We will test the RPOC flow by entering username and password: alice/Pass123$. Then you should login successfully and redirected back to http://localhost:3000/
Consume the API with the Access Token
We have learned how to authorize our users and successfully get the access_token from Identity Server. Now we will use that token to consume our API.
The cool thing is that NextAuth.js already made it very easy for us. It provides a helper call getToken() which we can inject everywhere to get the current login JWT token.
By default, NextAuth.js doesn’t save the OAuth tokens to it provider. So to start, we want to make those tokens accessible so that we can use them to consume our API.
In NextAuth.js, we can define callbacks which allow us to tap into the authentication events and customize what gets returned. Open up the [...nextauth].ts and add the following codes
// ....
export default NextAuth({
  // ...
    providers: [...]
    // ...
    callbacks: {
    async signIn({ user, account, profile, email, credentials }) {
      if (user?.access_token) {
        account.access_token = user?.access_token as string
      }
      if (user?.refresh_token) {
        account.refresh_token = user?.refresh_token as string
      }

      return true
    },
    async jwt({ token, user, account, profile, isNewUser }) {
      if (account?.access_token) {
        token.access_token = account?.access_token
      }

      if (account?.refresh_token) {
        token.refresh_token = account?.refresh_token
      }

      return token
    },
})
A little explaination further
- The
signIncallback will be called before thejwtcall back. We will make sure the returned token of thejwtcallback will always contains the access_token and refresh_token. - If we sign in using the ROPC flow, then the access_token and refresh_token will be available in the
signIn’s user object. We will pass down the tokens from the user to account, then from account to token inside thejwtcallback - If we sign in using the Authorization Code flow (the flow we did in the previous article), then the access_token and refresh_token will be available in the
jwt’s account object. We just have to pass down the tokens from account to token object. - Then the tokens will be available in the session and we can use it anywhere within the NextAuth.js’s SessionProvider
In the context of this example, we will make a call to our WeatherForecastController’s endpoints. (Remember to start the API application first!!)
Inside the /pages/api folder, create a folder called sample. and put an index.ts file into it. This will be used to call our endpoint.
// /pages/api/sampe/index.ts
import { getToken } from "next-auth/jwt"
import type { NextApiRequest, NextApiResponse } from "next"

const secret = process.env.SECRET

export default async function sample(req: NextApiRequest, res: NextApiResponse
) {
    const token = await getToken({ req, secret });
    if(!token?.access_token){
        return res.status(401).json({
            status: 'Need Authorization!'
        })
    }

    try{
        const result = await fetch("https://localhost:7101/WeatherForecast", {
            method: "GET",
            headers: {
              "Authorization": "Bearer " + token?.access_token,
            },
          });

        return res.status(200).json({
            status: 'Ok',
            data: await result.json()
        })

    }
    catch(e: any){
        return res.status(400).json({
            status: e.message
          });
    }
}
Once we done this, we should be able to access this directly in our browser by visiting http://localhost:3000/api/sample
At the first time the page should return
{"status":"Need Authorization!"}
We have to go back to http://localhost:3000/, perform the login actions, then the data at http://localhost:3000/api/sample should be which indicate that we are successfully consuming our API!
{
    "status": "Ok",
    "data": [
        {
            "date": "2022-04-14T17:59:46.1262274+07:00",
            "temperatureC": -2,
            "temperatureF": 29,
            "summary": "Bracing"
        },
        {
            "date": "2022-04-15T17:59:46.1262316+07:00",
            "temperatureC": 37,
            "temperatureF": 98,
            "summary": "Chilly"
        },
        {
            "date": "2022-04-16T17:59:46.1262318+07:00",
            "temperatureC": 6,
            "temperatureF": 42,
            "summary": "Balmy"
        },
        {
            "date": "2022-04-17T17:59:46.1262319+07:00",
            "temperatureC": -8,
            "temperatureF": 18,
            "summary": "Hot"
        },
        {
            "date": "2022-04-18T17:59:46.126232+07:00",
            "temperatureC": -13,
            "temperatureF": 9,
            "summary": "Warm"
        }
    ]
}
What else can we do?
Read more about OAuth2, Grant Types and why ROPC is deprecated
- https://aaronparecki.com/oauth-2-simplified/
- https://www.scottbrady91.com/oauth/why-the-resource-owner-password-credentials-grant-type-is-not-authentication-nor-suitable-for-modern-applications
Role based Authorization
Further to this tutorial, I will make another series of how to implement the Role Based Authorization and use it to protect our API. Hope that everyone will enjoy it!
Summary
We have done the most basic ways to authenticate a Next.js SPA with Duende Identity Server. There're more things to explore at NextAuth.js documentation and Duende Identity Server documentation. So remember to give them a visit and try to implement things on your own.
Thank you for reading!! 🤗🤗🤗
References
- https://referbruv.com/blog/posts/implementing-resource-owner-password-credentials-(ropc)-using-identityserver4
- https://next-auth.js.org/getting-started/introduction
- https://www.scottbrady91.com/oauth/why-the-resource-owner-password-credentials-grant-type-is-not-authentication-nor-suitable-for-modern-applications

Top comments (0)