
You must always maintain the application's state when working on a React project. The best way to do this is to use a tool like Redux to store the state in one place. However, if you are building a large application, its state can become very complex and hard to maintain.
This blog will look at how you can use Redux Slices with the react-redux toolkit to manage the complexity of your application.
But before proceeding, let’s discuss Redux and Redux Toolkit!!
What is Redux?
Redux is a JavaScript library for managing app state. It is often used with React, a popular JavaScript library for building user interfaces, but it can also be used with other frameworks or on its own.
Redux is based on the idea of a global, immutable state tree, which means that the entire application's state is stored in a single, immutable data structure. This data structure can only be modified by dispatching an action, an object describing a state change. When an action is dispatched, it is passed through a series of functions called reducers, which update the state tree according to the action.
One of the main benefits of using Redux is that it makes it easy to manage and debug the state of a complex application. Because the state is stored in a single, immutable data structure, it is easy to track changes over time and understand how the application's state evolved. In addition, because actions and reducers are pure functions, they are easy to test and debug.
What is Redux Toolkit?
Redux Toolkit is a set of libraries and utilities designed to make it easier to work with Redux and write Redux-based applications. It provides a streamlined, opinionated approach to defining actions and reducers. It includes a set of utility functions for common Redux tasks, such as store setup, immutable update logic, and serialization.
One of the main benefits of using Redux Toolkit is that it helps reduce the boilerplate code typically required when working with Redux. For example, the createSlice function allows you to define a reducer and associated actions in a single place and automatically generates the action types and creators for you. This can make it much easier to work with Redux, especially in larger applications where there may be many actions and reducers.
In addition to providing utility functions, React-Redux Toolkit includes a set of recommended best practices for working with Redux. These best practices are designed to help developers write clean, maintainable code that is easy to test and debug.
Overall, Redux Toolkit react is a powerful tool for working with Redux that can help developers build complex, scalable applications easily.
Read More:

Complete Guide to Redux-Toolkit & RTK Query with React
Do you know that you can use Redux Toolkit & its latest addition: RTK Query? Yes, now you can use Redux with features as React Query provides.
What is CreateSlice?
CreateSlice is a utility function provided by Redux Toolkit that makes it easier to define a reducer and associated actions for a particular application state. It is designed to reduce the boilerplate code typically required when working with Redux. And to make it easier to organize and structure your code.
To use CreateSlice, you pass in an object that defines the initial state of the slice, as well as any reducer functions that you want to create. CreateSlice will then generate the action types & action creators based reducer function name you provided.
Here's an illustration of how you can use CreateSlice to define a reducer for a slice of state called "counter":
import { createSlice } from '@reduxjs/toolkit';
const counterSlice = createSlice({
  name: 'counter',
  initialState: {
    value: 0
  },
  reducers: {
    increment: state => {
      state.value += 1;
    },
    decrement: state => {
      state.value -= 1;
    }
  }
});

export const { increment, decrement } = counterSlice.actions;
export default counterSlice.reducer;
This code defines a reducer with two actions: increment and decrement. CreateSlice will automatically generate action types and action creators for these actions based on the names of the reducer functions.
You can then use the generated action creators to dispatch actions and the generated reducer to update the state in response to those actions. For example-
import store from './store';

import { increment, decrement } from './counterSlice';

store.dispatch(increment());

store.dispatch(decrement());
In a nutshell, CreateSlice is a powerful and convenient tool for defining reducers and actions in Redux applications, and it can help you write clean, maintainable code with less boilerplate.
How To Setup Redux Slices with Redux Toolkit?
Let's build a quick application to dynamically add a place name to the existing list. This will aid in the implementation of CreateSlice, dispatch action, and store configuration.
Step 1: Process to Implement createSilce and Export Actions and Reducer
Creating the file containing the slice is a part of this phase. Here, the file name is maintained as "locationSlice.js."
- Initially, import the redux-toolkit library's createSlice method.
- Use the createSlice method to generate your slice.
- All the values needed to build a reducer are present in the locationSlice that was created earlier. We now need to export the reducer and the actions.
import { createSlice } from '@reduxjs/toolkit';
const locationSlice = createSlice({
    name: "location",
    initialState: {
        location: ['Noida', 'Banglore', 'Delhi'],
    },
    reducers: {
        save: (state, param) => {
            const { payload } = param;
            state.location = [...state.location, payload];
        },
    }
});
const { actions, reducer } = locationSlice
export const { save } = actions;
export default reducer;
In each scenario, createSlice generates an action creator using the reducer name as the action type itself after examining all the functions declared in the reducers field.
In the code mentioned above, the save reducer created above evolved an action type of location/save, and the save() action creator will produce an action with that type.
Here, we also define the slice and export its action creators and reducers using the advised ES6 de-structuring. However, if favored, we can export the slice object directly instead of de-structuring and exporting.
Step 2: Here, Dispatch Action by Using React Hooks in Functional Component
We must now use the React Hooks. Use the useSelector to read the state and the useDispatcher to send the slice-created action. We'll implement it now and check out the app's functionality.
import { useDispatch, useSelector } from "react-redux";

import { save } from "./locationSlice";
We can destruct the redux-store object provided by the useSelector hook to obtain the state values.
The dispatcher must be configured by calling useDispatch hook.
const { location } = useSelector(state=>state)

const dispatch = useDispatch();
Here is the final code for integrating the above logic to have an app that dynamically reads and updates the state value.
import React, { useState } from "react";
import { save } from "./locationSlice";
import { useDispatch, useSelector } from "react-redux";
import { Box, TextField, Button } from "@material-ui/core";

export default function App() {
    const [locationName, setLocationName] = useState('');
    const dispatch = useDispatch();
    const { location } = useSelector(state=>state)
    const handleData = (e) => {
        setLocationName(e.target.value);
    }
    const handleSave = () => {
        const ifPrestent = location.includes(locationName);
        if(locationName !== undefined && !ifPrestent) {
            dispatch(save(locationName));
            setLocationName('')
        } else {
            setLocationName('')
        }
    }
    return (
        <Box>
            <Box>
 <TextField
                    onChange={handleData}
                    value={locationName}
                    label="Enter location name"
                />
                <Button
                    style={{margin: '10px'}}
                    variant="contained"
                    color="primary"
                    onClick={handleSave}
                >
                    add
                </Button>
            </Box>
            <Box>
                <h3> List of locations </h3>
            </Box>
            <Box>
                 {location.map((item) => <li>{item}</li>) }
            </Box>
        </Box>
    );
}
Step 3: Store Configuration
We now require to link our store with the application. CreateStore() is wrapped by configureStore({}) in this case to make configuration easier for us. The complete state tree of your app is stored in the redux store created by createStore().
import React from "react";
import ReactDOM from "react-dom";
import App from "./App";
import { configureStore } from "@reduxjs/toolkit";
import { Provider } from "react-redux";
import rootReducer from "./locationSlice";
const store = configureStore({
    reducer: rootReducer
});
ReactDOM.render(
    <Provider store={store}>
        <App />
    </Provider>,
    document.getElementById('root')
);
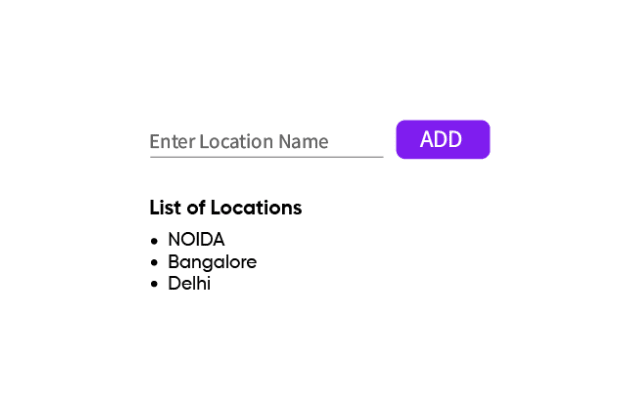
Here is how the app appears in the browser after its use. Try adding a new location name to see if the list of locations is dynamically updated.
Final TakeAway
You now know how to create and use the redux toolkit's createSlice method. This allows you to write all the actions and reducers for your redux store in a single file and to do it in a much more readable style.

Top comments (6)
// store.js
import { legacy_createStore as createStore, applyMiddleware } from 'redux';
import thunk from 'redux-thunk';
import rootReducer from './reducers'; // Import your combined reducers
const store = createStore(rootReducer, applyMiddleware(thunk));
export default store;
// actions.js
export const FETCH_DATA_REQUEST = 'FETCH_DATA_REQUEST';
export const FETCH_DATA_SUCCESS = 'FETCH_DATA_SUCCESS';
export const FETCH_DATA_FAILURE = 'FETCH_DATA_FAILURE';
export const SEARCH ='SEARCH'
export const fetchDataRequest = () => ({
type: FETCH_DATA_REQUEST,
});
export const fetchDataSuccess = (data) => ({
type: FETCH_DATA_SUCCESS,
payload: data,
});
export const fetchDataFailure = (error) => ({
type: FETCH_DATA_FAILURE,
payload: error,
});
export const FIND1 = (value) => ({
type: SEARCH,
payload: value,
});
export const fetchData = () => {
console.log("start1")
return async (dispatch) => {
dispatch(fetchDataRequest());
try {
console.log("start2")
const response = await fetch('dummyjson.com/products');
if (!response.ok) {
throw new Error('Network response was not ok');
}
const data = await response.json();
dispatch(fetchDataSuccess(data));
} catch (error) {
dispatch(fetchDataFailure(error.message));
}
};
};
export const Search = (state,value) => {
console.log("start1")
return async (dispatch) => {
try {
const response = await fetch('dummyjson.com/products');
if (!response.ok) {
throw new Error('Network response was not ok');
}
const data = await response.json();
dispatch(fetchDataSuccess(data));
} catch (error) {
dispatch(fetchDataFailure(error.message));
}
};
};
// dataReducer.js
import {
FETCH_DATA_REQUEST,
FETCH_DATA_SUCCESS,
FETCH_DATA_FAILURE,
SEARCH,
} from './actions';
const initialState = {
data: [],
loading: false,
error: null,
};
const dataReducer = (state = initialState, action) => {
switch (action.type) {
case FETCH_DATA_REQUEST:
return { ...state, loading: true, error: null };
case FETCH_DATA_SUCCESS:
console.log(action.payload)
return { ...state, loading: false, data: action.payload };
case SEARCH:
function filterItems(itemList, query) {
return itemList.filter(item => {
for (const key in item) {
if (typeof item[key] === "string" && item[key].toLowerCase().includes(query.toLowerCase())) {
return true;
}
}
return false;});
}
const filteredItems = filterItems(state.data, action.payload);
return { ...state, loading: false, data: filteredItems};
};
export default dataReducer;
useEffect(() => {
App1dispatch(fetchData());
}, [dispatch]);
return (
)
}
dummyjson.com/products
const data1 = useSelector((state) => state);
const dispatch = useDispatch();