Learn how to build extensible applications with Angular and reuse your code and abilities to build apps for any deployment target —web, mobile web, iOS, Android, and desktops (macOS, Windows, and Linux).
Based on an original article by Richard Sithole. Angular and Electron versions updated an text cropped.
Why use a single codebase?
Monorepo-style development is an approach where you develop multiple projects in the same repository. Projects can depend on each other and allows code-sharing.
Code changes in one project do not necessarily force all other projects to be rebuilt. You only rebuild or retest the projects affected by the code change. As a result, your Continuous Integration (CI) pipeline is faster, while maintaining your teams' independence.
Why Angular?
"Learn one way to build applications with Angular and reuse your code and abilities to build apps for any deployment target. For web, mobile web, native mobile and native desktop".
— Angular.io docs.
Angular provides tooling which allows you to build features quickly with simple declarative templates. This article assumes basic knowledge of Angular and its best practices. If not, try it out.
Much has been written about Angular and other JavaScript frameworks. As the original article author, I have had a great developer experience with Angular. Check the Richard talk about why Angular has been his framework of choice.
Why Electron?
Electron is a framework that enables developers to create cross-platform desktop applications with JavaScript, HTML, and CSS. These apps can then be packaged to run directly on the OS or distributed via the Mac App Store or the Microsoft Store.
Why Capacitor?
Capacitor is an open source native runtime for building web native apps. It allows you to target iOS, Android, and Progressive Web Apps (PWAs) platforms with JavaScript, HTML, and CSS. Also, it provides access to the full Native SDKs on each platform, so you can deploy to the App Stores while still able to target the web.
If you're familiar with Cordova, check the differences according to Capacitor.js creators here.
Introduction to the sample application (and tools)
We will go through each step of weaving together all the target platforms starting with Electron, then Android and finally iOS. I recommend you to start from scratch, but if you have an existing Angular application, you will see where and how you can add support for other platforms.
If you just want to see the end result (or fork the project), here is the git repo.
In any case, I encourage every reader to go through the details as it might come in handy down the line when your app is all grown up, and you have to debug it.
Why should I care?
In this article, I will show how we can use our Angular knowledge to build a game application using the Angular framework. As a default, you will be able to play the game on the web. We will add Electron to have the game installable on a computer. Lastly, we will enable our game to be deployable on a mobile device for maximum user reach. All this from a single (and simple) repository.
As an aside, if you are interested in game development with Angular, you can check out this article, which our game application is based on. I will not dwell in the details of how the game is built, as the article goes in-depth and shows you how to build one from scratch. Our focus will be on how to stitch together disparate technologies to help us, not only to understand all the moving parts, but also enable us to target as many platforms as possible. Let's get started!
Setting up the project
First, let us start by globally installing Angular-CLI:
npm install -g @angular/cli
Since we plan to have multiple applications in the workspace, we create an empty workspace using ng new and set the —createApplication option to false:
ng new cross-platform-monorepo --create-application=false
Go to the new created folder and then add the first Angular application to the workspace:
cd cross-platform-monorepo
ng generate application tetris --ssr=false
The above allows a workspace name to be different from the initial app name, and ensures that all applications (and libraries) reside in the /projects subfolder, matching the workspace structure of the configuration file in angular.json.
Add the second Angular application (placeholder) to the workspace:
ng generate application tetris2 --ssr=false
In order to reuse code in our applications, we can take advantage of the Angular multi-project architecture and create a library project which will hold the game engine logic.
ng generate library game-engine-lib
By separating the shell parts (apps) from the logic parts (libs), we ensure that our code is manageable, extendible, and reusable between teams.
Game code
Now that we have the core structure of our game application, the next thing is to add the code for our game.
As mentioned above, the game is based on this article, which also contains a link to the GitHub repository which you can find here. We have modified the code a bit to demonstrate the use of native APIs (e.g. file system access) both on desktop and mobile apps, and improving design 🤩. More on this later.
Using libraries in Angular apps
Angular framework allows us to easily build npm libraries. We do not have to publish a library to the npm package manager to use it in our own apps, however, we cannot use a library before it is built so let us do that now.
Note: I use the terms "lib" and "library" interchangeably —both refer to an Angular library as described here
In the terminal of your choice, run this command:
ng build game-engine-lib
If the operation was successful, you should see an output like the one below:

To make our lives a little easier, let's add some scripts to the package.json file:
"scripts": {
    "ng": "ng",
    "serve:ssr:tetris": "node dist/tetris/server/server.mjs",
    "start:tetris": "ng serve tetris -o",
    "build:tetris": "ng build tetris",
    "test:tetris": "ng test tetris",
    "lint:tetris": "ng lint tetris",
    "e2e:tetris": "ng e2e tetris",
    "start:tetris2": "ng serve tetris2 -o",
    "build:game-engine-lib": "ng build game-engine-lib --watch",
    "test:game-engine-lib": "ng test game-engine-lib",
    "lint:game-engine-lib": "ng lint game-engine-lib",
    "e2e:game-engine-lib": "ng e2e game-engine-lib"
  }
Lastly, we will use TypeScript path mapping for peer dependencies to reference our lib within our apps.
In the root tsconfig.json inside compilerOptions, modify the code as follows:
"paths": {
      "@game-engine-lib": ["./dist/game-engine-lib"]
}
Note: I prefer to add "@" in front of the library name to easily distinguish it from local file imports.
In the game-engine-lib.service.ts file, add the following getter:
get testing(): string {
    return "GameEngineLibService works!";
  }
Each time we make changes to a lib, we need to rebuild it —alternatively, we can use the -watch flag to automatically do so on file save.
Let's rebuild the lib using one of the scripts we have just added:
npm run build:game-engine-lib
Now let us test whether or not we are able to consume the exports specified in the public-api.ts file.
In the app.componet.ts of the tetris app, import and usethe service (In Angular 17's standalone mode, where the traditional app.module.ts file is not automatically generated, you can organize your application without a central module file. Instead, you can import the necessary modules directly into the components where they are needed):
import { GameEngineLibService } from '@game-engine-lib';
constructor(private engineService: GameEngineLibService) {
    console.info(engineService.testing);
  }
Finally, in your terminal, serve the tetris app using one of the scripts we added earlier:
npm run start:tetris
After the app is compiled and the browser window opened, you should see the following:

Pat yourself on the back, stretch your legs and when you are ready, let us continue to the fun(ky) parts.
Note: The following section involves moving files. If you feel lost, compare your file structure with that of the finished project.
Adding game code
Since we are working in a multi-project repository, we need to re-organize the game code a bit. The "utility" parts of the code will go into the library, and the "shell" will be the application project (tetris folder). We will leave the tetris2 app as is for the time being.
To keep our code well-organized, let's create a components sub-folder inside the lib folder (i.e., projects/game-engine-lib/src/lib):
ng g c components/board --project=game-engine-lib
Change board.component.ts code to this one:
import {
  Component,
  ViewChild,
  ElementRef,
  OnInit,
  HostListener,
} from '@angular/core';
import {
  COLS,
  BLOCK_SIZE,
  ROWS,
  COLORS,
  COLORSLIGHTER,
  LINES_PER_LEVEL,
  LEVEL,
  POINTS,
  KEY,
  COLORSDARKER,
} from '../../constants';
import { Zoundfx } from 'ng-zzfx';
import { IPiece, PieceComponent } from '../piece/piece.component';
import { GameEngineLibService } from '../../services/game-engine-lib.service';

@Component({
  selector: 'game-board',
  templateUrl: 'board.component.html',
})
export class BoardComponent implements OnInit {
  @ViewChild('board', { static: true })
  canvas!: ElementRef<HTMLCanvasElement>;
  @ViewChild('next', { static: true })
  canvasNext!: ElementRef<HTMLCanvasElement>;
  ctx!: CanvasRenderingContext2D;
  ctxNext!: CanvasRenderingContext2D;
  board!: number[][];
  piece!: PieceComponent;
  next!: PieceComponent;
  requestId!: number;
  paused!: boolean;
  gameStarted!: boolean;
  time!: { start: number; elapsed: number; level: number };
  points!: number;
  highScore!: number;
  lines!: number;
  level!: number;
  moves = {
    [KEY.LEFT as string]: (p: IPiece): IPiece => ({ ...p, x: p.x - 1 }),
    [KEY.RIGHT as string]: (p: IPiece): IPiece => ({ ...p, x: p.x + 1 }),
    [KEY.DOWN as string]: (p: IPiece): IPiece => ({ ...p, y: p.y + 1 }),
    [KEY.SPACE as string]: (p: IPiece): IPiece => ({ ...p, y: p.y + 1 }),
    [KEY.UP as string]: (p: IPiece): IPiece => this.service.rotate(p),
  };
  playSoundFn!: Function;

  @HostListener('window:keydown', ['$event'])
  keyEvent(event: KeyboardEvent) {
    if (event.key === KEY.ESC) {
      this.gameOver();
    } else if (this.moves[event.key]) {
      event.preventDefault();
      // Get new state
      let p = this.moves[event.key](this.piece);
      if (event.key === KEY.SPACE) {
        // Hard drop
        while (this.service.valid(p, this.board)) {
          this.points += POINTS.HARD_DROP;
          this.piece.move(p);
          p = this.moves[KEY.DOWN](this.piece);
        }
      } else if (this.service.valid(p, this.board)) {
        this.piece.move(p);
        if (event.key === KEY.DOWN) {
          this.points += POINTS.SOFT_DROP;
        }
      }
    }
  }

  constructor(
    private service: GameEngineLibService) {}

  async ngOnInit() {
    this.initBoard();
    this.initSound();
    this.initNext();
    this.resetGame();
  }

  initSound() {
    this.playSoundFn = Zoundfx.start(0.2);
  }

  initBoard() {
    this.ctx = this.canvas.nativeElement.getContext('2d')!;

    // Calculate size of canvas from constants.
    this.ctx.canvas.width = COLS * BLOCK_SIZE;
    this.ctx.canvas.height = ROWS * BLOCK_SIZE;

    // Scale so we don't need to give size on every draw.
    this.ctx.scale(BLOCK_SIZE, BLOCK_SIZE);
  }

  initNext() {
    this.ctxNext = this.canvasNext.nativeElement.getContext('2d')!;

    // Calculate size of canvas from constants.
    // The + 2 is to allow for space to add the drop shadow to
    // the "next piece"
    this.ctxNext.canvas.width = 4 * BLOCK_SIZE + 2;
    this.ctxNext.canvas.height = 4 * BLOCK_SIZE;

    this.ctxNext.scale(BLOCK_SIZE, BLOCK_SIZE);
  }

  play() {
    this.gameStarted = true;
    this.resetGame();
    this.next = new PieceComponent(this.ctx);
    this.piece = new PieceComponent(this.ctx);
    this.next.drawNext(this.ctxNext);
    this.time.start = performance.now();

    // If we have an old game running a game then cancel the old
    if (this.requestId) {
      cancelAnimationFrame(this.requestId);
    }

    this.animate();
  }

  resetGame() {
    this.points = 0;
    this.lines = 0;
    this.level = 0;
    this.board = this.getEmptyBoard();
    this.time = { start: 0, elapsed: 0, level: LEVEL[this.level] };
    this.paused = false;
    this.addOutlines();
  }

  animate(now = 0) {
    this.time.elapsed = now - this.time.start;
    if (this.time.elapsed > this.time.level) {
      this.time.start = now;
      if (!this.drop()) {
        this.gameOver();
        return;
      }
    }
    this.draw();
    this.requestId = requestAnimationFrame(this.animate.bind(this));
  }

  draw() {
    this.ctx.clearRect(0, 0, this.ctx.canvas.width, this.ctx.canvas.height);
    this.piece.draw();
    this.drawBoard();
  }

  drop(): boolean {
    let p = this.moves[KEY.DOWN](this.piece);
    if (this.service.valid(p, this.board)) {
      this.piece.move(p);
    } else {
      this.freeze();
      this.clearLines();
      if (this.piece.y === 0) {
        // Game over
        return false;
      }
      this.playSoundFn([
        ,
        ,
        224,
        0.02,
        0.02,
        0.08,
        1,
        1.7,
        -13.9,
        ,
        ,
        ,
        ,
        ,
        6.7,
      ]);
      this.piece = this.next;
      this.next = new PieceComponent(this.ctx);
      this.next.drawNext(this.ctxNext);
    }
    return true;
  }

  clearLines() {
    let lines = 0;
    this.board.forEach((row, y) => {
      if (row.every((value) => value !== 0)) {
        lines++;
        this.board.splice(y, 1);
        this.board.unshift(Array(COLS).fill(0));
      }
    });
    if (lines > 0) {
      this.points += this.service.getLinesClearedPoints(lines, this.level);
      this.lines += lines;
      if (this.lines >= LINES_PER_LEVEL) {
        this.level++;
        this.lines -= LINES_PER_LEVEL;
        this.time.level = LEVEL[this.level];
      }
    }
  }

  freeze() {
    this.piece.shape.forEach((row, y) => {
      row.forEach((value, x) => {
        if (value > 0) {
          this.board[y + this.piece.y][x + this.piece.x] = value;
        }
      });
    });
  }

  private add3D(x: number, y: number, color: number): void {
    //Darker Color
    this.ctx.fillStyle = COLORSDARKER[color];
    // Vertical
    this.ctx.fillRect(x + 0.9, y, 0.1, 1);
    // Horizontal
    this.ctx.fillRect(x, y + 0.9, 1, 0.1);

    //Darker Color - Inner
    // Vertical
    this.ctx.fillRect(x + 0.65, y + 0.3, 0.05, 0.3);
    // Horizontal
    this.ctx.fillRect(x + 0.3, y + 0.6, 0.4, 0.05);

    // Lighter Color - Outer
    this.ctx.fillStyle = COLORSLIGHTER[color];

    // Lighter Color - Inner
    // Vertical
    this.ctx.fillRect(x + 0.3, y + 0.3, 0.05, 0.3);
    // Horizontal
    this.ctx.fillRect(x + 0.3, y + 0.3, 0.4, 0.05);

    // Lighter Color - Outer
    // Vertical
    this.ctx.fillRect(x, y, 0.05, 1);
    this.ctx.fillRect(x, y, 0.1, 0.95);
    // Horizontal
    this.ctx.fillRect(x, y, 1, 0.05);
    this.ctx.fillRect(x, y, 0.95, 0.1);
  }

  private addOutlines() {
    for (let index = 1; index < COLS; index++) {
      this.ctx.fillStyle = 'black';
      this.ctx.fillRect(index, 0, 0.025, this.ctx.canvas.height);
    }

    for (let index = 1; index < ROWS; index++) {
      this.ctx.fillStyle = 'black';
      this.ctx.fillRect(0, index, this.ctx.canvas.width, 0.025);
    }
  }

  drawBoard() {
    this.board.forEach((row, y) => {
      row.forEach((value, x) => {
        if (value > 0) {
          this.ctx.fillStyle = COLORS[value];
          this.ctx.fillRect(x, y, 1, 1);
          this.add3D(x, y, value);
        }
      });
    });
    this.addOutlines();
  }

  pause() {
    if (this.gameStarted) {
      if (this.paused) {
        this.animate();
      } else {
        this.ctx.font = '1px Arial';
        this.ctx.fillStyle = 'black';
        this.ctx.fillText('GAME PAUSED', 1.4, 4);
        cancelAnimationFrame(this.requestId);
      }

      this.paused = !this.paused;
    }
  }

  gameOver() {
    this.gameStarted = false;
    cancelAnimationFrame(this.requestId);
    this.ctx.fillStyle = 'black';
    this.ctx.fillRect(1, 3, 8, 1.2);
    this.ctx.font = '1px Arial';
    this.ctx.fillStyle = 'red';
    this.ctx.fillText('GAME OVER', 1.8, 4);
  }

  getEmptyBoard(): number[][] {
    return Array.from({ length: ROWS }, () => Array(COLS).fill(0));
  }
}
Next, in the same lib directory, create a piece folder. Delete game-engine-lib.component.ts and game-engine-lib.component.spec.ts files.
Copy the contents of board.component.html, piece.component.ts and piece.component.html files from the finished project of our monorepo board and piece folders respectively. Grab the constants.ts file and add it to projects/game-engine-lib/src/lib directory.
Move game-engine-lib.service.ts and game-engine-lib.service.spec.ts files to a new services folder.
Install ng-zzfx:
npm install ng-zzfx
Expose the Board component in the public API surface of our game-engine-lib so it can be consumed by the apps:
export * from './lib/components/board/board.component';
Our code structure should now look like this:

Now we are ready to use the game engine logic in the tetris app (or any other app you might decide to add at a later stage).
In the tetris app (i.e. /projects/tetris/src/app), replace the placeholder code in app.component.html with the following:
<game-board></game-board>
Do not forget to copy and paste the styles.scss file content to its equivalent as well.
Now let us use one of our scripts to build the lib one more time (if not already running with - watch flag) and test if everything works:
npm run build:game-engine-lib
Then fire up the Tetris game (npm run start:tetris). If all worked out fine, you should see the below when your browser opens, try it out! ☺:

Integrating Electron into the workspace
To have an in-depth idea of how to setup a standalone Electron app, have a look here.
For our tetris game app, we need to first install Electron.js
npm install --save-dev electron
npm install @electron/remote
An Electron app uses the package.json file as its main entry point (as any other node.js app). So let us modify the package.json file as follows:
{
...
"name": "cross-platform-monorepo",
 "version": "0.0.0",
 "description": "Cross-platform monorepo Angular app",
 "author": {
    "name": "your name",
    "email": "your@email.address"
  },
 "main": "main.js",
...
}
If you have written a lot of Angular code or worked in large codebases like I have, you would know how indispensable TypeScript (TS) is, so let us create a main.ts file instead of writing error-prone pure JavaScript (JS) code. When we build the tetris app, the main.ts code will be transpiled to JS code by the TS compiler (tsc). The output of this process will be the main.js file. This is what gets served to Electron.
Create the main.ts file and fill it with the following code:
import { app, BrowserWindow, screen } from 'electron';
import * as path from 'path';
import * as url from 'url';

let win: BrowserWindow = null;
const args = process.argv.slice(1),
  serve = args.some((val) => val === '--serve');

function createWindow(): BrowserWindow {
  const electronScreen = screen;
  const size = electronScreen.getPrimaryDisplay().workAreaSize;

  const remoteMain = require('@electron/remote/main');
  remoteMain.initialize();

  // Create the browser window:
  win = new BrowserWindow({
    x: 0,
    y: 0,
    width: size.width,
    height: size.height,
    webPreferences: {
      nodeIntegration: true,
      allowRunningInsecureContent: serve ? true : false,
      contextIsolation: false, // false if you want to run e2e tests with Spectron
    },
  });

  remoteMain.enable(win.webContents); // if you want to run e2e tests with Spectron or use remote module in renderer context (i.e. Angular apps)

  if (serve) {
    win.webContents.openDevTools();

    require('electron-reload')(__dirname, {
      electron: path.join(__dirname, 'node_modules', '.bin', 'electron'),
    });
    win.loadURL('http://localhost:4200');
  } else {
    win.loadURL(
      url.format({
        pathname: path.join(__dirname, 'dist/index.html'),
        protocol: 'file:',
        slashes: true,
      })
    );
  }

  // Emitted when the window is closed.
  win.on('closed', () => {
    // Deference from the window object, usually you would store window
    // in an array if your app supports multi windows, this is the time
    // when you should delete the corresponding element.
    win = null;
  });

  return win;
}

try {
  // This method will be called when Electron has finished
  // initialization and is ready to create browser windows.
  // Some APIs can only be used after this event occurs.
  // Added 400ms to fix the black background issue while using a transparent window.
  app.on('ready', () => setTimeout(createWindow, 400));

  // Quit when all windows are closed.
  app.on('window-all-closed', () => {
    // On OS X it is common for applications and their menu bar
    // to stay active until the user quits explicitly with Cmd + Q
    if (process.platform !== 'darwin') {
      app.quit();
    }
  });

  app.on('activate', () => {
    // On OS X it's common to re-create a window in the app when the
    // dock icon is clicked and there are no other windows open.
    if (win === null) {
      createWindow();
    }
  });
} catch (e) {
  // handle error
}
Let's now add a couple more npm scripts to help us with the compilation and serving of the Electron app:
{
...
"start": "npm-run-all -p electron:serve start:tetris",
"electron:serve-tsc": "tsc -p tsconfig.serve.json",
"electron:serve": "wait-on tcp:4200 && npm run electron:serve-tsc && npx electron . --serve"
...
}
As you can see from the above scripts, there are a few files and packages we need to create for this to work properly. Let's go ahead and do that now.
Firstly, add the following npm packages:
npm install wait-on // wait for resources (e.g. http) to become available before proceeding
npm install electron-reload // load contents of all active BrowserWindows when files change
npm install npm-run-all // run multiple npm-scripts in parallel
Then create a tsconfig.serve.json file in the root directory and top it up with this code:
{
"compilerOptions": {
"sourceMap": true,
"declaration": false,
"moduleResolution": "node",
"emitDecoratorMetadata": true,
"experimentalDecorators": true,
"target": "es5",
"types": [
"node"
],
"lib": [
"es2017",
"es2016",
"es2015",
"dom"
]
},
"files": [
"main.ts"
],
"exclude": [
"node_modules",
"*/.spec.ts"
]
}
Ok, that's it - let us take it for another spin. If all is good, we should be able to play the tetris game, running on desktop.
Use the script we added earlier:
npm start
Congratulations! We have an Electron desktop app running with hot module reload!
Before we jump into the next section, let us tidy up the code and create some helper services to give us a convenient way to communicate between Electron and Angular. Also, we want to package the game into an installable binary for the different operating systems. This is where [electron-builder](https://medium.com/r/?url=https%3A%2F%2Fwww.electron.build%2F) comes into play.
First, update the Electron _main.ts_ file, line 41 (add "/tetris/browser" to the path of the pathname parameter):
win.loadURL(
url.format({
pathname: path.join(__dirname, 'dist/tetris/browser/index.html'),
protocol: 'file:',
slashes: true,
})
);
Next, in the root directory, create a electron-builder.json file and add this content:
{
"productName": "cross-platform Tetris game",
"directories": {
"output": "release/"
},
"files": [
"/*",
"!/.ts",
"!.code-workspace",
"!LICENSE.md",
"!package.json",
"!package-lock.json",
"!src/",
"!e2e/",
"!hooks/",
"!angular.json",
"!_config.yml",
"!karma.conf.js",
"!tsconfig.json",
"!tslint.json"
],
"win": {
"icon": "dist/tetris/assets/icons",
"target": ["portable"]
},
"mac": {
"icon": " dist/tetris/assets/icons",
"target": ["dmg"]
},
"linux": {
"icon": " dist/tetris/assets/icons",
"target": ["AppImage"]
}
}
Now let's install electron-builder using the terminal:
npm i electron-builder -D
In the package.json file, add the respective scripts for packaging the game:
{
...
"postinstall": "electron-builder install-app-deps",
"build": "npm run electron:serve-tsc && ng build tetris --base-href ./",
"build:prod": "npm run build -- -c production",
"electron:package": "npm run build:prod && electron-builder build"
...
}
That's it! Build and package the application using npm run electron:package command and depending on your operating system (on Windows, maybe you need to run it from a elevated termial, with Run as administrator), you will get an installer (in the newly created `/release` folder) for Linux, Windows or macOS with "auto update" support out of the box!
This is what it looks like on Windows 10:
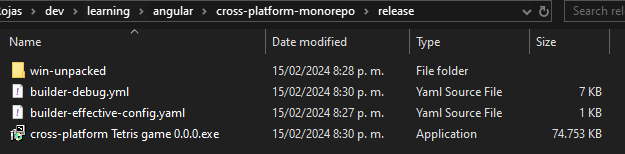
> Tip: remember to add the new output folder release to the .gitignore file
...
Compiled output
/release
/dist
/tmp
/out-tsc
/bazel-out
...
## Angular-Electron Communication
We cannot directly access all of Electron's APIs from the Angular app. To easily communicate between Electron and Angular, we need to make use of Inter-Process Communication (IPC). It is a mechanism the operating system provides so that two different processes (i.e. from main process to browser process and vice versa) can communicate with each other.
Let's create a service in the `projects/tetris/src/app` directory to facilitate this inter-process communication:
ng generate module core --project=tetris
ng generate service core/services/electron --project=tetris
Add the following code inside the newly created file (i.e. _electron.service.ts_):
import { Injectable } from '@angular/core';
import { ipcRenderer, webFrame } from 'electron';
import * as childProcess from 'child_process';
import * as fs from 'fs';
@Injectable({
providedIn: 'root',
})
export class ElectronService {
ipcRenderer!: typeof ipcRenderer;
webFrame!: typeof webFrame;
remote: any;
childProcess!: typeof childProcess;
fs!: typeof fs;
get isElectron(): boolean {
return !!window?.process?.type;
}
constructor() {
if (this.isElectron) {
this.ipcRenderer = window.require('electron').ipcRenderer;
this.webFrame = window.require('electron').webFrame;
  this.remote = require('@electron/remote');

  this.childProcess = window.require('child_process');
  this.fs = window.require('fs');
}
}
}
Consume it in the _app.component.ts_ file (or any other file in the projects):
export class AppComponent {
title = "tetris";
constructor(private electronService: ElectronService) {
if (electronService.isElectron) {
  console.log("Run in electron");
  console.log("Electron ipcRenderer", this.electronService.ipcRenderer);
  console.log("NodeJS childProcess", this.electronService.childProcess);
} else {
  console.log("Run in browser");
}
}
}
Whoa that was a mouthful. Look back at what we have done - with the above setup, you have the power to go wild and use your Angular skills to build apps like VS Code, Slack, Twitch, [Superpowers](https://medium.com/r/?url=http%3A%2F%2Fsuperpowers-html5.com%2Findex.en.html) and [all kinds of apps](https://medium.com/r/?url=https%3A%2F%2Fwww.electronjs.org%2Fapps) you can imagine, and distribute them to the most popular desktop platforms.
With that said, let us jump into the last platform integration - Mobile.
## Integrating iOS and Android into the workspace
We first have to install the package. There are other [pre-requisites](https://medium.com/r/?url=https%3A%2F%2Fcapacitorjs.com%2Fdocs%2Fgetting-started%2Fdependencies) that you should comply with before you can proceed.
Once you have installed the above dependencies, run the following script in the root directory:
npm i @capacitor/core
npm i -D @capacitor/cli
Then, initialize Capacitor with our app data (npx is a utility that executes local binaries or scripts to avoid global installs):
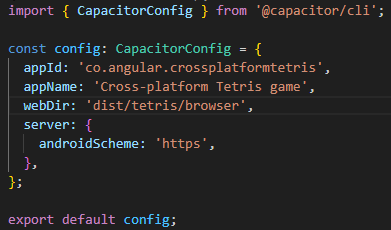
npx cap init
As you can see, a capacitor.config.ts was created with the prompts info and some defaults. Replace webDir param with "dist/tetris/browser".
Lastly, let us add the platforms of our choice. We will first target Android:
npm i @capacitor/android
npx cap add android
Capacitor works on a three-step build process: First, your web code is built (if necessary). Next, the built web code is copied to each platform. Finally, the app is compiled using the platform-specific tooling. There is a recommended [developer workflow](https://medium.com/r/?url=https%3A%2F%2Fcapacitorjs.com%2Fdocs%2Fbasics%2Fworkflow) that you should follow.
After Android has been successfully added, you should see a bunch of android specific files (inside the newly created android folder). **These files should be part of version control**.
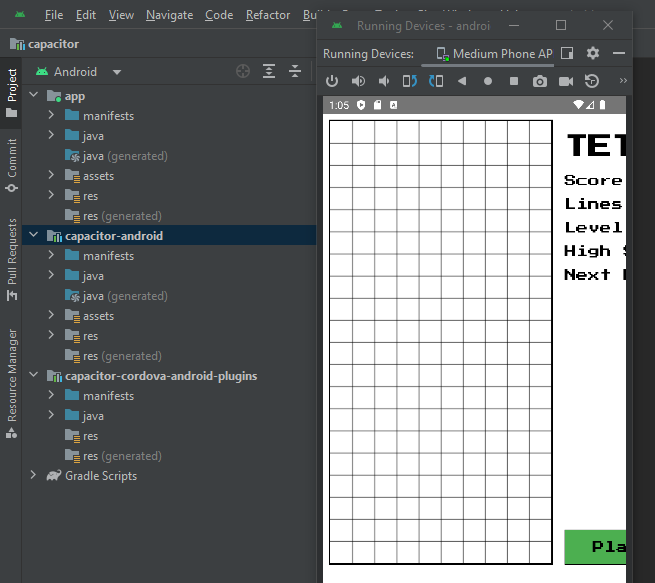
Capacitor relies on each platform's IDE, so we need to launch Android Studio (be sure to have the lattest version) to test our game. To do so, simply run:
npx cap open android
Once Android Studio opens, you can build, emulate or run your app through the standard [Android Studio workflow](https://medium.com/r/?url=https%3A%2F%2Fdeveloper.android.com%2Fstudio%2Fworkflow) (be awere that yo need at leats).
As a final point, let us do the same as above to add iOS platform support:
npm install @capacitor/ios
npx cap add ios
Just like we saw when adding Android, after iOS has been successfully added, you should see a bunch of iOS specific files (inside the newly created ios folder). These files should be added to source control.
To start Xcode and build the app for the emulator, run:
npx cap open ios
Capacitor will package your app files and hand them over to Xcode. The rest of the development is up to you.
The beauty of Capacitor is that it features a native iOS bridge that enables developers to communicate between JavaScript and Native Swift or Objective-C code. This means you have the freedom to author your code by using the various APIs available, Capacitor or Cordova plugins, or custom native code to build out the rest of your app.
As mentioned in the [Capacitor developer workflow,](https://medium.com/r/?url=https%3A%2F%2Fcapacitorjs.com%2Fdocs%2Fbasics%2Fworkflow) each time we build a project, we need to sync the app assets with platform folders. Yo can use a npx command or the [VSC Ionic extension](https://medium.com/r/?url=https%3A%2F%2Fcapacitorjs.com%2Fdocs%2Fvscode%2Fgetting-started):
npx cap sync
## Cleaning up
Keeping with the theme of simple and clean multi-project architecture, and since we now have another platform to maintain, it makes sense to create a new Angular library to hold all the services, components, directives, etc. that are common across the platforms:. Go ahead and create the lib:
ng g library shared-lib
You can delete the automatically generated component and service. In _tsconfig.json_ under compilerOptions, add the "@" to the name of the path:
"paths": {
...
"@shared-lib": [
"dist/shared-lib"
]
}
Move all services from `projects/tetris/src/app/core/services` to `projects/shared-lib/src/lib/services` and make sure to export the classes via the lib's public API (i.e. _public-api.ts_):
/*
- Public API Surface of shared-lib */
export * from './lib/services/electron/electron.service';
export * from './lib/services/capacitor/capacitorstorage.service';
Lastly, let's add a new service which we will need in the next section. Run the following command in `projects/shared-lib/src/lib/services` folder:
ng g s services/capacitor/capacitorstorage --project=shared-lib
npm install @capacitor/preferences
npx cap syn
c
import { Injectable } from '@angular/core';
import { Preferences } from '@capacitor/preferences';
@Injectable({
providedIn: 'root',
})
export class CapacitorStorageService {
constructor() {}
async set(key: string, value: any): Promise {
await Preferences.set({
key: key,
value: JSON.stringify(value),
});
}
async get(key: string): Promise {
const item = await Preferences.get({ key: key });
return item ? JSON.parse(item.value!) : null;
}
async remove(key: string): Promise {
await Preferences.remove({
key: key,
});
}
}
As with the previous lib, we have to build it before it can be used —add a script to do so and **then run it**:
{
...
"build:shared-lib": "ng build shared-lib --watch"
...
}
With that done, we are now ready to use the shared-lib anywhere in the projects.
> Warning: libs can import other libs, however, avoid importing services, modules, directives, etc. defined in the projects' apps into libs. This often leads to circular dependencies which are hard to debug.
## Tying it together
We are almost at the finish line. Let us import the _CapacitorStorageService_, specifically, inside the _board.component.ts_ file (_game-engine-lib_ project):
import { CapacitorStorageService } from "@shared-lib";
...
constructor(
private service: GameEngineLibService,
private capacitorStorageService: CapacitorStorageService
) {}
We want to persist the highscore after a webpage refresh or when we reopen the app on mobile phones or desktop, so modify these methods as follows:
async ngOnInit() {
const highscore = await this.localStorageGet('highscore');
highscore ? (this.highScore = highscore) : (this.highScore = 0);
this.initBoard();
this.initSound();
this.initNext();
this.resetGame();
}
gameOver() {
this.gameStarted = false;
cancelAnimationFrame(this.requestId);
this.highScore =
this.points > this.highScore ? this.points : this.highScore;
this.localStorageSet('highscore', this.highScore);
this.ctx.fillStyle = 'black';
this.ctx.fillStyle = 'black';
this.ctx.fillRect(1, 3, 8, 1.2);
this.ctx.font = '1px Arial';
this.ctx.fillStyle = 'red';
this.ctx.fillText('GAME OVER', 1.8, 4);
}
Also, add the localStorageSet and localStorageGet methods inside the _board.component.ts_ file:
async localStorageGet(key: string): Promise {
return await this.capacitorStorageService.get(key);
}
localStorageSet(key: string, value: any): void {
this.capacitorStorageService.set(key, value);
}
Don't forget to rebuild the libraries if not running already:
npm run build:shared-lib
npm run build:game-engine-lib
LocalStorage is considered transient, meaning your app can expect that the data will be lost eventually. The same can be said for IndexedDB at least on iOS. On Android, the [persisted storage API](https://medium.com/r/?url=https%3A%2F%2Fweb.dev%2Fpersistent-storage%2F) is available to mark IndexedDB as persisted.
Capacitor comes with a native [Preferences API](https://medium.com/r/?url=https%3A%2F%2Fcapacitorjs.com%2Fdocs%2Fapis%2Fpreferences) that avoids the eviction issues above, but it is meant for key-value store of simple data. This API will fall back to using localStorage when not running on mobile. Hence localStorage works for our webApp, Electron as well as mobile platforms.
## End of the road
The final workspace file structure and npm scripts should look like this —clean and simple:
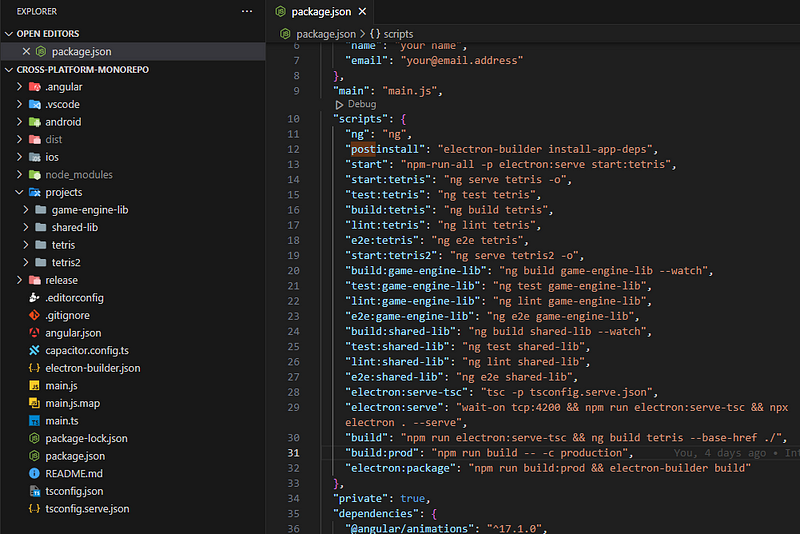
Well done! You have made it to the end of the article. Take a deep breath and marvel at your creations ☺
## Recap
We have seen why and how to create a monorepo-style workspace using Angular. We have also seen how effortless it is to add support for platforms other than the web. What started out as a seemingly insurmountable amount of work turned out to be quite an enjoyable journey.
We have only scratched the surface of [what the web can do today](https://medium.com/r/?url=https%3A%2F%2Fwhatwebcando.today%2F) and by extension, as I have demonstrated in this article - what you as a developer can do to reach as many users as possible on many devices of their choice.
If you are new to software development, I hope this article has sparked your interest and makes you eager to go out there and discover more. If you are in the veteran club, I also hope this piece has inspired you and that you will share this newly acquired knowledge (and the article) with your fellow developers and teams.
## Acknowledgements
Thank you for taking the time to go on this journey with me, I highly appreciate your feedback and comments. I would also like to thank my colleagues who continue to inspire me with their sheer technical skills as well as their humbleness. To the reviewers (Agnieszka, Andrej, Diana, Hartmut, Игорь Кацуба, [Max](https://medium.com/r/?url=https%3A%2F%2Ftwitter.com%2Fmaxkoretskyi), Nikola, René, Stacy, Torsten, Wiebke) of this article - a big shout out and thank you for all your input.
## What is next?
Try out [Nx devtools](https://medium.com/r/?url=https%3A%2F%2Fnx.dev%2Flatest%2Fangular%2Fgetting-started%2Fgetting-started) (out of the box tooling) for monorepos. There is also[ NestJS](https://medium.com/r/?url=https%3A%2F%2Fnestjs.com%2F)—a backend integration which works well with the current [tech stack](https://medium.com/r/?url=https%3A%2F%2Findepth.dev%2Fposts%2F1247%2Fcode-sharing-made-easy-in-a-full-stack-app-with-nx-angular-and-nestjs) i.e. Angular + Nodejs. Remember we also created a tetris2 project placeholder? Go ahead and fill that out with the next version of tetris i.e. make it look "pretty" and playable, for example, using native key gestures - as they say, the sky is the proverbial limit.
## About the original article author
Richard Sithole is a passionate frontend developer at OPTIMAL SYSTEMS Berlin where he leads efforts to build, maintain and extend a feature-rich propriety Enterprise Content Management software called[ enaio® webclient](https://medium.com/r/?url=https%3A%2F%2Fwww.optimal-systems.de%2Fen%2Fenaio%2Fwebclient). Previously he worked for one of the largest banks in Africa where he focused on full-stack development, application architecture, software developer [hiring](https://medium.com/r/?url=https%3A%2F%2Fjobportal.optimal-systems.de%2F) and mentoring. Say "hallo" to him on twitter [@sliqric](https://medium.com/r/?url=https%3A%2F%2Ftwitter.com%2Fsliqric).
## Inspirational sources
1. [Bootstrap and package your project with Angular and Electron - Maxime Gris](https://medium.com/r/?url=https%3A%2F%2Fgithub.com%2Fmaximegris%2Fangular-electron)
2. [Desktop Apps with Electron and Angular - Jeff Delaney](https://medium.com/r/?url=https%3A%2F%2Ffireship.io%2Flessons%2Fdesktop-apps-with-electron-and-angular%2F)
3. [Why we're using a single codebase for GitLab Community and Enterprise editions](https://medium.com/r/?url=https%3A%2F%2Fabout.gitlab.com%2Fblog%2F2019%2F08%2F23%2Fa-single-codebase-for-gitlab-community-and-enterprise-edition%2F)
4. [Angular and Electron - More than just a desktop app with Aristeidis Bampakos](https://medium.com/r/?url=https%3A%2F%2Fwww.youtube.com%2Fwatch%3Fv%3D8JHz402bz34)
5. [Give Your Angular App Unlimited Powers with Electron - Stephen Fluin](https://medium.com/r/?url=https%3A%2F%2Fwww.youtube.com%2Fwatch%3Fv%3Dv8_1lDSDdgM)
6. [Capacitor Workflow for iOS and Android Applications - Joshua Morony](https://medium.com/r/?url=https%3A%2F%2Fwww.youtube.com%2Fwatch%3Fv%3DoXbRcpsytGQ)
Fin.

Top comments (0)