
Well, well, back again!
I am bored of saying what are we going to do today!! So, here it is, you don't need to ask! BTW - Sorry, if you find me rude. I don't want to be rude. And, if you are coming here the first time, then check these out first - Part 1, Part 2!
Today's Plan
Today is no code. We are going to working with Windows and some other non-code things! So, get ready.
Prerequisites
Python Libraries:
Be familiar with:
- The Windows Registry
Installation
We need to install auto-py-to-exe to convert our application to an executable.
Install using - $ pip install auto-py-to-exe
Done! Everything installed!
Let's Start
Open a new Command Prompt Window and type - auto-py-to-exe
A window similar to this should open -
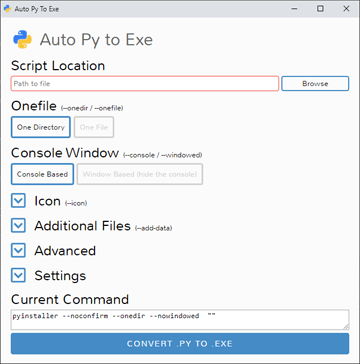
Now, click browse and locate your python file containing the handler. Then select One File in the next section and Console Based in the Console Window Section. Then, expand the Settings section and Put a path you can remember under Output Directory. and finally, click "CONVERT .PY TO .EXE". After it is complete, close the window and go back to the Command Prompt and type regedit and select yes if a UAC window pops up.
Registry Editor
It is recommended you make a restore point before following the next steps. Changing anything other than what is mentioned here could even break your whole computer. The author is not liable for any changes you do further. Follow the next steps at your own risk.
After you have read the above, follow these steps -
- Inside Registry Editor right-click HKEY_CLASSES_ROOT and create a new key
- Name the key whatever you want your protocol to be called!
pythonfor my case. - Inside the
pythonkey create a new String Value and name it "URL Protocol" - Under
pythoncreate a new key and name itshell. Undershellcreate new key and name itopen. - And finally, under
shellcreate a key namedcommand. - Now inside
commandchange the value of(Default)to this"D:/path/to/your/exe/file/within/quotes" "%1" - And Done! Now close registry editor and open up a browser.
- Type -
python://D:/path/to/any/python/file.pyin the address bar and press enter. - Enjoy!
I am Super Sorry
I did not post for the past month or so... Don't be mad. I was working on the Documentation for py-everything. And that took all of my time... I had this post written before hand just a tiny part was left and I couldn't complete it. But now I am super happy to publish this post and also announce that py-everything 2.0.0 just got released with tons of new features, CLIs, modules, etc. So go check that out as well. 😢
py-everything:
 pybash1
/
py_everything
pybash1
/
py_everything
A python package containing all the basic functions and classes for python. From simple addition to advanced file encryption.
![]()
py_everything
A python module containing all the functions and classes from basic to advanced for Python. From simple calculations to advanced file encryption. Everything is included in this one package.
It allows you to use all of its functions and classes without having to write huge complex code. It is a very simple and easy to use library.
Downloads -
PyPI -


Status -


GitHub -


Got Queries? Join our Discord!
Have questions? Or find docs boring to read through? Then join our discord to get help and chat with the devs!

Installation
py_everything is available on PyPi, and you can install it as follows:
$ python -m pip install py-everything
Features
- You can make use of the huge number of functions and classes available to you.
- Has an in-built CLI tool that generates a python package project structure for you. - setupPyGen
- setupPyGen now comes with support for…
Goodbye! And see you soon!
Hope you are enjoying this series so far. And stay tuned for Part 4. You are gonna love it. I am going to keep Part 4 a surprise and not spoil it. And as always, byeeeeeee!

Oldest comments (0)