Automate in YAML with Puppet Bolt
The Puppet DSL or Domain Specific Language is one of the things most associated with Puppet. A number of other automation tools make use of a DSL such as HashiCorp Terraform which uses HCL or HashiCorp Configuration Language.
One of the most interesting things about Puppet Bolt is its ability to support the Puppet DSL but also YAML. YAML is quicker to adopt especially for those already familiar with YAML.
In this post we’ll take a look at how to quickly get started with a YAML plan by deploying a simple website using NGINX.
Initialize the Bolt project
Ensure that the latest version of Puppet Bolt is installed before getting started.
Puppet Bolt utilizes Project directories as launching points for running Bolt operations. Create a directory for our Puppet Bolt project name webapp.
mkdir webapp
Change the working directory to webapp directory
cd webapp
Now that we have a directory for hosting our Bolt project, we need to initialize the project and also add the NGINX Puppet module from the Puppet Forge.
bolt project init --modules puppet-nginx
The command should generate output similar to that shown below if it ran successfully.
Installing project modules

→ Resolving module dependencies, this may take a moment

→ Writing Puppetfile at
    /system/path/webapp/Puppetfile

→ Syncing modules from
    /system/path/webapp/Puppetfile to
    /system/path/webapp/modules

Successfully synced modules from /system/path/webapp/Puppetfile to /system/path/webapp/modules
Successfully created Bolt project at /system/path/webapp
Create the Bolt YAML plan
In order to utilize plans in Bolt, we need to create a directory named plans.
mkdir plans
Now that we have our plans directory created we’ll plan out what we want to accomplish as part of our deployment. We’ll keep this plan as simple as possible to show how easy it is to use YAML with Puppet Bolt. We’ll accomplish the following tasks
- Install NGINX
- Create an HTML file using content specified
We’ve got a plan of what we want to do and now we are ready to create the Bolt plan. We’ll dig into the basic syntax of a Bolt YAML plan to understand the following Bolt Plan.
Create a file named deploy.yaml with the following content.
parameters:
targets:
type: TargetSpec
steps:
- name: installnginx
targets: $targets
resources:
- class: nginx
- name: deploycontent
targets: $targets
resources:
- file: /usr/share/nginx/html/index.html
parameters:
ensure: present
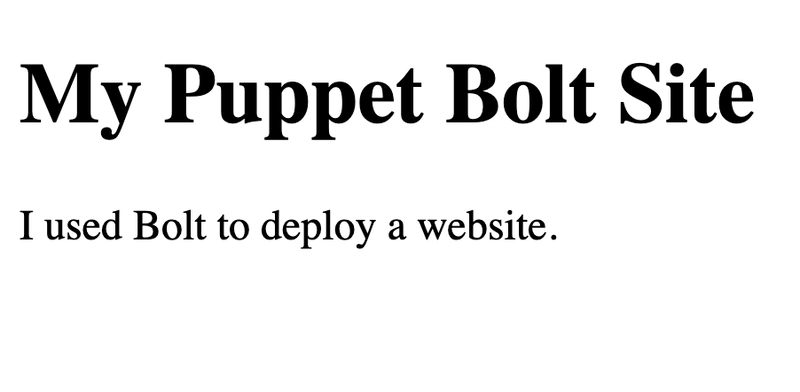
content: '<!DOCTYPE html><html><body><h1>My Puppet Bolt Site</h1><p>I used Bolt to deploy a website.</p></body></html>'
Plan Syntax
The plan above includes two sections which are parameters and steps.
Parameters allow us to pass values to the plan, in this case our plan accepts a parameter named targets with a type of TargetSpec. This is used to pass the IP address or FQDN of the machine or machines that we want to run the plan against.
Steps as the name implies are the steps that we want to run against the machine. The plan above includes two stepsThe following
- Message: The message step is used to print a message.
- Command: The command step is used to run a command against the target or targets.
- Task: The task step is used to run a Bolt task against the target or targets.
- Script: The script step is used to run a script against the target or targets.
- File Download: The file download step is used to download a file from the target or targets to the system that Bolt is running on.
- File Upload: The file upload step is used to upload a file from the system that Bolt is running on to the target or targets.
- Plan: The plan step is used to run other plans as part of a plan (nested plans).
- Resources: The resource step is used apply Puppet resources to the target or targets.
Now that we’ve created our plan we can ensure that it’s recognized by Bolt by running the following command.
bolt plan show
If the plan registers properly the output should include a webapp::deploy entry.
aggregate::count
aggregate::nodes
aggregate::targets
canary
facts
facts::external
facts::info
puppet_agent::run
puppetdb_fact
reboot
secure_env_vars
terraform::apply
terraform::destroy
**webapp::deploy**
With the plan registered we are now ready to run the plan by running the bolt plan run webapp::deploy command.
bolt plan run webapp::deploy --targets web01.grt.local --no-host-key-check --user root
If the plan ran successfully it should have generated output similar to that displayed below.
Starting: plan webapp::deploy
Starting: install puppet and gather facts on 10.0.0.40
Finished: install puppet and gather facts with 0 failures in 12.3 sec
Starting: apply catalog on 10.0.0.40
Finished: apply catalog with 0 failures in 72.64 sec
Starting: install puppet and gather facts on 10.0.0.40
Finished: install puppet and gather facts with 0 failures in 7.01 sec
Starting: apply catalog on 10.0.0.40
Finished: apply catalog with 0 failures in 15.02 sec
Finished: plan webapp::deploy in 1 min, 48 sec
Plan completed successfully with no result
Once the command completes successfully we can check that everything worked by opening entering the IP address or FQDN of the Bolt target in a web browser. The site should show the following message.
We have now successfully deployed a website using Puppet Bolt. The automation can be made more elaborate such as downloading the web files from a git repository or uploading a directory of files.
Additional information about Puppet Bolt YAML plans can be found here.

Top comments (0)