tldr;
Scully is great for building fast, static websites. If you have a technical background, adding content to the site is relatively easy. You can edit the HTML directly, or add new markdown files for new blog posts. But less technical users benefit from having a content management system to edit the content. Netlify provides a CMS option that you can use, and getting it set up with Scully is pretty straightforward. In this post, you'll learn how to create a Scully site and enable Netlify CMS.
First Steps
First up, create a new Angular application, and initialize Scully and the blog:
$ ng new scully-netlify-cms --routing
...
$ ng add @scullyio/init
...
$ ng g @scullyio/init:blog
...
I'm not going to go over each of these steps in detail; that's best left for another post. Just know that those three commands create a new Angular application, initialize Scully, and add blog support to Scully. Next up, we need to create a couple modules and components to use for routing. You can do that like this:
$ ng g m admin --routing
$ ng g c admin/home
$ ng g m home --routing
$ ng g c home/home
$ ng g c blog/list
Here we create two modules, admin and home as well as a HomeComponent that will be used as the main route for each of those modules. This is just an example of the component names, by the way; you can name them whatever you want. The only required one for getting Netlify CMS working is the Admin module.
Next up, make sure the routes are set up in the app-routing.module.ts file:
// app-routing.module.ts

const routes: Routes = [
  { path: '', loadChildren: () => import('./home/home.module').then((m) => m.HomeModule) },
  { path: 'blog', loadChildren: () => import('./blog/blog.module').then((m) => m.BlogModule) },
  { path: 'admin', loadChildren: () => import('./admin/admin.module').then((m) => m.AdminModule) },
];
This route definition lazy loads each of these modules when visiting the routes. Before moving on to the next section, let's add at least a basic navigation to the app.component.html file so we can get to different parts of the application:
<!-- app.component.html -->

<nav *ngIf="(isAdminPage$ | async) === false">
  <a routerLink="/">Home</a>
  <a routerLink="/admin">Admin</a>
  <a routerLink="/blog">Blog Posts</a>
</nav>

<router-outlet></router-outlet>
Now you will be able to get around the application. You'll notice the *ngIf on the nav element. This is needed because when you go to the CMS admin page, which you'll configure below, this nav will throw off the layout and make some parts unusable. This way you don't have to worry about that. The logic for the observable isAdminPage$ is decided in the app.component.ts file:
// app.component.ts

  isAdminPage$: Observable<boolean>;

  constructor(private _router: Router) {}

  ngOnInit() {
    this.isAdminPage$ = this._router.events.pipe(
      filter((evt: any) => {
        return evt instanceof NavigationEnd;
      }),
      map((evt: NavigationEnd) => {
        return evt.url.includes('/admin');
      }),
    );
  }
You should now have everything prepared to set up Netlify CMS on your Scully site. Once you're to this point, push the code to a GitHub repo.
Just like you didn't learn what all the commands above did (because it was outside the scope of this project), you won't learn all the ins and outs of Netlify CMS. You can do that on their documentation site. The Netlify related code snippets mentioned in this post come from the section of the CMS docs that show you how to add the CMS to your own site. I will repeat parts of that portion of the docs in the sections to follow, but I won't be going in to depth. I'll refer back to the CMS docs when necessary.
Required Steps in Netlify Web App
There are a few steps that you need to do in Netlify for everything to work. The first thing is to create a new site from Git. Select the repo you created at the end of the last step and fill out the fields Netlify asks for. This will make it so that the site is deployed to Netlify when you push to your main branch. After creating the site, you can follow the Netlify CMS authentication steps. This will allow you to log in to the CMS once it's up and running. You can read through the documentation on Netlify to configure Netlify Identity.
Adding Netlify CMS to Your Angular App
Okay, now you'll get into the additions to the Angular app. First up, you need to add a couple of script tags to the app's index.html file. The first should be placed inside the head tag, the second in the body tag:
<!-- src/index.html -->
<script src="https://identity.netlify.com/v1/netlify-identity-widget.js"></script>

<script>
  if (window.netlifyIdentity) {
    window.netlifyIdentity.on("init", user => {
      if (!user) {
        window.netlifyIdentity.on("login", () => {
          document.location.href = "/admin/";
        });
      }
    });
  }
</script>
These two scripts are necessary to authenticate with Netlify Identity to gain access to the CMS admin section. Next up we need to add one more script to the app, but it needs to be added to the component that will be injected to the page when you go to the /admin route. If you followed the steps above, that's the /admin/home/home.component. Inside the components TypeScript file, we'll use RendererFactory2 to inject the script. This is the conventional way to add third party scripts like this in Angular apps. The component will look like this:
// admin/home/home.component.ts

export class HomeComponent implements OnInit {
  private renderer2;

  constructor(private rendererFactory2: RendererFactory2, @Inject(DOCUMENT) private _document: Document) {
    this.renderer2 = this.rendererFactory2.createRenderer(null, null);
  }

  ngOnInit(): void {
    const script: HTMLScriptElement = this.renderer2.createElement('script');
    script.type = 'text/javascript';
    script.src = `https://unpkg.com/netlify-cms@^2.0.0/dist/netlify-cms.js`;
    script.text = '';
    this.renderer2.appendChild(this._document.body, script);
  }
}
In this component, the RendererFactory2 service creates an instance of a renderer. Then in the OnInit method, the script is created and the netlify-cms.js script is added to the document. Now when you navigate to the /admin route, the CMS can load.
The last part you need to do is to prepare the config.yml file that Netlify CMS needs. You can read about the configuration in the docs, but here's a basic config file. It configures what branch to commit to, what type of authentication it's using, where to store uploaded files, and defines a collection. The collection in this example is the blog posts that will be written with the CMS.
# config.yml

backend:
  name: git-gateway
  branch: main # Branch to update (optional; defaults to main)
collections:
  - name: "blog" # Used in routes, e.g., /admin/collections/blog
    label: "Blog" # Used in the UI
    folder: "blog" # The path to the folder where the documents are stored
    create: true # Allow users to create new documents in this collection
    slug: "{{year}}-{{month}}-{{day}}-{{slug}}" # Filename template, e.g., YYYY-MM-DD-title.md
    fields: # The fields for each document, usually in front matter
      - {label: "Layout", name: "layout", widget: "hidden", default: "blog"}
      - {label: "Title", name: "title", widget: "string"}
      - {label: "Description", name: "description", widget: "string"}
      - {label: "Slug", name: "slug", widget: "string"}
      - {label: "Publish Date", name: "publishDate", widget: "datetime"}
      - {label: "Body", name: "body", widget: "markdown"}
      - {label: "Published", name: "published", widget: "boolean", default: true}
media_folder: 'static/img' # Folder where user uploaded files should go
You can put this file anywhere you would like, as long as it's included in the output after the site is generated with Scully. One possibility would be to add it to the src folder, and then include it in the assets array for the project. This would handle the config.yml just like the favicon is handled.
<!-- angular.json -->
...
  "assets": ["src/favicon.ico", "src/config.yml", "src/assets"],
...
When the application is built, the config file is copied to the dist/static folder. Once you have this config.yml file in the correct place after the app is built, you are good to move on to the next step. Commit all your changes and push them to the main branch of your repo, which will trigger a new build and deploy.
Accessing the CMS from the Browser
Once your app has been built and deployed by Netlify, you can visit the site and go to the /admin route. When the script is injected, Netlify should take over and ask you to authenticate with Netlify Identity. After you authenticate, you should be taken to a CMS landing page. It will look something like this:
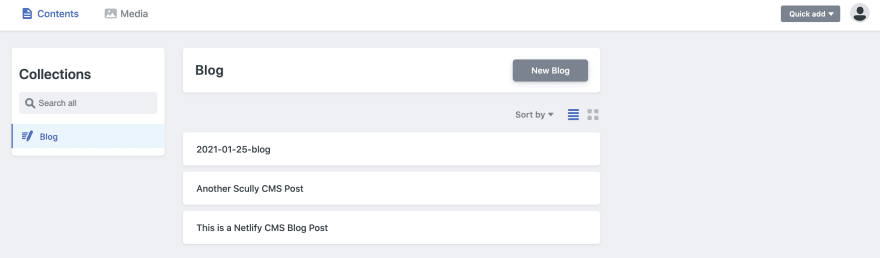
From here, you will be able to add and edit new blog posts in a user friendly rich text or markdown editor. You won't have to edit the markdown blog post files directly any more.
Conclusion
Netlify CMS is a great tool for placing a lightweight CMS on top of your Scully app. All the code can live in one codebase, and everything is just backed by markdown files directly. It doesn't take much to add it to your site, and is cost effective on top of all of that.
You can see an example of all this in this GitHub repo

Top comments (0)