
What is a Swap?
Swap is a space on a disk that is used when the amount of physical RAM memory is full. When a Linux system runs out of RAM, inactive pages are moved from the RAM to the swap space.
Swap Sapce can take the form of -
- A Dedicated Swap Partition or,
- A Swap File
Generally when running Ubuntu on a virtual machine, a swap partition is not present, and the only option is to create a swap file.
You can add Swap space using both of above option. There is no any pros and cons b/w them If your using Ubuntu in your laptop then you can add simply a swapfile or can make a special partition on your disk for swap both will work same.
But making swapfile is a handy method from making a speical partition for swap, You can change it's swap size any time without even rebooting your machine.
How Much Swap do I need?

Before You Begin
Before continuing with this tutorial, check if your Ubuntu installation already has swap enabled by typing:
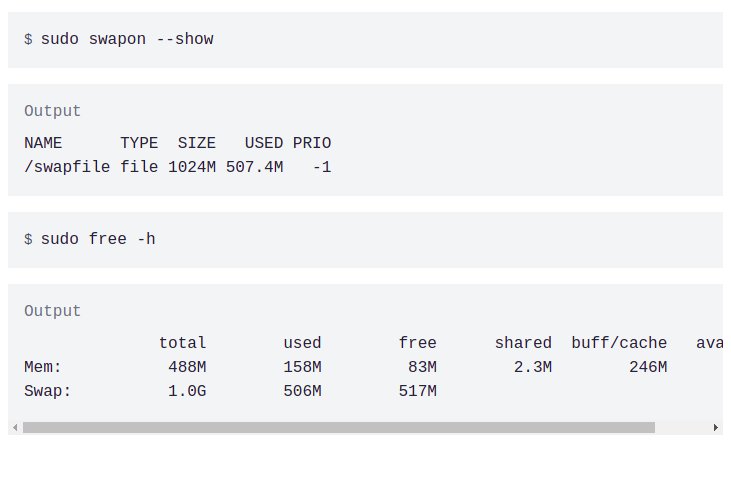
$ sudo swapon ---show
If the output is empty, it means that your system does not have swap space enabled.
Otherwise, if you get something like below, you already have swap enable on your machine.

Although possible, it is not common to have multiple swap spaces on a single machine.
1. First We discuss How to add or modify a Swap Partiton.
Creating the Swap Partition
- Boot the Ubuntu install CD and choose the option to run Ubuntu now.
- Go to System -> GParted Partition Editor.
- Delete the swap Partition and, if there is nothing else in it, the extended partition that holds it.
- Decrease the size of you primary parition by the amount you want your new sawp to be.
- In the free space/unallocated space, choose new, type linux-swap and you can name the partition 'Swap' if you want.
- Hit the "Apply" button to write the changes to disk.
- When Done, reboot back into your ubuntu.
Activating the Swap Partiton
- Open Gparted from the Applicatin menu. If you have not installed gparted then simply install it.
$ sudo apt install gpart
$ sudo apt install gparted
Right-Click on your Swap Partition and choose Information. You should see the path and UUID listed there. Keep this open for further reference.

Run sudo gedit /etc/fstab and the below code in it.You can either use the path or the UUID to tell Linux where to find you swap partition. I recommend UUID because it'll stay constant even if you move the partition around or the disk somehow becomes sdb instead of sda or something like that. Make the appropriate edits and save the file.
UUID=41e86209-3802-424b-9a9d-d7683142dab7 none swap sw 0 0
or this if you used path:
/dev/sda2 none swap sw 0 0
Your changes should look something like this if you used UUID

- Enable the new swap partition with this command.
sudo swapon --all
- Confirm that the swap partition exists

2. How do I add Swap File?
The user you are logged in as must have sudo privileges to be able to activate swap. In this example, we will add 1G swap. If you want to add more swap, replace 1G with the size of the swap space you need.
Perform the steps below to add swap space on Ubuntu 18.04.
- Start by Creating a file which will be used for swap:
$ sudo fallocate -l 1G /swapfile
If *fallocate **is not installed or you get an error message saying *fallocate failed: Operation not supported then use the following command to create the swap file:
$ sudo dd if=/dev/zero of=/swapfile bs=1024 count=1048576
- Only the root user should be able to write and read the swap file. Set the correct permissions by typing:
$ sudo chmod 600 /swapfile
- Use the mkswap utility to set up a Linux swap area on the file:
sudo mkswap /swapfile
- Activate the swap file using the following command:
$ sudo swapon /swapfile
To make the change permanent open the /etc/fstab file:
$ sudo gedit /etc/fstab
and past the following line

- Verify that the swap is active by using either the swapon or the free command, as shown below
What is Swappiness and how do i Adjust it?
Swappiness is a Linux kernel property that defines how often the system will use the swap space. Swappiness can have a value between 0 and 100. A low value will make the kernel to try to avoid swapping whenever possible, while a higher value will make the kernel to use the swap space more aggressively.
The default swappiness value is 60. You can check the current swappiness value by typing the following command:

While the swappiness value of 60 is OK for most Linux systems, for production servers, you may need to set a lower value.
For example, to set the swappiness value to 10, run:
$ sudo sysctl vm.swappiness=10
To make this parameter persistent across reboots, append the following line to the /etc/sysctl.conf file:

The optimal swappiness value depends on your system workload and how the memory is being used. You should adjust this parameter in small increments to find an optimal value.
Removing a Swap File
To deactivate and remove the swap file, follow these steps:
- Start by deactivating the swap space by typing
$ sudo swapoff -v /swapfile
Next, remove the swap file entry /swapfile swap swap defaults 0 0 form the /etc/fstab file.
Finally, remove the actual swapfile using the rm command:
$ sudo rm /swpfile


Top comments (0)