
Let's move on with our Docker series but before that if you haven't read the previous 2 articles then please go and give them a read I assure you that you'll like it.

Okay, Now let's talk about Images First, like what are Docker Images?
Images are nothing but a prototype for your application with all the dependancies and other stuff defined inside it.In short you can think of Images as a Class and a container as an object of that class.
You can check out various pre-built images on Docker Hub.
Docker Hub is a Docker Registry where you can upload and Download Images from. Note: Only the official Images can be found directly on Docker Hub but what if you want to get Images from some other trusted user(Please only download Official Images or from a user you trust you don't want to create problems for your machine) then you can find their Images here: Organization/repository/Image:tag like docker.io/pratik6217/covid-webapp:latest. This is my repository on Docker Hub).
Now, as I said Earlier in the previous posts that Dockerfile contain Intructions to build your Docker Image. so let's see some of the instructions right now:
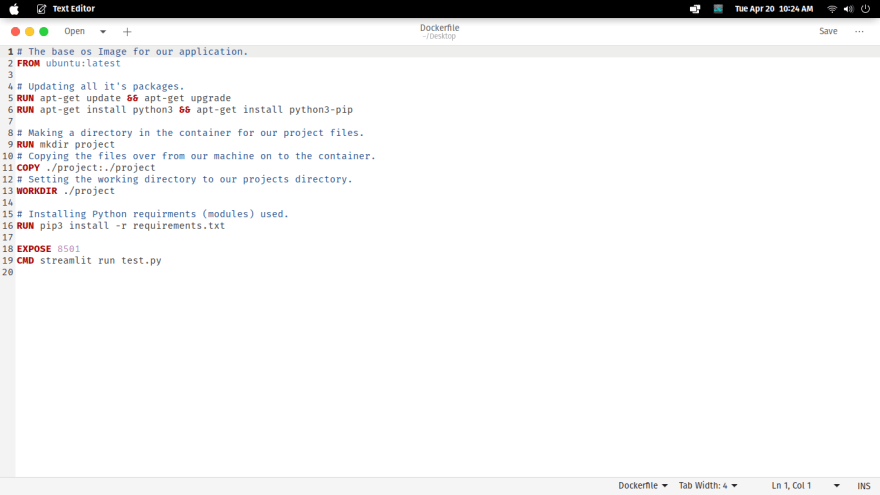
Here is a simple Dockerfile:
# The base os Image for our application.
FROM ubuntu:latest

# Updating all it's packages.
RUN apt-get update && apt-get upgrade
RUN apt-get install python3 && apt-get install python3-pip

# Making a directory in the container for our project files.
RUN mkdir project
# Copying the files over from our machine on to the container.
COPY ./project:./project
# Setting the working directory to our projects directory.
WORKDIR ./project

# Installing Python requirments (modules) used.
RUN pip3 install -r requirements.txt

EXPOSE 8501
CMD streamlit run test.py
Let's break it down what exactly is happening here, first we always need a base os Image for our application on which our application sits.(These are lightweight os Images unlike VM's which only contain the necessary files which makes them to boot very quickly).
So first we mention which base Image we are going to use using the FROM keyword.
Next is the RUN instructions it is used to Run commands in the base Images bash(shell) to update it and get it ready for our use.
Next, we installed python3 and pip since I am deploying a python based app. As I said docker packs in all the required files and dependencies, so we copy all our project files from our local machine to the container.
Next, I have exposed port 8501 of the docker container as streamlit uses that port.
Then the final part is defining the entrypoint for your application so as you run your container the application will start running.
Now, let's build this Image:
The syntax for building Images is as follows:
# You can either use docker image build or docker build they are one and the same.
# docker build-keyword tag-name and then the loaction where the Dockerfile is.
docker build -t qrcode:latest .
As you can see from the above video our Image was successfully compiled and we are ready to start a container from it.
But before doing that let's analyse what happened when we ran docker build command as we saw when we ran this command docker daemon was called and it started building each stage one by one by stage I mean whenever you run commands in your docker file docker spins up a temporary container from it and runs your commands within that container and upon finishing that task it exits and saves the committed changes. Now Images are not a single file it consists of several layers within it which are lossely connected in the correct order using a manifest ( manifest is nothing but it consists of the metadata as well as a list of all the layers and the order in which they need to be stacked ).
Also you might have noticed that I used -t flag along with the build command it is nothing but used to specify a tag(name) to your image.
Now, lets run our built Image:
The syntax for running a container is as follows:
# You can either use docker container run or docker run they are one and the same command.
# docker run-keyword tags and at last the name of the image.
docker run -i -t -p 8501:8501 --name qrcode qrcode:latest
As we can see I easily started a container from the built Image within seconds also note that I used several tags with the docker run command let's understand those one by one.
-i flag: It is used to specify that we want our container to be interactive that we want to see the output of our docker container on our local terminal. So docker basically links the containers terminal with your local terminal. It stands for Interactive.
-t flag: Docker in it's self doesn't provide terminal to it's containers now if you wish to give a terminal to your docker container (reasons can be many for this say you want to change certain things in your container so you easily do those using the containers terminal) you can use this flag. It stands for Pseudo Terminal.
-p flag: This flag is used to publish the ports on the container and link those ports of our docker container with the ports of our local machine. See in the video above I have linked port 8501 of my docker container to port 8501 of my local machine. (always remember the port on the left is your local machine's port and the one on the right is the port of your docker container
-p (local machine -> )8501:8501(<- Docker container))
--name flag: is used to name your container if not mentioned docker will give it some random name.
So, that's it here's how you can create your own Images and run Containers from them.I know I have'nt covered each and every command and the reason is I myself don't know each and every command and you don't need to know it either it's just that whenever you are about to use these commands for your use case you can just look them up on docker's official website. I know it must be difficult to grasp all of these in the first time and I totally Understand that as it took me a lot of time to get used to all of these just practise all of these and one day all this will be a piece of cake for you :)

Top comments (0)