
Introduction
In this series of blogs, I am going to show how to create an on chain and off chain NFT collection smart contract and create a DApp to mint NFTs.
I am also going to show how to create your own DApp which I designed for fun last year and also to learn about NFTs and DApps.
Idea
The idea to create an NFT DApp is inspired from the loot project but I also want to add my own flavors of creativity to it and understand the working of smart contracts in the process.
Learning
Before this , I tried out different things like building my own token on Ethereum test network back in July, 2021 when I am new to cryptocurrency space and understanding little things like how merkle tree is used.
It is this time when I learned about remix IDE, MetaMask wallet, different test networks of Ethereum blockchain, deploying smart contracts through remix IDE. I also learned little things like we can deploy the same contract which deployed on Ethereum blockchain on other blockchains like Binance Smart Chain.
I have decided what to build but don’t know how. I began exploring some resources with little knowledge and found this solidity tutorial from a reddit post.
I have gone through the solidity basics to understand code from verified smart contracts and to develop new ones.
Smart Contract Development
After getting a bit of knowledge on solidity, I began exploring the smart contract of loot project. It didn’t make much sense but after spending some time with it, I understood the working.
I know ERC-721 standard is used to build NFTs and ERC-20 standard to build our own token on Ethereum block chain but don’t know what functions exactly we need to define in those standards.
I referred openzeppelin docs to understand more about the functions in the ERC-721. So, without any further journey lessons, I will jump into smart contract development.
To develop our own NFT smart contract, we require
-
Ownable Smart contract
- It is used to manage the ownership of the contract. By default, the owner of a smart contract is the address from which it is deployed.
- It has functions that lets transfer ownership of the contract to other address using transferOwnership(newOwner) method.
- It lets you renounce your ownership of the contract with renounceOwnership()
- It provides onlyOwner() modifier to let some functions get executed by only owner like starting the sale, pausing the contract, Give away NFTs from the contract.
-
Enumerable721 Smart contract
- It extends ERC721 standards, so we don’t need our contract to extend ERC721 contract explicitly.
- This provides enumerability of all the token ids in the contract as well as all token ids owned by each account.
- See the functions provided by it the he documentation.
-
ReentrancyGuard Smart Contract
- This module that helps prevent reentrant calls to a function meaning it makes nonReentrant modifier available, which can be applied to functions to make sure there are no nested (reentrant) calls to them.
- Functions marked as
nonReentrantmay not call one another.
-
Pausable Smart Contract
- It is also advisable to extend this one which allows child contracts to implement an emergency stop mechanism that can be triggered by an authorized account.
- This used through inheritance and makes modifiers
whenNotPausedandwhenPausedavailable which can be applied to the functions of your contract.
We can make our main smart contract extend these smart contracts directly by importing these in our code
The code is found here for Loot Royale Onchain NFT Smart Contract - Loot Royale On chain NFT Collection Smart contract code . Please open this in new tab to follow along.
Let us discuss about the functions inside the main smart contract - BattleRoyale.sol
Three functions are important.
- Function to let the users mint NFT Tokens by paying required amount of price for the NFTs they are minting.
- Function to get the token URI of the NFT. This takes in token Id and gives a JSON with the NFT. Here in our case, it is an SVG image generated from the code - On Chain. No external calls required.
- Function to get the amount from the contract address to your own address or any address you want to withdraw. I wrote the function to withdraw to owner address of the smart contract.
NFT Design for on chain smart contract
Here is one of my NFTs look like.

A simple HTML CSS Design inside svg tag with curved border and it also displays the token ID at the top. It took some time for me to realize that we can include html CSS inside svg tag. Initially, I took the HTML CSS code and used this site to convert to SVG but the output svg size is very heavy.
Another problem I faced while storing this data for design was that the max size of a smart contract cannot be more than 24576 bytes. So, I moved the code to another smart contract then to library, just so to reuse it in another contract. This is just one line but took some time since I tried optimizing it first before realizing I can do move this to another contract. Learning++.
Here is the link to SVG Code for the above NFT.
Also, you can see my data in the code which is different from loot project. You should have guessed it by now where did I get my data from. Now lets see what are on chain vs off chain NFTs.
On chain vs Off chain NFTs
The difference between on chain and off chain NFTs as the name suggest we will be storing all the data related to NFTs on the blockchain itself for on chain NFTs.
In case of off chain, I need to provide some external URLs like https://somedomain.com , ipfs://sha256hash/1.png.
In both cases, I need to return the JSON output file following NFT metadata standard.
A sample IPFS image URL looks like this - ipfs://QmV3yGkzx2Uw3NHPZV9SAMLA58j7LvCFLFYtyfCMBAvstF/2.jpg
You can open this in brave browser directly - a pin I have drawn on art flow mobile app long time back.
If we were to create off chain NFTs, how would the code look like?
Refer this github gist link for offchain smart contract.
I will set the IPFS or HTTPS BASE URI in the contract when the sale starts or now a days, the developers are revealing the NFTs after all NFTs are minted.
It is simple to write a function to set URI variable and call it once all NFTs are minted.
There are two variables
- Base URI - actual URI for NFTs
- Blind URI - Till we reveal the NFTs, this image or video will be same for all the minted NFTs.
The URI we should set will be like ipfs://QmV3yGkzx2Uw3NHPZV9SAMLA58j7LvCFLFYtyfCMBAvstF/
When we query, our token Id gets appended to it and Open Sea or any other market place can find and display it.
Starting steps are to set the contract active, then set the blind URI. Once all NFTs are minted, you can reveal the NFTs minted.
The tokenURI method output will look like
{
    "image": "ipfs://QmV3yGkzx2Uw3NHPZV9SAMLA58j7LvCFLFYtyfCMBAvstF/1.png",
    "name": "Loot Royale 1",
    "description" : "Some description"
}
Compiling and Deploying to blockchain
Now we have our contracts, how do we deploy them to the blockchain network. Many blockchains forked Ethereum with added changes to bring DApp development features. You can deploy to any network that supports solidity.
Let us deploy this on chain NFT smart contract to Ethereum’s Ropsten test network. But before that, we need
- Remix IDE - You can use it online. Simply click https://remix.ethereum.org/. In case you want to run it offline, you can refer this blog on how to download it on docker and run it.
- Metamask wallet - If you don’t have metamask wallet, follow this blog to install metamask wallet in the browser of your choice. If you are using brave, it is inbuilt within the browser. You can access it from settings.
- Get some Ropsten testnet ether/ Rinkeby testnet ether/ Polygon testnet Matic to deploy the contract on the ropsten network. Change the network to ropsten on metamask.
- https://faucet.ropsten.be/ - Ropsten Testnet Faucet
- https://faucet.polygon.technology/ - Polygon testnet faucet
- If you deploy on Rinkeby testnet or polygon testnet you will be able to see your NFTs on opensea testnetwork. Next steps are same for all the networks.
Next steps
- Copy the contract to your remix IDE. It should look like below.
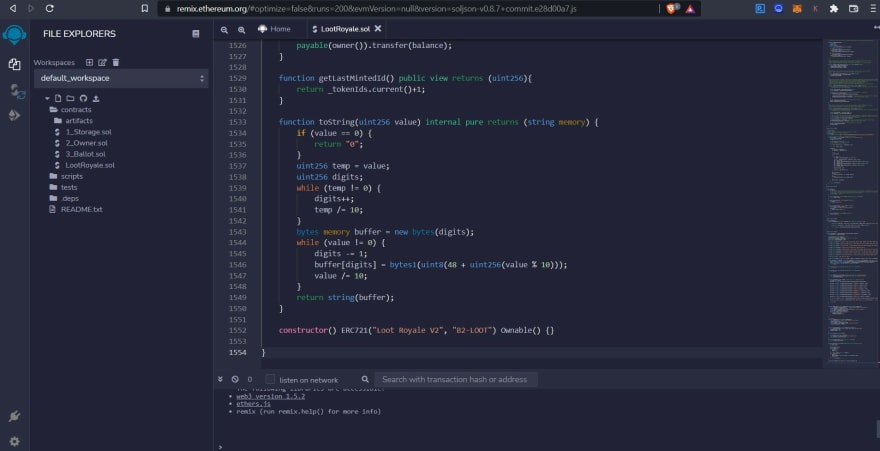
- You can select the compiler version to any version above 8.0 But remember this version which you used to compile. This is needed while verifying contract on the block explorer.
- In case you don’t know what is a block explorer, refer this blog to understand in detail.
- Go to compiler tab and click on compile. You should see a green tick mark like below.

- Go to deploy tab. You should select the contract as BattleRoyale.sol
- By Default, the environment will be Javascript VM. All the transactions will be executed in a sandbox blockchain in the browser. This means nothing will be persisted when you reload the page. The Javascript VM is its own blockchain and on each reload it will start a new blockchain, the old one will not be saved.

- You need to select Injected Web3 as environment, which will allow us to inject metamask and deploy to the network selected on metamask. You should be able to see the your metamask account and balance in the accounts section.
- When you click on deploy, you will be prompted twice. First the CardDesign Library is deployed and then our smart contract.
- You will receive two metamask notifications once the contracts deployed. Click on them, you will be redirected to Ropsten block explorer. You can also view the transactions from activity tab in metamask.
- Congrats, now the On chain NFT smart contract - loot royale has been deployed.
But how do we interact with it. I will explain in detail on how to interact it from our custom react frontend later.
Let’s see how to interact with the contract from the block explorer.
FYI, block explorer is also a DApp.
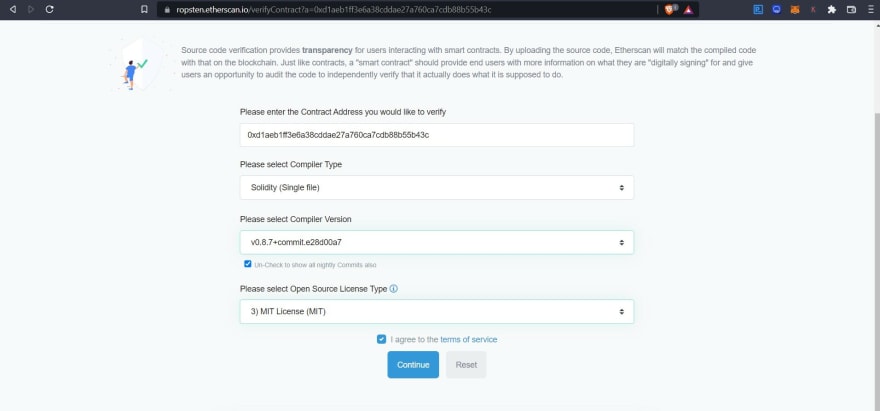
Verifying the contract on blockchain Explorer
Now, let us verify the contract on the block chain explorer and interact with it from the explorer itself.
- Open contract addresses of Card Design Library in one tab (We require this address), Open the contract address of the Loot Royale contract in another tab like below.

- Click on verify and Publish and fill the details as below. I used 8.7 as compiler version while deploying from remix, so I am using the same here. Click on continue.
- Copy the code from remix IDE and paste in the code part. Remove the string from constructor part like below.

- Enter the library address as below and verify you are not a robot and click on Verify and publish.

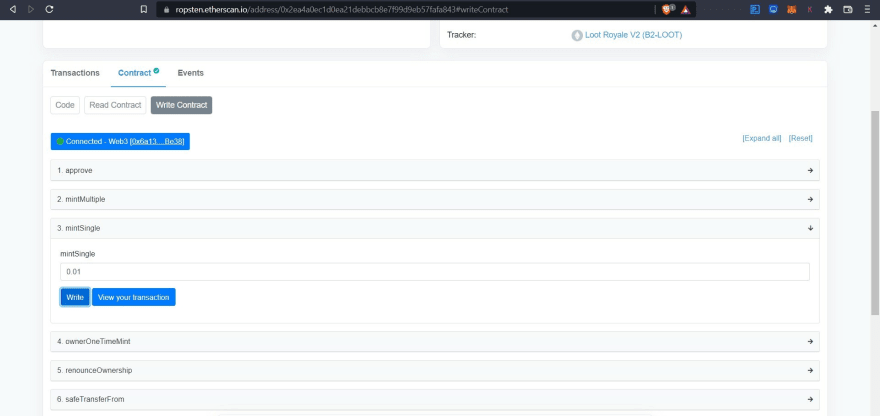
Now, our contract is verified. It looks like below image. You should see the functions to read and write to blockchain.

Navigate to write contract section and click on connect to web3, you will be prompted to connect to a provider like below.

Click on Metamask, it will prompt to connect. Click on connect to web3 again and you should be able to connect explorer with Metamask like below.

Now click on mintSingle function, it will an NFT. Enter 0.01 as NFT Price like below.
Congratulations. You have successfully minted an NFT. Now, lets view the token URI.

You can go to testnets.opensea.io, connect your wallet and you should be able to see your Loot Royale NFTs.
Loot Royale NFTs on Open sea Testnet

In the next blog, I will show how to design the frontend for lootroyale.xyz to mint the loot royale NFTs since this blog has become lengthy already.
Any feedback is appreciated. In case of any doubts or issues or any new ideas, DM me on twitter - @pranay_bathini. Let us learn together.
Thanks for reading!!

Latest comments (0)