
This quick guide shows you how to set up a form to upload images to your media library using the free WordPress plugin Snippy.
Creating a File Upload Handler
First step, let's open your themes functions.php file, and add the code snippet below. This will create a location for us to send our files to.
function handle_my_file_upload() {

    // will return the attachment id of the image in the media library
    $attachment_id = media_handle_upload('my_file_field', 0);

    // test if upload succeeded
    if (is_wp_error($attachment_id)) {
        http_response_code(400);
        echo 'Failed to upload file.';
    }
    else {
        http_response_code(200);
        echo $attachment_id;
    }

    // done!
    die();
}

// allow uploads from users that are logged in
add_action('wp_ajax_my_file_upload', 'handle_my_file_upload');

// allow uploads from guests
add_action('wp_ajax_nopriv_my_file_upload', 'handle_my_file_upload');
There are a couple things to take note of:
-
handle_my_file_uploadis the name of the function that will deal with the upload, bothadd_actioncalls reference it. -
wp_ajax_andwp_ajax_noprive_are default hooks, we addmy_file_uploadto them to allow communication with our form which we'll set up next. - Comment out the
noprivcall to prevent file uploads from guests.
Creating the Form
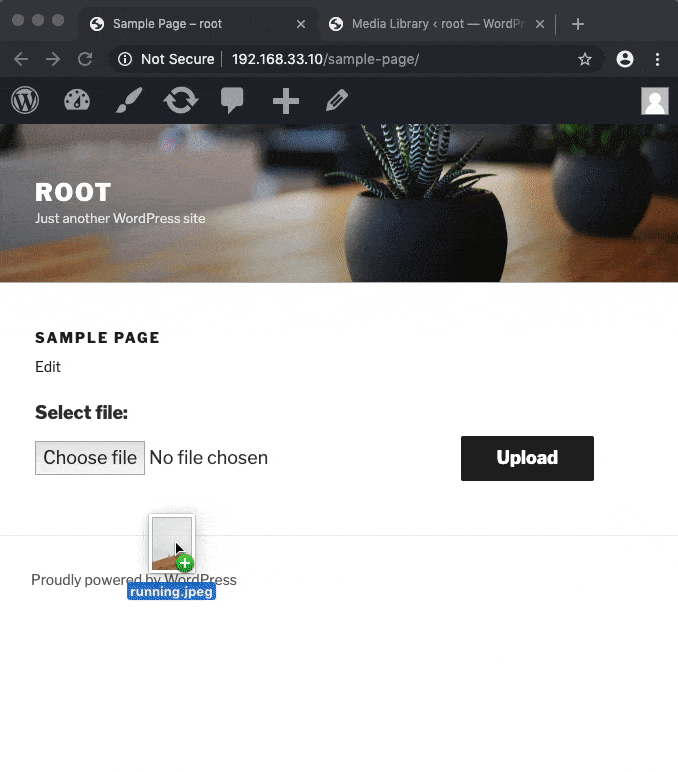
Alright now we need to add a <form> to give the user a location to select the images they want to upload.
We'll use the free WordPress plugin Snippy to create a shortcode that we can use everywhere on our WordPress website.
With Snippy installed we'll start by creating an HTML bit. Click on the "Snippy/Add Bit" menu item. Name your HTML bit "file-form". Set type to "HTML". And paste the code below in the textfield.
<form action="{{admin_url}}" method="POST" enctype="multipart/form-data">
    <input type="hidden" name="action" value="my_file_upload"/>
    <label for="image">Select file:</label>
    <input type="file" id="image" name="my_file_field" accept="image/*"/>
    <button type="submit">Upload</button>
</form>
-
my_file_uploadcorresponds to the value used in theadd_actioncalls. -
my_file_fieldcorresponds to the value used in themedia_handle_uploadcall.
Now we'll create our custom shortcode.
Click "Snippy/Add Shortcode" and use "file-upload" as the name. In the "Available bits" list we select our "file-form". Click Save.
That's it! We now have a form shortcode at our disposal.
[file-upload/]
Add it to a page (using the page editor), refresh the page, your file upload form should now appear.
Bonus: Editing the Image
Let's upgrade our form to allow our users to edit dropped images using Doka
We can use Snippy to add the Doka files to the page.
- Create a new local resource bit and select the Doka CSS file (doka.min.css).
- Create another local resource bit and select the Doka JavaScript file (doka.min.js).
- Create a JavaScript bit and add the following code.
document.addEventListener('change', function(e) {

    // Store reference to the field to make later code easier to read
    var field = e.target;

    // Only intercept fields of type file that accept images
    if ((field.type !== 'file') || (!/image\/*/.test(field.accept))) return;

    // Get reference to parent form
    var form = field.form;

    // Edit dropped image with Doka
    Doka.create({

        // The file the user selected
        src: field.files[0],

        // We allow the user to crop and filter the image
        utils: ['crop', 'filter'],

        // Called when the user is done editing
        onconfirm: function(output) {

            // Create a new FormData object based on the information in the form
            var formData = new FormData(form);

            // Overwrite the file data with the modified file
            formData.set(field.name, output.file, output.file.name);

            // Post async to the server
            fetch(form.getAttribute('action'), {
                    method: form.getAttribute('method'),
                    body: formData
                })
                .then(function(id) {
                    alert('done!') // Or redirect to another page
                });
        }
    });

});
Now we can link these newly created bits to our "file-upload" shortcode by clicking the "Snippy/Shortcodes" menu item and editing our "file-upload" shortcode. Select the bits we just created and click "Save".
Refresh the page and select an image, Doka should open the image and when clicking done the edited image should appear in the WordPress Media Library.
Security
To make this solution a little bit more secure we can add a WordPress nonce field.
Edit the HTML form like this:
<form action="{{admin_url}}" method="POST" enctype="multipart/form-data">

    {{nonce_field:my_file_upload, my_nonce_field}}

    <!-- ...This part of the form remains untouched -->

</form>
And add the following if statements to the functions.php file so it checks if the form post is valid and came from your own site.
<?php
function handle_my_file_upload() {

    if (empty($_POST)) {
        http_response_code(400);
        echo 'Nothing data received.';
        die();
    }

    if (!wp_verify_nonce($_POST['my_nonce_field'], 'my_file_upload')) {
        http_response_code(400);
        echo 'Unknown error.';
        die();
    }

    /* ...The rest of the function stays the same */

}
Conclusion
That's it! We're done. These code snippets should give you a good idea of what is required for uploading files with WordPress and how to build uppon it. If you were not familiar with Snippy this should've been a nice introduction on how it can help you manage small parts of your WordPress site.
That said. This is still a bare bone solution that can be further build uppon with redirects, upload progress indicators, sending additional form data, and more. I'll leave that for a future article.

Top comments (0)