
Note: This blog post was first published on my personal blog
Last summer I tried to set up a custom website and implement Dynamics Omnichannel chat widget with authenticated users. While Microsoft documentation clearly stated this could be done, I was not able to set it up properly, largely because documentation was a bit unclear. Since then, the documentation improved drastically and I thought I would give it another shot. Still, there were some hiccups here and there along the road chat, but this time I got the job done and wanted to share the steps with all you guys.
What we are trying to accomplish
The basic idea is as follows, you have a custom web app with its own user login authentication mechanism. Once a user is logged in on your website, you want the embedded chat widget on the site to send information to dynamics, the agent receiving the chats will then be able to see what contact in the system the user corresponds to. For this to work properly, we will need to have some sort of mapping between authenticated users in the custom website and what contactid in dynamics the users correspond to. For simplicity, we will just hardcode a contactid in today's post.
How authentication for Omnichannel chat is set up under the hood
The omnichannel authentication mechanism is based around json web tokens (JWT). JWT is an open standard that lets you transfer json object information in a verified and secure way. JWTs are digitally signed using a secret or, as in our case, using a private/public key pair.
How to set up everything, a step by step guide:
Set up a custom website
I created a custom node.js web app using the following guide from Microsoft.
Once you have set up the basic website it is time to create the public and private keys.
Generate public and private keys
The documentation says you should use PowerShell to generate public and private keys. However, you need to install openssl to be able to do this. This guide explains how to do that. Otherwise, if you have git bash installed, you don't need to do anything. Just right-click in a folder select 'git bash here' and enter the commands:
openssl genpkey -algorithm RSA -out private_key.pem -pkeyopt rsa_keygen_bits:2048
openssl rsa -pubout -in private_key.pem -out public_key.pem
Implement your authentication service
Now we need to add routes to our web app. We need one public endpoint that exposes the public key to the internet, and one protected endpoint that only authorized users should be able to call and that will return a signed JWT. When we are done, we will have two API endpoints in our web app. In my case:
https://omnichannel-custom-portal.azurewebsites.net/publickey
https://omnichannel-custom-portal.azurewebsites.net/privatekey
Note: I have disabled my webapp so the urls won't lead anywhere.


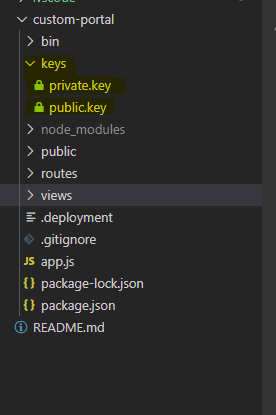
Create a folder named keys in your web app and create two files, public.key and private.key. Paste the public key from the pem-file to the public.key and do corresponding for the private key. Install jsonwebtoken library by opening a terminal att typing the following command:
npm install --save jsonwebtoken
In your web app, under the routes folder, add two new files. You can call them what you want. I called them publickey.js and privatekey.js. In the publickey.js file, add code that gets the public key and returns it to the calling client. Initially, it was not obvious to me from the documentation, what the content-type for the response should be. But after comparing it with the out-of-box authentication for power apps portals I realized it should be set to 'text/plain'.
publickey.js
var fs = require('fs');
var express = require('express');
var router = express.Router();

/* GET home page. */
router.get('/', function(req, res){
    var publicKEY  = fs.readFileSync('./keys/public.key', 'utf8');


    res.charset = 'utf-8'
    res.set({
        'content-type': 'text/plain'
    }).send(publicKEY);
});

module.exports = router;
In the privatekey.js file, add code that takes a JSON-payload, signs it with the private key, and returns a JSON web token to the calling client. For simplicity, I hardcoded the payload but ideally, it should be generated dynamically based on who the logged-in user is. Also here I had some issues with setting the correct content-type in the response, make sure to set it to 'application/jwt'.
privatekey.js
var jwt = require('jsonwebtoken');
var fs = require('fs');
var express = require('express');
var router = express.Router();

/* GET home page. */
router.get('/', function(req, res){
    var privateKEY  = fs.readFileSync('./keys/private.key', 'utf8');
    const secondsSinceEpoch = Math.round(Date.now()/ 1000);
    const oneHour = 60*60;

    var signOptions = {
      algorithm:    "RS256"
    };

    var jwtPayload = {
        "sub": "66cb446f-5e43-ea11-a812-000d3a24c087", //contactid in Dynamics
        "preferred_username": "danijel.buljat@test.com",
        "phone_number": "",
        "given_name": "Dan",
        "family_name": "Test",
        "email": "danijel.buljat@test.com",
        "iat": secondsSinceEpoch,
        "exp": secondsSinceEpoch + oneHour,
        "iss": "omnichannel-custom-portal.azurewebsites.net"
    };

    var token = jwt.sign(jwtPayload, privateKEY, signOptions);

    res.charset = 'utf-8'
    res.set({
        'content-type': 'application/jwt'
    }).send(token);

  });

module.exports = router;
Lastly add the routes in the app.js file.
app.js
...
app.use('/', indexRouter);
app.use('/users', usersRouter);
app.use('/publickey', publicRouter);
app.use('/privatekey', privateRouter);
...
Add an HTML-file containing the chat widget code
Add the chat widget code that you got from Dynamics Omnichannel in an HTML-file and include the HTML-file in the layout.pug file.

chatwidget.html
<script id="Microsoft_Omnichannel_LCWidget" src="https://oc-cdn-public-eur.azureedge.net/livechatwidget/scripts/LiveChatBootstrapper.js" data-app-id="cdc3eb9a-5aa4-497e-97c5-42d42b274a8e" data-lcw-version="prod" data-org-id="439d8021-cf15-4ea7-9d12-b55039602be0" data-org-url="https://crmorg-crm4.omnichannelengagementhub.com"></script>
layout.pug
doctype html
html
  head
    title= title
    link(rel='stylesheet', href='/stylesheets/style.css')
  body
    block content
    include chatwidget.html
Create a javascript function on your website
The last part of coding is to add a function in the client-side code. The purpose of this function is to make a call to our private JWT service and send the JWT-token to dynamics servers for validation. The dynamics server will then validate that the JWT came from our web app by calling our public key endpoint and make sure the signature is verified. This function will be initialized on load and when the token is verified the user can start chatting with an agent.

Make sure to add this function after the chat widget has loaded, I put it in the same HTML-file as the chat widget.
chatwidget.html
<script id="Microsoft_Omnichannel_LCWidget" src="https://oc-cdn-public-eur.azureedge.net/livechatwidget/scripts/LiveChatBootstrapper.js" data-app-id="cdc3eb9a-5aa4-497e-97c5-42d42b274a8e" data-lcw-version="prod" data-org-id="439d8021-cf15-4ea7-9d12-b55039602be0" data-org-url="https://crmorg-crm4.omnichannelengagementhub.com"></script>
<script>
    var auth ={};
    auth.getAuthenticationToken = function(callback){

        var xhttp = new XMLHttpRequest();
        xhttp.onreadystatechange = function() {
            if (this.readyState == 4 && this.status == 200) {
                callback(xhttp.responseText);
            }
        };
        xhttp.onerror = function(error) {
            callback(null);
        };
        //Replace this with a call to your token generating service
        xhttp.open("GET", "https://omnichannel-custom-portal.azurewebsites.net/privatekey", true);
        xhttp.send();
    }
</script>
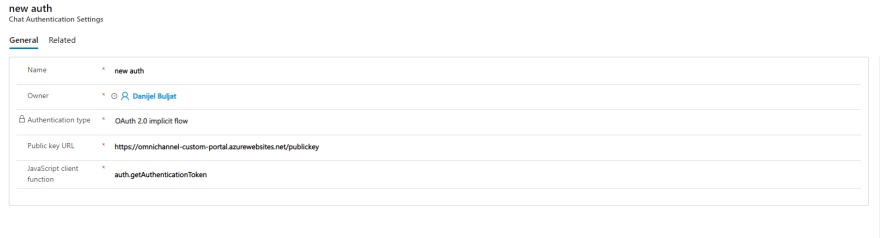
Tie everything together in dynamics
Finally in Dynamics, create a Chat Authentication Settings record. Enter the public endpoint and the name of the client-side function for getting the token and passing it to Dynamics. When you save, dynamics will verify that the public key and client-side function are compatible and if you don't get any errors, you are ready to continue to the last step. Which is, add the authentication setting to your chat widget and save. Now you are good. When a contact that exists in CRM logs in to your custom website and starts a chat conversation with customer service, the agents will see what contact in the system the user corresponds to.

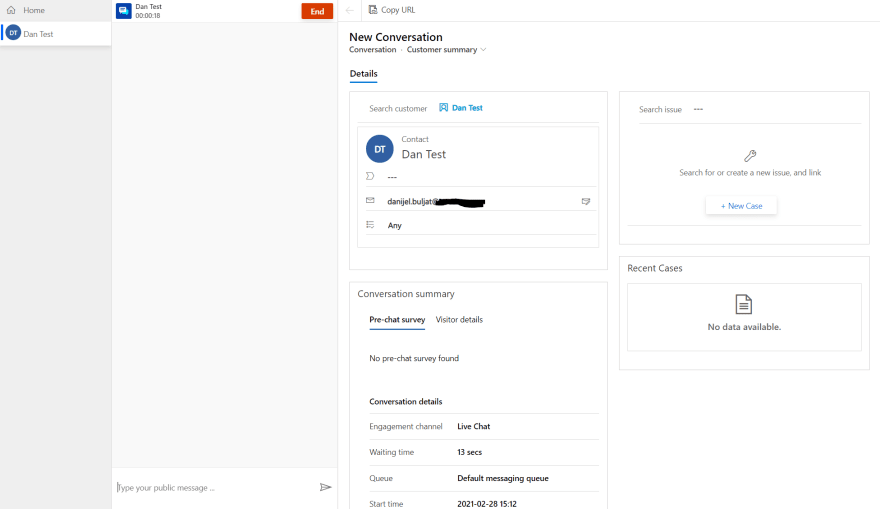
When a user logs in to the website and initializes a chat conversation, the agent will get the information about which contact in Dynamics this is and all history will be saved as activities on that contact in the system.

Conclusion
I have show-cased how you can create a custom website with node.js and embed an authenticated chat widget. The details were not crystal clear in the documentation but I hope that I have made it somewhat clearer.
If you want to discuss the topic in detail, feel free to contact me on social media.
Cheers!

Top comments (0)