Background
Of course, you all are aware of CLI(Command Line Interface) tools, because you might use any OS like Linux-based, Mac or Windows, you have used these tools in your life. These are Git CLI, language interpreters and runtimes(Python, Node, Ruby, Java, Go etc), system commands and network utilities(reboot, restart, ping etc), editors like nano, vim and there many other tools and command line software that we use nowadays which are minimalist to fulfil our needs and save time. In this tutorial, I'll explain how to implement a CLI app that gives answers to your input about me based on CLI inputs. Let's dive in.
Setup
If you don't want to set up and go with development/install/publish flow and directly want to try CLI, then you can clone or direct install the package.
First, we'll be using Python 3 for this project. let's install basic dependencies.
Install PIP, python package manager, used to install Python packages.
Install a virtual environment for this project, which isolates python packages.
Make the project directory( click-piyush ), set up virtualenv and activate. Then install click with pip, the library to make CLI apps.
Let's Code
Let's create a python file named clickpiyush.py where we'll write the below code.
import click

@click.command()
def age():
    """Get Age"""
    click.echo("I'm 2X years older, shouldn't be matter.")

if __name__ == ' __main__':
    age()
Here we are importing the package click that is used to make the CLI app.
Then we are adding one command to get the age and method for that command, which prints the age. Then call the method when the script is executed.
$ python test.py
I'm 2X years older, shouldn't be matter.
Here, as you can see, you are not seeing any feeling like the CLI app but a simple script is running and printing some stuff, just like a normal python program does.
Now you can register for options and arguments(next section) or make command groups for adding multiple commands or nesting of commands. Let's do that.
import click

@click.group()
def cli():
    pass

@click.command()
def age():
    """Get Age"""
    click.echo("I'm 2X years older, shouldn't be matter.")

cli.add_command(age)

if __name__ == ' __main__':
    cli()
In this, we have made slight changes. We are adding multi-command using group functionality of click. inside that, we added one method which passes invocation as it's empty. Using that cli() method, we are registering the command using add_command and passing an argument of the commanding method(age). Now you can see the output below. As you can see click auto-generate beautiful Usage guide, options and help pages.
$ python test.py
Usage: test.py [OPTIONS] COMMAND [ARGS]...

Options:
  --help Show this message and exit.

Commands:
  age Get Age
Now we'll add different types of commands and functionality to our CLI app.
@click.command()
@click.option('--name', prompt='Identify youself by name')
def greet(name):
    """Describe this tool with colors to You."""
    click.secho(f"Hello {name}", bold=True, bg='green', fg='black')
    click.secho(
        "This is Command Line Interface which gives information of maker named Piyush.", bg='blue', fg='white')

cli.add_command(greet)

In this greet command, we are asking for --name option using the runtime prompt, you can configure it as you want. which is stored in the name variable for further access to the method. Inside that, we are printing two lines with different background colours and font colours in CLI using click.secho(). It combines echo and style functionality of click in one method and styles of the font as bold.
Let's add another command.
@click.command()
@click.option('--desc', default=False, show_default=True, help='Show detailed Info.')
def bio(desc):
    """Basic Bio"""
    if desc:
        click.echo("Hey, this is piyush here, thanks for your interest.\nTo know more about me please run this CLI and different commands.\nThank You!")
    else:
        click.echo("This is me, and describing self.")

cli.add_command(bio)
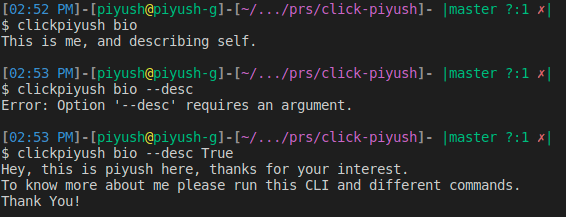
In the bio command, the user can get information about me, but basic if not input is passed. To get detailed info --desc true flag must be passed. This argument can be configured with the @click.option method. In which you can describe the default value, enabling the default value in the help doc and help text.
Full Code and Output
Here is the full code of my package script clickpiyush.py and the output is below for your reference.
import click
import time

@click.group()
def cli():
    pass

@click.command()
@click.option('--name', prompt='Identify youself by name')
def greet(name):
    """Describe this tool with colors to You."""
    click.secho(f"Hello {name}", bold=True, bg='green', fg='black')
    click.secho(
        "This is Command Line Interface which gives information of maker named Piyush.", bg='blue', fg='white')

@click.command()
@click.option('--desc', default=False, show_default=True, help='Show detailed Info.')
def bio(desc):
    """Basic Bio"""
    if desc:
        click.echo("Hey, this is piyush here, thanks for your interest.\nTo know more about me please run this CLI and different commands.\nThank You!")
    else:
        click.echo("This is me, and describing self.")

@click.command()
def age():
    """Get Age"""
    click.echo("I'm 2X years older, shouldn't be matter.")

@click.command()
def skills():
    """Get my dummy skills set with progress bar"""
    skill_set = ["JavaScript", "Python", "GraphQL", "C", "TypeScript", "VueJS",
                 "NuxtJS", "Socket Programming", "Machine Learning", "NodeJS", "Linux"]

    with click.progressbar(skill_set, label='Getting skills', length=len(skill_set)-1, show_eta=False, color='blue') as skill_list:
        for skill in skill_list:
            click.echo(f" {skill}")
            time.sleep(0.3)

@click.command()
def blog():
    """Get My blog URL"""
    blog_url = "https://blog.thesourcepedia.org/"
    click.echo(f"{blog_url} Wanna visit [y/n]: ", nl=False)
    c = click.getchar()
    click.echo(c)
    if c == 'y':
        click.echo("Launching Piyush's Blog")
        click.launch(blog_url)

@click.command()
def portfolio():
    """Launch my Portfolio!"""
    click.launch("https://piyushgoyani.thesourcepedia.org/")

# @click.command()
# @click.Choice()
cli.add_command(greet)
cli.add_command(bio)
cli.add_command(age)
cli.add_command(skills)
cli.add_command(blog)
cli.add_command(portfolio)

if __name__ == ' __main__':
    cli()
Running CLI Locally
To run the and see output execute clickpiyush.py file with no argument or option so it'll show help and all command as below.
python clickpiyush.py
Usage: clickpiyush.py [OPTIONS] COMMAND [ARGS]...

Options:
  --help Show this message and exit.

Commands:
  age Get Age
  bio Basic Bio
  blog Get My blog URL
  greet Describe this tool with colors to You.
  portfolio Launch my Portfolio!
  skills Get my dummy skills set with progress bar
In this, we are launching a website in a browser based on the user input, showing a progress bar in skill command and more.
Source Repository
Prepare for Package
Let's create a setup.py file and paste the below configuration. This file contains the name of the package, version, inside modules, requirements, entry points and more configurable things.
from setuptools import setup

setup(
    name='clickpiyush',
    version='1.0.1,
    py_modules=['clickpiyush'],
    install_requires=['Click',],
    entry_points={
        'console_scripts': [
            'clickpiyush = clickpiyush:cli'
        ]
    }
)
Install Local Package
We have created a setup file, now we can install our CLI app and run it just like a normal program, so don't need to invoke a python interpreter.
pip install --editable .


Obtaining file:///home/piyush/Documents/prs/click-piyush
Requirement already satisfied: Click in ./venv/lib/python3.8/site-packages (from clickpiyush==1.0.1) (8.1.3)
Installing collected packages: clickpiyush
  Running setup.py develop for clickpiyush
Successfully installed clickpiyush
As you can see clickpiyush package is installed successfully, now you can use it with the name of the CLI app.
clickpiyush
Publish to PyPI
Till now whatever we make, run and install was on our system. Now we want to publish our package to PyPI(Python Package Index) so other users can download our CLI app and use it in their system.
python setup.py sdist
Once we run the above command, we have a new directory dist/, which contains our distribution or simply archived package.
running sdist
running egg_info
writing clickpiyush.egg-info/PKG-INFO
writing dependency_links to clickpiyush.egg-info/dependency_links.txt
writing entry points to clickpiyush.egg-info/entry_points.txt
writing requirements to clickpiyush.egg-info/requires.txt
writing top-level names to clickpiyush.egg-info/top_level.txt
reading manifest file 'clickpiyush.egg-info/SOURCES.txt'
adding license file 'LICENSE'
writing manifest file 'clickpiyush.egg-info/SOURCES.txt'
running check
creating clickpiyush-1.0.1
creating clickpiyush-1.0.1/clickpiyush.egg-info
copying files to clickpiyush-1.0.1...
copying LICENSE -> clickpiyush-1.0.1
copying README.md -> clickpiyush-1.0.1
copying clickpiyush.py -> clickpiyush-1.0.1
copying setup.cfg -> clickpiyush-1.0.1
copying setup.py -> clickpiyush-1.0.1
copying clickpiyush.egg-info/PKG-INFO -> clickpiyush-1.0.1/clickpiyush.egg-info
copying clickpiyush.egg-info/SOURCES.txt -> clickpiyush-1.0.1/clickpiyush.egg-info
copying clickpiyush.egg-info/dependency_links.txt -> clickpiyush-1.0.1/clickpiyush.egg-info
copying clickpiyush.egg-info/entry_points.txt -> clickpiyush-1.0.1/clickpiyush.egg-info
copying clickpiyush.egg-info/requires.txt -> clickpiyush-1.0.1/clickpiyush.egg-info
copying clickpiyush.egg-info/top_level.txt -> clickpiyush-1.0.1/clickpiyush.egg-info
Writing clickpiyush-1.0.1/setup.cfg
Creating tar archive
removing 'clickpiyush-1.0.1' (and everything under it)
Now let's install twine. It's a utility to publish python packages to PyPI and then upload generated distribution.
pip install twine
twine upload dist/*
After you run the command, you'll show that distribution is uploading to PyPI and asking for your credentials. Once you enter those, the package will be published successfully and listed in PyPI as this.
https://pypi.org/project/clickpiyush/
Now anyone can install this package by using the below command.
pip install clickpiyush

$ clickpiyush
Usage: clickpiyush [OPTIONS] COMMAND [ARGS]...

Options:
  --help Show this message and exit.

Commands:
  age Get Age
  bio Basic Bio
  blog Get My blog URL
  greet Describe this tool with colors to You.
  portfolio Launch my Portfolio!
  skills Get my dummy skills set with progress bar
I hope you enjoyed this article. Share, subscribe and stay tuned for more!

Top comments (1)
Found this article when looking for a project to give my friend who’s getting into coding! The detail is super appreciated as he’s using it as a guide rn. Thank you for sharing cheers!