

If you have Azure Resources that aren’t exposed on the internet but only accessible via a private network, you can’t use Microsoft-hosted agents because they can’t connect to the private network. Therefore, we need to maintain a pool (or several pools) of self-hosted agents, with the associated costs and effort to maintain that pool(s).
In this case it is where Ephemeral pipelines agents come into action.
Overview
Ephemeral pipelines agents come to eliminate the need to use and maintain pools of self-hosted agents for deployment purposes.This type of agents are capable to deploy to private azure resources. The process is not very complex. Ephemeral pipelines agents run in an Azure Container Instance (ACI) with access to the private network where the other Azure resources are. The agents are created to run a pipeline job and then deleted to avoid extra costs and resources consumption.
This way, we can deploy to private Azure resources without having to expose them on the internet or having to maintain self-hosted agents on the same (or with access) virtual network (with their associated costs and cons).
The agent that runs in the ACI its only a basic Docker image with the necessary dependencies to run the agent and to be capable to deploy to our private resources. For example, a base Ubuntu image with the necessary dependencies and the deploy agent installed.
TL;DR: The purpose of this task is to create a short-lived Azure Pipelines Agent to run a deploy in a private virtual network so we can deploy to Azure Resources that are not internet accessible.
⚠️ Important: This approach (and task) is currently in preview and has known issues and limitations. Please take this into account before proceeding to use this process.
How does the process works
Only three steps/requirements:
- One docker image that can run a deploy agent in a container (needed to provision agents).
- Provision one ephemeral pipeline agent to run the deployment job. This process can be done using this task. This task provisions, configures and registers an agent on an ACI using the docker image mentioned in the first step.
- The container runs one pipeline job, and then it unregisters the agent and deletes the container (it self destructs).
So considering we have setup a docker image that can run a deploy agent in a container, our pipeline will look like this:
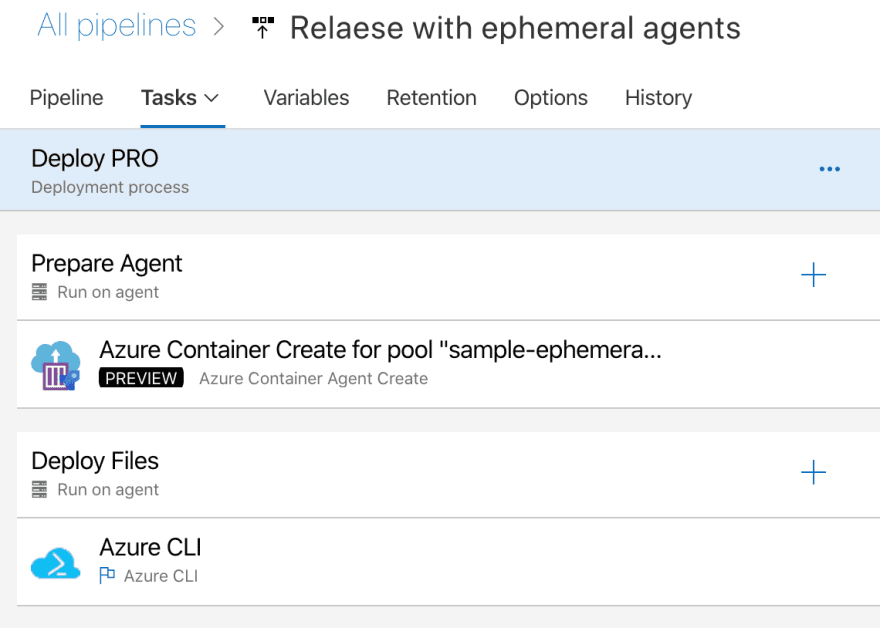
As you can see, two jobs are needed:
- The first one provisions the agent in one pool to run the deployment job.
- The second one (depending on the first being finished correctly), runs the deployment job. It runs on the agent that the first job has provisioned.
Tutorial
In this post I will guide you through a simple tutorial on how to deploy assets on a container in an Azure Storage account in a private virtual network, using Ephemeral pipeline agents.
So let’s get started!
Requirements:
- A virtual network with a security group.
- A dedicated subnet in the virtual network to run the ephemeral agents.
- The agent must run in the same Azure location as the virtual network.
- All the created subnets must share the same security group.
Overview of the resources
For this tutorial I have created two resource groups:
- One for the virtual network and the security group.
- Another one for the Azure Container Registry (ACR) and the storage we will deploy to.
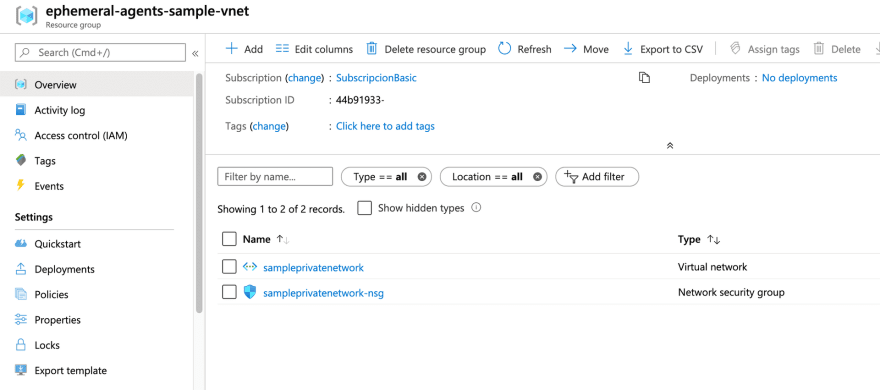

Also, the Azure Storage account should be in the private network, with a configuration similar to this one:

If you need it, the main repo of ephemeral agents has sample scripts on how to deploy these resources.
Pushing the base image for ephemeral agents
Once finished configuring our resources in Azure, we will need the base image to use with the ephemeral agents.In this case I have used the Agent Images available in the GitHub repo, specifically the Ubuntu one. We can use the pipeline in the GitHub repo to deploy our Agent image in the ACR (using an ACR Service connection).
After that, we should have one repository with one image in our ACR:

Setting up the pipeline in Azure DevOps
After creating the needed resources and pushing the Agent Image to the ACR, we are ready to create our pipeline and use ephemeral agents to deploy.
First of all, we will need to create an additional agent pool in our Project, and grant access to all pipelines.
Permissions:
For this process we will need to give specific permissions in order to allow the pipeline to register agents in the new pool, running jobs in these agents and unregister them.
In order to register the agent a token with sufficient permissions on the Azure DevOps Organization the agent is going to be registered is needed.
You can use two different types of tokens: a Personal Access Token or an OAuth token (recommended).
- If using an Personal Access Token (PAT), it requires the Agent Pools Read & Manage scope and that the user who owns the PAT has administration privileges on the agent pool you intend to register the agent.
- If using an OAuth token, the best approach is to use System.AccessToken which are short lived, dynamic and automatically managed by the system.
If using the OAuth token, you need to met the following conditions:
- The timeout for the job that creates the agent only expires after the deploy job in the agent is finished (because the token is used to register and unregister the agent in the pool).
- The account
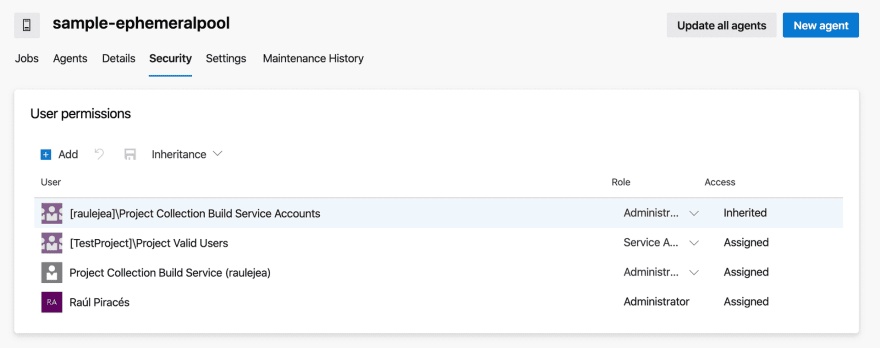
Project Collection Build Service (YOUR_ORG)needs to have administration permissions on the pool (granted at the organization level, not at team project level).
In this example, permissions on the pool (for the OAuth token approach) will look like the following:
Additional considerations:
You must register an Azure Resource provider for the namespace Microsoft.ContainerInstance in order to create container instances for the agents. This can be done easily opening a Powershell instance in the Azure portal and executing the following command:
Register-AzureRmResourceProvider -ProviderNamespace 'Microsoft.ContainerInstance'
This will register the needed Azure Resource provider.
Service connections:
We will need a Service connection using a Service principal, which has to have access to the VNet resource group and the ACR and Storage Account resource group. We can set it up in the project settings in Azure DevOps, granting permissions to one resource group and then going to the Azure Portal to grant permissions to the another one. Make sure to grant permissions to all pipelines.
Also, as mentioned above we will need an ACR Service Connection to our ACR to run the ephemeral agents in the ACI from the Agent Image in the ACR (granting permissions to all pipelines).
Pipeline definition:
In this part of the process two pipelines are created for my sample project, one for creating the base image for the agents in the ACR (which we have previously created), and another one for the main deploy process of our project.
The main deploy pipeline used in this tutorial is the same defined in the GitHub repo sample. As we have seen in the previous stages, we have to define two jobs: one to provision the agent and another one to perform the deploy job.
Configure the variables in the sample pipeline to reference your resources correctly and then try to run it:

If we have configured everything correctly, the pipeline will succeed:
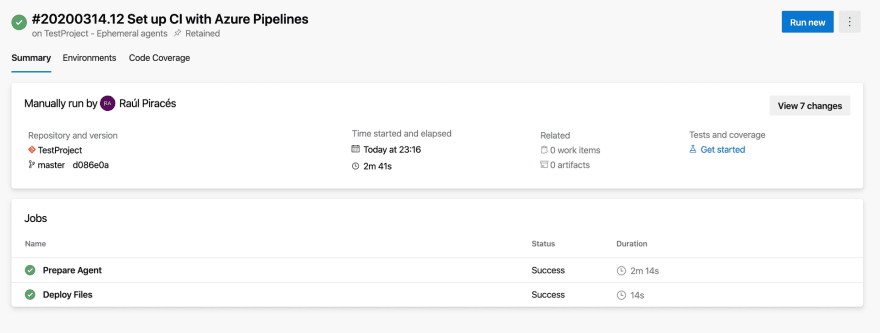
If we inspect our created agent pool, we will see the executed job but no agents registered in the pool (which is the main purpose of this process). This is because the agent has unregistered itself when the deployment job finished.

Final result:
After the deploy pipeline execution, we can check how we successfully have deployed our assets to the Azure Storage container connected to the private virtual network:

Conclusion
We have seen how ephemeral pipelines agents works, how to replace self-hosted agents with ephemeral ones and the most important part: how to reduce maintenance costs of having our own self-hosted agents pool(s).
It is important to emphasize that this process its currently in preview, so maybe some things just do not work out of the box, but I personally think its an excellent approach to avoid having self-hosted agents in the mentioned situations.
Happy deploy! 🎉🎉
Sources:

Latest comments (0)