In the past, I've always used multiple third-party services to, for example, host and deploy my code to production. I like the idea of minimizing the number of third-party services as they provide overhead, potential security risks, and often additional costs. So I decided to give Github Actions a try to see if I can replicate the famous zero-downtime deployments across multiple servers. GitHub introduced GitHub Actions in 2019, a workflow automation tool that allows GitHub users to use Actions to build their continuous delivery pipelines.
As the article implies, I was able to do so 😄 Before I walk you through every step, I recommend taking a look at the free GitHub Actions: Hello World course if you haven't used GitHub Actions before.
GitHub Action Workflow jobs overview
Each GitHub Action workflow consists of one or multiple jobs which contain one or multiple steps. To deploy our application, we need to create the following jobs:
Create GitHub Action build artifacts for deployment
I want to create one archive containing all the code ready to be deployed on production. You could run commands like npm run production on your production server, but I like to keep my production server mean and clean. This reduces server maintenance overhead, like updating NodeJS across multiple servers.
We want to achieve the following for our Laravel application artifacts:
- Install NPM dependencies.
- Compile CSS and Javascript assets.
- Install Composer dependencies.
- Archive our build and remove unnecessary data (e.g., node_modules).
- Store our archive so we can deploy it to our servers.
Prepare release on all our servers
We want to make sure our deployments are stable and reliable, meaning we don't want one server to be updated while the second server failed. If the preparation fails on one server, we want the deployment sequence to stop.
We want the release preparation job to do the following:
- Ensure we have a directory that holds every release.
- Ensure we have a storage directory that shares data between releases.
- Ensure we have a current directory that links to the active release.
- Extract our build files into our releases directory.
Run optional before hooks
This is an optional feature, but I want to execute specific commands before the release is activated (e.g., chmod directories). So there needs to be a way to configure these so-called before hooks.
Activate the release
Now we are ready to activate our new release without any downtime. We can do this by changing symbolic links; this basically swaps the underlying release, which is linked to our current directory, to a new release inside our releases directory. I'm running PHP FPM on my servers, so I also want to reload PHP FPM to detect the changes.
Run optional after hooks
This is an optional feature as well, but I want to execute specific commands after the release is activated to send a notification that my deployment completed for example. So there needs to be a way to configure these so-called after hooks.
Cleaning up
Given that we are uploading and extracting new releases, we take up more disk spaces after each release. To make sure we don't end up with thousands of releases and a full disk, we need to limit the number of release artifacts living on every server.
Project scaffolding
To get started, you need to create a GitHub repository as testing your workflow requires you to commit and push your workflow yml file. It doesn't matter if your chosen repository is public or private. Feel free to try and implement this with one of your existing projects. I recommend you create a separate branch for this, so your repository stays clean, and you don't have a bunch of angry colleagues looking at you ;)
I'm using a clean Laravel 8.* installation to deploy in this demonstration, which you can download here. Be sure to verify that everything works before you continue.
Finally, create a new workflow file; feel free to give it any name you would like and place it in the .github/workflows directory inside your project.
name: Deploy Application

on:
  push:
    branches: [master]

jobs:
  # Magic
As I mentioned earlier, you will probably end up committing and pushing to GitHub several times. So if you are working along with one of your existing projects, make sure you choose a different branch if you don't want to clutter your commit history.
Our first job: Create deployment Artifacts
Before we have something to deploy, we need to start the build our Laravel application as we would typically do. So let's kick off by checking out our project by using the predefined checkout action by GitHub.
# // code from earlier is ommited for clearity

jobs:
  create-deployment-artifacts:
    name: Create deployment artifacts
    runs-on: ubuntu-latest

  steps:
  - uses: actions/checkout@v2
GitHub will checkout the code from our repository in the container; no further steps necessary. Now that we have our code, we can continue with compiling our assets.
# //
  steps:
  - uses: actions/checkout@v2

  - name: Compile CSS and Javascript
    run: |
      npm install
      npm run prod
Tip: If you use a CDN to deliver your static files, be sure to implement your own solution. The front-end assets are now shared amongst all servers individually, which is not ideal. It may impact your website speed since assets could be loaded from different servers on every request depending on your load-balancer.
We can now continue with our back-end code. Before we can install any composer packages, we need to make sure PHP is installed first. We will use the setup-php action by Shivam Mathur, which makes this a breeze.
# //
  - name: Compile CSS and Javascript
    run: |
      npm ci
      npm run prod

  - name: Configure PHP 8.0
    uses: shivammathur/setup-php@master
    with:
      php-version: 8.0
      extensions: mbstring, ctype, fileinfo, openssl, PDO, bcmath, json, tokenizer, xml
This will configure PHP 8.0 (I've started with PHP 7.4 and updated the article to PHP 8.0) and install the required extensions. If your application requires additional extensions, be sure to add them to the list. We can continue by installing our Composer dependencies.
# //
  - name: Configure PHP 8.0
     uses: shivammathur/setup-php@master
     with:
      php-version: 8.0
      extensions: mbstring, ctype, fileinfo, openssl, PDO, bcmath, json, tokenizer, xml
  - name: Composer install
    run: |
    composer install --no-dev --no-interaction --prefer-dist
Since we are preparing to deploy to production, I've added the --no-dev flag. These additional packages are not required for production. In case you want to run PHPUnit before your deployment, you could either install the dependencies, run PHPUnit, and remove the dependencies or simply create a new workflow. I recommend the latter since it keeps testing and deployment logic separated.
Time to test out what we've got so far! Commit your code changes and push them to GitHub. Once you've done so, visit the Actions page (github.com///actions)
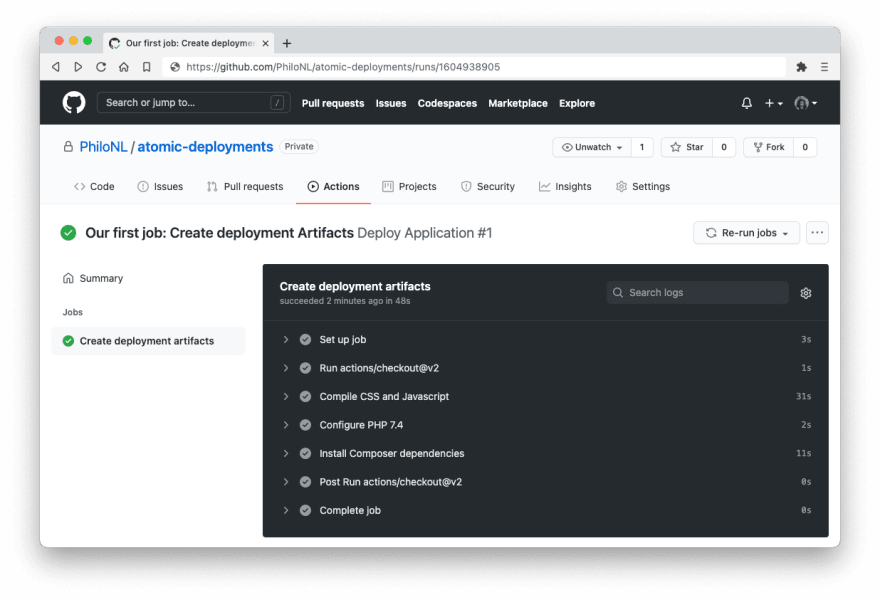
You can click each job to see the execution output. If a job fails, it will show a red cross instead of a checkmark. The execution output will often provide you with the information you need to resolve the issue.
We've successfully compiled our front-end assets and installed our Composer dependencies. Now we need to store the results. GitHub provides an Upload-Artifact helper. This will help us to share the Github Actions artifacts between jobs.
You can upload single files, multiple files, and directories. Since we just want all our files deployed, I prefer to create a TAR archive, so we have a single file to work with. You could also create a ZIP archive, but this will require installing additional software in the build container as Ubuntu doesn't ship with the required libraries.
# //
  - name: Composer install
    run: |
     composer install --no-dev --no-interaction --prefer-dist

  - name: Create deployment artifact
    run: tar -czf app.tar.gz *
This will create a new tar archive called app.tar.gz containing all the files, including the additional build artifacts we've made in the previous steps.
This works just fine, but the archive now contains files we don't need, like the node_modules directory. We only required these to run the npm run production command. Let's fix this by excluding directories from our archive.
# //
- name: Create deployment artifact
  run: tar -czf app.tar.gz --exclude=*.git --exclude=node_modules --exclude=tests *
Our archive will now skip the .git, node_modules, and tests directories from our archive. If you have additional files that are not required to be on your production server, exclude them now. By making the archive smaller, your deployment will be quicker.
I want to change our archive's filename so it's easier to identify which commit our archive contains. GitHub has some global variables you can use in your .yml file, so let's change the name to the commit hash.
# //
- name: Create deployment artifact
  env:
    GITHUB_SHA: ${{ github.sha }}
  run: tar -czf "${GITHUB_SHA}".tar.gz --exclude=*.git --exclude=node_modules *
We use the env option to pass environment variables down into the container. In this case, we define an environment variable called GITHUB_SHA and assign it the commit hash from the current job. If you want to know more about context and expression syntax for GitHub Actions, click here.
We're now ready to upload our build artifacts with the Upload-Artifact helper.
# //
- name: Create deployment artifact
  env:
    GITHUB_SHA: ${{ github.sha }}
  run: tar -czf "${GITHUB_SHA}".tar.gz --exclude=*.git --exclude=node_modules *

- name: Store artifact for distribution
  uses: actions/upload-artifact@v2
  with:
    name: app-build
    path: ${{ github.sha }}.tar.gz
We only need to provide this step with the path to our file. We again use the GitHub Action expression to get the commit hash. Finally, we provide our artifact with a name, which we can use for later reference to download the GitHub Actions artifacts in our deployment job.
Before we can continue with any of the follow-up jobs, we need to prepare something called a GitHub Actions strategy matrix. A strategy creates a build matrix for your jobs. You can define different variations to run each job in.
You can define a matrix of different job configurations. A matrix allows you to create multiple jobs by performing variable substitution in a single job definition.
In our case, servers are the variable in our jobs. We we will use a JSON file inside our repository, so we don't have to switch back and forth between the GitHub UI.
Create a new file called deployment-config.json in the root of your project and add the following contents:
[
  {
    "name": "server-1",
    "ip": "123.456.78.90",
    "username": "web",
    "port": "22",
    "beforeHooks": "",
    "afterHooks": "",
    "path": ""
  }
]
This file contains a list of all our servers we wish to deploy to. We can define the before and after hook, and our Nginx directory path, which will serve our application for each server. For authentication we will use an SSH key which you can store inside a repository secret. In this example I will name the secret SSH_KEY and reference this secret inside our workflow to authenticate the commands we want to execute on our remote server .
You could even host this file somewhere to dynamically populate this file, so if you add more instances to your infrastructure, they will be automatically included in the deployment cycle.
Note: A job matrix can generate a maximum of 256 jobs per workflow run. If you want to deploy to hundreds of servers in a single workflow, you need an alternative. I would recommend going serverless with a solution like Laravel Vapor.
To make this configuration available inside our GitHub Actions workflow, we need to export this data. Using a special syntax, GitHub can identify which data to assign to which variable to reference later on our workflow matrix.
# //
- name: Store artifact for distribution
  uses: actions/upload-artifact@v2
  with:
    name: app-build
    path: ${{ github.sha }}.tar.gz

- name: Export deployment matrix
  id: export-deployment-matrix
  run: |
    JSON="$(cat ./deployment-config.json)"
    JSON="${JSON//'%'/'%25'}"
    JSON="${JSON//$'\n'/'%0A'}"
    JSON="${JSON//$'\r'/'%0D'}"
    echo "::set-output name=deployment-matrix::$JSON"
First, we need to get the JSON from our deployment-config.json by using a simple cat command. Next, we will escape the JSON (only required if your JSON is multiple lines). Finally, we use the ::set-output syntax to tell GitHub which value we want to associate with the deployment-matrix key, ::set-output name= deployment-matrix ::$JSON.
If we want our other jobs to get the output from this job, we need to specify the output reference in our create-deployment-artifacts job.
# //
jobs:
  create-deployment-artifacts:
    name: Create deployment artifacts
    runs-on: ubuntu-latest
    outputs:
      deployment-matrix: ${{ steps.export-deployment-matrix.outputs.deployment-matrix }}
    steps:
      - uses: actions/checkout@v2

# //
We can now reference deployment-matrix in other jobs and get all the required information for each of our servers.
Our second job: Prepare the release on all the servers
Next up, we can continue to prepare our release on every server. Thanks to the deployment matrix configuration we've created, we can cycle through each server to repeat all the steps on every server.
# //
prepare-release-on-servers:
  name: "${{ matrix.server.name }}: Prepare release"
  runs-on: ubuntu-latest
  needs: create-deployment-artifacts
  strategy:
    matrix:
      server: ${{ fromJson(needs.create-deployment-artifacts.outputs.deployment-matrix) }}
As you can see, there are a couple of new parameters. The first new parameter, needs, allows us to make sure a specific step has finished before this job can start. In our case, we want to prepare the release on the servers once the create-deployment-artifacts. If you have multiple step dependencies, you can also pass an array.
Next, we got our strategy parameter, which allows us to define our matrix. In this case, we define a matrix variable named server and assign it to our deployment-matrix we've created in our previous job. By default, the build matrix expects an array and not a JSON string.
As mentioned earlier, GitHub Actions support context and expression syntax to access context information but also to evaluate expressions. This includes a couple of functions to, for example, cast values. To read our server configuration, we need to change our JSON string into a real JSON object using the fromJSON function.
We can retrieve our JSON object through the matrix context. This enables access to the matrix parameters we've configured for the current job. For example, in the code above, you can see we define a variable job name: name: "${{ matrix.server.name }}: Prepare release". In the GitHub UI, this will resolve to "server-1: Prepare release".
We are now ready to continue with the steps of our job, downloading our artifact to our build container, uploading our artifact to the server, extracting our archive, and set up required directories on our server if they don't exist.
# //
prepare-release-on-servers:
  name: "${{ matrix.server.name }}: Prepare release"
  runs-on: ubuntu-latest
  needs: create-deployment-artifacts
  strategy:
    matrix:
      server: ${{ fromJson(needs.create-deployment-artifacts.outputs.deployment-matrix) }}
  steps:
    - uses: actions/download-artifact@v2
      with:
        name: app-build
    - name: Upload
      uses: appleboy/scp-action@master
      with:
        host: ${{ matrix.server.ip }}
        username: ${{ matrix.server.username }}
        key: ${{ secrets.SSH_KEY }}
        port: ${{ matrix.server.port }}
        source: ${{ github.sha }}.tar.gz
        target: ${{ matrix.server.path }}/artifacts
We start by downloading our GitHub Actions build artifact, which is quite simple as GitHub provides a simple action out of the box called "Download Artifacts." We reference the name we've used for uploading our artifact. This will download the artifact into the build container.
Next, we upload the artifact to the server using a third-party SCP action in the GitHub Actions marketplace. This action will copy our file via SSH based on our configuration. Make sure to check out the repository for all available input variables for this action if you, for example, want to use SSH keys for authentication.
The SSH credentials are self-explanatory; we simply reference our JSON object to get the server's connection details and the credentials. The SCP action requires a source input variable; this is the file we want to upload. We use the commit hash context object again to generate the filename ${{ github.sha }}.tar.gz.
Besides the source input variable, we also need to provide the target input variable. I want to keep all the uploaded artifacts in a separate directory. I reference the server path and append the path with the directory name artifacts to achieve this. The final path will be /var/www/html/artifacts.
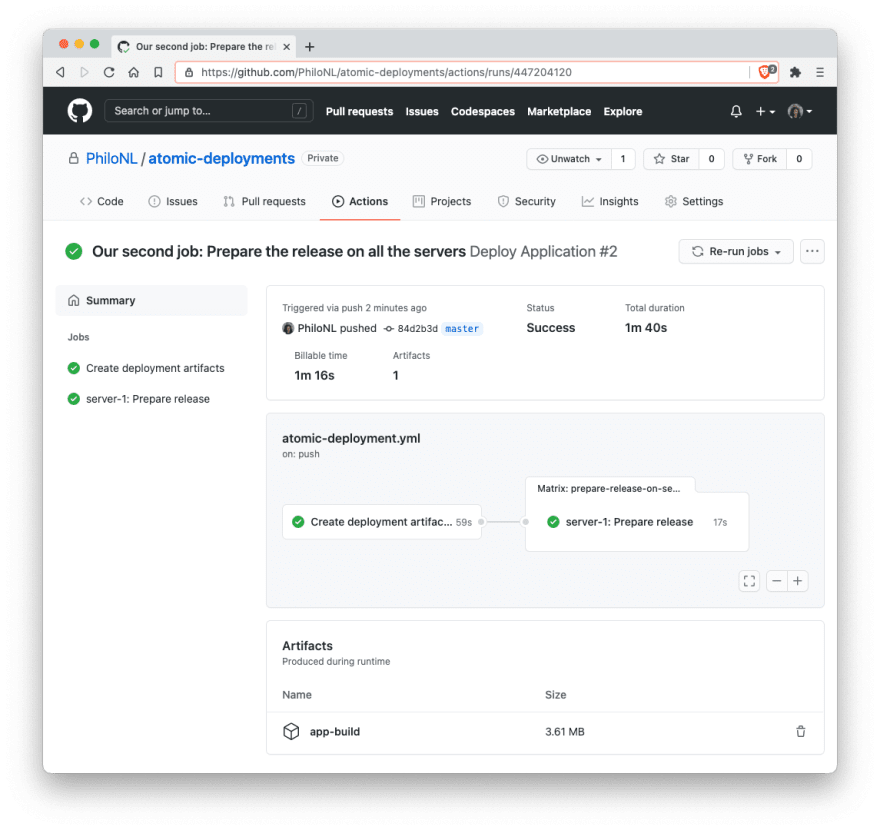
Let's take a look and make sure everything is working so far. Commit all your changes and push them to GitHub. Visit the actions page of your repository again, and you should see a running action.
Click the server-1: Prepare release job so you can see the output of all the steps. Click on the Upload job to expand the output. Seems to be looking good so far, our GitHub Actions release artifacts are now uploaded to our remote server.
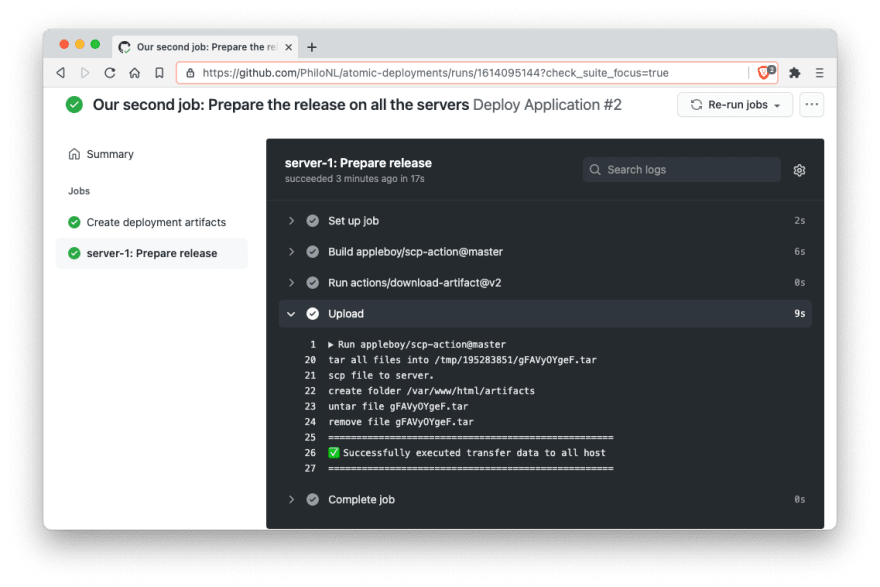
Our final step for this job is to extract our uploaded archive and create a couple of directories if they don't exist. We will use SSH commands to set this up. We will again use a third-party action in the GitHub Actions marketplace called SSH Action. By now, you will be familiar with most of the syntax. The input variables are similar to the previous upload step:
# //
- name: Extract archive and create directories
  uses: appleboy/ssh-action@master
  env:
    GITHUB_SHA: ${{ github.sha }}
  with:
    host: ${{ matrix.server.ip }}
    username: ${{ matrix.server.username }}
    key: ${{ secrets.SSH_KEY }}
    port: ${{ matrix.server.port }}
    envs: GITHUB_SHA
    script: |
      mkdir -p "${{ matrix.server.path }}/releases/${GITHUB_SHA}"
      tar xzf ${{ matrix.server.path }}/artifacts/${GITHUB_SHA}.tar.gz -C "${{ matrix.server.path }}/releases/${GITHUB_SHA}"
      rm -rf ${{ matrix.server.path }}/releases/${GITHUB_SHA}/storage

      mkdir -p ${{ matrix.server.path }}/storage/{app,public,framework,logs}
      mkdir -p ${{ matrix.server.path }}/storage/framework/{cache,sessions,testing,views}
      chmod -R 0777 ${{ matrix.server.path }}/storage
If you use the | character in your script, you can define multiple commands split across multiple lines you want to execute on your server.
# Create a new directory with the commit hash as the directory name
mkdir -p "${{ matrix.server.path }}/releases/${GITHUB_SHA}"

# Extract the tar file into our release directory
tar xzf ${{ matrix.server.path }}/artifacts/${GITHUB_SHA}.tar.gz -C "${{ matrix.server.path }}/releases/${GITHUB_SHA}"

# Create Laravel storage directories and set permissions
mkdir -p ${{ matrix.server.path }}/storage/{app,public,framework,logs}
mkdir -p ${{ matrix.server.path }}/storage/framework/{cache,sessions,testing,views}
chmod -R 0777 ${{ matrix.server.path }}/storage
If you want, you can SSH into one of your servers and verify that the directories exist and the archive is unarchived.
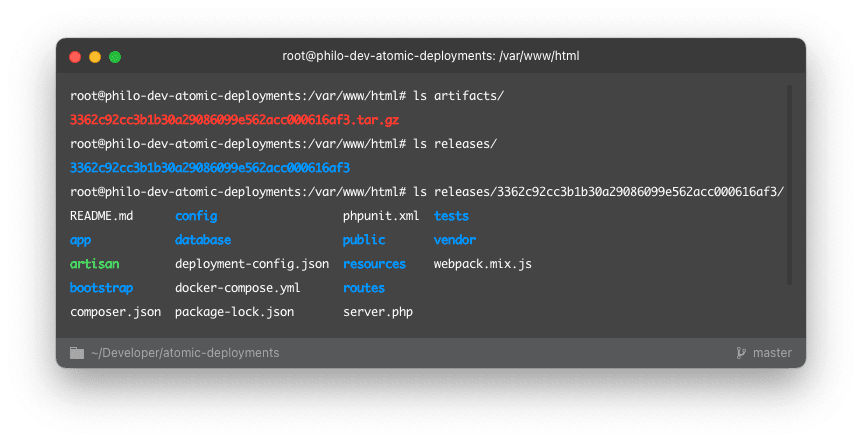
So far, so good! We've made our build, uploaded the results to our server, extracted the archive, and made sure the required directories exist. We are almost there :)
Our third job: Run before hooks
This step is optional, but it's quite useful if you want to execute specific commands before you activate your release. In this example, we are using Laravel, so you might want to run database migrations.
# //
run-before-hooks:
  name: "${{ matrix.server.name }}: Before hook"
  runs-on: ubuntu-latest
  needs: [create-deployment-artifacts, prepare-release-on-servers]
  strategy:
    matrix:
      server: ${{ fromJson(needs.create-deployment-artifacts.outputs.deployment-matrix) }}
  steps:
  - name: Run before hooks
    uses: appleboy/ssh-action@master
    env:
      GITHUB_SHA: ${{ github.sha }}
      RELEASE_PATH: ${{ matrix.server.path }}/releases/${{ github.sha }}
      ACTIVE_RELEASE_PATH: ${{ matrix.server.path }}/current
      STORAGE_PATH: ${{ matrix.server.path }}/storage
      BASE_PATH: ${{ matrix.server.path }}
    with:
      host: ${{ matrix.server.ip }}
      username: ${{ matrix.server.username }}
      key: ${{ secrets.SSH_KEY }}
      port: ${{ matrix.server.port }}
      envs: envs: GITHUB_SHA,RELEASE_PATH,ACTIVE_RELEASE_PATH,STORAGE_PATH,BASE_PATH
      script: |
        ${{ matrix.server.beforeHooks }}
Again, similar job but with a couple of changes. First, we want to make sure the create-deployment-artifacts and the prepare-release-on-servers have been completed by passing an array to the need property.
needs: [create-deployment-artifacts, prepare-release-on-servers]
To make things a bit easier when defining before hooks, I want to use specific environment variables to simplify things. Let's say I want to execute set permissions on the storage directory:
[
  {
    "name": "server-1",
    "beforeHooks": "chmod -R 0777 ${RELEASE_PATH}/storage",
    "afterHooks": "",
    "path": "/var/www/html"
  }
]
To make these environment variables available, you need to explicitly define which variables you want to pass via the envs input variable.
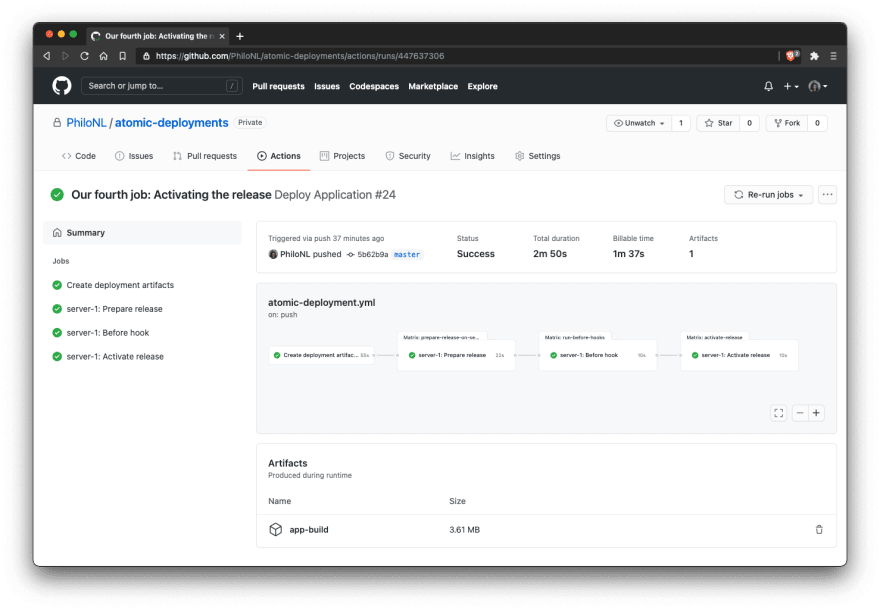
Our fourth job: Activating the release
Time for the most exciting part, if I say so myself, activating our release. We will re-use a big chunk of our previous step with a couple of changes.
# //
activate-release:
  name: "${{ matrix.server.name }}: Activate release"
  runs-on: ubuntu-latest
  needs: [create-deployment-artifacts, prepare-release-on-servers, run-before-hooks]
  strategy:
    matrix:
      server: ${{ fromJson(needs.create-deployment-artifacts.outputs.deployment-matrix) }}
  steps:
    - name: Activate release
      uses: appleboy/ssh-action@master
      env:
        GITHUB_SHA: ${{ github.sha }}
        RELEASE_PATH: ${{ matrix.server.path }}/releases/${{ github.sha }}
        ACTIVE_RELEASE_PATH: ${{ matrix.server.path }}/current
        STORAGE_PATH: ${{ matrix.server.path }}/storage
        BASE_PATH: ${{ matrix.server.path }}
        LARAVEL_ENV: ${{ secrets.LARAVEL_ENV }}
      with:
        host: ${{ matrix.server.ip }}
        username: ${{ matrix.server.username }}
        key: ${{ secrets.SSH_KEY }}
        port: ${{ matrix.server.port }}
        envs: GITHUB_SHA,RELEASE_PATH,ACTIVE_RELEASE_PATH,STORAGE_PATH,BASE_PATH,ENV_PATH,LARAVEL_ENV
        script: |
          printf "%s" "$LARAVEL_ENV" > "${BASE_PATH}/.env"
          ln -s -f ${BASE_PATH}/.env $RELEASE_PATH
          ln -s -f $STORAGE_PATH $RELEASE_PATH
          ln -s -n -f $RELEASE_PATH $ACTIVE_RELEASE_PATH
          service php8.0-fpm reload
Again, we update the need input variable to include all previous steps before running the activate-release job:
needs: [create-deployment-artifacts, prepare-release-on-servers, run-before-hooks]
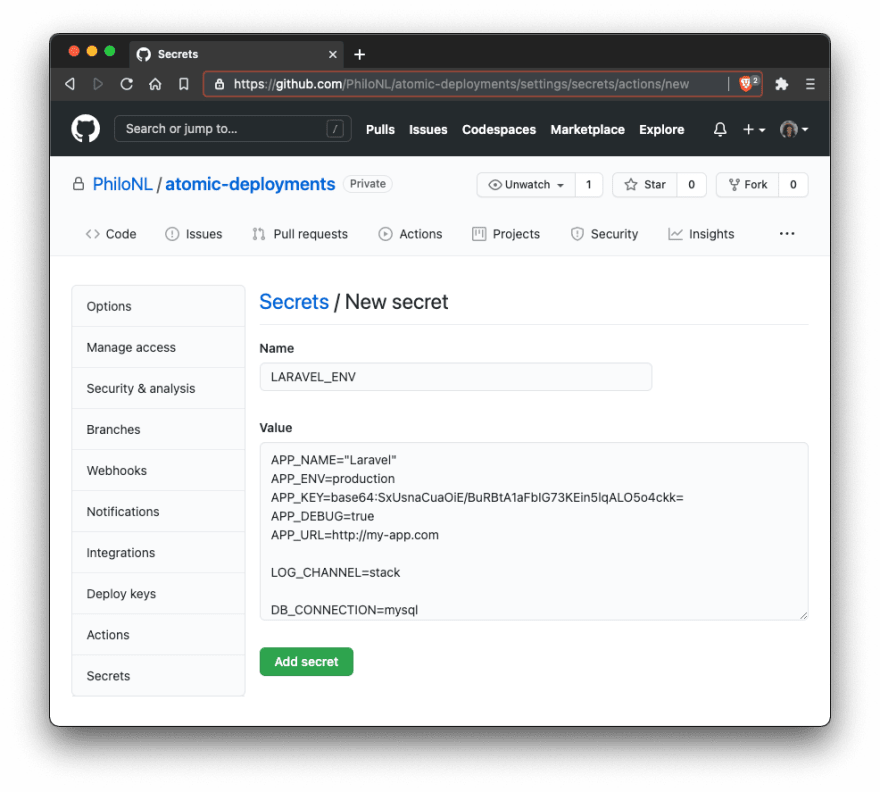
I've added a new Laravel environment variable, LARAVEL_ENV, which will contain the environment variable for our Laravel application. This variable doesn't contain any data just yet. So let's do this first, you can define key-value secrets per repository via the GitHub UI (repository->settings ->secrets)
Let's take a closer look at our bash script line by line:
# Store the environment data to the /var/www/html/.env file
printf "%s" "$LARAVEL_ENV" > "${BASE_PATH}/.env"

# Link /var/www/html/.env file to /var/www/html/releases/633be605b03169ef96c2cee1f756852e1ceb2688/.env
ln -s -f ${BASE_PATH}/.env $RELEASE_PATH

# Link /var/www/html/storage directory to /var/www/html/releases/633be605b03169ef96c2cee1f756852e1ceb2688/storage
ln -s -f $STORAGE_PATH $RELEASE_PATH

# Link the release path to the active release path, /var/www/html/current -> /var/www/html/releases/633be605b03169ef96c2cee1f756852e1ceb2688
ln -s -n -f $RELEASE_PATH $ACTIVE_RELEASE_PATH

# Reload php8.0 to detect file changes
service php8.0-fpm reload
Tip: There is a minor delay between the activation and the after hook job. So make sure to include critical commands in the activation job. You could add an extra release hook configuration if you want to define this per server.
Taking a quick look at all the directories via SSH verifies shows that everything is working correctly.
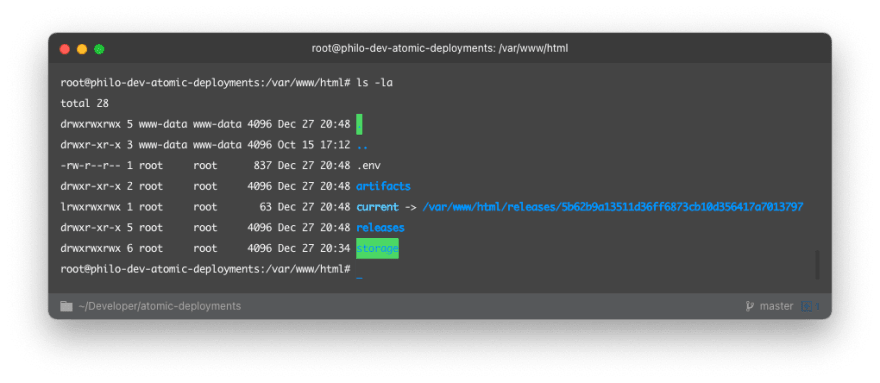
The current directory is pointing to /var/www/html/releases/5b62b9a13...
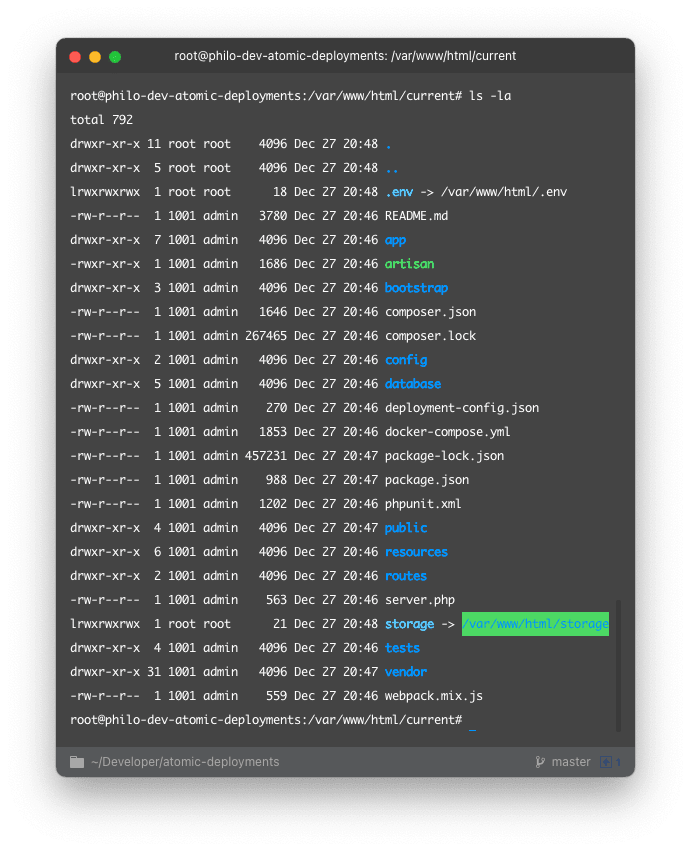
The current release environment file /var/www/html/current/.env is pointing to /var/www/html/.env and /var/www/html/current/storage is pointing to /var/www/html/storage.

Our Laravel application is up and running with zero downtime! Hurray!
Our fifth job: After hook
Our after hook is exactly the same as our before hook besides a few naming changes:
# //
run-after-hooks:
  name: "${{ matrix.server.name }}: After hook"
  runs-on: ubuntu-latest
  needs: [create-deployment-artifacts, prepare-release-on-servers, run-before-hooks, activate-release]
  strategy:
    matrix:
      server: ${{ fromJson(needs.create-deployment-artifacts.outputs.deployment-matrix) }}
  steps:
    - name: Run after hooks
      uses: appleboy/ssh-action@master
      env:
        GITHUB_SHA: ${{ github.sha }}
        RELEASE_PATH: ${{ matrix.server.path }}/releases/${{ github.sha }}
        ACTIVE_RELEASE_PATH: ${{ matrix.server.path }}/current
        STORAGE_PATH: ${{ matrix.server.path }}/storage
        BASE_PATH: ${{ matrix.server.path }}
      with:
        host: ${{ matrix.server.ip }}
        username: ${{ matrix.server.username }}
        key: ${{ secrets.SSH_KEY }}
        port: ${{ matrix.server.port }}
        envs: GITHUB_SHA,RELEASE_PATH,ACTIVE_RELEASE_PATH,STORAGE_PATH,BASE_PATH
        script: |
          ${{ matrix.server.afterHooks }}
Again the needs input variable is updated to make sure all previous steps have been completed.
Our sixth job: Cleaning up
Every release we upload and extract on our production servers take up space. You don't want to end up having servers meltdown because of their hard drives being full. So let's clean up after each deployment and keep 5 releases.
clean-up:
  name: "${{ matrix.server.name }}: Clean up"
  runs-on: ubuntu-latest
  needs: [create-deployment-artifacts, prepare-release-on-servers, run-before-hooks, activate-release, run-after-hooks]
  strategy:
    matrix:
      server: ${{ fromJson(needs.create-deployment-artifacts.outputs.deployment-matrix) }}
  steps:
    - name: Run after hooks
      uses: appleboy/ssh-action@master
      env:
        RELEASES_PATH: ${{ matrix.server.path }}/releases
        ARTIFACTS_PATH: ${{ matrix.server.path }}/artifacts
      with:
        host: ${{ matrix.server.ip }}
        username: ${{ matrix.server.username }}
        key: ${{ secrets.SSH_KEY }}
        port: ${{ matrix.server.port }}
        envs: RELEASES_PATH
        script: |
          cd $RELEASES_PATH && ls -t -1 | tail -n +6 | xargs rm -rf
          cd $ARTIFACTS_PATH && ls -t -1 | tail -n +6 | xargs rm -rf
Let's take closer look at the commands we are executing:
cd $RELEASES_PATH && ls -t -1 | tail -n +6 | xargs rm -rf
cd $ARTIFACTS_PATH && ls -t -1 | tail -n +6 | xargs rm -rf
This will cd into our release and artifacts directory, list all files in given directory, order the list by timestamp, return the results with the offset of 5 entries, and finally remove given files or folders.
Multi-server deployment
To deploy to multiple servers, you only need to update your deployment-config.json to include the additional servers:
[
  {
    "name": "server-1",
    "ip": "123.456.78.90",
    "username": "web",
    "port": "22",
    "beforeHooks": "",
    "afterHooks": "",
    "path": "/var/www/html"
  },
  {
    "name": "server-2",
    "ip": "901.234.56.78",
    "username": "web",
    "port": "22",
    "beforeHooks": "",
    "afterHooks": "",
    "path": "/var/www/html"
  }
]

That's a wrap! You've successfully made a release artifact from your application build and deployed it to multiple servers without any downtime!
I'd love to hear if you use this workflow to deploy your application, if you are happy with the results, which steps you've implemented or skipped, and the modifications/improvements you've made. Drop me a tweet @Philo01 and talk! 🙌🏼

I'm thinking about releasing a premium video course in the near future where I will show you how to build a real-world application from start to finish using Laravel, Livewire, and Tailwind CSS. I will be covering everything, from registering a domain, setting up a server, writing tests, you name it. Subscribe if you are interested and want to be notified, and you might also get access for free as I will be doing a give away when the course launches.


Top comments (0)