Have you heard of gateways, proxies (forward and reverse), load balancers, API gateways? You probably did, and even if you haven't you might have heard of products such as nginx,HAProxy, Envoy, Traefik, Kong, Ambassador, Tyk, and many others. You are probably using gateways each time without even knowing it.
Get this article in PDF and epub format
A gateway usually lives between clients and backing applications or services. Gateways' job is to proxy or "negotiate" the communication between the client and the server. Imagine walking into a mall through the main entrance. As you walk in you probably run into one of these things:
A mall directory. Regardless of which mall you go to, you will run into a directory that displays the names of all shops, their locations and probably includes a map as well. Let's say you want to visit the Lego store. You know the store is in the mall, but you don't know the exact address (why should you?!). Luckily, it's enough to know the name of the store and use the directory to find where the store is inside the mall.
Now if we think of a mall as a server (or a cluster of servers), then the stores in a mall are services or applications running on that server. The client, in this case, is you or your computer. If there's a single store in the mall, the problem is trivial - there's a single address, you know where to go.
However, we both know that's not reality. Just like there are hundreds of stores in a mall, there can also be hundreds or more applications running on the servers. We could say that clients memorizing all addresses would not be practical at least, let alone having only one application running on the server.
Going back to the analogy - you can think of the mall directory as a gateway in the software world. This gateway knows where all the applications live. It knows the actual addresses (think IPs or fully qualified domain names) of each application that's running on the server.
And just like you don't need to know the exact address of the store, neither do the clients making requests through the gateway.
If you want to get to the Lego store or call the application, you request stores.example.com/lego and the gateway will know to forward or proxy the request to the actual address stores.example.com/stores/level3/suite1610.
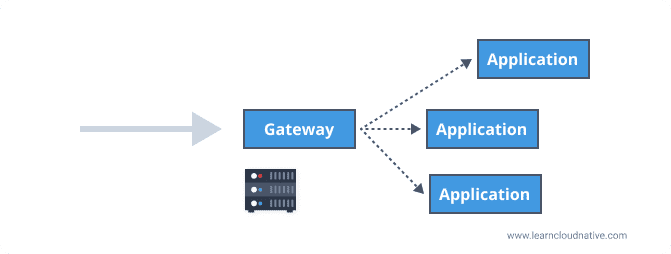
A gateway can be placed between the client and the applications for the incoming traffic, hence the name ingress gateway. Instead of a client making requests to separate applications, it only needs to know about and make a request to the gateway.
Routing the incoming requests and exposing API's through a common endpoint are just some of the responsibilities gateways can have. Other typical tasks a gateway does is rate-limiting, SSL termination, load balancing, and more.
What is rate-limiting?
Think of rate-limiting as a funnel that only lets a certain number of requests per unit of time go through to the application. If I stretch the mall analogy and combine with Black Friday - the stores are full, so you need to limit how many people can enter the store.
A rate limiter does something very similar - it limits the number of requests that can be made in a certain period. For example, with a rate limit of 10 requests per second, a client can only make 10 requests each second. If a client tries to make more than 10 requests per second, we say that they are getting rate limited by the server. The server's HTTP response, in this case, is 429: Too Many Requests.
What is SSL termination?
SSL stands for secure socket layer protocol. The SSL termination or also called SSL offloading is the process of decrypting encrypted traffic. SSL termination works perfectly with the gateway pattern. When encrypted traffic hits the gateway it gets decrypted there and then passed to the backend applications. Doing SSL termination at the gateway level also lessens the burden on your server, as you are only doing it once at the gateway level and not in each application.
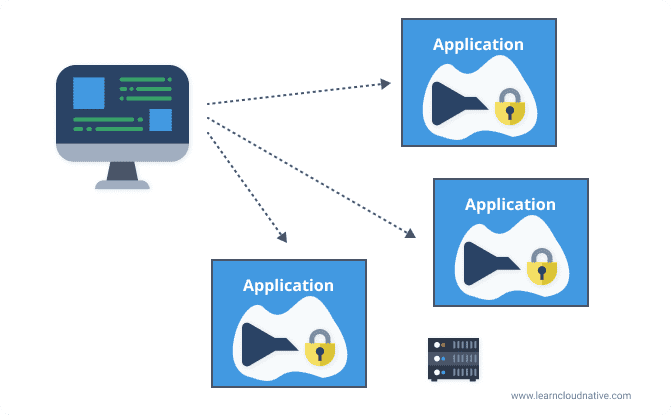
You could implement these at every application or service as shown in the figure below.
However, both SSL termination and rate-limiting "costs" time and resources if done at each application level. A gateway can help with offloading this functionality and perform it once at the gateway level.
Here's a list of some of the functionality that can be offloaded and executed at the gateway level:
- Authentication
- SSL termination
- Load balancing
- Rate limiting
- Circuit breaking
- Response transformation based on the client
What is circuit breaking?
Circuit breaking is a pattern that can help with service resiliency. It is used to prevent making unnecessary requests to applications once they are already failing. You can check the "What is circuit breaking?" post for more details.
The gateway approach also has its drawbacks. It is an additional piece of software you have to develop, maintain or at least configure (if using existing gateway solutions). You also need to make sure your gateway is not becoming a bottleneck - don't try to offload too many things to the gateway if it's not needed.
Egress gateway
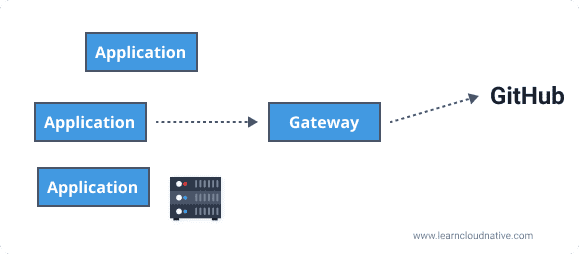
On the other hand (or the other side), an egress gateway runs inside your private network and can be used as an exit point for traffic exiting your network. For example, if your application interacts with an external API (Github for example), any requests made to https://api.github.com would go through the egress gateway first, and then the egress gateway can proxy the call to the external service.
Why would you want to use an egress gateway? Egress gateways are used for controlling all traffic that's exiting your network. For example, if you know your external dependencies (e.g. Github API) you can block any other outbound connection. In case your service gets compromised, blocking all outbound connections will prevent potential attackers from performing further attacks. If we take this a step further, you can run the egress gateway on a dedicated machine where you can apply stricter security policies and monitor the machine separately. Another common scenario is where your server does not have access to external IPs or the public internet. In this case, your egress gateway (accessible to services in your network) serves as an exit point for any external requests.
Gateways in practice
Let's finish this with a quick example that shows some basic features of a gateway. I'll be using the HAProxy, but the same functionality can be achieved with other proxies as well. You can get the source code from the GitHub repo.
I have created a service called Square that exposes a single API. The API takes a single parameter from the URL (a number) and returns a square of that number. The service is packaged in a Docker image. To run this on your machine, you will have to download and install Docker. You can follow the instructions for downloading and installing Docker Desktop.
Once you Docker Desktop is installed, open the terminal window, and let's run the learnloudnative/square:0.1.0 Docker image.
docker run -p 8080:8080 learncloudnative/square:0.1.0
The first time you run the above command, it can take a bit as Docker needs to download (or pull, if using the Docker terminology) the image. Since the Square service exposes an API we need to provide a port number where we want to access the API. Hence the -p 8080:8080 - the first 8080 is saying we want to expose the service on port 8080 on our local machine, and the second 8080 is the port number the service is listening on.
Once the image is downloaded and container is running, you'll see a message like this:
$ docker run -p 8080:8080 learncloudnative/square:0.1.0
{"level":"info","msg":"Running on 8080","time":"2020-04-25T21:20:01Z"}
Let's try and send a request to the service. Open a second terminal window, so you can keep the service running, and run the following command:
$ curl localhost:8080/square/25
625
The service responds with the result (625) and you'll notice in the previous terminal window that the request was also logged:
$ docker run -p 8080:8080 learncloudnative/square:0.1.0
{"level":"info","msg":"Running on 8080","time":"2020-04-25T21:20:01Z"}
{"level":"info","msg":"GET | /square/25 | curl/7.64.1 | 6.781µs","time":"2020-04-25T21:22:50Z"}
You can press CTRL+C to stop running the container.
Adding a proxy
To make things easier to run, I will use Docker Compose that will run both the Square service and the HAProxy instance. Don't worry if you're not familiar with Docker Compose, it is just a way to run multiple Docker containers at the same time.
The docker-compose.yaml file defines two services - the haproxy and the square-service. The docker-compose.yaml file looks like this:
version: '3'
services:
  haproxy:
    image: haproxy:1.7
    volumes:
      - ./:/usr/local/etc/haproxy:ro
    ports:
      - '5000:80'
    links:
      - square-service

  square-service:
    image: learncloudnative/square:0.1.0
In addition to the compose file, we also need a configuration file to configure what the HAProxy should do. Remember, we won't be calling the square-service directly, instead, we will send the request to the proxy and the proxy will pass our request to the square-service.
The HAProxy is configured using the haproxy.cfg file with the following contents:
global
  maxconn 4096
  daemon

defaults
    log global
    mode http

    timeout connect 10s
    timeout client 30s
    timeout server 30s

frontend api_gateway
    bind 0.0.0.0:80
    default_backend be_square

# Backend is called `be_square`
backend be_square
    # There's only one instance of the server and it
    # points to the `square-service:8080` (name is from the docker-compose)
    server s1 square-service:8080
We are interested in two sections - frontend and backend. We are calling the frontend section api_gateway and this is where we bind the proxy to the address and port as well as where to route the incoming traffic. We are simply setting a default_backend to the be_square backend that's defined right after the frontend section.
In the backend section, we are creating a single server called s1 with an endpoint square-service:8080 - this is the name that we defined for the square service in the docker-compose.yaml file.
Let's use Docker compose to run both services. Make sure you run the below command from the folder where your docker-compose.yaml and haproxy.cfg files are:
$ docker-compose up
Starting gateway_square-service_1 ... done
Starting gateway_haproxy_1 ... done
Attaching to gateway_square-service_1, gateway_haproxy_1
square-service_1 | {"level":"info","msg":"Running on 8080","time":"2020-04-25T21:41:12Z"}
haproxy_1 | <7>haproxy-systemd-wrapper: executing /usr/local/sbin/haproxy -p /run/haproxy.pid -db -f /usr/local/etc/haproxy/haproxy.cfg -Ds
The Docker compose does its job, creates a new network and two services. From the second terminal, let's run the curl command again:
$ curl localhost:5000/square/25
625
Note that this time, we are using the port 5000 as that's the port the HAProxy is exposed on (look at the ports section in the docker-compose.yaml file). Just like before, you get the response back from the Square service. The difference this time is that the request went through the proxy first.
You can press CTRL+C again to stop running Docker compose.
Enable stats on HAProxy
Since every request goes through the proxy it can collect the statistics on the requests, frontends, and backend servers.
Let's enable stats in HAProxy by adding the following lines to the end of the haproxy.cfg file:
listen stats
    bind *:8404
    stats enable
    stats uri /stats
    stats refresh 5s
The above enables stats on port 8404 and URI /stats. Since we want to access the stats from the proxy we also need to expose it in the docker-compose.yaml. Add the line "8404:8404" under the ports key in the docker-compose.yaml file:
ports:
  - "5000:80"
  - "8404:8404"
Stop docker-compose if it's running (press CTRL+C), then run docker-compose down to remove the services and then docker-compose up to start them again.
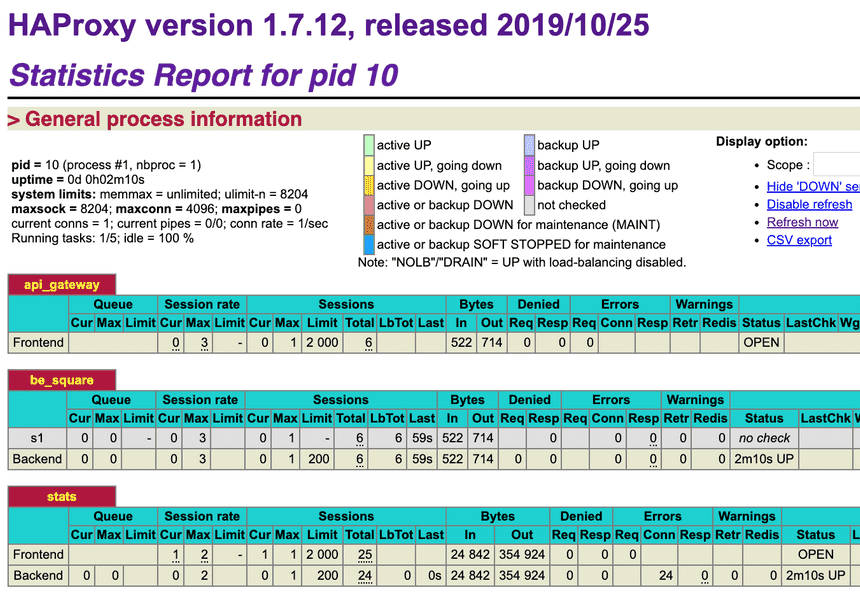
Once the containers are started, you can open http://localhost:8404/stats in your browser. Make a couple of requests by running curl localhost:5000/square/25 to generate some data. You will notice the number of sessions in the statistics report of the HAProxy.
Enable health checks
HAProxy also supports health checks. The HAProxy can be configured to periodically make TCP requests to the backend services to ensure they are 'alive'. To enable a health check, you can add the word check on the same line your server backend is defined in the haproxy.cfg file. Like this:
server s1 square-service:8080 check
Once you're updated the config file, stop the Docker compose (CTRL+C), and then run docker-compose up again to restart the containers.
If you open or refresh the stats page http://localhost:8404/stats, you will notice that the row in the be_square table is now in green, which means that the proxy is performing health checks and that the service is healthy. In the report legend, you will see the active UP used. Additionally, the LastChk column will show the result of the health check.
Denying requests
Let's say we want to protect our super cool Square service and require users to provide an API key when making requests. If they don't have the API key, we don't want to allow them to make calls to the service.
One way to do this using the HAProxy is to configure it in such a way that it denies all requests that don't have an API header set. To do that, you can add the following line, right after the bind command in the frontend section of the haproxy.cfg file:
http-request deny unless { req.hdr(api-key) -m found }
This line is telling the proxy to deny all requests unless there's a header called api-key set. Let's restart the containers (CTRL+C and docker-compose up) and see how this works.
If you make a request without an api-key header set, you'll get a 403 response back, like this:
$ curl localhost:5000/square/25
<html><body><h1>403 Forbidden</h1>
Request forbidden by administrative rules.
</body></html>
But, if you include an api-key header, the proxy lets the request through and you get the response from the service, just like before:
$ curl -H "api-key: hello" localhost:5000/square/25
625
Rate-limiting requests
Finally, let's also implement a rate limiter, so one single user can't make too many requests and cause unnecessary strain to the service.
We will have to define a couple of things in the haproxy.cfg file. I'll explain them separately first and then we will put them together.
Store/count the requests
For the rate limiter to work correctly we need a way to count and store the number of requests that were made. We will use in-memory storage that HAProxy calls stick table. With the stick table you can store the number of requests and then automatically expire them (remove them) after a certain time (5 minutes in our case):
stick-table type string size 1m expire 5m store http_req_cnt
Set the request limit
We also need to set a limit. This limit is a number at which point we will start denying (or rate-limiting) the requests. We will use an Access Control List or ACL to test for a condition (e.g., is the number of requests greater than X) and perform an action based on that (e.g., deny the request):
acl exceeds_limit req.hdr(api-key),table_http_req_cnt(api_gateway) gt 10
The above line checks if the number of requests with the specific api-key value is greater than 10. If the limit is not exceeded, we will just track the request and allow it to continue:
http-request track-sc0 req.hdr(api-key) unless exceeds_limit
Otherwise, if the limit is exceeded, we deny the request:
http-request deny deny_status 429 if exceeds_limit
All these changes need to be made in the frontend api_gateway section of the haproxy.cfg file. Here's how that should look like:
frontend api_gateway
    bind 0.0.0.0:80

    # Deny the request unless the api-key header is present
    http-request deny unless { req.hdr(api-key) -m found }

    # Create a stick table to track request counts
    # The values in the table expire in 5m
    stick-table type string size 1m expire 5m store http_req_cnt

    # Create an ACL that checks if we exceeded the value of 10 requests
    acl exceeds_limit req.hdr(api-key),table_http_req_cnt(api_gateway) gt 10

    # Track the value of the `api-key` header unless the limit was exceeded
    http-request track-sc0 req.hdr(api-key) unless exceeds_limit

    # Deny the request with 429 if limit was exceeded
    http-request deny deny_status 429 if exceeds_limit

    default_backend be_square
    ....
Time to try this out! Restart the container and make 10 requests to the service. On the eleventh requests, you will get the 429 Too Many Requests response back, like this:
$ curl -H "api-key: hello" localhost:5000/square/25
<html><body><h1>429 Too Many Requests</h1>
You have sent too many requests in a given amount of time.
</body></html>
You can either wait for 5 minutes for the rate limiter information to expire or, just try with a different api-key and you will notice the requests will go through:
$ curl -H "api-key: hello-1" localhost:5000/square/25
625
Finally, you can check the stats page again, specifically the Denied column in the api_gateway table. The Denied column will show the number of requests that were denied.
Conclusion
In this article, I explained what gateways or proxies are and showed a couple of practical examples on how you can use a gateway to implement rate-limiting or deny requests.


Top comments (12)
Fantastic article, love it, especially the "hands on" part! This really demystified the "proxy" concept for me in a humane and comprehensible way. Great teaching.
So, what you call an "egress gateway" is that the same as a "reverse proxy"? And is a "gateway" the same thing as a "proxy"?
Very well explained!! Love the mall analogy!!!
Thank you! I wasn’t sure how far I could stretch it :)
Excellent article. Explains gateways very well. Thanks for writing this
Thank you Aditya!
Something I really appreciate is when you allow the user to just get some knowledge about the topic before getting in with an example.
Thanks Cristian! Some of the topics I write and talk about can be very daunting for beginners. There are a lot of things that build on top of each other, so it's always hard to decide how far you want to go.
Awesome post 👍🏼
Thanks Robert!
I really like this presentation, Peter. Chapeau!
Thanks Stef!
Amazing article, a well balanced overview followed by practical and real world examples to the point of setting up and performing routine tasks needed for a gateway.