Resource group - A container that holds related resources for an Azure solution. The resource group can include all the resources for the solution, or only those resources that you want to manage as a group. You decide how you want to allocate resources to resource groups based on what makes the most sense for your organization.
In this walkthrough, we will add a lock to the resource group and test deleting the resource group. Locks can be applied in a subscription to resource groups, or individual resources to prevent accidental deletion or modification of critical resources.
- Add a Lock to the resource group and test deletion
We will add a resource lock to the resource group and test deleting the resource group.
- Sign in to the Azure Portal
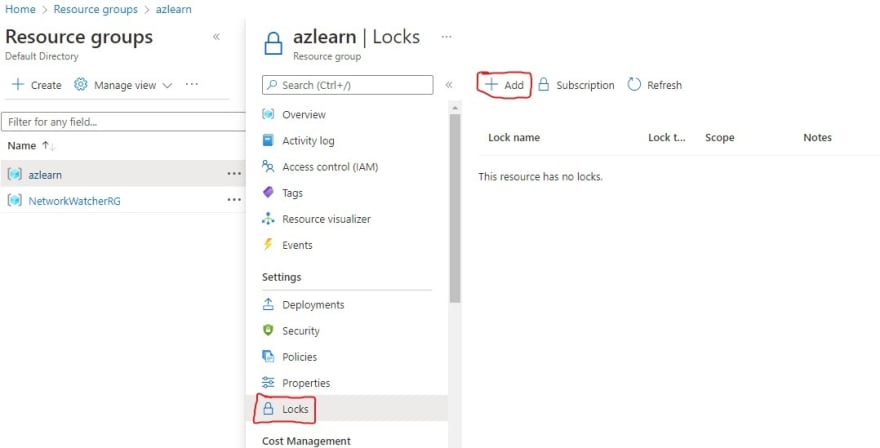
- In the Azure portal, navigate to the resource group.

- You can apply a lock to a subscription, resource group, or individual resource to prevent accidental deletion or modification of critical resources.
- In the Settings section, click Locks, and then click + Add.
 5.Configure the new lock. When selecting the lock type you notice the Read-only and Delete. Read only means authorized users can read a resource, but they can not delete or update the resource, while the Delete means authorized users can read and modify a resource, but they can not delete the resource.
When you are done click OK.
5.Configure the new lock. When selecting the lock type you notice the Read-only and Delete. Read only means authorized users can read a resource, but they can not delete or update the resource, while the Delete means authorized users can read and modify a resource, but they can not delete the resource.
When you are done click OK.

- Click Overview and click Delete resource group. Type the name of the resource group and click Delete. You receive an error message stating the resource group is locked and can’t be deleted.

- Test deleting a member of the resource group
We will test if the resource lock protects a storage account in the resource group.
- From Search bar, Search for and select Storage accounts, and then click + Create

- On the Storage Accounts page +Create, fill in the following information (pick the name of the resource group that was lock earlier and the storage account name with letters such that the name is globally unique). Leave the defaults for everything else.
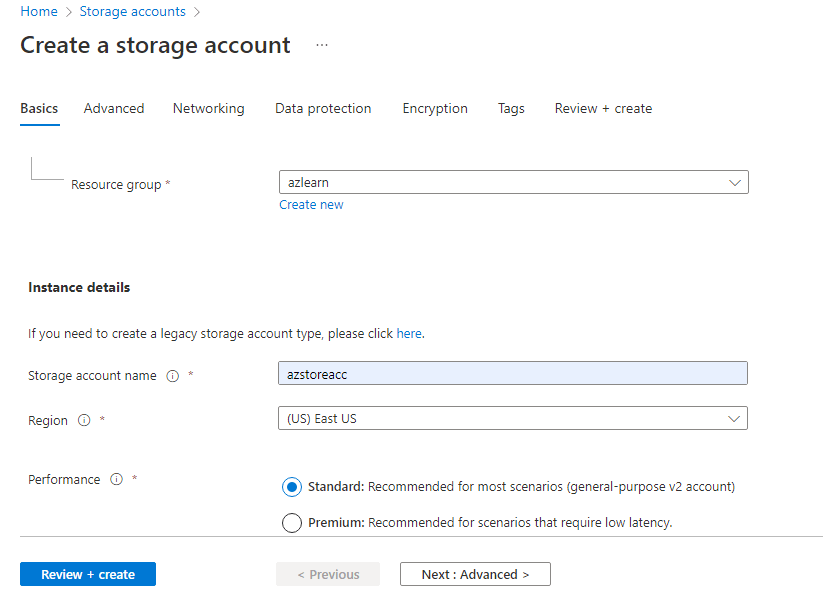
- Click Review + Create to review your storage account settings and allow Azure to validate the configuration.
- Once validated, click Create. Wait for the notification that the account Deployment Succeeded.
- Access your new storage account and from the Overview pane, click Delete.

You receive an error message stating the resource or its parent has a delete lock.

Note: Although we did not create a lock specifically for the storage account, we did create a lock at the resource group level, which contains the storage account. As such, this parent level lock prevents us from deleting the resource and the storage account inherits the lock from the parent.
- Remove the resource lock
We will remove the resource lock and test.
- Return to the resource group myRGLocks, in the Settings section, click Locks and Click Delete

- Return to the storage account blade and confirm you can now delete the resource.

Congratulations! You created a resource group, added a lock to resource group and tested deletion, tested deleting a resource in the resource group, and removed the resource lock.
Note: To avoid additional costs, you can optionally remove this resource group. Search for resource groups, click your resource group, and then click Delete resource group. Verify the name of the resource group and then click Delete. Monitor the Notifications to see how the delete is proceeding.

Top comments (0)