In part one of the Rest API using Spring Boot and Heroku, we built an imaginary bucket list of places we wish to travel to or visit in our lifetime. However, the buckets are not stored in a database. This means that whenever we restart our server our buckets information get lost.

Let’s fix that.
In part two of this tutorial, you will learn how to store our bucket lists in MySQL database and deploy it to Heroku.
To get the finished code, scroll down to the bottom of this page. If you are don’t know what Rest is or want a refresher on what we have covered so far, please read part 1 of the tutorial here.
Tools used in the tutorial
1. IDE: IntelliJ
2. Framework: Spring Boot
3. Web Maven Dependency: It provides with tomcat server which handles request and response mapping among other things.
4. Mysql maven dependency: This provides a connector for connect to mysql database
5. Maven JPA dependency: This is the ORM, Hibernate to be precise. It provides a wrapper for mapping Java classes to tables in the database.
6. Build Tool: Maven
7. Language: Java
8. Hosting platform: Heroku
9. Mysql database
10. Database GUI (not required)
My selection has been shown here


The Spring boot starter web contains everything needed to bootstrap an app such as an embedded server. Tomcat is the default.
Section 2
We need to create two Java classes. One will serve as a controller for receiving request and responding with response. The second will serve as a data model.
Here is what our Data Model(BucketList) looks like:
package com.zerotoproduction.bucketlist;

import javax.persistence.*;

@Entity
public class BucketList {

@Id
@Column(name = "id", unique = true, nullable = false)
@GeneratedValue(strategy = GenerationType.IDENTITY)
private long id;

@Column(name = "name", length = 60, nullable = false)
private String name;

@Column
private  String description;

BucketList() {

}

BucketList(String name, String description){
    this.name = name;
    this.description = description;
}

BucketList(long id, String name, String description){
    this.id = id;
    this.name = name;
    this.description = description;
}

public long getId() {
    return id;
}

public void setId(long id) {
    this.id = id;
}

public String getName() {
    return name;
}

public void setName(String name) {
    this.name = name;
}

public String getDescription() {
    return description;
}

public void setDescription(String description) {
    this.description = description;
}

@Override
public String toString() {
    return "BucketList{" +
            "id=" + id +
            ", name='" + name + '\'' +
            ", description='" + description + '\'' +
            '}';
}
}
An explanation for each of the annotation
@Entity: with this annotation, we have specified that this class represents an entity in the DB.
@id : this specifies that this attribute is a primary key
@Column(name = “id”, unique = true, nullable = false): @Column specifies that this field should be column, its name should be id, the values should be unique and it cannot be null.
@GeneratedValue(strategy = GenerationType.IDENTITY). We are specified that the values should be generated by DB using Identity generation type.
We also need Data Access Object (DAO). Luckily for us, Spring comes with lots of options from CrudRepository to JPARepository. These interfaces provide CRUD functionalities out of the box for Objects annotated with @Entity annotation. However, the caveat is that your DAO interface must extend them and specify the entity and data type of the primary key for that entity. In our example, we are extending JPARepository like so: JpaRepository. The entity is BucketList and data type of its primary key is Long. Now we have all we need to persist our buckets in the DB.
Here is what our BucketListRepository looks like
package com.zerotoproduction.bucketlist;

import org.springframework.data.jpa.repository.JpaRepository;

public interface BucketRepository extends JpaRepository<BucketList, Long> {
}
Here is what the controller looks like:
 package com.zerotoproduction.bucketlist;

 import org.springframework.beans.factory.annotation.Autowired;
 import org.springframework.http.ResponseEntity;
 import org.springframework.web.bind.annotation.*;
 import java.util.Optional;

 @RestController
 public class BucketListController {

@Autowired
BucketRepository bucketRepository;

@GetMapping(value = "/")
public ResponseEntity index() {
    return ResponseEntity.ok(bucketRepository.findAll());
}

@GetMapping(value = "/bucket")
public ResponseEntity getBucket(@RequestParam(value="id") Long id) {
    Optional<BucketList> foundBucketList = bucketRepository.findById(id);

    if(foundBucketList.isPresent()){
        return ResponseEntity.ok(foundBucketList.get());
    }else {
        return ResponseEntity.badRequest().body("No bucket with specified id " + id + " found");
    }
}

@PostMapping(value = "/")
public ResponseEntity addToBucketList(@RequestParam(value="name") String name, @RequestParam(value="description") String desc) {
    return ResponseEntity.ok(bucketRepository.save(new BucketList(name, desc)));
}

@PutMapping(value = "/")
public ResponseEntity updateBucketList(@RequestParam(value="name") String name, @RequestParam(value="id") Long id, @RequestParam(value="description") String desc) {
    Optional<BucketList> optionalBucketList = bucketRepository.findById(id);
    if(!optionalBucketList.isPresent()){
        return ResponseEntity.badRequest().body("No bucket with specified id " + id + " found");
    }

    BucketList foundBucketList = optionalBucketList.get();
    foundBucketList.setName(name);
    foundBucketList.setDescription(desc);

    return ResponseEntity.ok(bucketRepository.save(foundBucketList));
}

@DeleteMapping(value = "/")
public ResponseEntity removeBucketList(@RequestParam(value="id") Long id) {
    bucketRepository.deleteById(id);
    return ResponseEntity.noContent().build();
}
}
Here is what my folder structure looks like

Since we are connecting to a database, we need the address of the database, username and password.
We will test this locally on our pc before deploying it to Heroku. I have specified the properties in application.properties. Let’s go over it
 spring.datasource.url=jdbc:mysql://localhost:3306/zero_to_production_bucketlist_jpa?serverTimezone=UTC
 spring.datasource.username=root
 spring.datasource.password=Toor1234

# Hibernate ddl auto (create, create-drop, update)
spring.jpa.hibernate.ddl-auto=update

#MySQL DIALECT
#spring.jpa.properties.hibernate.dialect=org.hibernate.dialect.MySQL5Dialect

server.port=9009
Explanation
- spring.datasource.url specifies the connection string for connecting to the database
- spring.datasource.username specifies the username for connecting to the Db
- spring.datatsource.password specifies the password.
- spring.jpa.hibernate.ddl-auto specifies how hibernate will handle entities in your database. The create option means that all entities will be dropped and created at every restart while the update option adds changes to the entities without dropping it. In production, you need to use update else your data will be flushed.
- server.port specifies the port number our application will run on.
It’s time to test and we will do it this time locally. We will use Postman
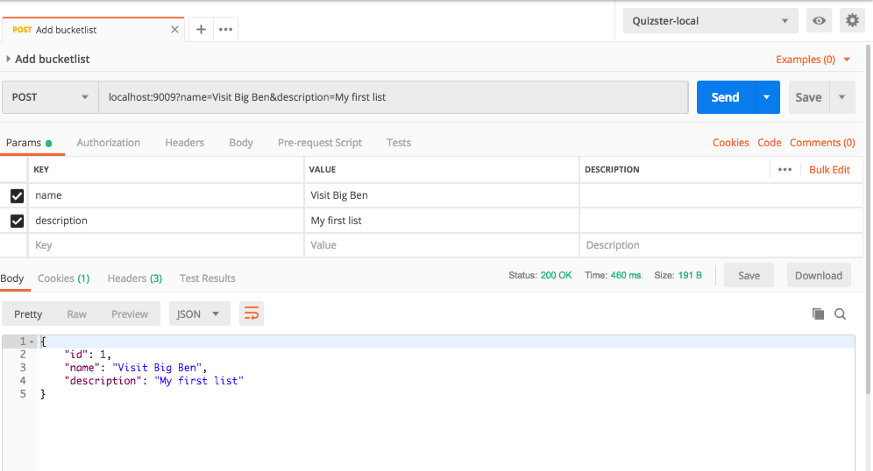
Test 1: Add a bucket list
http://localhost:9009?name=Visit Big Ben&description=My first list
Test 2: Get all bucket lists
You should see a response similar to the one below

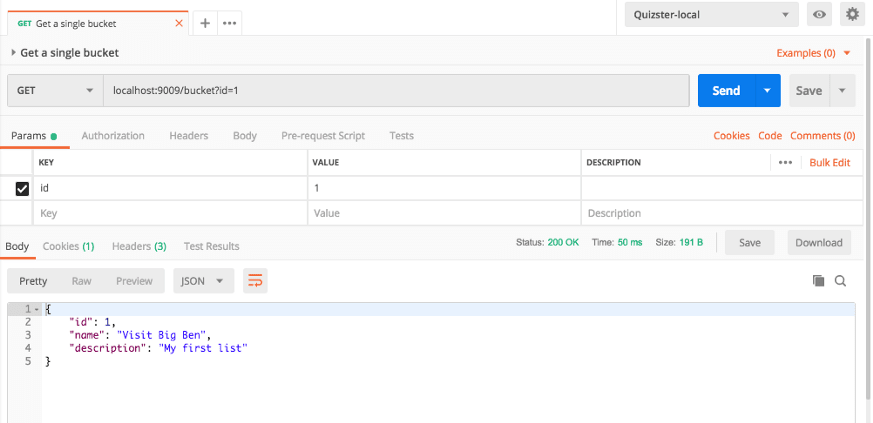
Test 3: get single bucket list
http://localhost:9009/bucket?id=1
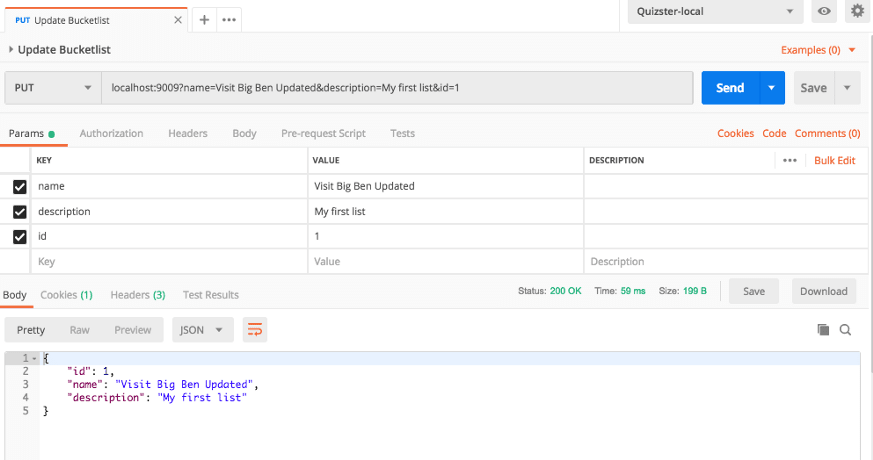
Test 4: Update Bucket
http://localhost:9009?name=Visit Big Ben Updated&description=My first list&id=1
Test 5: Delete bucket

Section 2: Time to deploy to Heroku
You need to create an account on Heroku
Install Heroku Cli. Heroku CLI is a command line application that lets you     create, deploy and manage Heroku apps from the command line.
You can download Heroku CLI from Heroku Dev Center.
Login using your email and password
Set up Git and create a Heroku app
git init
git add .
git commit -m "initial commit"
heroku login
Now, create an app using heroku create like so
heroku create
Next, you need to add mysql DB like so:
heroku addons:create cleardb:ignite
Now that you have add clearDB, you need the connection url. To get this, type like so:
heroku config
It should return your connection string.
You need to replace the spring.datasource.url value with the value return from heroku config.
One last thing though, to make it work, add a database config file like so:
package com.zerotoproduction.bucketlist;

import com.zaxxer.hikari.HikariConfig;
import com.zaxxer.hikari.HikariDataSource;
import org.springframework.beans.factory.annotation.Value;
import org.springframework.context.annotation.Bean;
import org.springframework.context.annotation.Configuration;

import javax.sql.DataSource;

@Configuration
public class DatabaseConfig {

@Value("${spring.datasource.url}")
private String dbUrl;

@Bean
public DataSource dataSource() {
    HikariConfig config = new HikariConfig();
    config.setJdbcUrl(dbUrl);
    return new HikariDataSource(config);
}
}
Deploy app to Heroku
git push heroku master
Our app has been deployed to Heroku now
https://tranquil-mountain-81706.herokuapp.com/
Let’s test again but you must remove the localhost and port with the url given by heroku.
For example, to get all items in our bucket list, we use
https://tranquil-mountain-81706.herokuapp.com/
and to get an item we use
https://tranquil-mountain-81706.herokuapp.com//bucket?id=1
That wraps up our tutorial today.
To follow the full series on building, securing and deploying Spring Boot Rest Api, visit our blog:
https://medium.com/zero-to-production
Contact us via email on: zerotoproduction@gmail.com
The complete code can be found here:


Top comments (0)