
Panes, UI controls, and shapes are subtypes of Node. When you run MyJavaFX in here, the window is displayed. The button is always centered in the scene and occupies the entire window no matter how you resize it. You can fix the problem by setting the position and size properties of a button. However, a better approach is to use container classes, called panes, for automatically laying out the nodes in a desired location and size. You place nodes inside a pane and then place the pane into a scene. A node is a visual component such as a shape, an image view, a UI control, or a pane. A shape refers to a text, line, circle, ellipse, rectangle, arc, polygon, polyline, etc. A UI control refers to a label, button, check box, radio button, text field, text area, etc. A scene can be displayed in a stage, as shown in Figure below (a). The relationship among Stage, Scene, Node, Control, and Pane is illustrated in the UML diagram, as shown in Figure below (b).
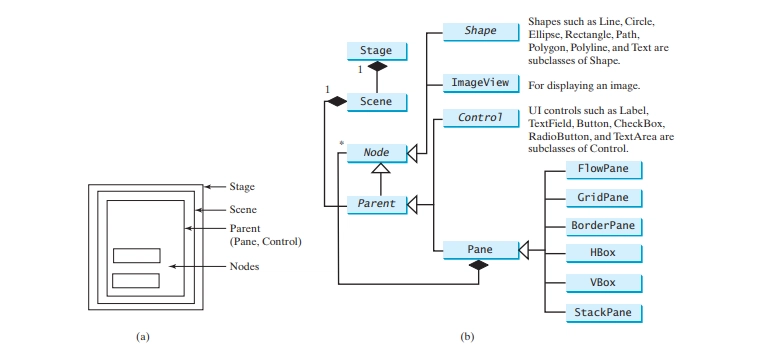
Note that a Scene can contain a Control or a Pane, but not a Shape or an ImageView. A Pane can contain any subtype of Node. You can create a Scene using the constructor Scene(Parent, width, height) or Scene(Parent). The dimension of the scene is automatically decided in the latter constructor. Every subclass of Node has a no-arg constructor for creating a default node.
The program below places a button in a pane.


The program creates a StackPane (line 12) and adds a button as a child of the pane (line 13). The getChildren() method returns an instance of javafx.collections.ObservableList. ObservableList behaves very much like an ArrayList for storing a collection of elements. Invoking add(e) adds an element to the list. The StackPane places the nodes in the center of the pane on top of each other. Here, there is only one node in the pane. The StackPane respects a node’s preferred size. So you see the button displayed in its preferred size.
The program below gives an example that displays a circle in the center of the pane, as shown in Figure below (a).


The program creates a Circle (line 13) and sets its center at (100, 100) (lines 14–15), which is also the center for the scene, since the scene is created with the width and height of 200 (line 25). The radius of the circle is set to 50 (line 16). Note that the measurement units for graphics in Java are all in pixels.
The stroke color (i.e., the color to draw the circle) is set to black (line 17). The fill color (i.e., the color to fill the circle) is set to white (line 18). You may set the color to null to specify that no color is set.
The program creates a Pane (line 21) and places the circle in the pane (line 22). Note that the coordinates of the upper left corner of the pane is (0, 0) in the Java coordinate system, as shown in Figure below (a), as opposed to the conventional coordinate system where (0, 0) is at the center of the window, as shown in Figure below (b). The x-coordinate increases from left to right and the y-coordinate increases downward in the Java coordinate system.
The pane is placed in the scene (line 25) and the scene is set in the stage (line 27). The circle is displayed in the center of the stage, as shown in Figure above (a). However, if you resize the window, the circle is not centered, as shown in Figure above (b). In order to display the circle centered as the window resizes, the x- and y-coordinates of the circle center need to be reset to the center of the pane. This can be done by using property binding.


Top comments (0)