
If you are interested in reading this article in Spanish, check out my blog:
The Developer's Dungeon
Hey guys what's up? it has been a few weeks since we talked about this project so you might have thought that the project tanked, let me tell you that is far from happening.
We have been working very hard and making some good progress on some fundamentals that our application needs to cover. Today I am gonna show you how we use all the power of Sanity to make our Homepage configurable and to load images in a very cool way, so without further ado let's get to it.
The requirements
Every website should have a homepage, lucky for us, our Design Team provided us with very polished designs using Figma which allowed us to check everything faster and always be in sync. It looks something like this:
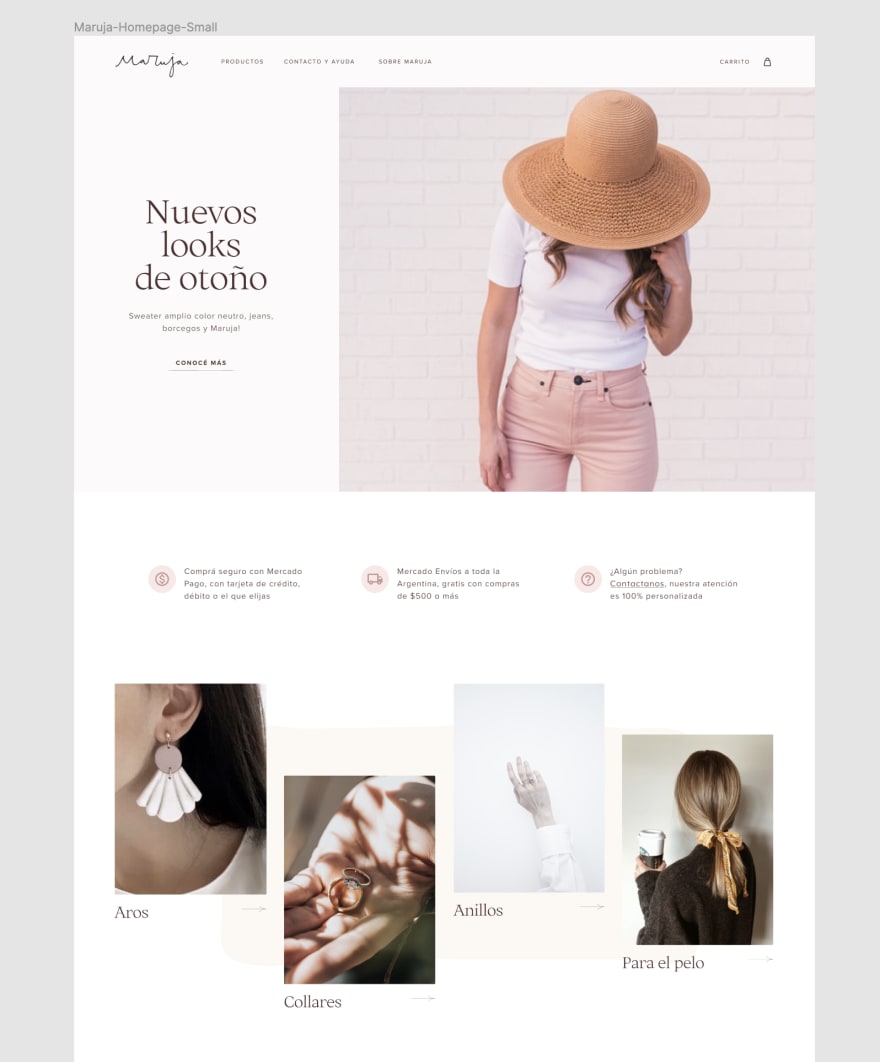
Attached to this design, the first requirements started to popup.
- Make the homepage configurable
- All images need to be loaded in a performant way
Those are some big challenges, but Sanity provides everything we need to implement them.
Making a page configurable
Here what we are gonna do is make some kind of schema in Sanity that will allow the user to setup configuration properties, pick the images, the text, and make our homepage get everything that needs to render from that configuration.
First, we are gonna define 3 schemas, one for the homepage, one for the hero, and one for the categories.
For the homepage we start by defining the homepage title, a property of type hero, and a property of type array of category
export default {
  name: "homeSettings",
  type: "document",
  title: "\"Home sections\","
  __experimental_actions: [/*'create',*/ "update", /*'delete',*/ "publish"],
  fields: [
    {
      title: "\"TituloPagina\","
      name: "homePageTitle",
      type: "string",
      readOnly: true,
      hidden: true,
    },
    {
      title: "\"Hero\","
      name: "hero",
      type: "hero",
    },
    {
      title: "\"Categorias\","
      name: "categories",
      type: "array",
      of: [{ type: "category" }],
    },
  ],
  initialValue: () => ({
    homePageTitle: "Configuración Home",
  }),
};
For the hero we define the image, the title, the subtitle, the text on the button, and the URL for the button.
export default {
  name: "hero",
  type: "document",
  title: "\"Hero\","
  __experimental_actions: [/*'create',*/ "update", /*'delete',*/ "publish"],
  fields: [
    {
      title: "\"Imagen\","
      name: "image",
      type: "image",
      options: {
        metadata: ["lqip"],
      },
    },
    {
      title: "\"Titulo\","
      name: "title",
      type: "string",
    },
    {
      title: "\"Subtitulo\","
      name: "subtitle",
      type: "string",
    },
    {
      title: "\"Texto del boton\","
      name: "buttonText",
      type: "string",
    },
    {
      title: "\"Url del boton\","
      name: "buttonURL",
      type: "string",
    },
  ],
};
Finally, we define a type called category which we will use to make a category list that is both dynamic and editable.
export default {
  name: "category",
  type: "document",
  title: "\"Categoria\","
  __experimental_actions: [/*'create',*/ "update", /*'delete',*/ "publish"],
  fields: [
    {
      title: "\"Imagen\","
      name: "image",
      type: "image",
      options: {
        metadata: ["lqip"],
      },
    },
    {
      title: "\"Nombre\","
      name: "name",
      type: "string",
    },
  ],
};
As the cherry on the cake we do some modifications to how Sanity displays the types inside the studio:
import S from "@sanity/desk-tool/structure-builder";
import { MdSettings } from "react-icons/md";

export default () =>
  S.list()
    .title("Content")
    .showIcons()
    .items([
      S.listItem()
        .title("Configuración Home")
        .child(
          S.document().schemaType("homeSettings").documentId("homeSettings")
        )
        .icon(MdSettings),
      // Add a visual divider (optional)
      S.divider(),
      // List out the rest of the document types, but filter out the config type
      ...S.documentTypeListItems().filter(
        (listItem) =>
          !["homeSettings", "hero", "category"].includes(listItem.getId())
      ),
    ]);
With this we get the following result:

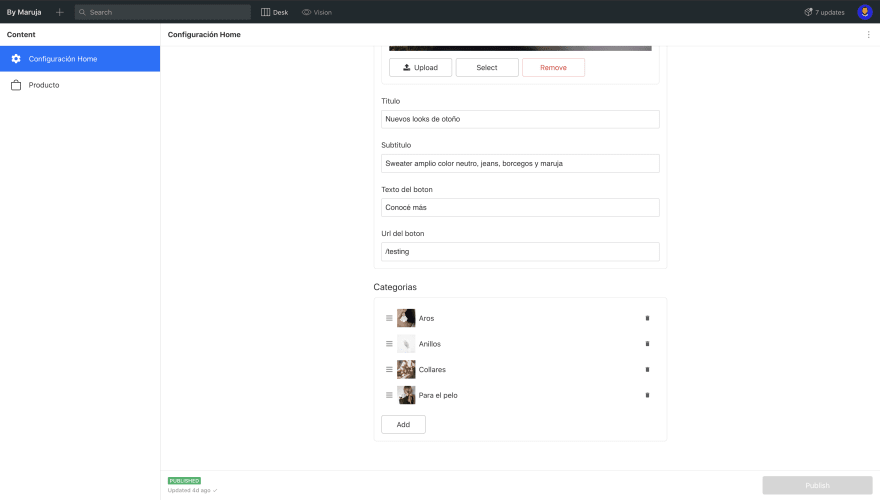
As you can see we get a nice UI with the ability to set up all the data we want our site to use while keeping a separate model for our products. This also takes care of the fact that we can only define one configuration, there is no way to create an extra home document.
So how we use this on our website? if your remember our previous episode we managed to bring the products from Sanity into the website by just making a query with Sanity JavaScript client, there is no difference here though the query is a little more complicated.
From our Next.js application we do the following:
export const getServerSideProps = async () => {
  const sanityResult = await sanity.fetch(
    `
    *[_type == "homeSettings"][0]{
      categories[] {
        ...,
         "asset": image.asset-> {
            url,
            metadata
         }
      },
       hero {
           ...,
         "asset": image.asset-> {
            url,
            metadata
         }
       }
     }
  `
  );

  return { props: { ...sanityResult } };
};
We retrieve the entire homeSettings model, notice how we are transforming the images into a special sanity type called Asset, it will be very clear why do this while building the next requirement.
From here, we just build a normal react app that uses those values to show the images and the text, as soon as the admin changes something from sanity studio, the changes will be automatically reflected in our website. By the way, if you want to check how we are progressing you might want to check our master branch deploy here
Loading images the right way
This is a complicated topic, there is tons of articles and approaches out there on how you should load images on a website, today we are gonna consider two problems and see how we implemented the solutions using Sanity.
The first thing we want to consider is that for images like the one in the hero, they can be super big which will cause our website to load very slowly. The standard approach for this problem would be to have the same image uploaded in 3 different sizes and load each one when it is appropriate.
This is a good approach but in reality, we cannot expect that the user is gonna deal with all that hassle. Luckily Sanity provides us with image transformations directly from their API, you can go here if you wanna read more on the subject.
But what does this mean for us? very simple, by executing methods from Sanity's JavaScript client we can get Sanity to deal with the trouble of providing the correct image size, we only have to take care of uploading the image in the biggest resolution we want to support and after that everything will be done for us.
Let's see how:
In our regular image tag, we define a srcset for providing responsive images, but instead of having the 3 different files, we ask for 3 different widths to the Sanity client.
 srcSet={`
     ${builder.image(image).auto('format')?.width(600)} 600w,
     ${builder.image(image).auto('format')?.width(1000)} 1000w,
     ${builder.image(image).auto('format')} 2000w
`}
Super easy right? you might be wondering, what is that auto('format') all about, that is another great thing we can do with Sanity.
We cannot expect that the user will upload the image in a format that is good for our website, so by including that call, if the browser supports webp it will return the image using that format, which is the best one for the web.
Is that enough? well, let's us think about it for one minute. Now images will be loaded dependant of the resolution we have on the device, which is great, but we are still dealing with the fact that if the internet connection is slow, the images will take forever to load and the UI will take ages to load and look weird while doing it.
For solving this issue there are two things we can do, the first one is lazy loading.
Lazy loading means that images are gonna be requested to Sanity only when we need them. If the image is not part of the viewport, then the images are not requested.
For implementing this there is two options, you can go for your own component or use a library like React Lazy Loading Image Component. In our case, we still haven't decided if the library covers all our needs to se we are keeping both implementations just for now.
With these changes, our product categories will only load once we scroll down in our homepage.
Finally, the last change we need is to use a Low-Quality Image Placeholder (LQIP). An LQIP is just a very small blurred out version of your image that is loaded first and displayed immediately while the real one is loaded in the background. When the real image is loaded, the placeholder gets replaced. This allows our website to look good while we wait for the images to get downloaded.
For that, we are gonna use the Asset we mentioned previously. Sanity automatically builds an LQIP for us as image asset metadata. The only thing that we have to do is request it from the client and use it inside our Image Componennt. Let's do it:
import { getImageAsset } from '@sanity/asset-utils';

src={getImageAsset(asset).metadata.lqip}
Don't tell me that wasn't easy? Let 's see the result:

I don't know you but I am super happy with the result 😄
That is it, this was a long practical example so I want to thank you very much for sticking with me till the end. I think it gives you a nice idea of the kind of things you can accomplish by using a CMS like Sanity inside your project. Btw I have 0 affiliations with Sanity, but having this project is making me love their amazing product.
If you liked my article and this series please share and let me know in the comments 😄

Top comments (1)
Hey great series, hoping to get the 4th part soon 🙌