
We here at Passage are all about creating a passwordless world that makes our online lives a whole lot more secure. Angular developers can join that world and quickly integrate Passage’s solution into their applications. I’ll show you how.
Our solution uses the WebAuthn protocol to leverage the biometrics solutions built into their devices (e.g., FaceID, TouchID, Windows Hello, or Android’s fingerprint technology). We’ll create a simple Angular application that only allows authenticated viewers to see a dashboard. Unauthorized viewers will be out of luck.
If you are highly motivated, you can go through the whole demo with me, or if you want to cut to the quick, you can clone our example app from GitHub and jump to the header entitled “Add Passwordless Authentication with Passage.” Either way, you’ll soon see how easy this is for everyone, both for you developer types and your users.
Note: I’ll be assuming that you are pretty familiar with Angular, the Angular CLI, and how things generally work in Angular. If not, Angular.io is a great place to start.
Setup
To create an Angular application, you can run the following at the command line at a command prompt in the directory where you want your application to go:
ng new passage-app
Note: Create the app with the angular router and with regular
CSS Styling
That will create a nice, basic application for you in a subdirectory called passage-app.
So, to include Passage in your application, you are going to want to install it into your application workspace via npm:
npm i @passageidentity/passage-node
That will install our Passage web components, which will enable us to include them later.
Main App Setup
Before we get really rolling, let’s do a little styling. Open up the project’s main CSS file, styles.css, and add the following code to it:
body {
    font-family: sans-serif;
    background-color: #E5E5E5;
    margin: 0;
}
Next, open up the CSS file for the main component — app.component.css — and add this CSS code to it:
.mainContainer {
    background: white;
    box-shadow: 0px 4px 4px rgba(0, 0, 0, 0.25);
    border-radius: 20px;
    width: 600px;
    min-height: 310px;
    margin: 30px auto;
}
.footer {
    text-align: center;
    font-size: 18px;
}
That will get us started with the styling. We’ll be doing more of that here in a few steps.
The Main Component
Next, we’ll get the main component for our application set up. We’ll insert some HTML, set up the routes, and add some more CSS.
For the app-routing.module.ts file, make it look like this:
import { NgModule } from '@angular/core';
import { RouterModule, Routes } from '@angular/router';
import { HomeComponent } from 'src/app/home/home.component';
import { DashboardComponent } from 'src/app/dashboard/dashboard.component';

const routes: Routes = [
    {path: '', component: HomeComponent},
    {path: 'dashboard', component: DashboardComponent}
  ];

  @NgModule({
    imports: [RouterModule.forRoot(routes)],
    exports: [RouterModule]
  })
export class AppRoutingModule { }
This code will set two routes, one for the Home component and one for the Dashboard component.
Add the following to the app.component.css file:
.mainContainer {
    background: white;
    box-shadow: 0px 4px 4px rgba(0, 0, 0, 0.25);
    border-radius: 20px;
    width: 310px;
    min-height: 310px;
    margin: 30px auto;
}
.footer {
    text-align: center;
    font-size: 18px;
}
and for the app.component.html file, replace the default HTML (there’s a bunch of it) with this:
<banner></banner>
<div class="mainContainer">
    <router-outlet></router-outlet>
</div>
<div class="footer">
    Learn more with our <a href="https://docs.passage.id">Documentation</a> and <a href="https://github.com/passageidentity">Github</a>.
</div>
That code will display the banner on top, a footer at the bottom, and will place the content chosen by the router in the middle.
Some Components
Next up, we’ll create three components. Run these three calls to the Angular CLI at the command line:
ng generate component home
ng generate component dashboard
ng generate component banner
Let’s set all this up now.
The Home Component
In the home.component.html file, add this HTML:
<passage-auth [appId]="appId"></passage-auth>

<passage-auth [appId]="appId"></passage-auth>
In the home.component.ts file, add the following code:
import { Component, OnInit } from '@angular/core';
import { environment } from 'src/environments/environment';

@Component({
  selector: 'app-home',
  templateUrl: './home.component.html',
  styleUrls: ['./home.component.css']
})
export class HomeComponent implements OnInit {

  public appId: string = environment.passageAppId;

  constructor() { }

  ngOnInit(): void {
  }
}
And in the home.component.css file:
.mainContainer {
    display: flex;
  }

  .spacer{
    flex-grow: 1;
  }

  .earlyAccessContainer{
    min-width: 325px;
    width: 35%;
    color: white;
    background-color: #27417E;
    border-top-left-radius: 30px;
    border-bottom-left-radius: 30px;
    display: flex;
    flex-direction: column;
  }

  .title {
    font-weight: 700;
    font-size: 48px;
    margin-top: 65px;
    padding-left: 45px;
    padding-right: 65px;
  }

  .bodyText{
    padding-left: 45px;
    padding-right: 45px;
    padding-bottom: 35px;
    font-size: 24px;
  }

  .authContainer{
    width: 65%;
    display: flex;
    flex-direction: column;
    justify-content: center;
    padding-left: 20px;
    padding-right: 20px;
  }

  /* for shorter 13" dekstop screens */
  @media screen and (max-height: 845px) {
    .title {
      font-size: 40px;
    }
    .bodyText{
      font-size: 20px;
    }
  }

  /* steps to mobile rules begin here */
  @media screen and (max-width: 870px) {

    .mainContainer{
      flex-direction: column;
      width: 100%;
    }

    .earlyAccessContainer{
      min-width: unset;
      width: 100%;
      min-height: 30%;
      border-top-left-radius: 30px;
      border-top-right-radius: 30px;
      border-bottom-left-radius: 0px;
      border-bottom-right-radius: 0px;
    }

    .title {
      font-size: 32px;
      margin-top: 30px;
      padding-left: 30px;
      padding-right: 30px;
    }
    .bodyText{
      font-size: 20px;
      padding-left: 30px;
      padding-right: 30px;
      padding-bottom: 15px;
    }

    .authContainer{
      width: 100%;
      height: 100%;
      flex-grow: 1;
      padding-top: 20px;
      padding-left: 0px;
      padding-right: 0px;
    }
  }

  @media screen and (max-width: 670px) {
    .title {
      font-size: 24px;
    }
    .bodyText{
      font-size: 16px;
    }
  }

  @media screen and (max-width: 460px) {
    .earlyAccessContainer{
      min-height: unset;
    }
  }
The Home component doesn’t do anything special — it just holds a single component. That component is a Passage-specific tag, namely <passage-auth>, which will display the Passage web component and do most of the work of registering and authenticating your users.
That tag also includes a reference to an appId which will uniquely identify your application to our servers and which we will create here in a bit. The home.component.ts file pulls the appID value out of the environment.ts file. We’ll set that part up later as well.
The Banner Component
The Banner component displays a nice header on the top of the page. There’s no functionality in the component, so it’s a bit easier to set up.
Set the banner.component.html file to look like this:
<div class="mainHeader">
    <a href="https://passage.id/"><div class="passageLogo"></div></a>
    <div class="headerText">Passage + Angular Example App</div>
    <div class="spacer"></div>
    <a href="https://passage.id/" class="link">Go to Passage</a>
</div>
and the banner.component.css as follows:
.mainHeader{
    padding: 20px 30px;
    display: flex;
    align-items: center;
    background-color: #282727;
    color: white;
}

.headerText {
    font-size: 24px;
    margin-left: 10px;
}

.passageLogo {
    background-image: url('https://storage.googleapis.com/passage-docs/passage-logo-dark.svg');
    background-repeat: no-repeat;
    width: 60px;
    height: 60px;
    cursor: pointer;
}

.spacer {
    flex-grow: 1;
}

.link {
    margin-left: 20px;
    color: white;
    text-decoration-color: white;
}
You can leave the banner.component.ts file alone.
The Dashboard Component
The Dashboard component is where all the “real” work will get done. It will display differently based on whether or not the user is authenticated. I’ll show you the code, and then I’ll discuss more about what it does after we get everything all set up.
The dashboard.component.ts file should include this code:
import { Component, OnInit, Input } from '@angular/core';
import { AuthService } from 'src/app/auth.service';

@Component({
  selector: 'dashboard',
  templateUrl: './dashboard.component.html',
  styleUrls: ['./dashboard.component.css']
})
export class DashboardComponent implements OnInit {
  title = 'dashboard';

  public username: String | undefined = '';
  public isLoading: Boolean = false;
  public isAuthenticated: Boolean = false;

  constructor(private authService: AuthService){}

  ngOnInit(){
    this.isLoading = true;
    this.authService.isLoggedIn().then((result) => {
      if (result) {
        this.isLoading = this.authService.isLoading;
        this.isAuthenticated = this.authService.isAuthenticated;
        this.username = this.authService.username;
      } else {
        this.isLoading = false;
        this.isAuthenticated = false;
        this.username = '';
      }
    })
}
}
Add this HTML to dashboard.component.html:
<div class="dashboard" *ngIf="!isLoading && isAuthenticated">
    <div class="title">
        Welcome!
    </div>
    <div class="message">
        You successfully signed in with Passage.
        <br/><br/>
        Your username is: <b>\{\{ username \}\}
        </b>
    </div>

</div>
<div class="dashboard" *ngIf="!isLoading && !isAuthenticated">
    <div class="title">
       Unauthorized
    </div>
    <div class="message">
        You have not logged in and cannot view the dashboard.
        <br/><br/>
        <a href="/" className={styles.link}>Login to continue.</a>
    </div>
</div>
and finally, in dashboard.component.css add this code:
.dashboard{
    padding: 30px 30px 20px;
}
.title {
    font-size: 24px;
    font-weight: 700;
    margin-bottom: 30px;
}
.message {
    overflow-wrap: anywhere;
}
.link {
    color: black;
    text-decoration-color: black;
}
An Authorization Service
At the heart of the application is an Authorization service. It is where your application checks the credentials presented.
Create the Authentication service at the command line:
ng generate service Auth
That creates a file called auth.service.ts. Change the code in that file to the following:
import { Injectable } from '@angular/core';
import { PassageUser, PassageUserInfo } from '@passageidentity/passage-elements/passage-user';

@Injectable({
  providedIn: 'root'
})
export class AuthService {
  isAuthenticated: boolean = false;
  public username: string | undefined = '';
  public isLoading: boolean = true;
  constructor() {

}

  public async isLoggedIn(): Promise<boolean> {
    this.isLoading = true;
    return await new PassageUser().userInfo().then(userInfo => {
       if (userInfo !== undefined) {
        this.isLoading = false;
        this.isAuthenticated = true;
        this.username = userInfo.email ? userInfo.email : userInfo.phone;
       } else {
        this.isLoading = false;
        this.isAuthenticated = false;
        this.username = '';
       }
       return this.isAuthenticated;

  })
}

}
There. That ought to do it. That’s a lot of code, but building it yourself is more fun, right?
Add Passwordless Authentication with Passage
Okay, that part is finished. Now, we need to tell Passage what you are up to and connect Passage to our application.
The first step is to register with Passage. You can do that on this page.
Note that you’ll use our passwordless solution to register and log in!
Once you are in, click the big plus sign to create a new application. From there,
Name your application whatever you like.
Set the Domain to http://localhost:4200 (this is the default for your Angular application)
Set the Redirect URL to: /dashboard
and then select the “Angular” icon and press the “Create New Application” button.
This should set up your application, and you should see the Passage Console displaying something like this:
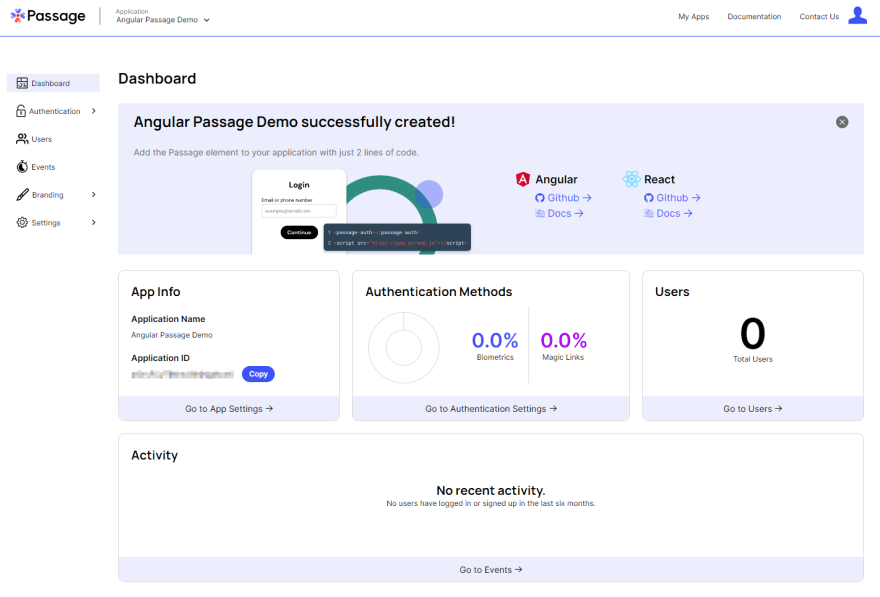
The Passage Dashboard for your Angular Application
In the “App Info” section on the left, you should have an Application ID (I’ve obfuscated mine in the graphic above). Copy that value, and then open up the environment.ts file in your application and add the following entry to the default values found there:
export const environment = {
  production: false,
  passageAppId: '<Put your AppID here>',
};
What this does is uniquely identify your application to Passage and allow us to work our authentication magic as well as keep stats for you about your application and your users.
Okay, if all is put together correctly, you should be able to go to the command line for your application and enter:
ng serve --open
And you should see something that looks like this:
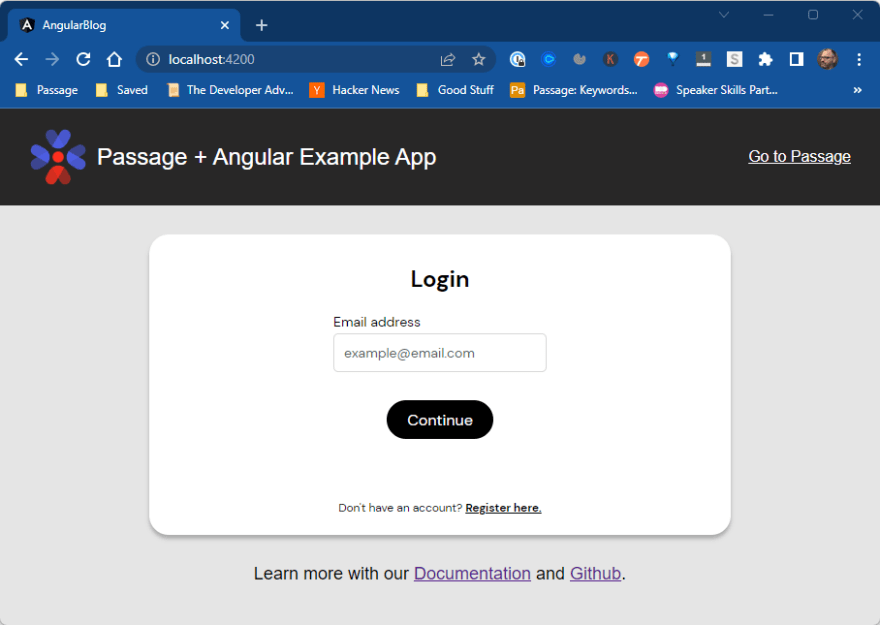
If everything is working, you should now be able to enter an email address into the login screen, register your device via biometrics, and log in to see the /dashboard page. If you don’t log in and try to navigate to the /dashboard page, you won’t be able to see anything except a message telling you that you aren’t logged in.
So What is Going on Here?
Well, a lot is going on here, but most of it is built into the Passage Web Component element.
The Passage element does all the work of registering and logging in users. You don’t have to do anything past what you’ve already done. The default component is pretty plain-looking by default, but don’t worry — you can customize it to your heart’s content.
Passage authenticates users using the WebAuthn protocol as standardized by the FIDO Alliance. Once it authenticates a user, Passage returns a signed JSON Web Token to identify the user. The whole process is hidden from you, the developer, and your users. All they need to worry about is authenticating with a simple biometrics check.
What Does the Code Do?
As far as what the code is up to, we’ll look at two of the files in the application — auth.service.ts and dashboard.component.ts.
First is the Authentication service.
The AuthService class contains three variables — isAuthenticated, username, and isLoading. isAuthenticated is the key variable here because it is the one that will keep track of whether or not the user is logged in.
The class contains a single function called isLoggedIn() . This function uses the PassageUser class, which is included with the Passage code.
The class is imported via the following import statement:
import { PassageUser, PassageUserInfo } from '@passageidentity/passage-elements/passage-user';
So the code in isLoggedin() merely asks the PassageUser() function for it’s userInfo(). That returns a promise, and if the userInfo is defined, then we know a valid user is present. The variables are set appropriately, and the function returns true because isAuthenticated is true. If the userInfo isn’t found, then the opposite occurs.
This takes us to the Dashboard component. In the dashboard.component.ts file, the ngOnInit() method is called, and the AuthService class is used to set the variables for the class, tracking the status of the user. This is again a promise, so that the information can be properly retrieved and read by the HTML file asynchronously.
The dashboard.component.html file is used to display one of two views, depending on whether the user is authenticated. If the user is authenticated, the username is displayed.
Pretty straightforward, I think.
Just for fun, once you run through the registration and login process a few times with a few different email addresses, you can explore the Console and see the data accumulating for your application.
Finding Out More
There is more to Passage. I already mentioned how you can easily customize the look of the Passage element. In addition, you can collect and store additional information about your users if you like. You can also display a user’s profile with a single HTML element. And of course, we will be continually adding new and useful features.
You can see the <passage-profile> element at work in the 02-Login-With-Profile application that is part of our GitHub Angular example.
Learn More About Passage
So there you have it. If you have any questions at all or need more assistance, or just want to find out more about what we at Passage are up to, please email us at support@passage.id, fill out this form, or join our Discord. We are quite pleased to hear from folks.

Top comments (0)