
This is a story of two problems and two solutions.
My first problem was a problem of my own creation. I read a lot of blog posts online, many of them so good that I save them for later, to re-read and share. I started with a simple page on my website where I just kept a list of those links, and why I enjoyed them. But eventually, the list became slow and annoying to update manually — I wanted an app.
That’s when I came upon my second problem, which was very much not my own: Even for something super, super simple, like I want a page on the Internet where I can share an updated list of links, it takes a lot of work to get something working. The road from idea to prototype is covered with excuses not to build, and I’m sure you’ve felt the same problem.
Remake sweeps away those excuses. I took a few hours on a Friday to sketch out an idea for Shelf.page and build it with Remake.
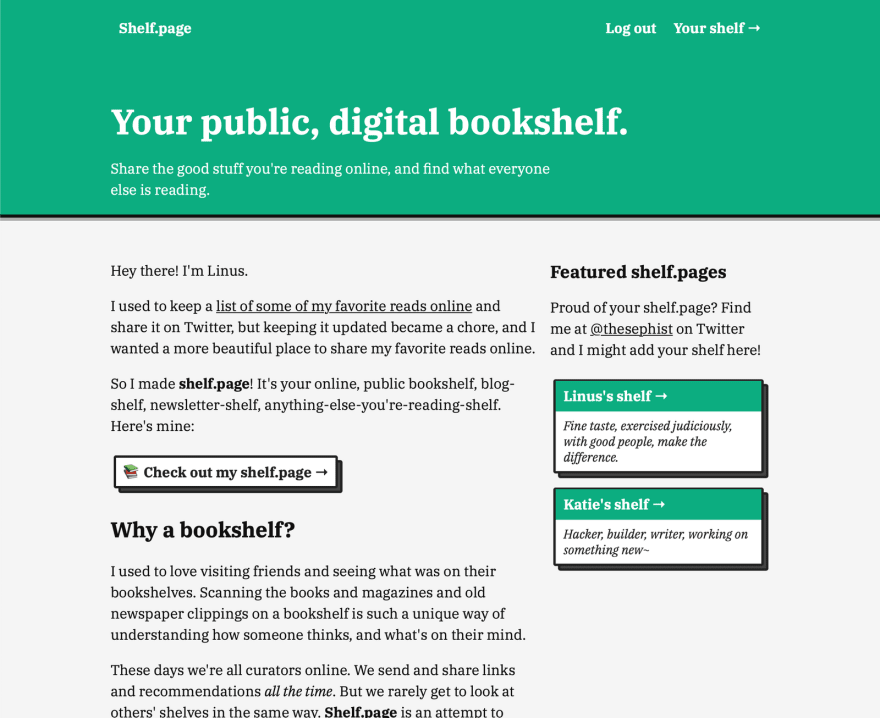 A preview of the shelf.page web app
Shelf.page is representative of a really common kind of app. Every user gets a profile or account page at a unique URL, with a bunch of fields to customize their page and edit it themselves.
Remake shines at building these kinds of apps.
Normally, I would spend the first hour or two of starting a project like this: installing tools, setting up a database, and connecting all the components together, but Remake let me build a full-stack app while focusing on just frontend code. This, combined with one-liner deploys and fast builds, makes Remake rocket fuel for building these kinds of single-page apps — I finished Shelf.page in about half the time I expected it to take!
The rest of this post is about Remake, and how it could cut down your time-to-launch to help you build faster, too.
If you already know what Remake is, and want to just get started with code, feel free to skip down to the Create Remake section.
What’s Remake?
Remake lets you write an app by describing your idea in annotated templates, not writing boilerplate code.
When you get down to it, Remake is a framework. And frameworks are always about abstracting out some repetitive, common part of projects. So a good way to understand Remake is to ask, what does Remake abstract for you?
In my experience, Remake is built on three big ideas.
1. Describe your app with annotated templates
The headline feature of Remake is that you can describe your entire app in a few templates. Remake looks at the shape of your data, and some annotations you add to your template, and takes care of making data editable and interactive in your page.
We’ll dive deeper into Remake’s annotations (attributes) later in the post, but here’s a taste. Let’s say you want every user to have an editable “name” field on their account. You can write a template with some attributes, like
<div class="user-name"
  object
  key:name="@innerText"
  edit:name
>{{ name }}</div>
This tells Remake that:
- This field is a property on the user’s account object (
object) - This field should be stored under the label “name” in the user’s account (
key:name) - This field should be editable on the page, for the account owner (
edit:name)
There are a few more directives that combine together to add a layer of editability over your app that’s smart enough to know how you store your data. Combined with Handlebars templates, Remake gives you a way to create fully interactive, editable web pages with just templates sprinkled with annotations.
Write templates that describe how your data relates to your UI, and Remake does the rest. This is a core idea of Remake.
2. *Zero-config user accounts and emails*
I’ve made lots of side projects over the years, but every time I start a new one, I always need to stop and ask myself if I want to support user accounts, because authentication and account management is an evergreen hassle. Even for prototypes and quick hacks, setting up a database, creating login flows, copy-pasting code from some other project to remember how to implement login securely … all of this takes time, and none of it adds to the actual functionality of the idea I’m trying to bring to life.
Remake apps know how to set up and manage accounts, so in building my own Shelf.page app, I never had to worry about setting up an authentication system. Because I also deployed through Remake’s CLI and platform, user accounts just worked — password resets, login, account pages, the whole thing.
There’s a tradeoff to this zero-configuration setup: There’s not a whole lot you can customize about the login process. It doesn’t support logging in with Google or Apple accounts, for example, and doesn’t support two-factor authentication. But until your idea grows out of the early phase of getting some traction, having to worry little about account management will probably save me hours off each project, and add years to my life.
3. Opinionated ecosystem for one-liner deployments
A lot of the strengths of Remake like zero-config accounts, smart templates, and easy deploys are possible because Remake is opinionated about how your project should be set up.
Like Ruby on Rails or Create React App, Remake comes with a CLI that helps you set up a Remake project. If you follow Remake’s conventions about where files go and how pages are rendered, in return Remake’s CLI also gives you a local development server out of the box and a way to deploy a production app to Remake’s deployment service with a CLI one-liner, remake deploy.
A second benefit of an opinionated design is that, if you have multiple Remake projects, you’ll never have to open up an old project and sit there trying to remind yourself where you put the exact file or page template you’re looking for — every project is roughly structured the same.
Taken altogether, by having a clear, opinionated model of describing how your data is related to your UI, Remake lets you write an app by just describing your idea, not wiring together lots of boilerplate code.
Let’s see how these pillars of Remake come together to actually help build a real app.
Create Remake!
Every Remake project starts the same:
npx remake create shelf
npx is a package runner for NPM libraries — it helps you run commands from NPM packages without installing it globally.
Here, I wanted to create an app called shelf, but you can pick your own name. Once we run the command, Remake will make a new folder named shelf (or a name you pick) with a starter Remake app inside. If you’ve used Create React App, this might feel familiar.
To test out the starter app, we can cd into the new project and run the dev server:
cd shelf
npm run dev
Remake will take a second to build the app, and start running the app at localhost:3000. Visit the URL on your computer to see the starter app, which is a Trello clone. You can also find this demo on the Remake website. It should look like this.
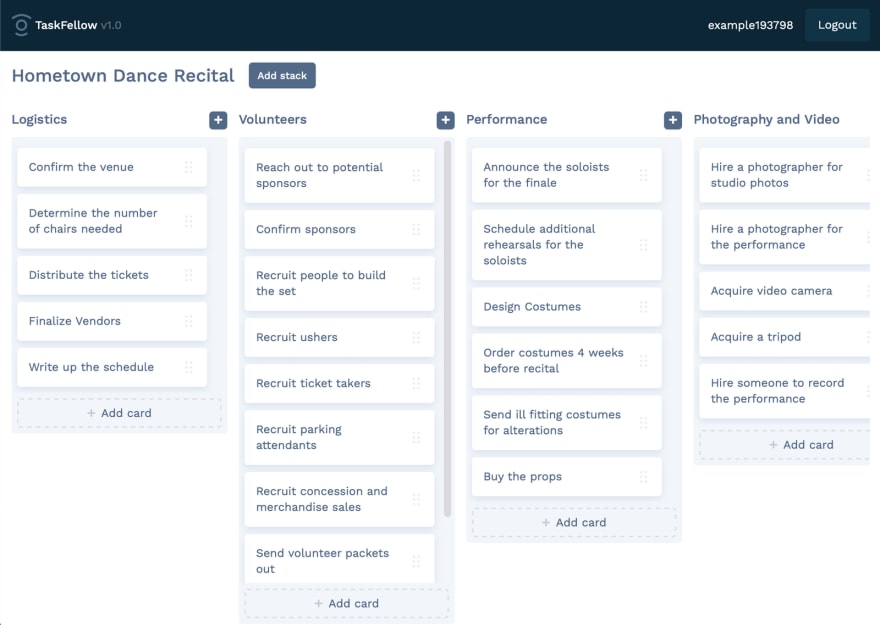 Remake Trello clone web app
Try using the starter app to get a feel for how Remake apps work. Try adding, removing, and saving changes. Here are a few things I noticed in my brief tour.
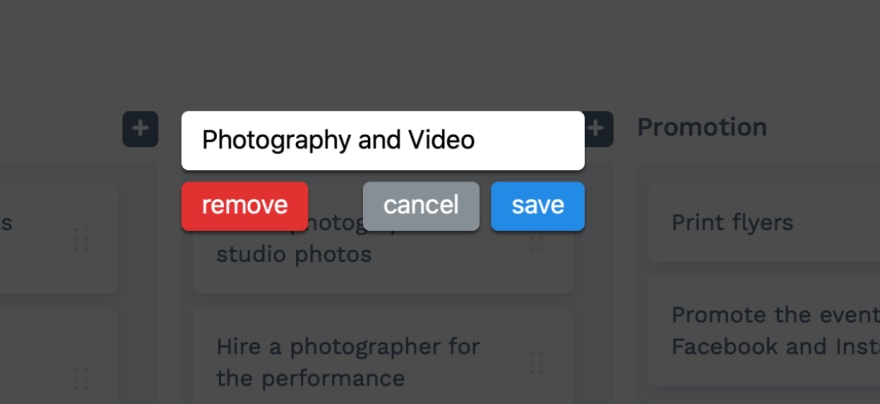 Remake's built-in edit popover
- You can click on titles of stacks or task items to edit the text inside.
- When you edit some text, a modal opens with buttons to save, cancel, or (sometimes) delete the item.
- You can drag-and-drop to reorder items in a list.
This is no Netflix, but there’s enough here to build many kinds of apps. Adding, removing, and changing things are the building blocks for everything from blogs and todo lists to personal dashboards.
Let’s see what code makes this app possible by visiting app/pages/app-index.hbs.
In the app-index.hbs file, which is a Handlebars template, we’ll find an HTML template sprinkled with attributes like object and edit:. You might have a guess as to what some of these attributes do, but for now, all we need to know is that these attributes are key to how Remake associates your app’s data with the template.
When you change the template and reload the page in your browser, you should see any changes in the template now reflected in the page. Try tweaking a few things before we explore the rest of Remake, like changing the “Add stack” button’s text.
A tour of Remake
Before diving into building an app with Remake, we should understand what goes where in a Remake project.
Static files in app/assets
Every web app needs to serve assets like images, JavaScript files, and CSS stylesheets. These are saved in app/assets under their respective folders.
Page templates in app/pages
If you’ve been following along thus far, you might have a good guess about what these files do — they’re templates for pages in your app.
For now, we only need to worry about app-index.hbs, but here are what the other pages do.
-
index.hbs: The “index page” of your app, when the user isn’t logged in (as opposed to app-index, for when the user is logged in). -
user/templates: Pages related to account management, like login/sign up pages and password reset.
Most of the time, you’ll be editing app-index.hbs. You can also add other pages next to app-index.hbs to create new static or dynamic (templated) pages for each user. This might be useful if your app has multiple pages or a sub-page for a particular piece of data, for example.
Root templates in app/layouts
You might have noticed that pages in app/pages don’t contain HTML boilerplate code like the page head. This is the responsibility of app/layouts/default.hbs, which defines the app “shell” into which all your pages are rendered by Remake.
User data in app/data and _remake-data
Remake stores user data in data/database/user-app-data as JSON files. For example, for my user account with the username “thesephist”, Remake will create a thesephist.json in which to store all my account data.
If you’re used to storing data in a relational database like Postgres, this tradeoff means a few things.
- Inspecting, editing, and debugging data is trivial, because you can just open the files to see how Remake sees your data.
- On the downside, storing data in files doesn't necessarily provide the same scalability and durability guarantees as a production-grade database.
For the kinds of apps I’m making for myself and a small number of users, most of the time, the advantages end up outweighing the costs. Under app/data, we can define a default user data file that every new user will inherit, when they make a new account.
Thinking in Remake
Remake started “clicking” for me when I learned that most of building a Remake app is finding a way to map a user’s data to parts of the user interface. I call this thinking in Remake.
When a user requests a page from a running Remake app, what actually happens?
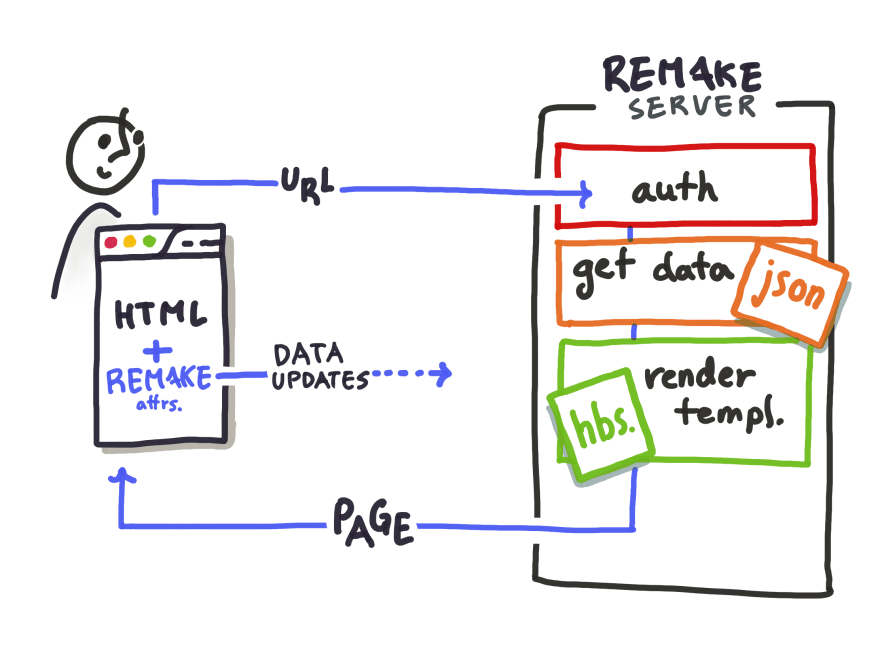 How the parts of Remake fit together
After authenticating the user, Remake…
- Fetches the data file (
{user-name}.json) for this user - Finds the Handlebars template for the requested page
- Renders the page template with data from the user’s data file, and sends it to the browser, along with small CSS and JavaScript bundles for Remake’s UI.
- The browser then loads the page, and Remake’s scripts crawls the page for any elements annotated with Remake’s attributes to understand how the UI maps back to the user’s data. When the user makes any edits to the page, the annotations tell Remake how to save those changes back to the backend.
A key piece of the puzzle to understand is that the template tells Remake how to render the page from the data; Remake attributes tell Remake how to save data back from the page’s UI.
Because of this, a good first step to building a Remake app is to map out how your user’s data connects to your UI. For my Shelf.page app, I started with a schema like this:
{
   "displayName": "Linus",
   "bio": "Student, writer, fan of the 90s",
   "topics": [
      {
         "name": "Tech",
         "links": [
            {
               "label": "Remake",
               "url": "remaketheweb.com"
            },
            {
               "label": "Mozilla",
               "url": "mozilla.com"
            }
         ]
      },
      {
         "name": "Community",
         "links": [
            {
               "label": "Get Together",
               "url": "gettogether.world"
            }
         ]
      }
   ]
}
A user has a display name and a short bio, and owns a list of topics. Each topic has a name for the topic, and a list of links under it with a label and a URL.
This shape of data maps really nicely to Shelf.page’s UI.
 The parts of the shelf.page application
Once we’ve sketched this out, the work that remains is to express this in code! First, we write a Handlebars template for this page — this lets Remake render our page.
Second, we add Remake attributes to our template, so Remake can save any edits. This is the topic of our next section.
Remake attributes
Remake attributes have a lot of flexibility, but to get started, you’ll probably use them in a handful of useful combinations.
1) Editable text fields
Most commonly, you’ll want to make a text field editable. In our example, we might want the user to be able to edit the displayName property of our user data object. This takes three attributes.
<div
  object
  key:display-name="@innerText"
  edit:display-name:without-remove
>{{ display_name }}</div>
Here, we tell Remake we’re talking about a property on a JSON object (object), specifically the property display_name (key:display-name). Then we make this field editable, but not removable, with edit:display-name:without-remove.
2) Lists of things
The next common case is a list of things. For example, you might want to add a task onto a todo list. If we have data that looks like below…
{
   "topics": [
      {
         "name": "Computer science"
      },
      {
         "name": "Writing"
      }
   ]
}
...and we want to show a list of editable topics, we’ll use these attributes.
<div
  array
  key="topics"
>
  {{#for topic in topics}}
    <section
      object
      key:name="@search"
    >
      <div
        target:name
        edit:name
      >{{ topic.name }}</div>
    </section>
  {{/for}}
</div>
There’s a lot going on here, so let’s break it down. As you follow along, consider how the hierarchy of the template matches the hierarchy of our data.
- At the top, we tell Remake we have an array (
array) of things at the property “topics” (key="topics"). Within this div, Remake will consider the array the “root” of our data. - We use Handlebars template notation to render an array of things
{{#for topic...}} - Each section element corresponds to a single item in the array of topics, which is an object in our data. We tell Remake this with
object.key:nametells Remake to “link” this element to a particular editable field, which will come in handy next. - Finally, we have an editable field for our topic names. We make this field editable and deletable with
edit:name. What happens when we delete this field? Deleting this field will delete the whole topic (the whole section element) because the topic is the closest JSON object that Remake could find in our data.
The target:name Remake attributes are the key to this pattern. It tells Remake to link one editable field to another part of our template.
3) Adding an item to a list
The last pattern to know is a button to add more items to a list. Given our template for a list from before, adding a button is straightforward.
<div array key="topics">
  {{#for topic in topics}}
    ...
  {{/for}}
</div>
<button new:topic>New topic</button>
Here, we added an element, outside of our loop with the Remake attribute new:topic, which tells Remake that clicking this button should add a topic item to our templated list of topics.
These patterns were enough for me to build Shelf.page, and will help you get started making Remake apps. But if you’re interested in the full breadth of attributes offered by Remake, you can check out Remake’s data attributes documentation: saving data, updating data, reacting to data.
Finishing touches and debugging tips
Once we have the basics of the app working with a template, there are a few finishing touches you might want to add. You might also run into some bugs you’re not sure how to start fixing. Here are a few tips I picked up shipping my first Remake project.
-
JavaScript. Remake will not compile your JavaScript or CSS with Babel or SASS, but you can set those up yourself. Just make sure all your transpiled files end up in the
assets/directory. -
Layouts. If you want to customize the “shell” of your app outside of the contents of page templates, you can update
app/layouts/default.hbsto add any stylesheets, script tags, or metadata you need. -
Debugging data. If you suspect Remake isn’t saving your data the way you expect, a good place to check is
data/database/user-app-data, to see how Remake is saving your changes. If the data in the user JSON file isn’t shaped the way you expect, you could narrow down your search for the buggy parts of the template.
Deploy!
Once you have a working Remake app, deploying is fast and simple on Remake’s deployment platform. From the root of your project folder, simply run the command
npx remake deploy
and Remake will copy the right files up and spin up your service! If this is your first time deploying, Remake might ask you to create an account.
That’s it! You’ve deployed your Remake app, hassle-free. Try it out by going to your new domain and creating an account!
Do more with Remake
We’ve explored the basics of Remake in this post, but Remake is still growing and improving. For Remake the framework, a cleaner project layout is in the works, with nicer error messages and better documentation. For Remake the tool and deployment platform, you can expect new features like custom domain support in the future.
I’m really excited by how much faster I am at building simple apps when building with Remake, and I’m looking forward to how Remake grows in the future. If you, like me, have a few too many ideas for the hours in a day, consider building out your next hack on Remake.
Guest post written by Linus Lee. I'd highly recommend following him for more hacks, insights, and cool projects.

Top comments (0)