
The world of web development has changed rapidly, It is largely driven by recent trends such as mobile, and the developing world is rapidly involving. In this article, We will learn to build a progressive web application(PWA) with Angular.
Beginner for Progressive Web Application?
Read Key Benefits of Progressive Web App to understand about Progressive Web App with its key benefit.
Let's Get Started
Make sure you are using latest version of Node.js and Angular CLI.
Step 1: Create an Angular app with CLI
ng new angular-pwa-app
and move to the new project folder after successfully creating an Angular app with the above command:
cd angular-pwa-app
Step 2: Install Angular Material
Install Angular Material UI library using the below command on the terminal.
ng add @angular/material
Add the material theme css file in src/styles.css.
@import "~@angular/material/prebuilt-themes/indigo-pink.css";
Update app.module.ts file
import { BrowserModule } from '@angular/platform-browser';
import { NgModule, CUSTOM_ELEMENTS_SCHEMA } from '@angular/core';


import { AppRoutingModule } from './app-routing.module';
import { AppComponent } from './app.component';
import { BrowserAnimationsModule } from '@angular/platform-browser/animations';

import { MatTableModule } from '@angular/material/table';
import { MatPaginatorModule, MatToolbarModule } from '@angular/material';

@NgModule({
declarations: [
  AppComponent
],
imports: [
  BrowserModule,
  AppRoutingModule,
  BrowserAnimationsModule,
  MatTableModule,
  MatPaginatorModule,
  MatToolbarModule
],
providers: [],
bootstrap: [AppComponent],
schemas: [CUSTOM_ELEMENTS_SCHEMA]
})
export class AppModule { }
In the above file Needed module of Angular Material has been imported in app.module.ts.
Step 3: Create Service for making HTTP Request
Import HTTP Module
import { HttpClientModule } from '@angular/common/http';

@NgModule({
  imports: [
    ...,
    ...,
    HttpClientModule
   ]
})
Now generate new service file with below CLI command:
ng g service services/post
Now we will use dummy API to show post list in our app. JSONPlaceholder provides dummy APIs for different purposes.
Open services/post.service.ts file generated with above command, and add below code:
import { Injectable } from '@angular/core';

import { Observable } from 'rxjs';
import { HttpClient } from '@angular/common/http';

export interface Post {
  userId: number;
  title: string;
  body: string;
}

@Injectable({
  providedIn: 'root'
})
export class PostService {
  apiUrl: string = "https://jsonplaceholder.typicode.com/posts";
  constructor(
    private http: HttpClient
  ) { }

  getPosts(): Observable<Post[]> {
    return this.http.get<Post[]>(this.apiUrl);
  }
}
In the above file, We have fetched dummy post lists in getPosts method.
Step 4: Update AppComponet
Open app.component.ts file and put below code in it.
import { Component, ViewChild } from '@angular/core';

import { PostService } from './services/post.service';
import { MatPaginator, MatTableDataSource } from '@angular/material';
export interface TableElement {
  userId: number;
  title: string;
  body: string;
}

@Component({
  selector: 'app-root',
  templateUrl: './app.component.html',
  styleUrls: ['./app.component.css']
})
export class AppComponent {
  title = 'angular-pwa-app';
  Data: TableElement[];
  col: string[] = ['userId', 'title', 'body'];
  dataSource = new MatTableDataSource<TableElement>(this.Data);
  @ViewChild(MatPaginator, { static: true }) paginator: MatPaginator;

  constructor(
    private _post: PostService
  ){
    this._post.getPosts().subscribe((res) => {
      this.dataSource = new MatTableDataSource<TableElement>(res);
      setTimeout(() => {
        this.dataSource.paginator = this.paginator;
      }, 0);
    })
  }
}
Update app.component.html file with below code.
<mat-toolbar color="accent" class="header">
<span>Angular PWA App</span>
</mat-toolbar>

<table mat-table [dataSource]="dataSource" matSort>
<ng-container matColumnDef="userId">
<th mat-header-cell *matHeaderCellDef mat-sort-header> User Id </th>
<td mat-cell *matCellDef="let element"> {{element.userId}} </td>
</ng-container>

<ng-container matColumnDef="title">
<th mat-header-cell *matHeaderCellDef mat-sort-header> Title </th>
<td mat-cell *matCellDef="let element"> {{element.title}} </td>
</ng-container>

<ng-container matColumnDef="body">
<th mat-header-cell *matHeaderCellDef mat-sort-header> Body </th>
<td mat-cell *matCellDef="let element"> {{element.body}} </td>
</ng-container>

<tr mat-header-row *matHeaderRowDef="col"></tr>
<tr mat-row *matRowDef="let row; columns: col;"></tr>
</table>

<mat-paginator [pageSizeOptions]="[7, 14, 28]" showFirstLastButtons></mat-paginator>

<router-outlet></router-outlet>
n the above file, We are using Angular Material Table with the navbar and table pagination.
Step 5: Run the app
Start the angular app with npm start and check the app on browser URL with link: http://localhost:4200

Step 6: Add PWA in Angular Application
Now we will convert our Angular Application. Run the below command to do the same.
ng add @angular/pwa
Above command adds PWA files and features inside our Angular application:
Installed packages for tooling via npm.

CREATE ngsw-config.json (392 bytes)
CREATE src/assets/icons/icon-128x128.png (1253 bytes)
CREATE src/assets/icons/icon-144x144.png (1394 bytes)
CREATE src/assets/icons/icon-152x152.png (1427 bytes)
CREATE src/assets/icons/icon-192x192.png (1790 bytes)
CREATE src/assets/icons/icon-384x384.png (3557 bytes)
CREATE src/assets/icons/icon-512x512.png (5008 bytes)
CREATE src/assets/icons/icon-72x72.png (792 bytes)
CREATE src/assets/icons/icon-96x96.png (958 bytes)
CREATE src/manifest.json (1071 bytes)
UPDATE angular.json (3565 bytes)
UPDATE package.json (1405 bytes)
UPDATE src/app/app.module.ts (1153 bytes)
UPDATE src/index.html (385 bytes)
With the above command new file, ngsw-config.json has been created. It is solely responsible for service workers. A service worker is a script that runs in the web browser and manages caching for an application. Service workers are also automatically added to app.module.ts file. service-worker also registered inside package.json file
{
  "dependencies": {
    ...
    "@angular/service-worker": "~8.2.14"
    ...
  }
}
Below tags have been in the index.html file.
 <link rel="manifest" href="manifest.webmanifest">
 <meta name="theme-color" content="#1976d2">
Step 7: build Angular app for production
Install http-server package globally using NPM.
sudo npm install -g http-server
Create Production build.
ng build --prod
After completely running above command, Our build is created inside dist/angular-pwa-app. Now move to build folder with cd dist/angular-pwa-app.
Run the Production build
Run below command on terminal
http-server -o
The above command will open the angular app on the following URL http://127.0.0.1:8080. Also provides the 2 different URLs on the terminal which can be used to check the app on url.
Step 8: Add the App icon on desktop to launch
Once you will launch the app on browser a plus icon will come up at the right side of URL bar like below.
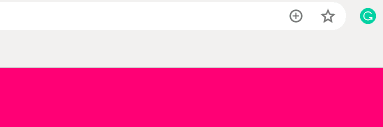
Click on plus icon to add the icon on dektop for launching the app further.
Conclusion
If you are new to Angular 8/9 then find Angular Sample Projects to start the app for enterprise-level application
Let me know your thoughts over the email demo.jsonworld@gmail.com. I would love to hear them and If you like this article, share with your friends.
Thank You!
We have successfully converted a very basic Angular app into Progressive web app very easily after following some steps.
This article is originally posted over jsonworld


Top comments (0)