Visual Studio Code or, as it is generally known, VS Code, is one of the most popular coding tools today. Being neither a pure editor nor a full-blown IDE, but something in between, it manages to be lightweight and fast, yet provides support for several languages through a set of easily installable VS Code extensions. It's cross-platform too, supporting Windows, macOS, and Linux operating systems, and provides a range of features covering the complete development life-cycle.
The philosophy underlying VS Code could be said to take what you need. The extension framework provides flexibility and has created a marketplace for an extensive range of tooling features. It also supports the automation of build processes, offering strong integration with Git for version control management. All this allows developers to install and build an environment tailored to their specific needs.
In this short introduction, we’ll take you through just some of the features that make VS Code such a compelling proposition for professional software developers.
Setting up VS Code
To start using VS Code visit https://code.visualstudio.com, from where you can download the version for your OS. If you would like to download for another OS, you can click on other platforms or press the down arrow button that shows next to the OS name, as illustrated in the following screenshot:

Figure 1 – Different versions of VS Code for different OSes
There are two versions available for download. The stable version is updated every month with new features, whereas the insiders version is a nightly build that provides an early peak into the upcoming features. Both versions can run side by side on the same machine.
Launching VS Code
Once you’ve downloaded VS Code, follow the guided installation wizard to set up your environment. Next, let's look at some of the different ways of launching VS Code and explore some command-line options.
The simplest way to start VS Code is by running the code . command.
This will open up a new instance of VS Code. If this command does not work in your macOS installation, you can follow the next steps. For Linux, visit https://code.visualstudio.com and look for Setup | Linux.
Setting up the command line for macOS
If you already have a Bash profile, you can skip Steps 1 and 2. Otherwise, proceed as follows:
1) Write the cd ~/ command to go to your home folder.
2) Write the touch .bash_profile command to create a new file.
3) Then, on the terminal window, write the following commands:
cat << EOF >> ~/.bash_profile
#Add Visual Studio Code (code)
Export PATH=''\$PATH:/Applications/Visual Studio Code.
app/Contents/Resources/app/bin
EOF
4) Close the terminal window and reopen to check whether the code . command works.
Now that your command line is set up and working, let's look at some different ways of launching VS Code.
The following command launches the code and opens the directory in VS Code where this is run:
code .
The –r variant allows you to open the specified workspace file in an already loaded VS Code instance; you can replace the workspace file with any file you would like to edit, as illustrated in the following code snippet:
code -r ''c:\My VS Code Projects\my project workspace.codeworkspace''
The –n addition allows you to open a new instance of VS Code, as illustrated in the following code snippet:
code -n ''c:\My VS Code Projects\Project 1''
If you would like to open a particular file and go to a specific row and column, use the –g addition. The following command will launch a new instance of VS Code; open the launch.json file and place the cursor on row 5 and column 10:
code -n -g ''c:\My VS Code Projects\Project 1.vscode\launch.
json'':5:10Exploring VS Code Layout
In this section, we will explore the editor's layout and the different panes. To get you familiar with the editor, we will go through the different sections of the editor and explain their utility. The layout of the editor can be seen in the following screenshot:

Figure 2 – VS Code editor layout
The most prominent section of the editor is the big pane on the right. This is where you edit code. Files selected from the EXPLORER are opened in this pane. You can open multiple files for editing at the same time.
Editing basics
VS Code comes with some great options to enable you to code faster. Let's look at some of them.
Generating HTML
The Emmet 2.0 extension is built into the editor, helping you to quickly write HTML code. For example, to create a table with five rows having two columns in each row, you can use the following statement:
table>tr*5>td*3
This is what the table looks like:
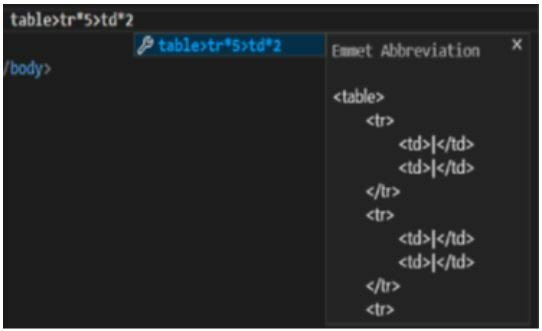
Figure 3 – Generate HTML using the Emmet extension
As shown in the preceding screenshot, you will notice that VS Code starts showing you the HTML it will generate. Press Enter to generate the HTML.
In case you want to add a class attribute to the tag, use a dot (.) after the tag name. An example of this can be seen in the following code snippet:
table>tr*5.myclass>td*2
This will generate the same table as in Figure 3, with myclass placed as a class attribute for the
Multi-cursor editing
One of the most important features of VS Code is the multi-select cursor. It has several variants, which we will explore now:
1) Alt/Option + Ctrl/Command + Down Arrow Key: This option will allow you to place a cursor on multiple lines at the same place. In the following screenshot, notice how the cursor spans five lines:
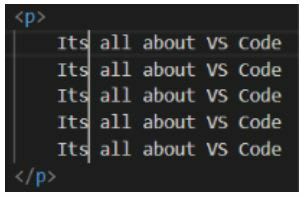
Figure 4 – Multi-cursor editing on the same position
2) Ctrl/Command + Shift + L: This command will allow you to select multiple occurrences of the same text and edit at the same time. Pressing the arrow key will keep the cursors active and allow quick multi-cursor editing. Press Esc to remove the cursors. This is illustrated in the following screenshot:

Figure 5 – Multi-cursor editing of the same text
3) Alt/Option + mouse click: This option allows you to place cursors at specific points and edit at the same time. Press Esc to remove the cursor. This is illustrated in the following screenshot:
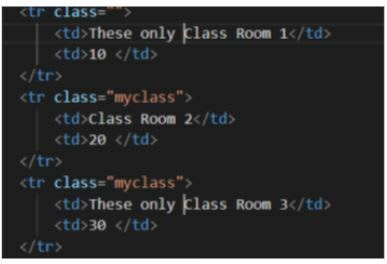
Figure 6 – Multi-cursor editing by placing the cursor on mouse clicks
4) Ctrl/Command + D: Highlight a text item and then, on each press of Ctrl/Command+D, the system moves the cursor to select the same text item. To skip a specific selection, press Ctrl/Command + K and then continue with Ctrl/Command + D.
5) Alt/Option + Shift + Down Arrow Key: Place the cursor on a particular line and press the command to duplicate the same line.
6) Alt/Option + Down Arrow Key: Place the cursor on a particular line and press the command to move the line below. The same works for multiple selected lines.
Code refactoring
While writing code, there are usually opportunities to further optimize the code you’ve written to increase readability and maintainability. Readable code is easier to change. It allows other developers to easily find the required code section and make changes as required. In a software development life-cycle, having to frequently maintain or change code is more time consuming than first writing it.
VS Code provides some nice code refactoring features. Support for JavaScript and TypeScript is built into the tool. Let's go through a few examples.
Extracting to a constant
Once you select a section of code, a light bulb appears on the left. On clicking it, you will see a context menu open up with some refactoring options. Once you select the Extract to constant in module scope option, VS Code will create a constant and replace it with the string literals—for example, 'Product List!', shown as follows:

Figure 7 – Extract to constant
The following screenshot shows the refactored code. Here, string literals have been replaced with a constant variable:

Figure 8 – Extract to constant refactored code
Apart from extract to constant, another option is extracting code to a method.
Extracting to a method
Often while writing code you will see a piece of code that can be reused. Extracted that code into a method to avoid code duplication. This enhances code maintainability since future changes are required in just one place rather than several.
VS Code provides a very easy-to-use and quick way to extract your code into reusable methods.
In the following example, the displayed success message is selected. A light bulb appears on the left and shows an Extract to method in class option:
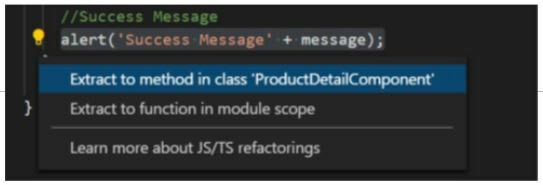
Figure 9 – Reusable code can be extracted to a method
Once you select this option, VS Code will ask for a method name as an input, as illustrated in the following screenshot:

Figure 10 – Reusable code can be extracted to a method
On entering the method name, and as shown in the preceding screenshot, the selected piece of code will be extracted into a method, and a method call will be placed in the same section.
Renaming symbols
While writing code, you might feel the need to rename some variables. These variables are not infrequently used in multiple places, and Find and Replace may feel like a laborious option.
VS Code here provides a quick Rename Symbol option.
Select the variable to be changed and press F2. VS Code will ask for the new variable, as illustrated in the following screenshot:
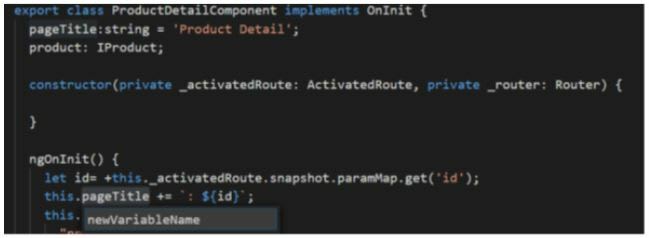
Figure 11 – Rename variable using F2
On pressing Enter, the variable name is replaced throughout the file:

Figure 12 – Variable name changed to newVariableName
The preceding screenshot shows pageTitle changed to newVariableName.
Refactoring extensions
Furthermore, with extensions VS Code supports refactoring for other languages. You can search the refactoring extension for your language on the VS Code extension marketplace.
Snippets
To help you code faster VS Code offers code snippets – predefined code templates that VS Code suggests while you write code. Here’s an example of a method template—on pressing Tab, the code on the right will be inserted:
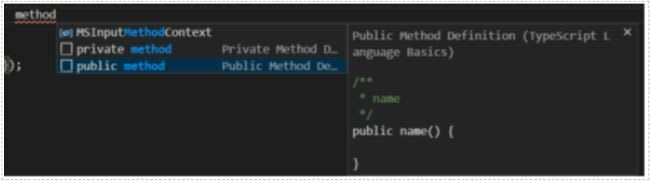
Figure 13 – Code snippets
Apart from the predefined templates, several extensions are available that come with their own code snippets.
Custom snippets
Snippets help you to be quick in writing repetitive code, and in case the out-of-the-box snippets do not satisfy your requirements, VS Code provides you with the option to define your own custom snippets, called User Snippet.
Let's create a user snippet for HTML code.
Go to File | Preferences | User Snippet. The command pallet will pop up. Enter html and press Enter, as illustrated in the following screenshot:

Figure 14 – Create custom HTML code snippets
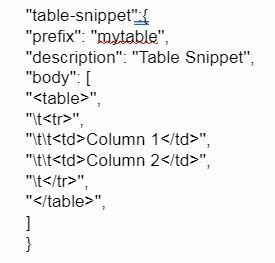
The html.json file contains the HTML user snippets. We will create a snippet to generate a table. The list that follows details the different parts of a user snippet.
In our example, the following applies:
1) table-snippet: This is the name of the snippet.
2) prefix: The name mentioned in this section is used to call the
snippet.
3) description: This will be displayed in the pop-up window.
4) body: This is the place where you write your code template.
It's an array that will contain the line of code to be inserted
when you call the snippet. \t is used for code indentation.
Copy and paste the following code into an html.json file:
So, our snippet is created. Next, we will call it. If the following code does not work for you, restart VS Code.
As soon as you start typing mytable, VS Code suggests the code snippet you created, as illustrated in the following screenshot:

Figure 15 – Calling the custom HTML code snippet created earlier
On pressing Tab, the code will be inserted, as illustrated in the following screenshot:
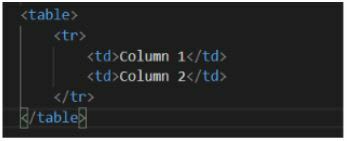
Figure 16 – Code created from the custom HTML code snippet
The preceding screenshot shows the table generated from User Snippet.
Code navigation
While writing code, developers are often working with several files at the same time. Quickly navigating between files or within the same file is an important capability.
VS Code offers multiple options for code navigation—let's explore them one by one.
Go to line
To move the cursor to a particular line and column, use the Goto (:) Line command, as illustrated in the following screenshot:

Figure 17 – Using the command palette to move cursor to a line and column
Go to symbol
To show the symbols used in your code and to navigate directly to a selected symbol, you can use Go to Symbol (@) in a File.
Also, while you are traversing, VS Code will highlight the code section, as illustrated in the following screenshot:
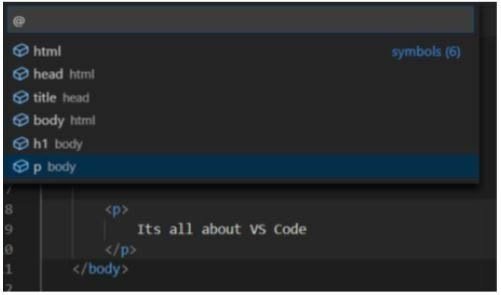
Figure 18 – Using the command palette to jump to a section of code
In the case of JavaScript, the command palette will show methods, as illustrated in the following screenshot:

Figure 19 – Jump to code section in a JavaScript example
Using commands for navigation
Here are some useful commands for quick code navigation:
1) Ctrl/Command + F12: Use this command to select an object and jump to its implementation.
2) Ctrl/Command + Shift + F12: This is a quick way to peek into an implementation. The pop-up window also allows code editing. This is illustrated in the following screenshot:

Figure 20 – Peek into an implementation
The preceding screenshot shows an example where the ProductDetailComponent implementation is open in Quick Peek mode.
Navigating between files
VS Code provides multiple options for navigating between different files. Let's assume you have a bunch of files open in your editor. To select a particular file from currently opened files, hold Ctrl and then press Tab. VS Code will open a list of files, and you can move your selection by holding Ctrl and pressing Tab. An example list of files can be seen in the following screenshot:

Figure 21 – Files listed for navigation
Apart from using Ctrl (hold) + Tab, you can also sequentially switch between multiple files opened in the editor.
Use Alt/Option + Right Arrow or Alt/Option + Left Arrow to switch from one file to other opened files.
Commenting code
Last but definitely not least, you can quickly comment and uncomment code by using the following keyboard shortcuts:
1) Ctrl/Command + K then C: to comment a line
2) Ctrl/Command + K then U: to uncomment a line
Summary
In this guide, we’ve looked at the basic features of VS Code. We explored multiple ways of launching VS Code and also covered several command-line options. We then moved on to showcase some of its editing and code refactoring features, and finished by looking at code navigation functionality. Now that you know what’s involved in using VS Code as an editor, and what it can offer, why not try it out for your next coding project?
Buy Developing Multi-platform apps with Visual Studio Code: http://packt.live/37g6IeO


Top comments (0)