It is for me once again time to deal with PHP, yes, some may cry out, but I love the language. Since I wanted to use again a “real VM for it, instead of a Docker container, here is a small tutorial for creating a VM using Virtualbox which can do the following.
VM "Features"
- PHP 7.x
- MySQL 5.x
- Apache 2.x
- Ubuntu 16.04.x
- PHPMyAdmin
- Shared Folder mit dem Mac
The first step is to get our Ubuntu 16.04.x image: Download.
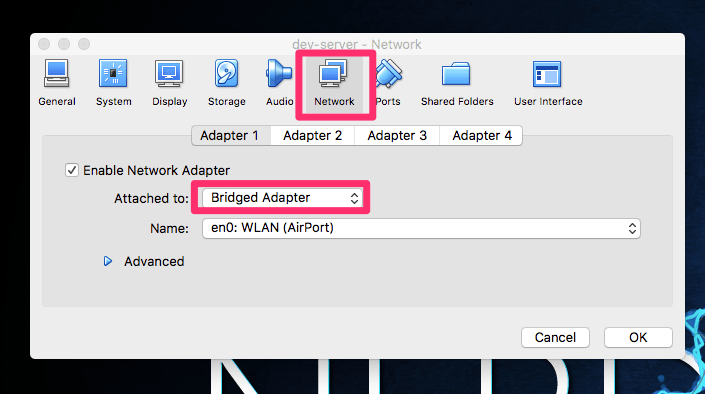
So we create a VM in the Virtualbox GUI, which I always like the best is the use of a network bridge for ssh access – so the VM gets an internal IP from my network and would be in principle also accessible by NAT from the outside.
I think, the installation of the Ubuntu server is nothing I need not describe here, only important: At the end of the installation tick the OpenSSH server so that we can work well with our VM via SSH.
If you’re still not sure how to do this, or just want to be put into a kind of trance, i have uploaded the whole as a screencast (without comments) on Youtube, 6:30 relaxing (is a bit slow, because in the background Elder Scrolls online is doing his install job).
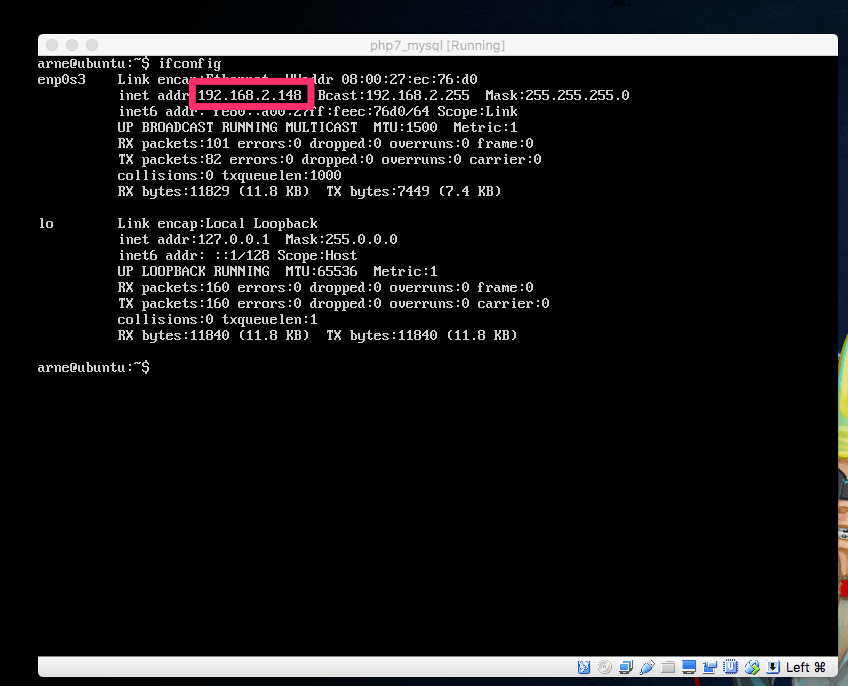
To get the private IP of the fresh VM, just login and use “ifconfig as command.
From now on, we are using an SSH connection from our computer to Virtualbox VM.
ssh ssh user@vm-ip
Installation of packages
Continue with the installation of the packages we need for our small server: PHP, Apache and MySQL, PHPMyADMIN (to manage databases from the browser).
sudo apt-get update
sudo apt-get install apache2 libapache2-mod-php7.0 php7.0 php7.0-mysql mysql-server
sudo apt-get install phpmyadmin php-mbstring php-gettext
Please note the “root password, which is set when the MySQL server is installed. So we can connect later to the databases – think on a development server we do not need dedicated users.
Some, or most PHP frameworks require mod rewrite to rewrite the URL, so:
sudo a2enmod rewrite
For the VirtualBOX Guest-extension (which we need to share us with the Mac folder) please set up the following packages before:
sudo apt-get install build-essential module-assistant
Next: Mount the “CD into the VirtualBox, there are the guest extensions on it. To do this, open the window with the virtualbox and click “Devices – Insert Guest Additions .. at the top of the menu bar.
Back in the terminal these are now installed:
sudo mount /dev/sr0 /media/cdrom/
cd /media/cdrom
sudo ./VBoxLinuxAdditions.run
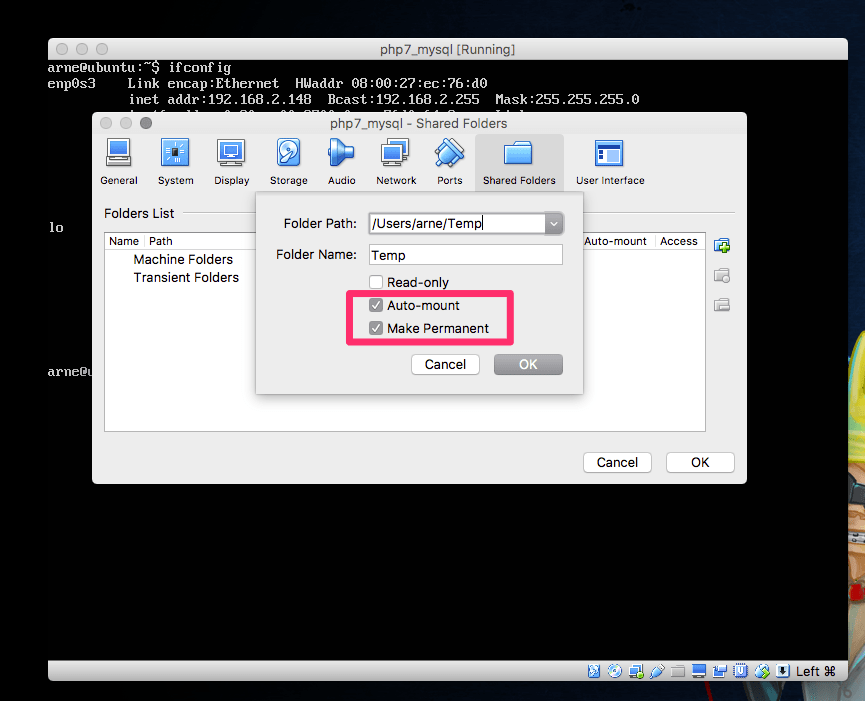
Time for a reboot of the box! To share a folder with your Mac (you’ll later put your code there), click Devices again, and open Shared Folders. Search for a suitable folder on your computer and a nice name, check options for Auto-Mount and Make Permanent. In my example I want to use the Temp directory in my personal folder.
Back in the terminal, we now only have to include the folder, I always mount it directly into the document root of the Apache web server.
sudo mount -t vboxsf Temp /var/www/html
We don’t want to repeat this on every reboot, so we put this stuff into “/etc/rc.local”:
#!/bin/sh -e
#
# rc.local
#
# This script is executed at the end of each multiuser runlevel.
# Make sure that the script will "exit 0" on success or any other
# value on error.
#
# In order to enable or disable this script just change the execution
# bits.
#
# By default this script does nothing.
mount -t vboxsf Temp /var/www/html
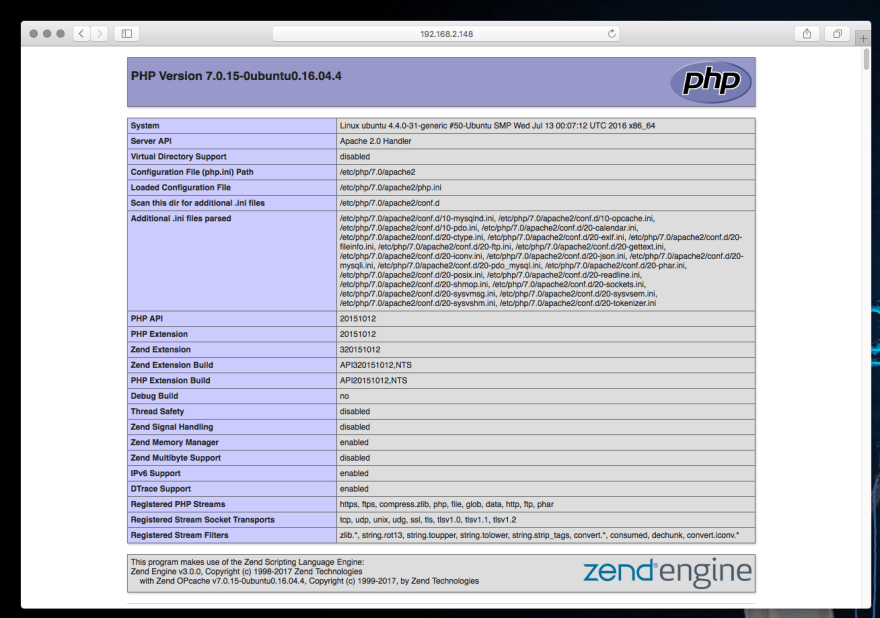
Let’s create an index.php in our shared folder on our computer with the following content:
<?php phpinfo(); ?>
If we now open our Browser with the private ip of our VM, we should the the PHP informations:
To open the PHPMyAdmin just hit the URL: http://IP/phpymadmin
That’s it – sorry for my english, but not my mother tongue. Hope someone finds this short tutorial useful.
If you want to read more from my stuff, just follow me on Twitter: @ophasnoname

Top comments (3)
That's a cool tutorial. Straight to the point. Not making easy things difficult.
Except, I am unable to put shared folder to work.
I have tried all sorts of solutions, but end up with guest folder not picking up the changes in hosts folder.
If you want to setup a PHP based server, then you can save your time by using some PaaS for PHP MySQL hosting where you can launch a managed server in just one click. There is no need to manually setup stack on the server because the stack will be pre-configured. Thus saving your time and cost.
Sure but for 10$ a month. You can get a vServer in germany for 3€ a month.