After trying Travis, CircleCI and BuddyBuild, I now choose Bitrise for my mobile applications. The many cool steps and workflows make Bitrise an ideal CI to try. Like any other CIs, the learning steps and configurations can be intimidating at first. Things that work locally can fail on CI, and how to send things that are marked as git ignore to be used in CI builds are popular issues.
In this post I will show how to deploy React Native apps for both iOS and Android. The key thing to remember is to have the same setup on CI as you have locally. They are to ensure exact same versions for packages and tools, to be aware of file patterns in gitignore as those changes won’t be there on CI, and how to property use environment variables and secured files.
This post tried to be intuitive with lots of screenshots. Hope you learn something and avoid the wasted hours that I have been too.
Support for React Native
In its simplest sense, React Native is just Javascript code with native iOS and Android projects, and Bitrise has a very good support for React Native. It scans ios and android folder, and give suggestion about scheme and build variants to build.
Another good thing about Bitrise is its various useful steps and workflows. Unlike other CIs where we have to spend days on how to property edit the configuration file, Bitrise has a pretty good UI to add and edit steps. Steps are just custom scripts, and we can write pretty much what we like. Most of the predefined steps are open source. Here are a few
Building for iOS
Unless you use the step Build with Simulator , you will need provisioning profile and certificates with private keys in order to build for devices.
Install React Native
React Native moves fast and break things. If you don’t have same version of React Native, you will have hard time figuring out why the builds constantly fail on CI.
Currently I use React Native 0.57.0, so I enter install react-native@0.57.0 to let Bitrise install the same version
Also, we need to make sure we have the same version of react-native-cli with Install React Native step
Install CocoaPods
It’s safe to have the same CocoaPods version. For Xcode 10, we need at least CocoaPods 1.6.0.beta-1 to avoid the bug Skipping code signing because the target does not have an Info.plist file. Note that our Xcode project is inside ios folder, so we specify ./ios/Podfile for Podfile path
Code signing
Under Workflow -> Code Signing we can upload provisioning profiles and certificates.
Then we need to use Certificate and profile install step to make use of the profiles and certificates we uploaded.
iOS Auto Provision
Another option is to use the iOS Auto Provision step, but it requires that we need to have an account in team that has connected Apple Developer Account. This way Bitrise can autogenerate profiles for us.
Recreate user scheme
Bitrise can autogenerate schemes with the Recreate user scheme step, but it’s good to mark our scheme as Shared in Xcode. This ensures consistence between local and CI builds.
Archive
To archive project, we need to add Xcode Archive & Export . For React Native, iOS project is inside ios folder, so we need to specify ./ios/MyApp.xcworkspace for Project path. Note that I use xcworkspace because I have CocoaPods
Right now, as of React Native 0.57.0, it has problem running with the new build system in Xcode 10, so the quick fix is to use legacy build system. Under Xcode Archive & Export step there are fields to add additional options for xcodebuild call. Enter -UseModernBuildSystem=NO
You can read more Build System Release Notes for Xcode 10
Xcode 10 uses a new build system. The new build system provides improved reliability and build performance, and it catches project configuration problems that the legacy build system does not.
Building for Android
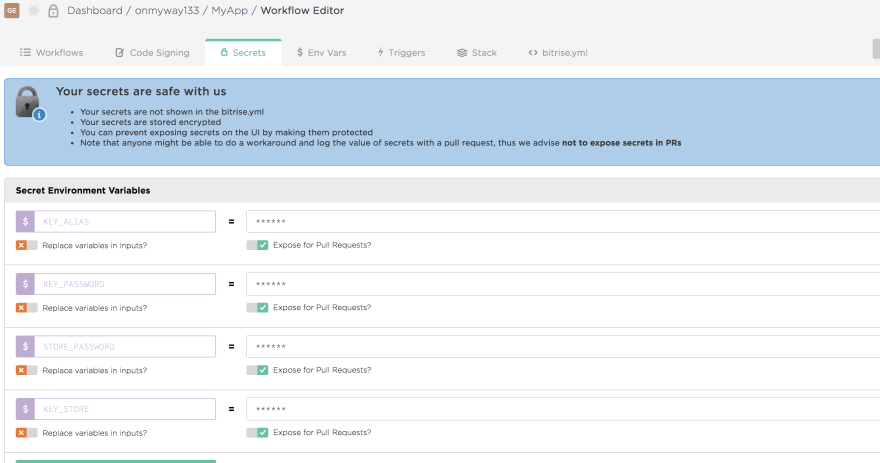
For Android, the most troublesome task is to give keystore files to Bitrise as it is something we would keep privately from GitHub. Bitrise allows us to upload keystore file, but we also need to specify key alias and key password. One solution is to use Secrets and Environment variables
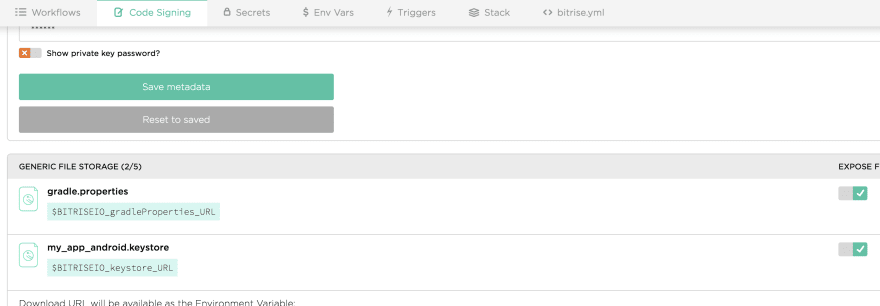
But as we often use gradle.properties to specify custom variables for Gradle, it’s convenient to upload this file. Under Workflow -> Code Signing is where we can upload keystore, as well as secured files
The generated URL variables are path to our uploaded files. We can use curl to download them. Bitrise has also Generic File Storage step to download all secured files.
The downloaded files is located at GENERIC_FILE_STORAGE , so we add another Custom Script step to copy those files into ./android folder
#!/usr/bin/env bash

cp $GENERIC_FILE_STORAGE/gradle.properties ./android/gradle.properties
cp $GENERIC_FILE_STORAGE/my_app_android.keystore ./android/my_app_android.keystore
Note that the name of the files are the same of when we uploaded, and we use cp command to copy to folders.
Android Build
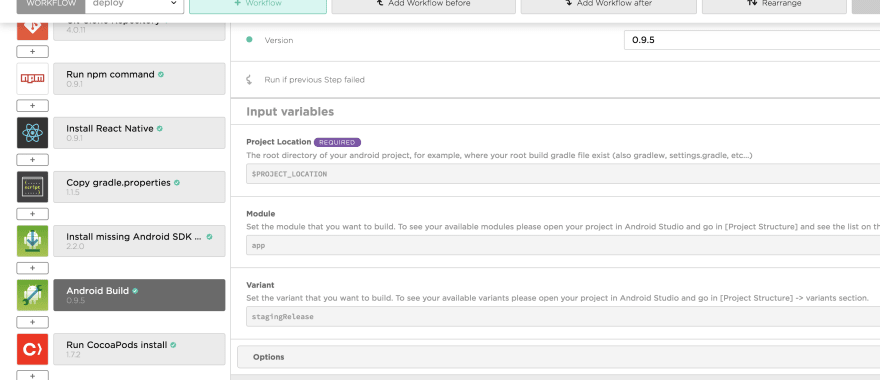
By default, Bitrise has 2 workflows: primary for quick start, and deploy for archiving and deploying. In the deploy workflow there is Android Build step. We can overwrite module and build variant here.
If all go well
In Bitrise we can mark a step to continue regardless of the previous step. I use this to make sure iOS build independently from Android
If both iOS and Android build are successful, we should see the below summary
Although Bitrise has a good UI to configure workflows and steps, we have fine grained control every parameters in the bitrise.yml file. It’s good to reason here as we get familiar with all the steps.
Where to go from here
I hope you learn something and have a happy deploy. Since you are here, below articles may be of your interest
May you code continue to compile.
Original post https://codeburst.io/using-bitrise-ci-for-react-native-apps-b9e7b2722fe5


Top comments (1)
How quickly Bitrise builds your app?
1h or 30min or ... ?