Original post https://github.com/onmyway133/blog/issues/110
Apps often have many screens, and UIViewController works well as the basis for a screen, together with presentation and navigation APIs. Things are fine until you get lost in the forest of flows, and code becomes hard to maintain.
One way to avoid this is the central URL routing approach. Think of it as a network router that handles and resolves all routing requests. This way, the code becomes declarative and decoupled, so that the list component does not need to know what it's presenting. URL routing also makes logging and tracking easy along with ease of handling external requests such as deep linking.
There are various frameworks that perform URL routing. In this tutorial you’ll use Compass for its simplicity. You’ll refactor an existing app, which is a simplified Instagram app named PhotoFeed. When you’ve finished this tutorial, you’ll know how to declare and use routers with Compass and handle deep linking.
Getting Started
Download the starter project and unzip it. Go to the PhotoFeed folder and run pod install to install the particular dependencies for this project. Open PhotoFeed.xcworkspace and run the project. Tap Login to go to the Instagram login page and enter your Instagram credentials, then have a look around the app.

The main app is made of a UITabBarController that shows the feed, the currently logged-in user profile and a menu. This is a typical Model View Controller project where UIViewController handles Cell delegates and takes responsibility for the navigation. For simplicity, all view controllers inherit from TableController and CollectionController that know how to manage list of a particular model and cell. All models conform to the new Swift 4 Codable protocol.
Registering Your App on Instagram
In order to use the Instagram API, you’ll need to register your app at Instagram Developer. After obtaining your client id, switch back to the project. Go to APIClient.swift and modify your clientId.

Note: The project comes with a default app with limited permissions. The app can't access following or follower APIs, and you can only see your own posts and comments
Compass 101
The concept of Compass is very simple: you have a set of routes and central place for handling these routes. Think of a route as a navigation request to a specific screen within the app. The idea behind URL routing is borrowed from the modern web server. When user enters a URL into the browser, such as https://www.raywenderlich.com/category/ios, that request is sent from the browser to the web server. The server parses the URL and returns the requested content, such as HTML or JSON. Most web server frameworks have URL routing support, including ASP.NET, Express.js, and others. For example, here is how you handle a URL route in express.js:
app.get('/api/category/:categoryTag', function (req, res) {
  const page = getCategoryPageFor(req.params.categoryTag)
  res.send(page)
})
Users or apps request a specific URL that express an intent about what should be returned or displayed. But instead of returning web pages, Compass constructs screens in terms of UIViewController and presents them.
Route Patterns
This is how you declare a routing schema in Compass:
Navigator.routes = ["profile:{userId}", "post:{postId}", "logout"]
This is simply as array of patterns you register on the Navigator. This is the central place where you define all your routes. Since they are in one place, all your navigations are kept in one place and can easily be understood. Looking at the example above, {userId}, {postId} are placeholders that will be resolved to actual parameters. For example with post:BYOkwgXnwr3, you get userId of BYOkwgXnwr3. Compass also performs pattern matching, in that post:BYOkwgXnwr3 matches post:{postId}, not comment:{postId}, blogpost:{postId}, ...This will become to make sense in following sections.
The Navigator
The Navigator is a the central place for routes registration, navigating and handling.

The next step is to trigger a routing request. You can do that via the Navigator. For example, this is how you do in the feed to request opening a specific post:
Navigator.navigate(urn: "post:BYOkwgXnwr3")
Compass uses the user-friendly urn, short for Uniform Resource Name to make itwork seamlessly with Deep Linking. This urn matches the routing schema post:{postId}. Compass uses {param} as the special token to identifier the parameter and : as the delimiter. You can change the delimiter to something else by configuring Navigator.delimiter. You have learned how to register routes and navigate in Compass. Next, you will learn how to customize the handling code to your need.
Location
Navigator parses and works with Location under the hood. Given the URN of post:BYOkwgXnwr3, you get a Location where path is the route pattern, and arguments contain the resolved parameters.
path = "post:{postId}"
arguments = [
  "postId": "BYOkwgXnwr3"
]
To actually perform the navigation, you assign a closure that takes a Location to Navigator.handle.
Navigator.handle = { [weak self] location in
  guard let `self` = self else {
    return
  }

  let arguments = location.arguments

  switch location.path {
    case "post:{postId}":
      let postController = PostController(postId: postID)
      self.rootController.pushViewController(postController, animated: true)
    default:
      break
  }
}
The letself= self dance is to ensure self isn't released by the time this closure is executed. If it is released, the routing it's about to perform is likely invalid, and you return without doing anything instead. You should typically do the above in the components that own the root controller, such as AppDelegate as seen above. That's the basic of Compass. Astute readers may have noticed that it does not scale, as the number of switch statements will grow as the number of routes and endpoints increase in your app. This is where the Routable protocol comes in. Anything conforming to Routable knows how to handle a specific route. Apps may have many modular sections, and each section may have a set of routes. Compass handles these scenario by using a composite Routable named Router that groups them . You can have a router for a pre-login module, a post-login module, premium features module, and so on.

In the next section, you'll change PhotoFeed to use Router and Routable.
Router to the Rescue
The first step is to include Compass in your project. Using CocoaPods, this is an easy task. Edit the Podfile with the project and type pod 'Compass', '~> 5.0' just before the end statement. Then open Terminal and execute the following:
pod install
The version of Compass used in this tutorial is 5.1.0.
Registering a Router

To start, you’ll create a simple router to handle all post-login routes. Open AppDelegate.swift, and import Compass at the top of the file:
import Compass
Next, add the following router declaration under the var mainController: MainController? declaration:
var postLoginRouter = Router()
Then declare a function called setupRouting, you 'll do this in an extension to separate the routing setup from the main code in AppDelegate.
extension AppDelegate {
  func setupRouting() {
    // [1] Register scheme
    Navigator.scheme = "photofeed"

    // [2] Configure routes for Router
    postLoginRouter.routes = [:]

    // [3] Register routes you 'd like to support
    Navigator.routes = Array(postLoginRouter.routes.keys)

    // [4] Do the handling
    Navigator.handle = { [weak self] location in
      guard let selectedController = self?.mainController?.selectedViewController else {
        return
      }

      // [5] Choose the current visible controller
      let currentController = (selectedController as? UINavigationController)?.topViewController
        ?? selectedController

      // [6] Navigate
      self?.postLoginRouter.navigate(to: location, from: currentController)
    }
  }
}
Here's what you do in the above method:
- Declare a scheme for Compass to work. This is your application URL scheme. This shines when you wish to support deep linking .
- Register all the routes in your app.
Routeraccepts a mapping of route andRoutableconformers. This is empty for now, but you will add several routes in a moment. - A
Navigatorcan manage multiple routers. In this case, you only register one router. - This is where you supply the handling closure.
Navigatoruses this to handle a resolved location request. - Screens in one modular section originate from one root or parent view controller. In order to show something from the route, you should try to push or present it from the selected most-visible view controller. In this project, the root is a
UITabBarController, so you try to get the top controller from the current selected navigation. The selection ofcurrent controllerdepends on the module and your app use cases, so Compass let you decide it. If you use the side menu drawer, then you can just change the selected view controller. - Finally, since
Routeris a compositeRoutable, you dispatch to it theLocation.

Finally, you need to call this newly added function. Add the following line right above window?.makeKeyAndVisible():
setupRouting()
Build and run. Nothing seems to work yet! To make things happen, you’ll need to add all the route handlers. You’ll do this in the next section.
Implementing the Route Handlers
First, create a new file and name it Routers.swift. This is where you’ll declare all of your route handlers. At the beginning of the file, add import Compass. Compass declares a simple protocol — Routable — that decides what to do with a given Location request from a Current Controller. If a request can't be handled, it will throw with RouteError. Its implementation looks like this:
public protocol Routable {
  func navigate(to location: Location, from currentController: CurrentController) throws
}
It’s an incredibly simple protocol. Any routes you create only need to implement that single method. Now create your first handler to deal with user info request.
struct UserRoute: Routable {
  func navigate(to location: Location, from currentController: CurrentController) throws {
    // [1] Examine arguments
    guard let userId = location.arguments["userId"] else {
      return
    }

    // [2] Create the controller
    let controller = UIStoryboard(name: "Main", bundle: nil).instantiateViewController(withIdentifier: "UserController") as! UserController
    controller.userId = userId
    currentController.navigationController?.pushViewController(controller, animated: true)
  }
}
This is called when you touch the post author on the feed. Here’s what's happening:
-
UserRoutedeals withuser:{userId} urn, solocation.arguments["userId"]should contain the correctuserIdto inject intoUserController. - This app uses storyboards to make the UI, so get the correct view controller based on its identifier. Remember tha
currentControlleris the current visible controller in the navigation stack. So you ask for itsUINavigationControllerto push a new view controller.
Right below this router, add one more route for the screen shown when the user wants to see who likes a particular post:
struct LikesRoute: Routable {
  func navigate(to location: Location, from currentController: CurrentController) throws {
    guard let mediaId = location.arguments["mediaId"] else {
      return
    }

    let controller = UIStoryboard(name: "Main", bundle: nil).instantiateViewController(withIdentifier: "LikesController") as! LikesController
    controller.mediaId = mediaId
    currentController.navigationController?.pushViewController(controller, animated: true)
  }
}
The remaining Route
Now it's your turn to write the other route handlers: CommentsRoute, FollowingRoute, FollowerRoute. See if you can figure it out first, you can find the solution below. Here's what you should have:
struct CommentsRoute: Routable {
  func navigate(to location: Location, from currentController: CurrentController) throws {
    guard let mediaId = location.arguments["mediaId"] else {
      return
    }

    let controller = UIStoryboard(name: "Main", bundle: nil).instantiateViewController(withIdentifier: "CommentsController") as! CommentsController
    controller.mediaId = mediaId
    currentController.navigationController?.pushViewController(controller, animated: true)
  }
}

struct FollowingRoute: Routable {
  func navigate(to location: Location, from currentController: CurrentController) throws {
    guard let userId = location.arguments["userId"] else {
      return
    }

    let controller = UIStoryboard(name: "Main", bundle: nil).instantiateViewController(withIdentifier: "FollowingController") as! FollowingController
    controller.userId = userId
    currentController.navigationController?.pushViewController(controller, animated: true)
  }
}

struct FollowerRoute: Routable {
  func navigate(to location: Location, from currentController: CurrentController) throws {
    guard let userId = location.arguments["userId"] else {
      return
    }

    let controller = UIStoryboard(name: "Main", bundle: nil).instantiateViewController(withIdentifier: "FollowerController") as! FollowerController
    controller.userId = userId
    currentController.navigationController?.pushViewController(controller, animated: true)
  }
}
The LogoutRoute
There is one more route to add: the one you'll use for logout. LogoutRoute is quite tricky, as it usually involves changing the current root view controller. Who knows this better than the app delegate? Open AppDelegate.swift and add the following code at the very bottom:
struct LogoutRoute: Routable {
  func navigate(to location: Location, from currentController: CurrentController) throws {
    APIClient.shared.accessToken = nil
    (UIApplication.shared.delegate as! AppDelegate).showLogin()
  }
}
Now that you’ve implemented all of the route handlers, you will have to tell Navigator which route is used for which URN. Still in AppDelegate.swift, find postLoginRouter.routes = [:] and replace it with the following:
postLoginRouter.routes = [
  "user:{userId}": UserRoute(),
  "comments:{mediaId}": CommentsRoute(),
  "likes:{mediaId}": LikesRoute(),
  "following:{userId}": FollowingRoute(),
  "follower:{userId}": FollowerRoute(),
  "logout": LogoutRoute()
]
Build the app and everything should compile. Now all that’s left is to actually all all of the code you’ve written!
Refactoring Time
It’s time to refactor all the code in UIViewController by replacing all the navigation code with your new routing instructions. Start by freeing the FeedController from the unnecessary tasks of navigation. Open FeedController.swift and add the following import to the top of the file:
import Compass
Next, look for // MARK: - MediaCellDelegate and replace the three MediaCell delegate methods with the following:
func mediaCell(_ cell: MediaCell, didViewLikes mediaId: String) {
  try? Navigator.navigate(urn: "likes:\(mediaId)")
}

func mediaCell(_ cell: MediaCell, didViewComments mediaId: String) {
  try? Navigator.navigate(urn: "comments:\(mediaId)")
}

func mediaCell(_ cell: MediaCell, didSelectUserName userId: String) {
  try? Navigator.navigate(urn: "user:\(userId)")
}
For these three cases, you simply want to navigate to another screen. Therefore, all you need to do is tell the Navigator where you want to go. For simplicity, you use try? to deal with any code that throws. Build and run the app. Search for your favorite post in the feed, and tap on the author, the post comments or likes to go to the target screen. The app behaves the same as it did before, but the code is now clean and declarative. Now do the same with UserController.swift. Add the following import to the top of the file:
import Compass
Replace the code after // MARK: - UserViewDelegate with the following:
func userView(_ view: UserView, didViewFollower userId: String) {
  try? Navigator.navigate(urn: "follower:\(userId)")
}

func userView(_ view: UserView, didViewFollowing userId: String) {
  try? Navigator.navigate(urn: "following:\(userId)")
}
Your task now is to refactor with the last route LogoutRoute. Open MenuController.swift and add the following to the top:
import Compass
Remove the logout method altogether. Find the following:
```swiftif indexPath.section == Section.account.rawValue, indexPath.row == 0 {
logout()
}
...and replace it with:


```swift
if indexPath.section == Section.account.rawValue, indexPath.row == 0 {
  try? Navigator.navigate(urn: "logout")
}
Build and run the app, navigate to the menu and tap Logout. You should be taken to the login screen.
Handling Deep Linking
Deep linking allows your apps to be opened via a predefined URN. The system identifies each app via its URL scheme. For web pages, the scheme is usually http, https. For Instagram it is, quite handily, instagram. Use cases for this are inter-app navigation and app advertisements. For examples, the Messenger app uses this to open the user profile in the Facebook app, and Twitter uses this to open the App Store to install another app from an advertisement. In order for user to be redirected back to PhotoFeed, you need to specify a custom URL scheme for your app. Remember where you declared Navigator.scheme = "photofeed"? PhotoFeed just so happens to conform to this URL scheme, so deep links already worked — and you didn't even know it! Build and run the app, then switch to Safari. Type photofeed:// in the address bar, then tap Go. That will trigger your app to open. The app opens, but PhotoFeed doesn't parse any parameters in the URL to go anywhere useful. Time to change that! Your app responds to the URL scheme opening by implementing a UIApplicationDelegate method. Add the following after setupRouting in AppDelegate.swift:
func application(_ app: UIApplication, open url: URL, options: [UIApplicationOpenURLOptionsKey : Any] = [:]) -> Bool {
  try? Navigator.navigate(url: url)
  return true
}
Navigator parses and handles this for you. Build and run again. Go to Safari app, type photofeed://user:self and tap Go. Photofeed will open and show the currently logged in users’ profile. Because you already had UserRoute, the requested URL was handled gracefully. Your app may already be presenting a particular screen when a routing request comes, but you’ve anticipated this by resetting the navigation controller or presentation stack to show the requested screen. This simple solution works for most cases. Again, it's recommended you pick the topmost visible view controller as the current controller in Navigator.handle.

Deep linking is usually considered external navigation, in that the routing requests come from outside your app. Thanks to the central routing system that you developed, the code to handle external and internal routing requests is very much the same and involves no code duplication at all.
Routing with Push Notifications
Push notifications help engage users with your app. You may have received messages like "Hey, checkout today 's most popular stories" on Medium, "Your friend has a birthday today" on Facebook, ... and when you tap those banners, you are taken straight to that particular screen. How cool is that? This is achievable with your URL routing approach. Imagine users tapping a push notification banner saying "You’re a celebrity on PhotoFeed — check out your profile now!" and being sent directly to their profile screen. To accomplish this, you simply have to embed the URN info into the push payload and handle that in your app.
Setting up
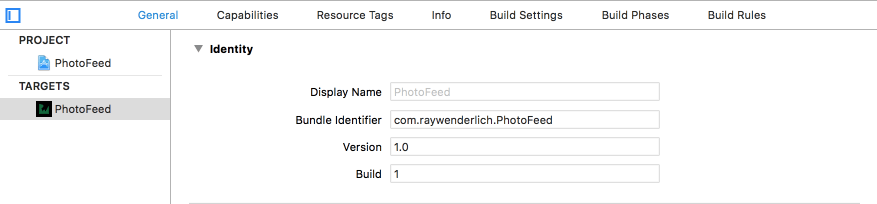
To start, you’ll need to specify your bundle ID. Go to Target Settings\General to change your bundle ID as push notification requires a unique bundle ID to work. Your project uses com.fantageek.PhotoFeed by default.
Next, you’ll need to register your App ID. Go to Member Center and register your App ID. Remember your Team ID, as you will need it in the final step. Also tick the Push Notification checkbox under Application Services.

Now you’ll need to generate your Authentication Key. Apple provides Token Authentication as a new authentication mechanism for push notifications. The token is easy to generate, works for all your apps, and mostly, it never expires. Still in Member Center, create a new Key and download it as a .p8 file. Remember your Key ID as you will need it in the final step.

Next up: enabling push notification capability. Back in Xcode, go to Target Settings\Capabilities and enable Push Notifications, which will add PhotoFeed.entitlements to your project.

The next step is to register for push notifications. Open MainController.swift and add the following import to the top of MainController.swift:
import UserNotifications
You want to enable push notification only after login, so MainController is the perfect place. UserNotifications is recommended for app targeting iOS 10 and above.
override func viewDidLoad() {
  super.viewDidLoad()

  // [1] Register to get device token for remote notifications
  UIApplication.shared.registerForRemoteNotifications()

  // [2] Register to handle push notification UI
  let options: UNAuthorizationOptions = [.alert, .sound, .badge]
  UNUserNotificationCenter.current().requestAuthorization(options: options) { (granted, error) in
    print(error as Any)
  }
}
The permission dialog is shown once, so make sure you accept it. It’s time to handle the device token. Open AppDelegate.swift, and add the following to the end of extension AppDelegate:
func application(_ application: UIApplication, didRegisterForRemoteNotificationsWithDeviceToken deviceToken: Data) {
  // [1] Parse to token string
  let token = deviceToken.map {
    return String(format: "%02.2hhx", $0)
  }.joined()

  // [2] Log it
  print("Your device token is \(token)")
}
This is where you get device token if your app successfully connects to APNs. Normally, you would send this device token to the backend so they can organize , but in this tutorial we just log it. It is required in the tool to be able to target a particular device.
Handling payload
Open AppDelegate.swift and add the following to th end of extension AppDelegate:
func application(_ application: UIApplication, didReceiveRemoteNotification userInfo: [AnyHashable : Any], fetchCompletionHandler completionHandler: @escaping (UIBackgroundFetchResult) -> Void) {
  // [1] Always call the completion handler
  defer {
    completionHandler(.newData)
  }

  // [2] Convert into JSON dictionary
  guard let json = userInfo as? [String: Any] else {
    return
  }

  // [3] Parse to aps
  guard let aps = json["aps"] as? [String: Any] else {
    return
  }

  // [4] Parse to urn
  guard let urn = aps["urn"] as? String else {
    return
  }

  try? Navigator.navigate(urn: urn)
}
This method is called when your app receives push notification payload and is running. The above code is relatively straightforward: it first tries to parse the urn information from the payload, then tells Navigator to do the job . Build and run the app on the device, since push notifications won’t work on the simulator. Log in to the app if prompted. Once on the main screen, grant push notification permissions to the app in order to receive alerts. You should see the device token logged to your Xcode console.

Testing Push Notifications
In this tutorial, you’ll use a tool called PushNotifications to help you easily create push notifications for your app. Download the tool PushNotifications from here. This tool sends payloads directly to APNs.
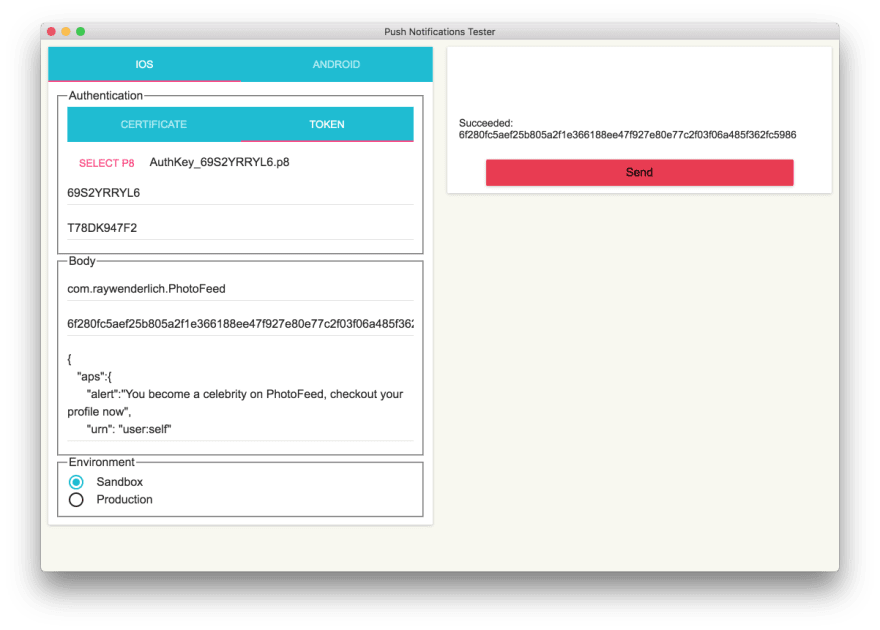
Choose iOS\Token to use Token Authentication, you get that by creating and downloading your Key from Certificates, Identifiers & Profiles. Browse for the .p8 auth key file that you downloaded earlier. Enter Team ID, you can check it by going to Membership Details Enter Key ID, this is the ID associated with the Key from the first step. Enter Bundle ID and device token. Paste the following into as. It is a traditional payload associated with the URN.
{
   "aps":{
      "alert":"You become a celebrity on PhotoFeed, checkout your profile now",
      "urn": "user:self"
   }
}
Since you're debugging with Xcode, select Sandbox as environment.

Tap Send now. If your app is in the background, an alert will appear. Tapping it will take you to your app and show you your user profile. Bravo! You just implemented deep linking in push notification, thanks again to the URL routing.
Read more
Here is the final project with all the code from this tutorial. You now understand central routing patterns, have mastered Compass and even refactored a real-world app. However, there is no silver bullet that works well for all apps. You need to understand your requirements and adjust accordingly. If you want to learn more about other navigation patterns, here are a few suggestions:
Remember, it's not only about the code, but also about the user experience that your app provides. So please make sure you conform to the guidelines Navigation in Human Interface Guidelines iOS.

Top comments (0)