
The need to quickly tweak UI
Our mission as mobile developers is to provide the best user experience for the end users, to make life more engaging and easier for them through dedicated apps. One of the tasks is to make sure the UI, the thing that users see, looks good and correct. Most of the time, we can say that app is a prettifier of data. We mostly fetch JSON data from backend, parse it to model and then render it using UIView, mostly UITableView or UICollectionView.
For iOS, we need to continuously tweak the UI according to the design to make it fit small sized handheld devices. That process involves us changing code, compiling, waiting, checking, then changing code and much more…Tools like Flawless App helps to easily compare between result on iOS app and Sketch design. But the real pain lies in the compiling part, which takes the most time, and that is even worse with Swift. It makes us less efficient to do quick iteration. It looks like the compiler is mining Bitcoin secretly while pretending to compile 😅
If you work with React, you know that it is just merely UI representation of state UI = f(state).You get some data, you build a UI to represent it. React has hot reloader and Storybook which make it super fast to do UI iterations. You make some changes and see the result immediately. You also get a complete overview of all the possible UIs for each state. You know you want the same thing in iOS!
Playground
Together with the introduction of Swift in WWDC 2014, Apple also introduced Playground, which is said to be “a new and innovative way to explore the Swift programming language”.
I wasn’t very convinced at first, and I saw lots of complains about slow or unresponsive Playground. But after seeing Kickstarter iOS app using Playground to faster their styling and development process, it impressed me a lot. So I started using it successfully in some of the apps. It is not rerendering immediately like React Native or Injection App, but hopefully it will be better over the years 😇
Or at least it depends on the development community. The scenario with Playground is that we only style one screen or component at a time. That forces to think carefully about dependencies, so I can just import a particular screen and iterate on that in Playground.
Custom framework in Playground
Xcode 9 allows to import custom framework in Playground as long as the framework is in the same workspace as the Playground. We can use Carthage to fetch custom framework and build it. But if we are using CocoaPods then it is viable too.

Creating app framework
Playground can’t access code in the same workspace, or parent project if the Playground is added as nested project. For this to work, you need to create a framework and add source files that you intend to work in Playground. Let’s call it app framework.
The demo for this article is an iOS project that uses CocoaPods to manage dependencies. For the time of this post, it is Xcode 9.3 and Swift 4.1.
Let’s walk through steps on making Playground work with project that uses CocoaPods. There are also some good practices.
Step 1: Adding a pod
I mostly use CocoaPods to manage dependencies. In some screens, there certainly will be some pods involved. So for our app framework to work, it needs to link with some pods.
Create a new project, let’s call it UsingPlayground. The app shows some kind of confetti particles 🎊. There are many options to adjust the way those particles show up, and I choose Playground to iterate on that.
For this demo, we will use CocoaPods to fetch one dependency called Cheers because we want something fun. Cheers helps show fancy confetti effect if you want to congratulate users with some achievements.
Create a Podfile with UsingPlayground as app target:
Step 2: Using the pod in your app project
After running pod install CocoaPods generates a new workspace with 2 projects. 1 is our app project, the other one is a project with all the pods, for now there is just Cheers. Close your project and open the generated workspace instead.
This is very straightforward, just to make sure the pod works. Write some code to use the Cheers:
Build and run the project to enjoy a very fascinating confetti 🎊
Step 3: Adding a CocoaTouch framework
For our code to be accessible in Playground, we need to set it into a framework. In iOS, it is the CocoaTouch framework target.
In your workspace select the UsingPlayground project and add new CocoaTouch framework. This is the framework that contains our app code. Let’s call it AppFramework.

Now add the source files you want to test into this framework. For now, just check file ViewController.swift and add it to the AppFramework target.

For this simple project, there is only one ViewController.swift . If this file references code from other files, you need to add related files to the AppFramework target too. This is how you should be clever about dependencies.
Step 4: Adding files to AppFramework
ViewController in iOS mostly lies in UI layer, so it should just get the parsed data and render it using UI components. If you have some logic, those may involves other parts like Caching, Networking, … which require you to add more files to AppFramework. Small, independent framework is more reasonable and allows us to iterate quickly.
Playground is no magic. You need to compile your AppFramework for every time you change the code, otherwise the changes won’t be reflected in your Playground. If you don’t mind slow compile time, you can add all files to your AppFramework . Simply expanding group folders, selecting and adding files to the target takes a lot of time. Not to mention that if you select both folder and files, you won’t be able to add them to your target. You can only add files to your target.
A quicker way is to go to Compile Sources under your AppFramework target Build Phase . Here all files are expanded automatically for you, all you need to do is to select them and click Add .

Step 5: Public
Swift types and methods are internal by default. So in order for them to be visible in the Playground, we need to declare them as public. Feel free to read more about Access Level in Swift:
Open access and public access enable entities to be used within any source file from their defining module, and also in a source file from another module that imports the defining module. You typically use open or public access when specifying the public interface to a framework.
Step 6: Adding pod to AppFramework
In order for AppFramework to use our pods, we need to add those pods into framework target as well. Add target ‘AppFramework’ to your Podfile:
Now run pod install again. In some rare cases, you need to run pod deintegrate and pod install to start from a clean slate.
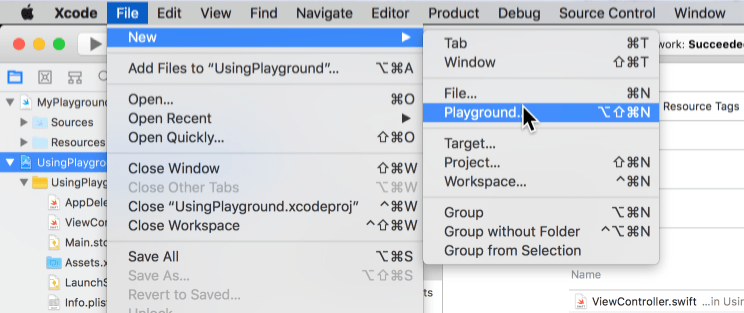
Step 7: Adding a Playground
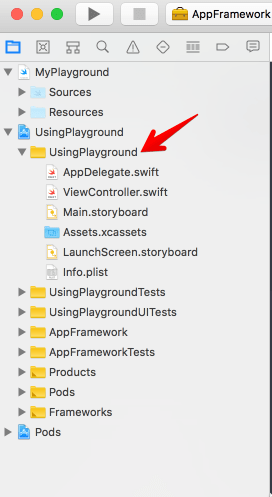
Add a Playground and drag that to our workspace. Let’s call it MyPlayground.
Step 8: Enjoy
Now is the final step: writing some code. Here we need to import our AppFramework and Cheers in our Playground. We need to import all the pods that is used in the Playground, just like we do in our app project.
Playground is best for testing our framework independently or our app. Select MyPlayground and type the code below. Here we tell liveView to render our ViewController:
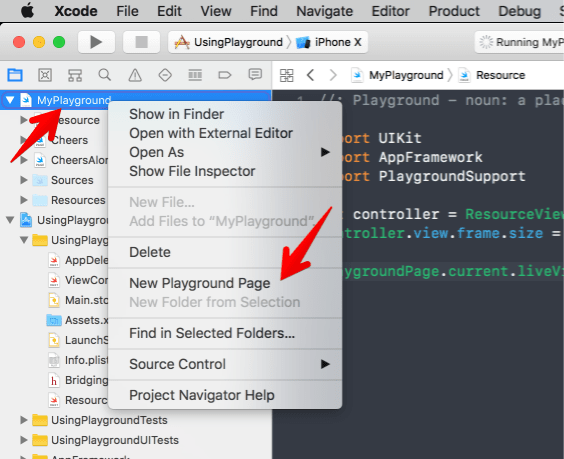
Sometimes you want to test a piece of the pod you want to use. Create a new Playground Page called CheersAlone. Here you just need to import Cheers.
Let’s use liveView of PlaygroundPage to display a live view. Remember to toggle Editor Mode so you can see Playground result. And 🎉

There is a button in the bottom panel of Xcode. That’s where you can toggle between Automatically Run and Manual Run behaviour. And you can stop and start the Playground by yourself. Pretty neat 🤘
Bridging header
Chances are that your app needs to deal with some prebuilt binary pod that exposes APIs via header. In some of the apps, I use BuddyBuildSDK for crash reports. If you take a look at its podspec, you‘ll see that it uses a public header called BuddyBuildSDK.h. In our app project, CocoaPods manages this nicely. All you need to do is to import the header in your app target via Bridging-Header.h
If you need a review of how to use bridging header, read Swift and Objective-C in the Same Project.
Just make sure the path to the header is correct:

Step 1: Import Bridging Header
But our AppFramework target will have a hard time finding that BuddyBuildSDK.h
Using bridging headers with framework targets is unsupported
The solution is to refer to that Bridging-Header.h inside your AppFramework.h
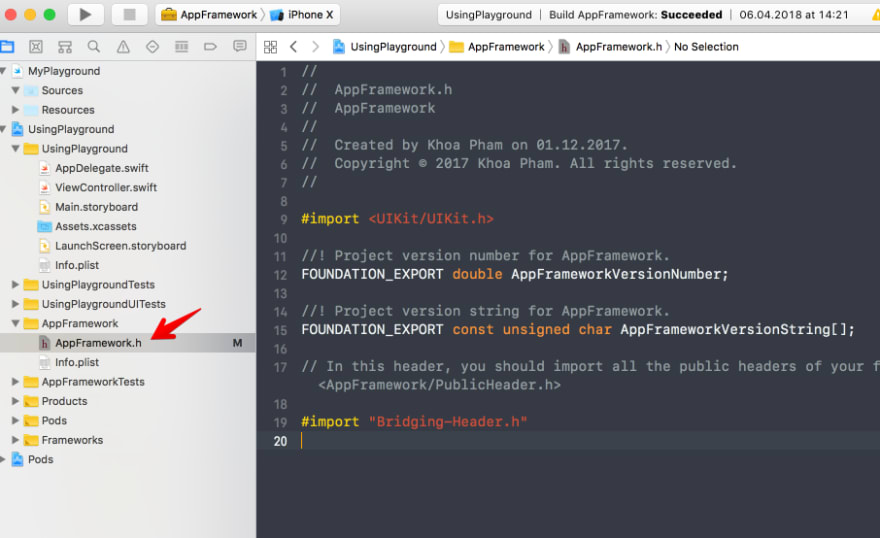
Step 2: Public header
After doing above, you will get
Include of non-modular header inside framework module
For this to work, you need to add the Bridging-Header.h to the framework, and declare it as public. A search on SO shows this quote
Public: The interface is finalized and meant to be used by your product’s clients. A public header is included in the product as readable source code without restriction.
Private: The interface isn’t intended for your clients or it’s in early stages of development. A private header is included in the product, but it’s marked “private”. Thus the symbols are visible to all clients, but clients should understand that they’re not supposed to use them.
Project: The interface is for use only by implementation files in the current project. A project header is not included in the target, except in object code. The symbols are not visible to clients at all, only to you.
So, select Bridging-Header.h and add it to AppFramework and set visibility as public:
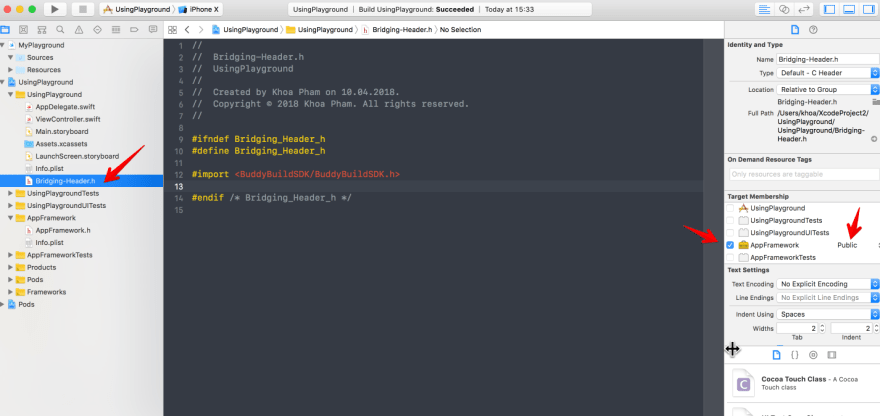
If you go to Build Phases of AppFramework you will see the 2 header files there.

Now, select scheme AppFramework and hit Build, it should compile without any errors.
Fonts, localised strings, images and bundle
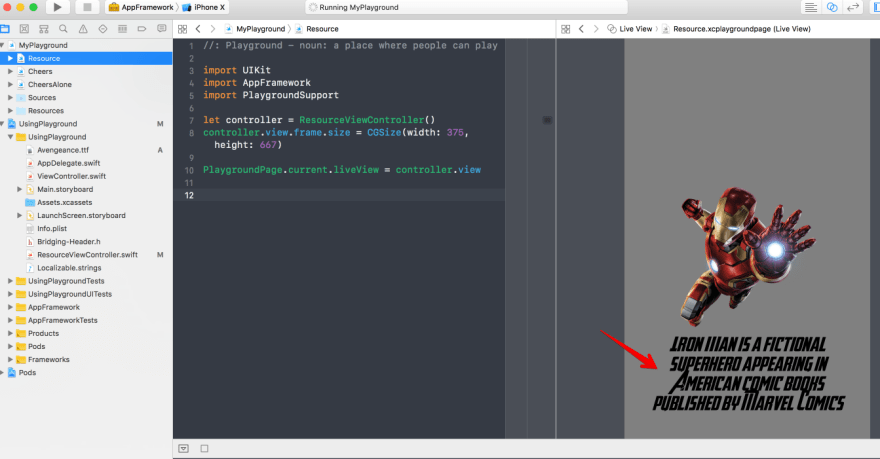
Our screen does not simply contains views from another pods. More often we display texts and images from our bundle. Let’s add an Iron Man image to our Asset Catalog and a Localizable.strings. The ResourceViewController contains oneUIImageView and oneUILabel.
Here I use Anchors for convenient and declarative Auto Layout 🤘. It is also for showing later how Swift Playground can handle any number of frameworks.
Now, select the app scheme UsingPlayground and hit build and run. The app should look like below, and of course it can pick up the right image and localised string.

Let’s see if our Playground can recognise these assets. Create a new page in MyPlayground called Resource and type the following
Wait a bit for the Playground to finish running. Oops. Things are not so great in the Playground, it does not recognise the images and localised strings 😢

Resources folder
Actually each Playground Page has a Resources folder where we can put resource files that is seen by this particular page. But here we need to access resource in our app bundle.
Main bundle
When accessing image and localised string, if you don’t specify bundle , the running app will by default pick up the resources in the main bundle. Here is more info Finding and Opening a Bundle.
Before you can locate a resource, you must first specify which bundle contains it. The Bundleclass has many constructors, but the one you use most often is main. The main bundle represents the bundle directory that contains the currently executing code. So for an app, the main bundle object gives you access to the resources that shipped with your app.
If your app interacts directly with plug-ins, frameworks, or other bundled content, you can use other methods of this class to create appropriate bundle objects.
// Get the app's main bundle
let mainBundle = Bundle.main

// Get the bundle containing the specified private class.
let myBundle = Bundle(for: NSClassFromString("MyPrivateClass")!)
Step 1: Adding resources to AppFramework target
So firstly, we need to add resource files to our AppFramework target. Select Asset Catalog and Localizable.strings and add them to our AppFramework target.

Step 2: Specifying bundle
If we don’t specify bundle, then by default mainBundle is used. In the context of the executed Playground, mainBundle refers to the its Resources folder. But we want the Playground to access resources in the AppFramework, so we need to useBundle.nit(for:) with a class in AppFramework to refer to the bundle inside AppFramework. That class can be ResourceViewController as it is added to AppFramework target too.
Change the code in ResourceViewController to
Every time we change code in AppFramework, we need to recompile it. This is important. Now open the Playground, it should pick up the right assets.

What about custom font?
We need to register fonts in order to use. Instead of using Fonts provided by application key in plist, we can use CTFontManagerRegisterFontsForURL to register custom fonts. This is handy because the font can be dynamically registered in Playground too.
Download a free font called Avengeance and add this font to both our app and AppFramework target.
Add the code to specify font in ResourceViewController, remember to recompile AppFramework :
And tada, both your app and Playground can see the custom font 🎉
Device size and trait collection
iOS 8 introduced TraitCollection which defines size classes, scale and user interface idiom, which simplifies device describing. The kickstarter-ios project has handy utility to prepare UIViewController for using in Playground under different traits. See playgroundController:
And AppEnvironment, which is like a stack to change dependencies and app properties, like bundle, locale and language. See one example about Signup screen:
Couldn’t lookup symbols
You may get some errors when using Playground. Some of them are because of your code, some are because of the way framework is configured. For me, after upgrading to CocoaPods 1.5.0, I get this:
error: Couldn’t lookup symbols:

__T06Cheers9CheerViewCMa

__T012AppFramework14ViewControllerCMa

__T06Cheers8ParticleO13ConfettiShapeON

__T06Cheers6ConfigVN
Problem with symbol lookup means that Playground can’t find your code. It may be because your class is not exposed as public, or you forget to add files to AppFramework target. Or the referenced pods is not visible in AppFramework Framework search path , …
Version 1.5.0 brings static library support, also changes in modular header. In the mean time, the demo switches back to CocoaPods 1.4.0, you can take a look at UsingPlayground demo.
In the terminal, type bundler init to generate Gemfile. Specify 1.4.0 for cocoapods gem:
Now run bundler exec pod install to run pod commands from CocoaPods 1.4.0. The problem should be solved.
Where to go from here
Swift Playground also has support for macOS and tvOS. Here are some interesting links if you want to find out more
Playground Driven Development The presentation by Brandon Williams and the kickstarter-ios project inspires in how Playground can be used in production apps. Also, the talk at objc.io about Playground-Driven Development is really good.
PointFree: The website is done with the help of Playground. You can learn lots of things just by reading the code and their project structure.
Using Swift to Visualize Algorithms: Playground is also good to prototype and visualise your ideas.
My friend Felipe also wrote how he successfully use Playground at work in his talk How to not get sand in your eyes
Also, Umberto Raimondi curates a list of awesome Playground if you want to be amazed.
Original post https://medium.com/flawless-app-stories/playground-driven-development-in-swift-cf167489fe7b

Top comments (0)