
React Native was designed to be “learn once, write anywhere,” and it is usually used to build cross platform apps for iOS and Android. And for each app that we build, there are times we need to reuse the same code, build and tweak it a bit to make it work for different environments. For example, we might need multiple skins, themes, a free and paid version, or more often different staging and production environments.
And the task that we can’t avoid is adding app icons and splash screens to our apps.
In fact, to add a staging and production environment, and to add app icons, requires us to use Xcode and Android Studio, and we do it the same way we do with native iOS or Android projects.
Let’s call our app MyApp and bootstrap it with react-native init MyApp . There will of course, be tons of libraries to help us with managing different environments.
In this post, we will do just like we did with native apps, so that we know the basic steps.
Build configuration, target, build types, production flavor, and build variant
There are some terminologies we needed to remember. In iOS, debug and releases are called build configurations, and staging and production are called targets.
A build configuration specifies a set of build settings used to build a target’s product in a particular way. For example, it is common to have separate build configurations for debug and release builds of a product.
A target specifies a product to build and contains the instructions for building the product from a set of files in a project or work-space. A target defines a single product; it organizes the inputs into the build system — the source files and instructions for processing those source files — required to build that product. Projects can contain one or more targets, each of which produces one product
In Android, debug and releases are called build types, and staging and production are called product flavors. Together they form build variants.
For example, a “demo” product flavor can specify different features and device requirements, such as custom source code, resources, and minimum API levels, while the “debug” build type applies different build and packaging settings, such as debug options and signing keys. The resulting build variant is the “demoDebug” version of your app, and it includes a combination of the configurations and resources included in the “demo” product flavor, “debug” build type, and main/ source set.
Staging and production targets in iOS
Open MyApp.xcodeproj inside ios using Xcode. Here is what we get after bootstrapping:
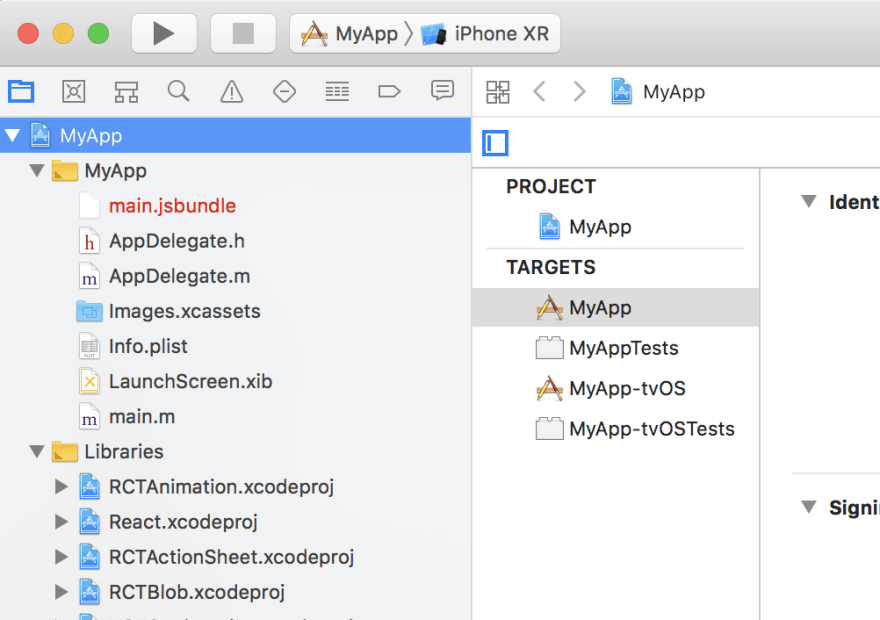
React Native creates iOS and tvOS apps, and two test targets. In Xcode, a project can contain many targets, and each target means a unique product with its own build settings — Info.plist and app icons.
Duplicate target
If we don’t need the tvOS app, we can delete the MyApp-tvOS and MyApp-tvOSTests . Let’s use MyApp target as our production environment, and right click -> Duplicate to make another target. Let’s call it MyApp Staging.

Each target must have unique bundle id. Change the bundle id of MyApp to com.onmyway133.MyApp and MyApp Staging to com.onmyway133.MyApp.Staging.

Info.plist
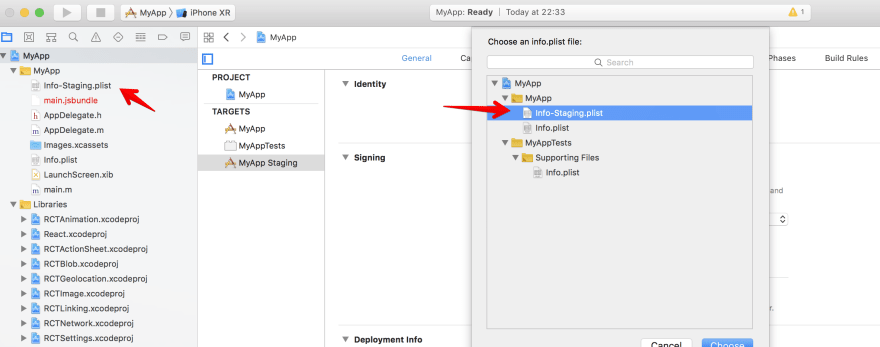
When we duplicate MyApp target , Xcode also duplicates Info.plist into MyApp copy-Info.plist for the staging target. Change it to a more meaningful name Info-Staging.plist and drag it to the MyApp group in Xcode to stay organised. After dragging, MyApp Staging target can’t find the plist, so click Choose Info.plist File and point to the Info-Staging.plist.
Scheme
Xcode also duplicates the scheme when we duplicate the target, so we get MyApp copy:
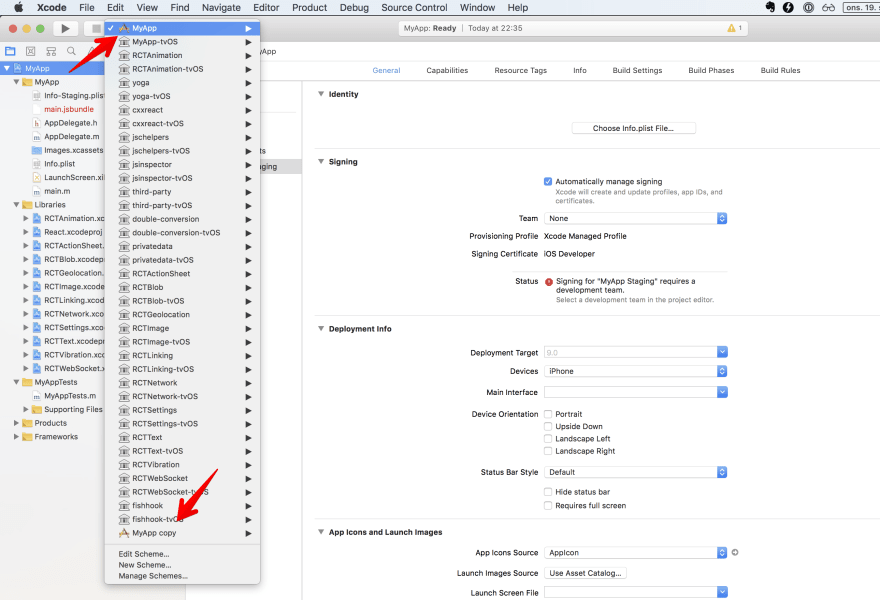
Click Manage Schemes in the scheme drop-down to open Scheme manager:

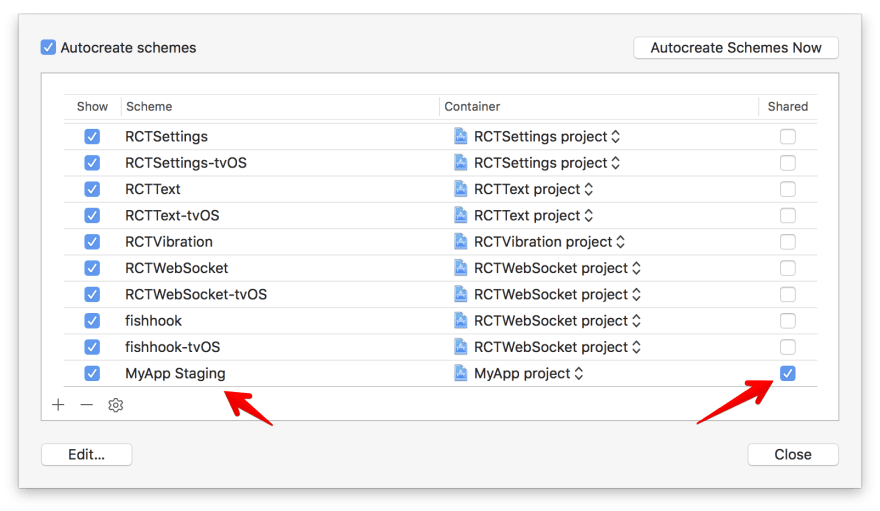
I usually delete the generated MyApp copy scheme, then I create a new scheme again for the MyApp Staging target. You need to make sure that the scheme is marked as Shared so that it is tracked into git.
For some reason, the staging scheme does not have all the things set up like the production scheme. You can run into issues like ‘React/RCTBundleURLProvider.h’ file not found or RN: ‘React/RCTBridgeModule.h’ file not found . It is because React target is not linked yet.
To solve it, we must disable Parallelise Build and add React target and move it above MyApp Staging.

Staging and production product flavors in Android
Open the android folder in Android Studio. By default there are only debug and release build types:

They are configured in the app module build.gradle:
buildTypes {
    release {
        minifyEnabled enableProguardInReleaseBuilds
        proguardFiles getDefaultProguardFile("proguard-android.txt"), "proguard-rules.pro"
    }
}
First, let’s change application id to com.onmyway133.MyApp to match iOS. It is not required but I think it’s good to stay organised. Then create two product flavors for staging and production. For staging, let’s add .Staging to the application id.
From Android Studio 3, “all flavors must now belong to a named flavor dimension” — normally we just need default dimensions. Here is how it looks in build.gradle for our app module:
android {
    compileSdkVersion rootProject.ext.compileSdkVersion
    buildToolsVersion rootProject.ext.buildToolsVersion
    flavorDimensions "default"

defaultConfig {
        applicationId "com.onmyway133.MyApp"
        minSdkVersion rootProject.ext.minSdkVersion
        targetSdkVersion rootProject.ext.targetSdkVersion
        versionCode 1
        versionName "1.0"
        ndk {
            abiFilters "armeabi-v7a", "x86"
        }
    }
    splits {
        abi {
            reset()
            enable enableSeparateBuildPerCPUArchitecture
            universalApk false  // If true, also generate a universal APK
            include "armeabi-v7a", "x86"
        }
    }
    buildTypes {
        release {
            minifyEnabled enableProguardInReleaseBuilds
            proguardFiles getDefaultProguardFile("proguard-android.txt"), "proguard-rules.pro"
        }
    }

productFlavors {
        staging {
            applicationIdSuffix ".Staging"
        }

        production {

        }
    }
}
Click Sync Now to let gradle do the syncing job. After that, we can see that we have four build variants:
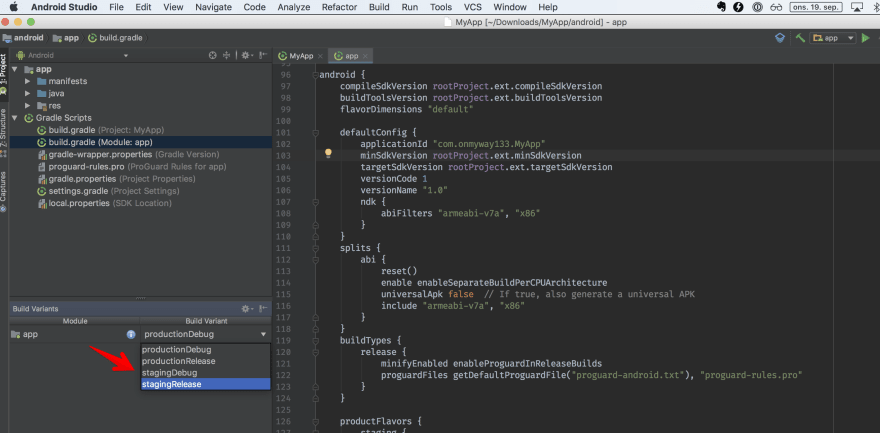
How to run staging and production
To run the Android app, we can specify a variant like react-native run-android — variant=productionDebug, but I prefer to go to Android Studio, select the variant, and run.
To run iOS app, we can specify the scheme like react-native run-ios — simulator=’iPhone X’ — scheme=”MyApp Staging” . As of react-native 0.57.0 this does not work. But it does not matter as I usually go to Xcode, select the scheme, and run.
Add app icon for iOS
According to the Human Interface Guideline, we need app icons of different sizes for different iOS versions, device resolutions, and situations (notification, settings, Spring Board). I’ve crafted a tool called IconGenerator, which was previously mentioned in Best Open Source Tools For Developers. Drag the icon that you want — I prefer those with 1024x1024 pixels for high resolution app icons — to the Icon Generator MacOS app.

Click Generate and we get AppIcon.appiconset . This contains app icons of the required sizes that are ready to be used in Asset Catalog. Drag this to Asset Catalog in Xcode. That is for production.
For staging, it’s good practice to add a “Staging” banner so that testers know which is staging, and which is production. We can easily do this in Sketch.

Remember to set a background, so we don’t get a transparent background. For an app icon with transparent background, iOS shows the background as black which looks horrible.
After exporting the image, drag the staging icon to the IconGenerator the same way we did earlier. But this time, rename the generated appiconset to AppIcon-Staging.appiconset. Then drag this to Asset Catalog in Xcode.
For the staging target to use staging app icons, open MyApp Staging target and choose AppIcon-Staging as App Icon Source.

Add app icon for Android

I like to switch to Project view, as it is easier to change app icons. Click res -> New -> Image Asset to open Asset Studio. We can use the same app icons that we used in iOS:
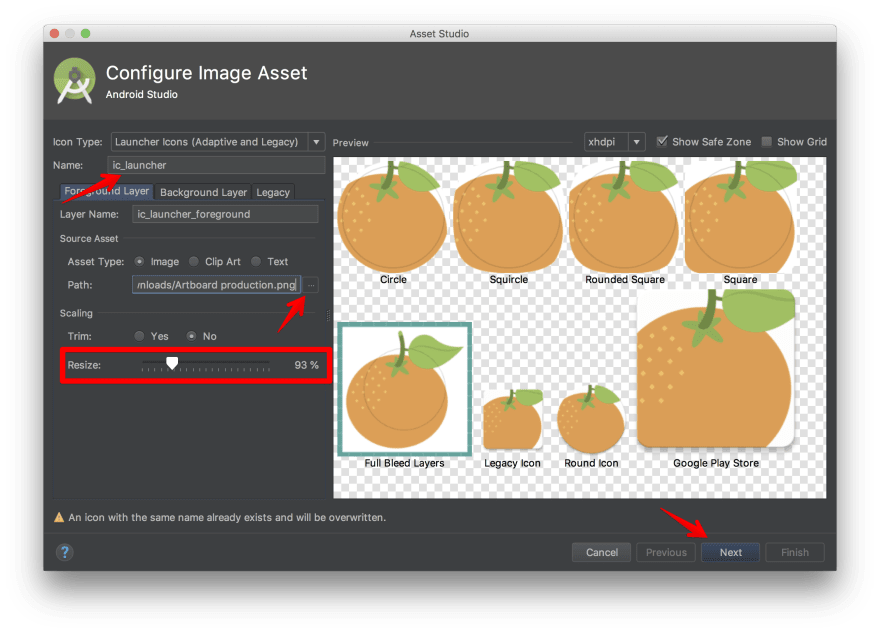
Android 8.0 (API level 26) introduced Adaptive Icons so we need to tweak the Resize slider to make sure our app icons look as nice as possible.
Android 8.0 (API level 26) introduces adaptive launcher icons, which can display a variety of shapes across different device models. For example, an adaptive launcher icon can display a circular shape on one OEM device, and display a squircle on another device. Each device OEM provides a mask, which the system then uses to render all adaptive icons with the same shape. Adaptive launcher icons are also used in shortcuts, the Settings app, sharing dialogs, and the overview screen. — Android developers
We are doing for production first, which means the main Res Directory. This step will replace the existing placeholder app icons generated by Android Studio when we bootstrapped React Native projects.

Now that we have production app icons, let’s make staging app icons. Android manages code and assets via convention. Click on src -> New -> Directory and create a staging folder. Inside staging, create a folder called res . Anything we place in staging will replace the ones in main — this is called source sets.
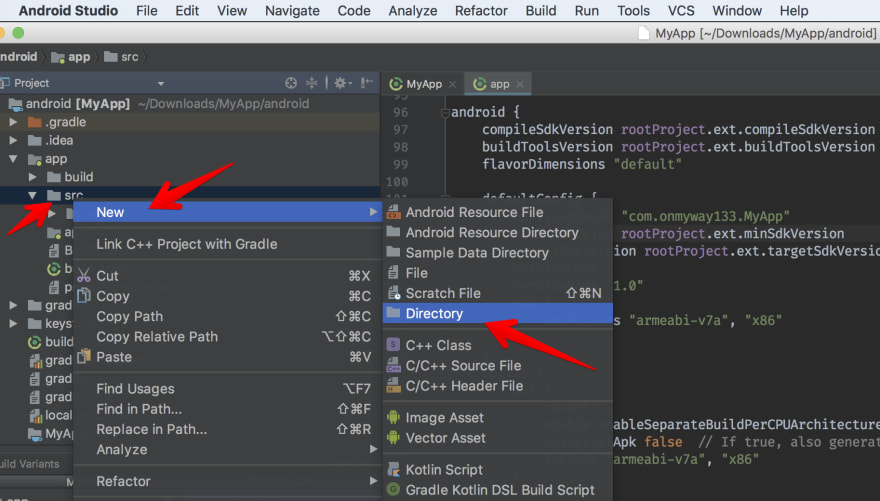
You can read more here: Build with source sets.
You can use source set directories to contain the code and resources you want packaged only with certain configurations. For example, if you are building the “demoDebug” build variant, which is the crossproduct of a “demo” product flavor and “debug” build type, Gradle looks at these directories, and gives them the following priority:
src/demoDebug/ (build variant source set)
src/debug/ (build type source set)
src/demo/ (product flavor source set)
src/main/ (main source set)
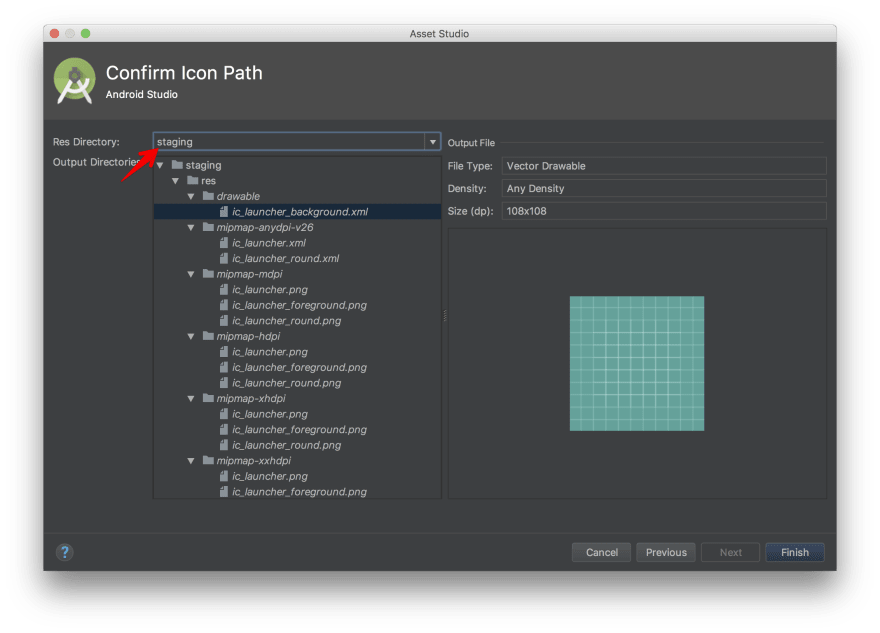
Right click on staging/res -> New -> Image Asset to make app icons for staging. We also use the same staging app icons like in iOS, but this time we choose staging as Res Directory. This way Android Studio knows how to generate different ic_launcher and put them into staging.
Add launch screen for iOS
The splash screen is called a Launch Screen in iOS, and it is important.
A launch screen appears instantly when your app starts up. The launch screen is quickly replaced with the first screen of your app, giving the impression that your app is fast and responsive
In the old days, we needed to use static launch images with different sizes for each device and orientation.

Launch Screen storyboard
For now the recommended way is to use Launch Screen storyboard . The iOS project from React Native comes with LaunchScreen.xib but xib is a thing of the past. Let’s delete it and create a file called Launch Screen.storyboard .
Right click on MyApp folder -> New and chose Launch Screen, add it to both targets as usually we show the same splash screen for both staging and production.

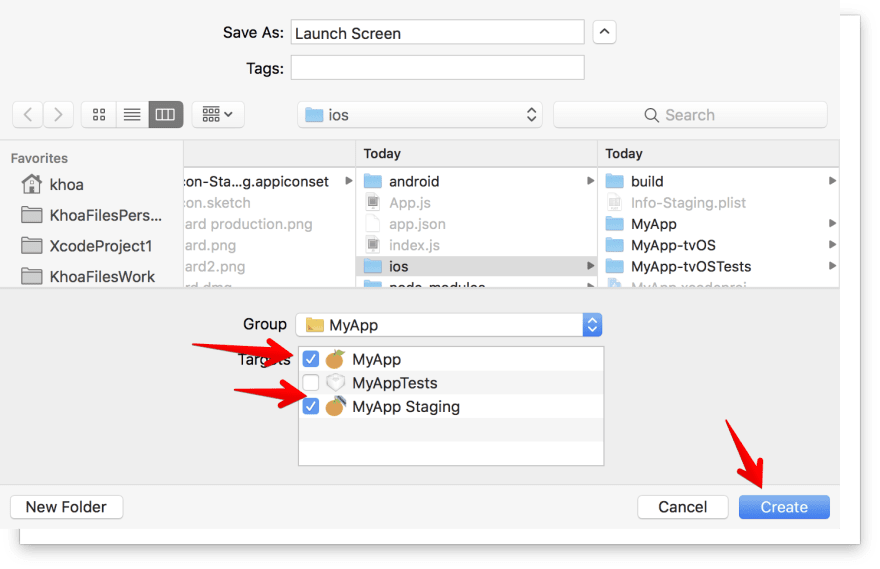
Image Set
Open asset catalog, right click and select New Image Set . We can name it anything. This will be used in the Launch Screen.storyboard.

Open Launch Screen.storyboard and add an UIImageView . If you are using Xcode 10, click the Library button in the upper right corner and choose Show Objects Library.

Set image for Image View, and make sure Content Mode is set to Aspect Filled, as this ensures that the image always covers the full screen (although it may be cropped). Then connect ImageView using constraints to the View, not the Safe Area. You do this by Control+drag from the Image View (splash) to the View.

Constrains without margin
Click into each constraint and uncheck Relative to Margin. This makes our ImageView pin to the very edges of the view and with no margin at all.

Now go to both targets and select Launch Screen.storyboard as Launch Screen File:

On iOS, the launch screen is often cached, so you probably won’t see the changes. One way to avoid that is to delete the app and run it again.
Add a launcher theme for Android
There are several ways to add splash screen for Android, from using launcher themes, Splash Activity, and a timer. For me, a reasonable splash screen for Android should be a very minimal image.
As there are many Android devices with different ratios and resolutions, if you want to show a full screen splash image, it will probably not scale correctly for each device. This is just about UX.
For the splash screen, let’s use the launcher theme with splash_background.xml .
Learn about Device Metric
There is no single splash image that suits all Android devices. A more logical approach is to create multiple splash images for all common resolutions in portrait and landscape. Or we can design a minimal splash image that works. You can find more info here: Device Metric.


Here is how to add splash screen in 4 easy steps:
Add splash image
We usually need a common splash screen for both staging and production. Drag an image into main/res/drawble . Android Studio seems to have a problem with recognising some jpg images for the splash screen, so it’s best to choose png images.
Add splash_background.xml
Right click on drawable -> New -> Drawable resource file . Name it whatever you want — I choose splash_background.xml . Choose the root element as layer-list:


A Layer List means “a Drawable that manages an array of other Drawables. These are drawn in array order, so the element with the largest index is drawn on top”. Here is how splash_background.xml looks like:
<?xml version="1.0" encoding="utf-8"?>

<!-- The android:opacity=”opaque” line — this is critical in preventing a flash of black as your theme transitions. -->
<layer-list xmlns:android="http://schemas.android.com/apk/res/android"
    android:opacity="opaque">

    <!-- The background color, preferably the same as your normal theme -->
    <item android:drawable="@android:color/white"/>

    <!-- Your splash image -->
    <item>
        <bitmap
            android:src="@drawable/iron_man"
            android:gravity="center"/>

    </item>

</layer-list>
Note that we point to our splash image we added earlier with android:src=”@drawable/iron_man”.
Declare style
Open styles.xml and add SplashTheme:
<style name="SplashTheme" parent="Theme.AppCompat.NoActionBar">
    <item name="android:windowBackground">@drawable/splash_background</item>
</style>
Use SplashTheme
Go to Manifest.xml and change the theme of the the launcher activity, which has category android:name="android.intent.category.LAUNCHER" . Change it to android:theme="@style/SplashTheme" . For React Native, the launcher activity is usually MainActivity . Here is how Manifest.xml looks:
<manifest xmlns:android="http://schemas.android.com/apk/res/android"
    package="com.myapp">

    <uses-permission android:name="android.permission.INTERNET" />
    <uses-permission android:name="android.permission.SYSTEM_ALERT_WINDOW"/>

    <application
      android:name=".MainApplication"
      android:label="@string/app_name"
      android:icon="@mipmap/ic_launcher"
      android:allowBackup="false"
      android:theme="@style/AppTheme">
      <activity
        android:name=".MainActivity"
        android:label="@string/app_name"
        android:configChanges="keyboard|keyboardHidden|orientation|screenSize"
        android:theme="@style/SplashTheme"
        android:windowSoftInputMode="adjustResize">
        <intent-filter>
            <action android:name="android.intent.action.MAIN" />
            <category android:name="android.intent.category.LAUNCHER" />
        </intent-filter>
      </activity>
      <activity android:name="com.facebook.react.devsupport.DevSettingsActivity" />
    </application>

</manifest>
Run the app now and you should see the splash screen showing when the app starts.
Managing environment configurations
The differences between staging and production are just about app names, application ids, and app icons. We probably use different API keys, and backend URL for staging and production.
Right now the most popular library to handle these scenarios is react-native-config, which is said to “bring some 12 factor love to your mobile apps”. It requires lots of steps to get started, and I hope there is a less verbose solution.
Where to go from here
In this post, we touched Xcode and Android Studio more than Visual Studio Code, but this was inevitable. I hope this post was useful to you. Here are some more links to read more about this topic:

Top comments (0)