Now that Azure now has a free service for hosting static web apps via Azure Static Web Apps, I decided to write a quick post on how to host Jekyll website on Azure Static WebApps. To my surprise it turned out to be quite simple and easy to host.
Jekyll - static site generator
Jekyll is a simple, static site generator.
Installation
Jekyll website has a good post on installation already based on your operating system. You can use WSL (Windows Subsystem for Linux) and it works just fine. If you specifically like to have Windows installation guide, David Burela has posted a neat trick to install it in 3 easy steps here using Chocolatey.
Creating a simple blog
Once you have Jekyll working, you can create a simple blog post by running the following command
jekyll new .
This will create a basic a blog structure which will look like below.

The _posts folder will contain all your blog posts and each post is a markdown file. Each markdown contains a front matter which allows you to add the meta data for the post.
Now to run your website locally run jekyll serve and you will see the blog up and running in local machine under port 4000 at http://localhost:4000.
Jekyll will build your site using
jekyll buildand store the generated static content in_sitefolder. Your site will be served from this_sitefolder.

Source control your website using GitHub
- Initialise the repo
git init
- Commit the changes
 git add -A
 git commit -m "initial commit"
I committed mine here. Finally push the changes to the repo.
- Next, create a repo on GitHub (if you have not done already) and add the remote to that GitHub repo.
git remote add origin https://github.com/<YOUR_USER_NAME>/jekyll-azure-static
- Finally, push the repo
git push --set-upstream origin master
Deploying the to Azure Static Web App
Create the application
- Navigate to the Azure portal
- Click
Create a Resource - Search for Static Web Apps
- Click
Static Web Apps (Preview) - Click Create
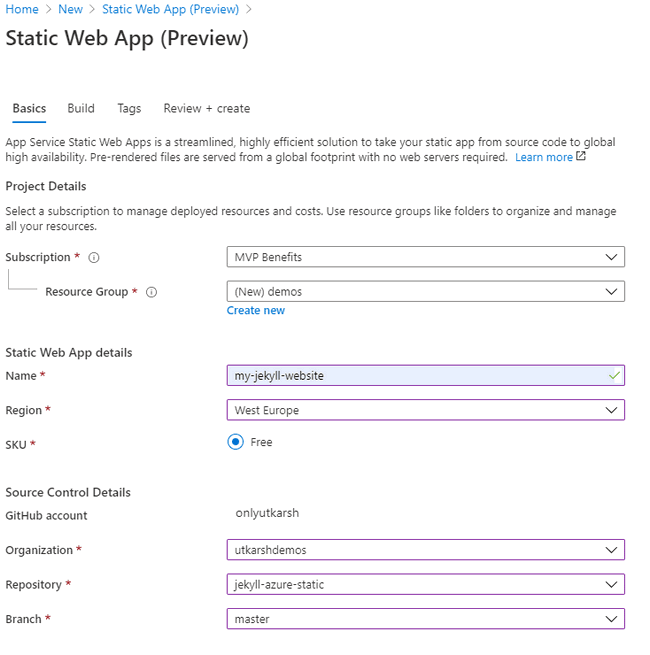
- Fill the details and click
Sign in with GitHubbutton

You will be prompted to authorise the Azure Static WebApp to GitHub. Make sure you Grant access to organisation that has the repo.
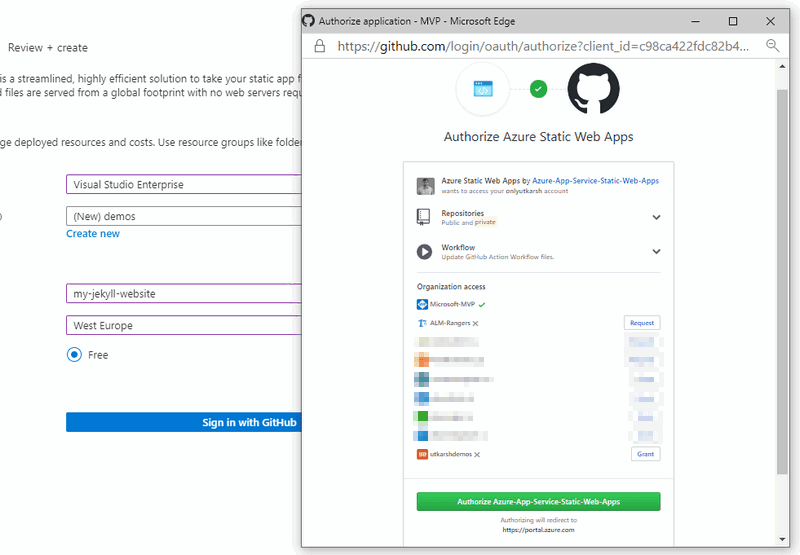
Complete the steps in the popup and you will see the below screen where you will select the repository and organisation. My values look as below.
⚠️ If for any reason, you missed granting access to the right organisation, you have to Revoke that Authorisation from GitHub by going to
Applicationssection in theSettingsand Revoking forAzure Static Web Appsas shown below

Setting up Build
- Next click
Next: Build >button to edit the build configuration. - Set the
App locationto_sitesince, that is the default folder where Jekyll puts the generated files. - No need to fill the
App artifact locationand alsoAPI locationas this is not an API.

Review and create
Click the
Review + Createbutton to verify the details are all correct.Click
Createto start the creation of the Azure Static Web Apps and provision a GitHub Action for deployment.

Once you see the notification that resource deployment is successful, the
Azure Static Web Appwould have created a workflow forGitHub Actionon the repository.Navigate to your terminal and pull the commit with the GitHub Action to your machine.
git pull
- In the workflow at
.github\workflows\<workflow-file-name>.yml, replace the line- uses: actions/checkout@v1with the following, to build the Jekyll application.
In the below steps, I am setting up Ruby (needed for installing Jekyll and dependencies), then installing the dependencies (using
bundle install) and finally callingjekyll buildto generate the static site.
    - uses: actions/checkout@v2
      with:
      submodules: true

    - name: Set up Ruby
      # To automatically get bug fixes and new Ruby versions for ruby/setup-ruby,
      # change this to (see https://github.com/ruby/setup-ruby#versioning):
      # uses: ruby/setup-ruby@v1
      uses: ruby/setup-ruby@ec106b438a1ff6ff109590de34ddc62c540232e0
      with:
      ruby-version: 2.6

    - name: Install dependencies
      run: bundle install

    - name: Jekyll build
      run: jekyll build

    - name: Build And Deploy
      id: builddeploy
      uses: Azure/static-web-apps-deploy@v0.0.1-preview
      with:
      azure_static_web_apps_api_token: $
      repo_token: $
      action: 'upload'
      app_location: '/_site' # App source code path
      api_location: '' # Api source code path - optional
      app_artifact_location: '' # Built app content directory - optional
I had a struggle with this to be honest. Eventually I had to change the
app_locationpath to generated/_siteinstead of setting it as just_site(see line # 27)Refer to the complete workflow file in the
repository
- Commit the updated workflow and push to GitHub.
 git add -A
 git commit -m "Updating GitHub Actions workflow"
 git push
Wait for the GitHub Action to complete.
In the Azure portal’s Overview window of newly created Azure Static Web Apps resource, click the URL link to open your deployed application. You can check the the demo site here

Isn’t it cool! Go check it out.


Top comments (0)