
In our previous blog post, we discussed the installation of istioctl and provided an overview of the various components of Istio. In this blog post, our focus will be on the installation of Istio in our cluster and the execution of our initial application on Istio.
Prerequisite
In order to follow along with this demo you have to have the following
Your cluster can either be minikube or a cluster running in the cloud
Istioctl installed and configured
Your application yaml files
Installing Istio
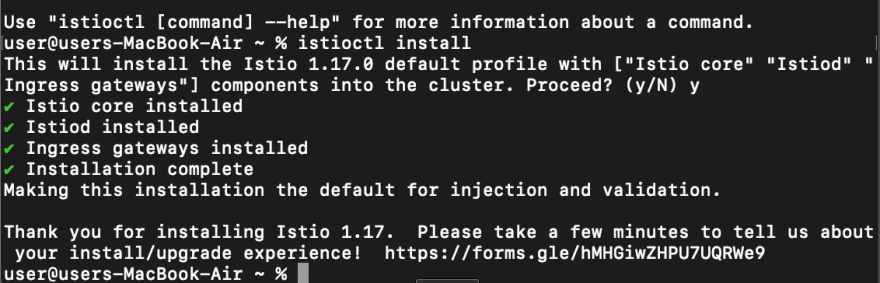
In order to install Istio in our cluster we can run the command
istioctl install
In the above definition, we are running Isitio in the demo profile we also touched upon different Istio profiles and how we can use them in our previous blog
When we installed Istio in our cluster it created its own Istiosystem namespace and installed some pods. Now we can be able to view the pods installed in the Istio-system namespace.
kubectl get pods -n istio-system

Also, we can be able to verify and see all the components that Istio installed into our cluster by running the following commands
istioctl verify-install
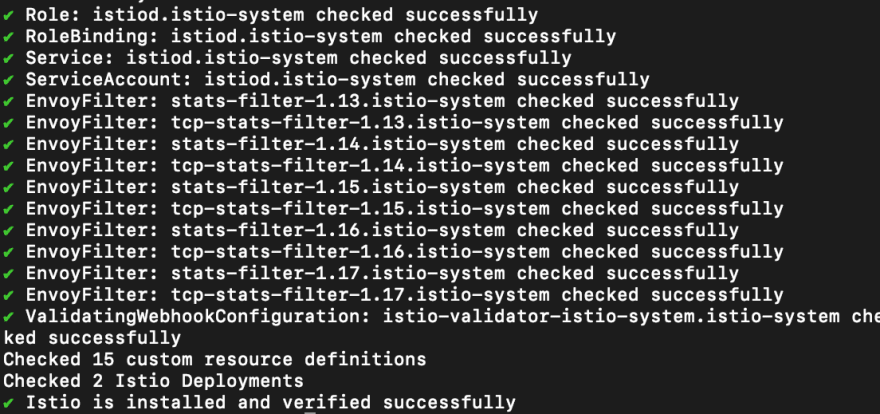
These components are just a subset of those that will be installed. To proceed with the application installation, we need to modify the label to enable Istio to discover each microservice in our application. This can be achieved by performing the following steps. Run the following code to change the labels.
kubectl label namespace default istio-injection=enabled
The command is used to modify the label of the default namespace in Kubernetes and enable automatic sidecar injection of the Istio Envoy proxy for all the pods running in the namespace.
When executed, this command adds the label “istio-injection=enabled” to the default namespace’s metadata. This tells Istio to automatically inject the Envoy sidecar proxy into all pods that are created in the namespace. By default, Istio only injects the Envoy sidecar proxy into pods that have the “istio-injection=enabled” label set on their metadata.
Enabling automatic sidecar injection with this command simplifies the process of deploying microservices on the Istio service mesh. Once the default namespace is labeled, you can deploy your microservices as usual and Istio will automatically inject the Envoy sidecar proxy into each pod, allowing Istio to control and monitor network traffic between the microservices.

After we have labeled the default namespace we can now deploy the application and see what happens. In this example, we will use the demo application by Istio to understand more. After deploying the application check for the pods running.
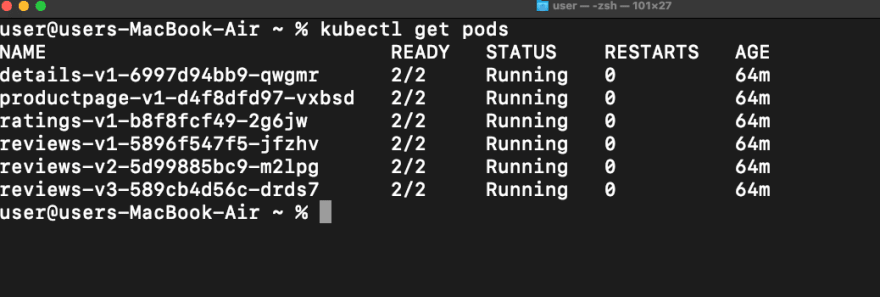
In the provided example, we can see that there are pods currently active within the default namespace. Each of these pods contains two containers: the first container is responsible for executing the business logic of the pod, while the second container is an envoy proxy that has been automatically deployed on each pod. This automatic deployment was made possible by labeling the default namespace with “istio-injection=enabled”. Should additional pods be added to this namespace, the istio service discovery component will detect their presence and deploy a corresponding envoy container. We can also check this by describing the pod.
Kiali

Next, we will talk about Kiali and other add-ons in Istio. Kiali is a web-based graphical user interface (GUI) that provides observability and visualization features for Istio service mesh. Istio is a powerful service mesh platform that can help manage and secure microservices-based applications in a distributed system. Kiali is a tool that can help you visualize and understand the traffic flow, service dependencies, and health status of your Istio service mesh.
Kiali provides a number of useful features for Istio users, including:
Service topology visualization: Kiali can display a real-time topology map of the services in your Istio service mesh, including their dependencies and traffic flows.
Metrics and telemetry: Kiali can display detailed metrics and telemetry data for individual services and traffic flows, including traffic rates, latency, and error rates.
Distributed tracing: Kiali can integrate with distributed tracing systems like Jaeger to provide detailed tracing information for service calls and transactions.
Service health monitoring: Kiali can provide real-time health status for individual services and the overall service mesh, including alerts and notifications for service failures and other issues.
Configuration validation: Kiali can validate the configuration of your Istio service mesh, including routing rules, security policies, and other settings, to help ensure that your services are running as expected.
Overall, Kiali is a powerful tool for Istio users who need to monitor and manage complex microservices-based applications in a distributed system. By providing real-time visibility and insights into your Istio service mesh, Kiali can help you diagnose and resolve issues quickly, optimize your system performance, and ensure that your services are running smoothly and securely.
Installing Kiali
There are multiple methods available for installing the Kiali demonstration using helm charts or the downloaded addons folder as part of the Istio installation process. To continue, we will carry out the installation of Istio on our cluster.
kubectl apply samples/addons/kiali.yaml

We can verify if we have installed Kiali by checking the pods that are running in the istio-system
kubectl get pods -n istio-system

After installing Kiali in our cluster we can view the Dashboard by using the command.
istioctl dashboard kiali
This will automatically open the Kiali dashboard running in Localhost
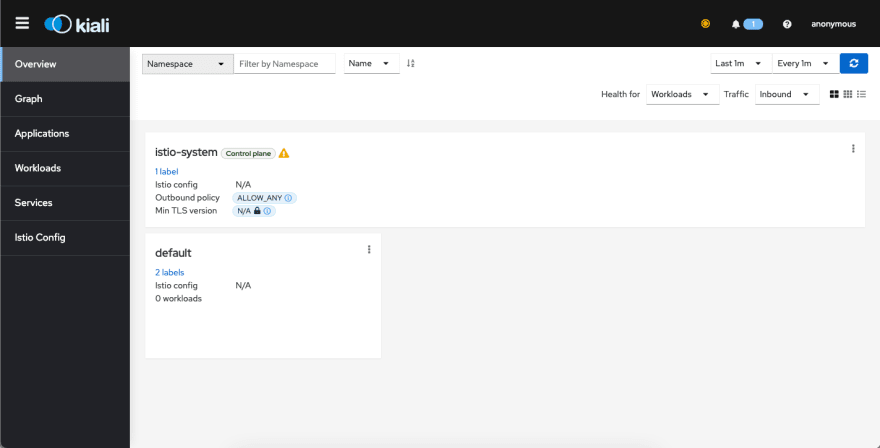
After successfully configuring Kiali within our cluster and accessing the Kiali dashboard, we can proceed to direct traffic towards the application and monitor it using the dashboard. To achieve this, we need to create a Gateway that will enable our service mesh to receive traffic from external sources outside the cluster.
But first, lets get to know some terms and definitions in order to understand more about Traffic management in Istio
Gateway

A Gateway resource is used to configure load-balancing of traffic entering the service mesh from outside the cluster. It defines a set of protocols, ports, and workload instances to which traffic should be directed.
The Gateway acts as an entry point for external traffic to enter the service mesh, and it can be configured to perform various tasks, such as TLS termination, header manipulation, or authentication.
With the help of the Gateway resource, Istio can control and secure the incoming traffic to the service mesh, providing an additional layer of control and visibility over network traffic.
A Gateway resource in Istio consists of two main components:
A set of workload instances — that represent the backend services that will handle incoming traffic, along with the protocol and port numbers they are listening on.
A set of networking configuration parameters that define how incoming traffic should be handled, such as TLS encryption settings, routing rules, and load-balancing algorithms.
Here’s an example of how a Gateway is used in Istio:
Let’s say we have a service mesh consisting of several microservices that are running on Kubernetes pods. These microservices are accessible only within the cluster, and we want to enable external users to access them from the internet. To achieve this, we can create a Gateway resource that defines the external IP address, port number, and TLS settings, and associate it with a set of workload instances representing the backend services.
For example, let’s say we have a microservice called “product” that runs on Kubernetes pods and listens on port 8080. We can create a Gateway resource that defines an external IP address of 203.0.113.0 and port 80, and associate it with the “product” service. When a user sends a request to http://203.0.113.0:80/product, the Gateway resource will receive the request and route it to the backend “product” service.
We can also configure the Gateway resource to use TLS encryption to secure the traffic between the external user and the service mesh. For example, we can configure Istio to use a certificate authority to issue and manage SSL/TLS certificates, and configure the Gateway to use these certificates to encrypt and decrypt the incoming traffic.
In summary, a Gateway in Istio is a Kubernetes resource that enables external traffic to enter a service mesh, and it can be used to configure load balancing, routing, and security for incoming traffic.
apiVersion: networking.istio.io/v1alpha3
kind: Gateway
metadata:
  name: my-gateway
spec:
  selector:
    istio: ingressgateway
  servers:
  - port:
      number: 80
      name: http
      protocol: HTTP
    hosts:
    - "product"
The spec field has two main components:
selector: A set of labels used to select the gateway workload instances that will handle incoming traffic. In this example, it selects the default ingress gateway using the label istio: ingressgateway.
servers: A list of servers that the gateway will listen on, including the port number, protocol, and hostnames that should be routed to this server. In this example, it defines a server that listens on port 80 using HTTP protocol.
To view the gateway in Kubernetes run the command
kubectl get gateway
Virtual Service
A VirtualService is a Kubernetes resource that defines a set of routing rules for incoming traffic to a service mesh. It allows you to control the routing of network traffic within the mesh, such as directing traffic to different versions of a service or sending traffic to a specific subset of a service.
A VirtualService resource consists of two main components:
A set of routing rules that define how incoming traffic should be directed to one or more destination services. The routing rules can be based on various criteria such as HTTP headers, URI paths, or traffic weights.
A set of destination services that represent the backend services that will handle incoming traffic.
The VirtualService resource provides a powerful way to control traffic within a service mesh, allowing you to implement advanced traffic management features such as canary releases, A/B testing, blue-green deployments, and fault injection.
Here’s an example of how a VirtualService can be used in Istio:
Let’s say we have a service mesh consisting of several versions of a microservice called “product” running on Kubernetes pods. We want to direct incoming traffic to the latest version of the “product” service, while still allowing a small percentage of traffic to be sent to the previous version for canary testing. To achieve this, we can create a VirtualService resource that defines two subsets of the “product” service, representing the latest version and the previous version respectively, and set traffic weights to direct 99% of the traffic to the latest version and 1% of the traffic to the previous version.
apiVersion: networking.istio.io/v1alpha3
kind: VirtualService
metadata:
  name: product
spec:
  hosts:
  - product-service
  http:
  - route:
    - destination:
        host: product-service
        subset: v1
      weight: 99
    - destination:
        host: product-service
        subset: v2
      weight: 1
In this example, we define a VirtualService resource called “product” that routes traffic to the “product-service”. It defines two routes, one for each subset of the “product-service”. The first route directs 99% of the traffic to the “v1” subset, while the second route directs 1% of the traffic to the “v2” subset. This allows us to test the new version of the “product” service with a small percentage of traffic, while still directing most of the traffic to the stable version.
In this next example, we will look at a service that can be accessed through various microservices
apiVersion: networking.istio.io/v1alpha3
kind: VirtualService
metadata:
  name: bookinfor
spec:
  hosts:
  - bookinfor.app
  gateway:
  - bookinfor-gateway
  http:
  - match:
    - uri:
        exact: /productpage
    - uri
        prefix: /static
    - uri
        exact: /login
    - uri
        exact: /logout
    - uri
        prefix: api/vi/products

   - route:
    - destination:
        host: productpage
        port:
           number: 9080
In the above YAML file we are routing all traffic from different points to one destination that is “productpage”
Destination Rule
DestinationRule is a Kubernetes resource that defines policies for routing traffic to a specific version of a service. It allows you to configure various aspects of how traffic is directed to a service, such as load-balancing, connection pool settings, TLS settings, and more.
A DestinationRule resource consists of two main components:
A set of rules that define how traffic should be routed to the service. This can include subsets of the service, load balancing policies, circuit breaker settings, and more.
A set of policies that define how traffic should be secured when communicating with the service. This can include mTLS (mutual TLS) settings, certificate authorities, and more.
Here’s an example of how a DestinationRule can be used in Istio:
Let’s say we have a service mesh consisting of several versions of a microservice called “product” running on Kubernetes pods. We want to configure the load balancing and connection pool settings for the “product” service. To achieve this, we can create a DestinationRule resource that defines the “product” service and sets the load balancing algorithm to round-robin and the maximum number of connections to 100.
Here’s an example YAML file for a DestinationRule:
apiVersion: networking.istio.io/v1alpha3
kind: DestinationRule
metadata:
  name: product
spec:
  host: product-service
  trafficPolicy:
    loadBalancer:
      simple: ROUND_ROBIN
    connectionPool:
      http:
        http1MaxPendingRequests: 100
        maxRequestsPerConnection: 5
In this example, we define a DestinationRule resource called “product” that sets the load balancing algorithm for the “product-service” to round-robin using the simple property. We also set the maximum number of pending requests to 100 and the maximum number of requests per connection to 5.
This allows us to fine-tune the load balancing and connection pool settings for the “product” service, providing better control and management of traffic in the service mesh.
In summary, a DestinationRule in Istio is a Kubernetes resource that defines policies for routing traffic to a specific version of a service, allowing you to configure various aspects of how traffic is directed to a service, such as load-balancing, connection pool settings, TLS settings, and more.
TrafficPolicies
Traffic Policies are rules and configurations that control the behavior of traffic within the service mesh. They provide fine-grained control over how traffic is routed, load balanced, secured, and monitored in the service mesh.
Traffic policies can be defined for individual services or for groups of services, and they can be specified at various levels in the service mesh, such as virtual services, destination rules, gateways, and more. Some of the common traffic policies in Istio include:
Load balancing policies: These policies control how traffic is distributed among different instances of a service. For example, you can specify a round-robin load-balancing algorithm or a weighted load-balancing algorithm based on the performance and availability of each instance.
Connection pool settings: These policies control how many connections are allowed to a service at any given time, and how long they can stay open. This helps prevent connection overload and optimizes resource utilization.
**Traffic routing policies: **These policies control how traffic is routed to different versions of a service, based on various factors such as HTTP headers, cookies, or client IP addresses.
Security policies: These policies control how traffic is secured within the service mesh. This can include mutual TLS (mTLS) authentication, certificate management, and access control policies.
Traffic monitoring policies: These policies control how traffic is monitored and logged in the service mesh. This can include configuring telemetry data collection, setting up tracing and logging, and more.
By using traffic policies in Istio, you can fine-tune and optimize the behavior of traffic in your service mesh, ensuring better performance, reliability, and security of your microservices-based applications.
let's talk briefly about the Load Balancing Policies
Load Balancing Policies
load balancing policies are a key aspect of traffic management in Istio. They determine how traffic is distributed among different instances of a service within the service mesh, ensuring optimal utilization of resources and better performance and availability of microservices-based applications.
There are several load-balancing policies that can be used in Istio, depending on the specific needs of the application. Some of the common load-balancing policies include:
Round-robin: In this policy, traffic is evenly distributed among all instances of a service, one after the other, in a cyclic order. This ensures that each instance of the service receives an equal share of the traffic.
Weighted: In this policy, traffic is distributed based on the relative weights assigned to each instance of a service. Instances with higher weights receive more traffic than instances with lower weights, allowing you to control the distribution of traffic based on the performance and availability of each instance.
Locality-based: In this policy, traffic is distributed based on the geographic location of the client and the instances of the service. This helps optimize the routing of traffic and reduce latency by directing traffic to the closest instance of the service.
Least connections: In this policy, traffic is directed to the instance with the least number of active connections, ensuring that each instance of the service is not overloaded with too many connections.
Random: In this policy, traffic is randomly distributed among all instances of a service, allowing you to achieve a more uniform distribution of traffic.
You can specify the load-balancing policy for a service or a group of services in Istio by creating a DestinationRule resource and setting the appropriate load-balancing algorithm. This can be done using the simple property for simple round-robin or random load balancing, or the weighted property for weighted load balancing. Once the DestinationRule is created, Istio will automatically apply the load-balancing policy to the specified service or group of services.


Top comments (0)