
Have you ever been in a situation where you have been asked to set up CI/CD for your new Azure Function App? Have the requirements been to use a single repository and workflow in GitHub to distribute the application to deployment slots?
In this post, you will follow step by step instructions to set up deployment slots within your Azure Function resource, implement a branching strategy in your repository, identify and create environments in GitHub, and assemble a single workflow to run in GitHub Actions as your CI/CD.
What you need
You would have already created the Azure Function resource in advance of following the below. You will also need access to this resource to configure it and download publication profiles.
Deployment Slots
My workflow for this project will be targeting three deployment slots:
- Development
- Test
- Staging
Deployment Slots allow me to run multiple environments within a single Azure Function App. This will provide a unique public endpoint for each of them, allowing me to develop and test without impacting the staging and live slots. I haven't listed a production slot, and this is because a default slot is available after creating an Azure Function for production use.
If you want to create a Deployment Slot:
Open Azure Function App
Select Deployment Slots from the side menu
Select Add Slot
Provide a name for your slot. The Function App name will automatically appear at the start, so it's unique across the
.azurewebsites.netdomain. You can then click the Add button when you are ready.
Branch Strategy
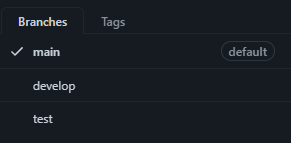
I will be using three git branches to represent the slots I've created above. They are:
main (will deploy to Staging slot)
test (will deploy to Test slot)
develop (will deploy to the Development slot)
I will not require a branch for production as I will either run a manual Swap of the Staging slot with Production or incorporate a release approval gate that will trigger the Swap with Staging and Production in the workflow.
Publish Profile
To publish our code to a deployment slot, we require the Publish Profile for each slot (excluding production). To do this, follow each step below and repeat for each slot you have:
Open Azure Function App
Select Deployment Slots from the side menu
Select a Slot (one with the blue hyperlink)
At the top of the window, select Get Publish Profile. This will download a copy of the publish profile as a file.
Repeat these steps per deployment slot.
Environments
I will create an environment in GitHub for every deployment slot I created, allowing me to associate each publish profile to its environment using secrets. To create an environment:
Open your GitHub repository in the Web UI
Select Settings
From the side menu, select Environments
Click the New environment button
Give your environment a name and click Configure environment
Repeating the above steps, I have the following environments:
- Development
- Test
- Production (where we will publish to the Staging slot)

I have enabled Required reviewers in each environment and added myself. When we run a job within a workflow against any of these environments, I do not want it to proceed until my approval. If you don't have this selected, our workflow will automatically deploy to the environment once the Pull Request merges.

Secrets
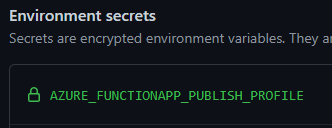
Within each environment, we will be creating a new secret that will contain the contents of the publish profile. First, select Add Secret under the heading Environments secrets in the environment you are configuring.
In the Name field, give your secret an appropriate name. The name you provide will be used when referring to the secret in the workflow, so make it identifiable. In the Value field, copy and paste the content from the Publish Profile file. This includes all the information required for authenticating and deploying your Azure Function App to the correct slot. Select Save when you are ready.
For this post, my secret will be named AZURE_FUNCTIONAPP_PUBLISH_PROFILE.
Workflow
I will break down each part of the workflow we will use to deploy our Azure Function.
name: Function App Deployment
on:
  push:
    branches:
      - main
      - test
      - develop
  workflow_dispatch:
Above is the first part of our workflow. I have defined the workflow's name as Function App Deployment and specified this workflow to run when push (updates) happen on one of the three branches. I have also included workflow_dispatch, so I can run the workflow manually.
jobs:

  cd-build-deploy-dev:
    name: Continuous Deployment - Development
    runs-on: ubuntu-latest
    environment: Development
    if: github.ref == 'refs/heads/develop'
    env:
      AZURE_FUNCTIONAPP_NAME: MyHTTPTrigger
      AZURE_FUNCTIONAPP_PACKAGE_PATH: '.'
      DOTNET_VERSION: '3.0.13'
Next, we define the jobs we are going to run. We will have in total three jobs, one for each environment. First, we will define the development environment job. We will set the job id to cd-build-deploy-dev and the name to Continuous Deployment - Development. We will be using ubuntu-latestfor all the runs, but we will be setting environments to each environment we create in GitHub.
We use an if statement here to say, "if push happens on the develop branch, run the job". We do this for all three of our jobs to run based on the branch push. If the if statement is not met, the job will skip.
And we define environment variables for the job. These will be:
AZURE_FUNCTIONAPP_NAME - the name of the function app
AZURE_FUNCTIONAPP_PACKAGE_PATH - the path to the code (mine is at the root of the repo so I specified ".")
DOTNET_VERSION - the version of .NET I am using.
    steps:

      - name: Checkout
        uses: actions/checkout@main

      - name: Setup DotNet 3.1.x Environment
        uses: actions/setup-dotnet@v1
        with:
          dotnet-version: 3.1.x

      - name: Resolve Project Dependencies Using Dotnet
        shell: bash
        run: |
          pushd './${{ env.AZURE_FUNCTIONAPP_PACKAGE_PATH }}'
          dotnet build --configuration Release --output ./output
          popd
      - name: Run Azure Functions Action
        uses: Azure/functions-action@v1
        id: fa
        with:
          app-name: ${{ env.AZURE_FUNCTIONAPP_NAME }}
          package: '${{ env.AZURE_FUNCTIONAPP_PACKAGE_PATH }}/output'
          publish-profile: ${{ secrets.AZURE_FUNCTIONAPP_PUBLISH_PROFILE }}
Once the job is configured, we want to configure each step we require to get the deployment going.
The first step is Checkout; this will clone the branch to the local runner.
The second step will set up .NET on the runner. Here I have specified to install the latest version of 3.1. We are using the GitHub action project setup-dotnet to complete the installation on the runner.
The third step will trigger a build ready for the function app to deploy.
The final step is for deployment to take place to our Function App. We specify environment variables and GitHub secrets to complete the app name, package and publish profile parameters. This uses a supplied GitHub action from Microsoft called functions-action.
Now you have to complete this for the other jobs (listed below) and copy the steps below each job (the steps should be identical).
  cd-build-deploy-test:
    name: Continuous Deployment - Test
    runs-on: ubuntu-latest
    environment: Test
    if: github.ref == 'refs/heads/test'
    env:
      AZURE_FUNCTIONAPP_NAME: MyHTTPTrigger
      AZURE_FUNCTIONAPP_PACKAGE_PATH: '.'
      DOTNET_VERSION: '3.0.13'
  cd-build-deploy-prod:
    name: Continuous Deployment - Production
    runs-on: ubuntu-latest
    environment: Production
    if: github.ref == 'refs/heads/main'
    env:
      AZURE_FUNCTIONAPP_NAME: MyHTTPTrigger
      AZURE_FUNCTIONAPP_PACKAGE_PATH: '.'
      DOTNET_VERSION: '3.0.13'
The final workflow should look similar to this:
name: Function App Deployment
on:
  push:
    branches:
      - main
      - test
      - develop
  workflow_dispatch:

jobs:
  cd-build-deploy-dev:
    name: Continuous Deployment - Development
    runs-on: ubuntu-latest
    environment: Development
    if: github.ref == 'refs/heads/develop'
    env:
      AZURE_FUNCTIONAPP_NAME: MyHTTPTrigger
      AZURE_FUNCTIONAPP_PACKAGE_PATH: '.'
      DOTNET_VERSION: '3.0.13'

    steps:

      - name: Checkout
        uses: actions/checkout@main

      - name: Setup DotNet 3.1.x Environment
        uses: actions/setup-dotnet@v1
        with:
          dotnet-version: 3.1.x

      - name: Resolve Project Dependencies Using Dotnet
        shell: bash
        run: |
          pushd './${{ env.AZURE_FUNCTIONAPP_PACKAGE_PATH }}'
          dotnet build --configuration Release --output ./output
          popd
      - name: Run Azure Functions Action
        uses: Azure/functions-action@v1
        id: fa
        with:
          app-name: ${{ env.AZURE_FUNCTIONAPP_NAME }}
          package: '${{ env.AZURE_FUNCTIONAPP_PACKAGE_PATH }}/output'
          publish-profile: ${{ secrets.AZURE_FUNCTIONAPP_PUBLISH_PROFILE }}

  cd-build-deploy-test:
    name: Continuous Deployment - Test
    runs-on: ubuntu-latest
    environment: Test
    if: github.ref == 'refs/heads/test'
    env:
      AZURE_FUNCTIONAPP_NAME: MyHTTPTrigger
      AZURE_FUNCTIONAPP_PACKAGE_PATH: '.'
      DOTNET_VERSION: '3.0.13'

    steps:

      - name: Checkout
        uses: actions/checkout@main

      - name: Setup DotNet 3.1.x Environment
        uses: actions/setup-dotnet@v1
        with:
          dotnet-version: 3.1.x

      - name: Resolve Project Dependencies Using Dotnet
        shell: bash
        run: |
          pushd './${{ env.AZURE_FUNCTIONAPP_PACKAGE_PATH }}'
          dotnet build --configuration Release --output ./output
          popd
      - name: Run Azure Functions Action
        uses: Azure/functions-action@v1
        id: fa
        with:
          app-name: ${{ env.AZURE_FUNCTIONAPP_NAME }}
          package: '${{ env.AZURE_FUNCTIONAPP_PACKAGE_PATH }}/output'
          publish-profile: ${{ secrets.AZURE_FUNCTIONAPP_PUBLISH_PROFILE }}

  cd-build-deploy-prod:
    name: Continuous Deployment - Production
    runs-on: ubuntu-latest
    environment: Production
    if: github.ref == 'refs/heads/main'
    env:
      AZURE_FUNCTIONAPP_NAME: MyHTTPTrigger
      AZURE_FUNCTIONAPP_PACKAGE_PATH: '.'
      DOTNET_VERSION: '3.0.13'

    steps:

      - name: Checkout
        uses: actions/checkout@main

      - name: Setup DotNet 3.1.x Environment
        uses: actions/setup-dotnet@v1
        with:
          dotnet-version: 3.1.x

      - name: Resolve Project Dependencies Using Dotnet
        shell: bash
        run: |
          pushd './${{ env.AZURE_FUNCTIONAPP_PACKAGE_PATH }}'
          dotnet build --configuration Release --output ./output
          popd
      - name: Run Azure Functions Action
        uses: Azure/functions-action@v1
        id: fa
        with:
          app-name: ${{ env.AZURE_FUNCTIONAPP_NAME }}
          package: '${{ env.AZURE_FUNCTIONAPP_PACKAGE_PATH }}/output'
          publish-profile: ${{ secrets.AZURE_FUNCTIONAPP_PUBLISH_PROFILE }}
Commit the workflow once completed and update your branches, so they are up-to-date.
Deployment
Now we have our workflow in place, we can trigger the workflow either by pushing to a particular branch or running manually.
For this post, I am going to trigger the deployment manually. To do this, I select the Actions tab and select my workflow from the left side menu.

From there, I click on the Run workflow button and select the develop branch to deploy the function app to the development slot.
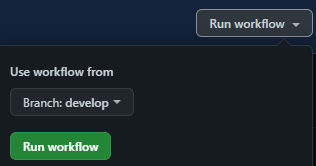
If you've set up reviewers on your environments, the deployment will not start until a reviewer approves the job.
Once the deployment completes and I can confirm it's working as intended, I can repeat the above to deploy to the testing slot and then the stagging slot.
Once I am happy for the app to go into the production slot, I will use the Swap button in the Deployment blade to swap Stagging with Production (within the Azure Function App resource).

Top comments (0)