During these days, I'm tidying up my homelab and found the necessity of having an internal domain to expose some apps inside my local network but not to the internet.
For example, I use Vault to store secrets, and I want an easy way to access the web-ui rather than using the IP address. The solution in Kubernetes is to create an Ingress; right now, I only have Ingresses with my main domain diomedet.com but if I use it will be exposed to the whole internet, and I don't want that.
external-dns is my tool of choice to handle the synchronization between my Ingresses and the DNS provider; on my local network, I use Pi-hole to filter all my DNS request and to block some of them.
Pi-hole already has a "Local DNS Records" section where you could list an arbitrary domain and point it to a specific IP inside or outside your network.
So, if there is a way to make external-dns updates that list, what I'm trying to achieve would be possible with a bit of effort. Unfortunately, there is no way to update the list of local DNS records on Pi-hole programmatically at the moment of writing, so we've to find another way to do that.
Messing around with the interface of Pi-hole, I've noticed that under "Settings -> DNS" you can choose which DNS server redirects all the incoming requests that the blacklist has not blocked. Besides the classic list of "Upstream DNS Servers" there is also a list of custom upstream DNS servers:
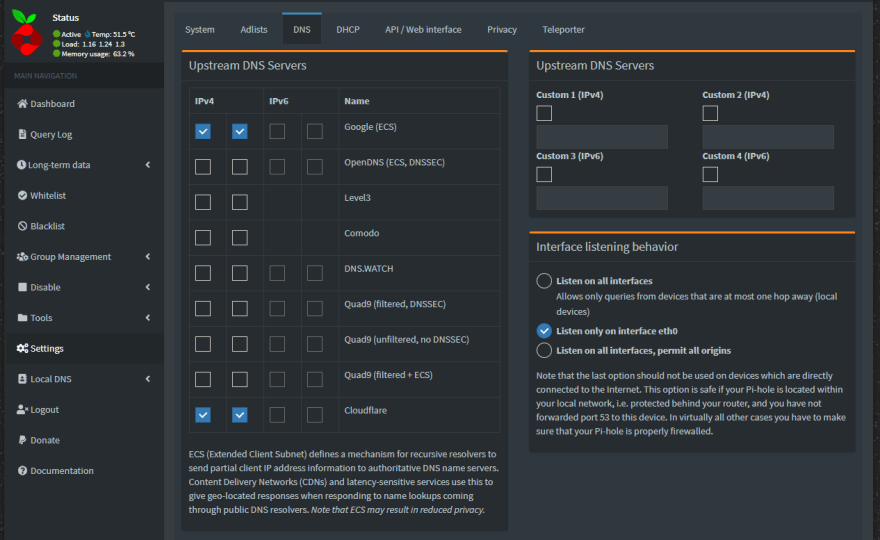
So, the idea is to create a custom DNS server that can be updated by external-dns and used by Pi-hole as an upstream DNS server. In this way, every Ingress with my internal domain will be resolved to the IP of my Kubernetes cluster.
Great, we've got a plan. Now it's time to make it real!
First things first, we need a DNS server
Scouting between the providers supported by external-dns there a bunch of choices that can be self-hosted, something like PowerDNS or CoreDNS, at this point I was like:
"mmh interesting, CoreDNS is the one used by Kubernetes internally must be a good choice, let's go with it."
A colleague suggested using PowerDNS*, but I was already set on my path, so I stuck with **CoreDNS*.
To be clear, it's not a wrong choice, but it might be a little overkill for this specific purpose but let's see what difficulties this path reserved for us.
In the external-dns repo, there is a folder docs/tutorial with a markdown file for each supported provider (I think each didn't count), we're looking for the CoreDNS one: https://github.com/kubernetes-sigs/external-dns/blob/master/docs/tutorials/coredns.md
It is a tutorial for minikube, but ignoring that part, we can use it for every Kubernetes cluster and bonus point, show us even how to install CoreDNS, great two birds with one stone.
If you've opened the file, you can see from the very beginning that the birds are not two anymore but three. The more, the merrier, right, right?!
If you haven't opened the link, let me recap that for you what we need to install:
- CoreDNS (obviously)
- etcd
- another instance of external-dns (you need an instance of external-dns for each dns provider you're going to support)
Wait, why we need etcd?
We need etcd because this is the way how external-dns talks to CoreDNS, we have to create a section in the configuration of CoreDNS that tells him to read the value from a specific path on the etcd instance we're going to configure and external-dns will update the same path with the information about the Ingresses we're going to create with our internal domain.
Note: Before switching to etcd directly, CoreDNS was using SkyDNS (a service built on top of etcd) to serve these kinds of request, so, in the manifest files, we're going to see you'll find some refuse of that implementation.
Install etcd
Let's get down to business and install etcd. In the end, it is a core component of Kubernetes; there nothing wrong with learning more about it.
Just to let you know, don't use the internal etcd for a user application (like the one we want to install here); it is not meant for that.
The tutorial linked above suggests we use the etcd-operator and use https://raw.githubusercontent.com/coreos/etcd-operator/HEAD/example/example-etcd-cluster.yaml to create our etcd cluster.
Great, an operator nothing more simple than that...
Slow down; the etcd-operator repo was archived more than a year ago; even if it could work for a case like this, we don't want to install an operator that is not maintained anymore, so let's see how to deploy it manually.
After searching around, I ended up on this documentation page https://etcd.io/docs/v3.4/op-guide/container/#docker that shows how to deploy, etcd with a single node configuration; prefect is what we need here.
Basically we need to port the command showed in the link in a manifest for kubernetes:
docker run from etcd documentation
docker run \
  -p 2379:2379 \
  -p 2380:2380 \
  --volume=${DATA_DIR}:/etcd-data \
  --name etcd ${REGISTRY}:latest \
  /usr/local/bin/etcd \
  --data-dir=/etcd-data --name node1 \
  --initial-advertise-peer-urls http://${NODE1}:2380 --listen-peer-urls http://0.0.0.0:2380 \
  --advertise-client-urls http://${NODE1}:2379 --listen-client-urls http://0.0.0.0:2379 \
  --initial-cluster node1=http://${NODE1}:2380
Manifest file etc-sts.yml
apiVersion: apps/v1
kind: StatefulSet
metadata:
  name: etcd
  labels:
    app.kubernetes.io/name: etcd
spec:
  serviceName: etcd
  replicas: 1
  updateStrategy:
    type: OnDelete
  selector:
    matchLabels:
      app.kubernetes.io/name: etcd
  template:
    metadata:
      labels:
        app.kubernetes.io/name: etcd
    spec:
      containers:
        - name: etcd
          image: gcr.io/etcd-development/etcd:latest
          imagePullPolicy: IfNotPresent
          command:
          - /usr/local/bin/etcd
          env:
            - name: ETCD_NAME
              value: node1
            - name: ETCD_DATA_DIR
              value: /etcd-data
            - name: ETCD_LISTEN_PEER_URLS
              value: http://0.0.0.0:2380
            - name: ETCD_LISTEN_CLIENT_URLS
              value: http://0.0.0.0:2379
            - name: ETCD_INITIAL_ADVERTISE_PEER_URLS
              value: http://0.0.0.0:2380
            - name: ETCD_ADVERTISE_CLIENT_URLS
              value: http://0.0.0.0:2379
            - name: ETCD_INITIAL_CLUSTER
              value: "node1=http://0.0.0.0:2380"
          volumeMounts:
            - name: data
              mountPath: /etcd-data
          ports:
            - containerPort: 2379
              name: client
            - containerPort: 2380
              name: peer
  volumeClaimTemplates:
    - metadata:
        name: data
      spec:
        accessModes:
          - ReadWriteOnce
        resources:
          requests:
            storage: 1Gi # we don't need much space to store DNS information
We're going to use a StatefulSet because etcd is a stateful app and needs a volume to persist its data. Rather than the classic Deploy with a StatefulSet we're certain that the generated pod will always receive the same name, and the volume attached to it will always be the same. More on the StatefulSet
The only noticeable difference between the docker run ... command and this manifest file is that we're using environment variables instead of configuration flags. I had some trouble getting the flags working, and I like more the environment variables, anyway; here a list of etcd configuration flags with the matching variable.
Now, in order to expose etcd to the other applications in the cluster we need to create a Service too:
etc-service.yml
apiVersion: v1
kind: Service
metadata:
  name: etcd
  labels:
    app.kubernetes.io/name: etcd
spec:
  ports:
    - port: 2379
      targetPort: 2379
      name: client
    - port: 2380
      targetPort: 2380
      name: peer
  selector:
    app.kubernetes.io/name: etcd
Nothing special here, but this completes the manifest needed for our etcd instance.
Install CoreDNS
Now that we have our etcd, we can continue with the tutorial and install our custom version of CoreDSN. You can use helm to install it, or if you want a more instructive approach, you can use helm template to render the file and applying them manually or with kustomize. In this way, you can check them individually to see what the chart will create in your cluster.
Since my homelab is a way to learn more about Kubernetes, I choose to render the file with helm template and use kustomize to apply them later.
Whichever way you choose, the important part is to set a couple of options inside the values.yml file correctly.
# if you don't have RBAC enabled on your cluster, I think you can set this to false
rbac:
  create: true

# isClusterService specifies whether the chart should be deployed as cluster-service or regular k8s app.
isClusterService: true

servers:
- zones:
  - zone: .
  port: 53
  plugins:
  ...
  # all other plugins
  - name: forward
    parameters: . 8.8.8.8:53 # tells where to forward all the DNS requests that CoreDNS can't solve
  - name: etcd
    parameters: diomedet.internal # insert your domain here
    configBlock: |-
      stubzones
      path /skydns
      endpoint http://etcd:2379
The most important part is the last one, we're going to configure the etcd plugin and tell CoreDNS to look inside the http://etcd:2379 to find the information about the domain diomedet.internal (this is my internal domain)
Also, the forward part is important; it tells CoreDNS where to redirect all the DNS that it can't solve. Later on, I'll explain why it is crucial.
With these values, we can run the command.
helm template custom coredns/coredns --output-dir . --values values.yaml
(custom is the name of my release, then it'll turn out in custom-coredns)
Helm will create a folder coredns/template with five files in it:
coredns/templates
├── clusterrole.yaml
├── clusterrolebinding.yaml
├── configmap.yaml
├── deployment.yaml
└── service.yaml
Now the only thing we've to do is to kubectl apply these files, and we'll end up with a working CoreDNS instance. Working but still not reachable outside the cluster, if you have MetalLB configured, you can change the ServiceType from ClusterIP to LoadBalancer to get an IP.
I haven't this feature in my cluster yet, so for now, I'm going to use the NodePort type; this allows me to use a port of my node and point it to the service.
With kustomize, there is the concept of patches, so I can create a patch that will modify the service.yaml file without directly touching it. I prefer this way, so if I have to re-run helm template ... I don't have to mind any modification I could have made because kustomize will patch everything.
patches/service.yaml
apiVersion: v1
kind: Service
metadata:
  name: custom-coredns
spec:
  type: NodePort
  ports:
  - {port: 53, protocol: UDP, name: udp-53, nodePort: 30053}
  - {port: 53, protocol: TCP, name: tcp-53, nodePort: 30053}
Here I tell Kubernetes to use the port 30053 for both UDP and TCP. With the NodePort, you can use ports from 30000 to 32767 if you do not modify it.
To wrap it up, here my kustomization.yml file:
kind: Kustomization
apiVersion: kustomize.config.k8s.io/v1beta1
namespace: custom-coredns
resources:
- templates/clusterrole.yaml
- templates/clusterrolebinding.yaml
- templates/configmap.yaml
- templates/deployment.yaml
- templates/service.yaml
- etcd-sts.yml
- etcd-service.yml
patchesStrategicMerge:
- patches/service.yaml
If you followed my path, you should have all the files to make it work, anyway. If you've installed the helm chart directly, you can always change the service manifest directly on Kubernetes. You can even set the serviceType in the values.yaml file, but I didn't find a way to specify the nodePort to use, so I decided to go with the patch.
Finally, install external-dns
Now we can finally install the instance of external-dns that will monitor the Ingress created with our internal domain.
I have RBAC enabled on my cluster, so my manifest look like this:
external-dns.yml
---
apiVersion: rbac.authorization.k8s.io/v1beta1
kind: ClusterRole
metadata:
  name: external-dns
rules:
- apiGroups: [""]
  resources: ["services","endpoints","pods"]
  verbs: ["get","watch","list"]
- apiGroups: ["extensions","networking.k8s.io"]
  resources: ["ingresses"]
  verbs: ["get","watch","list"]
- apiGroups: [""]
  resources: ["nodes"]
  verbs: ["list"]
---
apiVersion: rbac.authorization.k8s.io/v1beta1
kind: ClusterRoleBinding
metadata:
  name: external-dns-viewer
roleRef:
  apiGroup: rbac.authorization.k8s.io
  kind: ClusterRole
  name: external-dns
subjects:
- kind: ServiceAccount
  name: external-dns
  namespace: external-dns
--------
apiVersion: v1
kind: ServiceAccount
metadata:
  name: external-dns
  namespace: external-dns
--------
apiVersion: apps/v1
kind: Deployment
metadata:
  name: external-dns
spec:
  strategy:
    type: Recreate
  selector:
    matchLabels:
      app: external-dns
  template:
    metadata:
      labels:
        app: external-dns
    spec:
      serviceAccountName: external-dns
      containers:
      - name: external-dns
        image: k8s.gcr.io/external-dns/external-dns:v0.7.6
        args:
        - --source=ingress
        - --provider=coredns
        - --log-level=debug # debug only
        - --domain-filter=diomedet.internal
        env:
        - name: ETCD_URLS
          value: http://etcd.custom-coredns:2379
If you don't have RBAC enable, you can use only the Deployment manifest.
This is the most straightforward part, just set the correct ETCD_URLS with the correct value, and you're good to go. I have deployed my external-dns in a namespace different than the etcd one, so in the ETCD_URLS variable, I have to specify the service with the namespace too http://etcd.custom-coredns:2379
Once you applied your manifest you can create an ingress with the internal domain you chose, in my case is something like:
vault/ingress.yml
apiVersion: networking.k8s.io/v1beta1
kind: Ingress
metadata:
  annotations:
    kubernetes.io/ingress.class: nginx
  name: vault-ui-internal
  namespace: vault
spec:
  rules:
  - host: vault.diomedet.internal
    http:
      paths:
      - backend:
          serviceName: vault
          servicePort: http
        path: /
After you create an Ingress with your internal domain on the external-dns pod, you should see a log like the following one:
level=debug msg="Endpoints generated from ingress: vault/vault-ui-internal: [vault.diomedet.internal 0 IN A 10.10.5.123 []]"
10.10.5.123 is the IP address of my Kubernetes cluster, it's called "Scyther", the Pokédex number of Scyther is #123, so here explained my IP, not that you asked, but here it is anyway :P
Now, if I use dig to check the name resolution, it should work correctly:
❯ dig @10.10.5.123 -p 30053 vault.diomedet.internal

; <<>> DiG 9.11.3-1ubuntu1.13-Ubuntu <<>> @10.10.5.123 -p 30053 vault.diomedet.internal
; (1 server found)
;; global options: +cmd
;; Got answer:
;; ->>HEADER<<- opcode: QUERY, status: NOERROR, id: 5546
;; flags: qr aa rd; QUERY: 1, ANSWER: 1, AUTHORITY: 0, ADDITIONAL: 1
;; WARNING: recursion requested but not available

;; OPT PSEUDOSECTION:
; EDNS: version: 0, flags:; udp: 4096
; COOKIE: bc40278d825e2b16 (echoed)
;; QUESTION SECTION:
;vault.diomedet.internal.       IN      A

;; ANSWER SECTION:
vault.diomedet.internal. 30     IN      A       10.10.5.123

;; Query time: 3 msec
;; SERVER: 10.10.5.123#30053(10.10.5.123)
;; WHEN: Sat May 08 16:11:48 CEST 2021
;; MSG SIZE  rcvd: 103
But if I run the nslookup command, I still get an error:
❯ nslookup vault.diomedet.internal
Server:         172.29.96.1
Address:        172.29.96.1#53

** server can't find vault.diomedet.internal: NXDOMAIN
This error appears because we still have to change the Pi-hole configurations.
Configure Pi-hole to use our new DNS Server
To configure Pi-hole, you need to return to DNS Setting tab http://pihole.local/admin/settings.php?tab=dns, uncheck all the "Upstream DNS Servers" and insert your custom one, in my case 10.10.5.123#300123 (the # is used to specify the port).

Now, if you run the nslookup command again, you should end with the correct result:
❯ nslookup vault.diomedet.internal
Server:         172.29.96.1
Address:        172.29.96.1#53

Non-authoritative answer:
Name:   vault.diomedet.internal
Address: 10.10.5.123
Great! We can create as many Ingress with our internal domain as we want, and they will always be resolved to our cluster IP.
Conclusion
Unfortunately, our instance of CoreDNS will become a central point for our network in this scenario. If something happens to our cluster or the CoreDNS pod stops, we'll lose the ability to resolve domain names. I'm still searching for a way to solve this problem and have a more reliable solution, but for now, I have to stick with this downside.
Do you remember the forward value that we set on the values.yaml for CoreDNS?
That option has become the only way to choose which DNS server we want to use to solve all the DNS requests that can't be solved internally and aren't blocked by Pi-hole. This is because if we check some of the "Upstream DNS Server", we'll lose the ability to resolve our internal domain.
I have some ideas on how to solve that:
- A second Pi-hole that is going to be my "Custom 2" upstream DNS Server
- An ingress that masks the IP of the DNS server I want to use, something like I've done in a previous post Expose an external resource with a Kubernetes Ingress. A mask is needed because if you insert
8.8.8.8into the "Custom 2" field, Pi-hole will automatically check the Google server for you.
But I haven't tested any of that, so, for today, this is it.
I'm also looking for a way to have a certificate on my internal domain, so I don't get those annoying alerts when I'm trying to access my apps via HTTPS.
I hope you've found this article helpful. Stay tuned for future updates!

Oldest comments (0)